
Grow bananas at home? Absolutely! Imagine stepping into your backyard and harvesting your own sweet, creamy bananas. It sounds like a tropical dream, right? Well, it’s more achievable than you might think, and I’m here to guide you through the process with some simple DIY tricks and hacks.
Bananas have a rich history, dating back thousands of years to Southeast Asia. They’ve been cultivated and enjoyed across cultures, symbolizing prosperity and good fortune. While traditionally grown in warmer climates, with a little ingenuity, you can successfully grow bananas at home, even if you don’t live in the tropics!
Why bother with this DIY project? Because fresh, homegrown bananas taste incredible! Plus, it’s a fantastic way to connect with nature, learn about plant life, and impress your friends and family. In today’s world, where we’re increasingly conscious of food miles and sustainability, growing your own food is a rewarding and empowering experience. So, let’s dive in and discover the secrets to cultivating your own banana paradise!
Growing Bananas at Home: A Tropical Treat in Your Backyard (or Living Room!)
Okay, so you want to grow bananas at home? Awesome! It’s totally doable, even if you don’t live in the tropics. I’ve successfully grown bananas in a surprisingly non-tropical climate, and I’m here to share all my secrets (well, not really secrets, just tips and tricks!). It takes a little patience and the right approach, but the reward of homegrown bananas is totally worth it.
Choosing Your Banana Variety
Before we dive into the nitty-gritty, let’s talk about banana varieties. Not all bananas are created equal, and some are much better suited for home growing than others.
* Dwarf Cavendish: This is probably the most popular choice for home growers. It’s relatively small (hence the “dwarf”), making it manageable in pots or smaller gardens. Plus, it produces delicious, sweet bananas.
* Rajapuri: Another good option for containers. It’s cold-hardier than some other varieties, which is a bonus if you live in a cooler climate. The bananas are creamy and sweet.
* Ice Cream (Blue Java): If you’re feeling adventurous, try the Ice Cream banana! It has a unique flavor that some say resembles vanilla ice cream. It’s also relatively cold-hardy.
* Goldfinger: This variety is known for its disease resistance and slightly tangy flavor. It’s a good choice if you’re worried about pests or diseases.
Important Note: Do your research! Check the mature height of the variety you’re considering and make sure you have enough space. Also, consider your climate and choose a variety that can tolerate your local conditions.
Getting Started: Planting Your Banana Plant
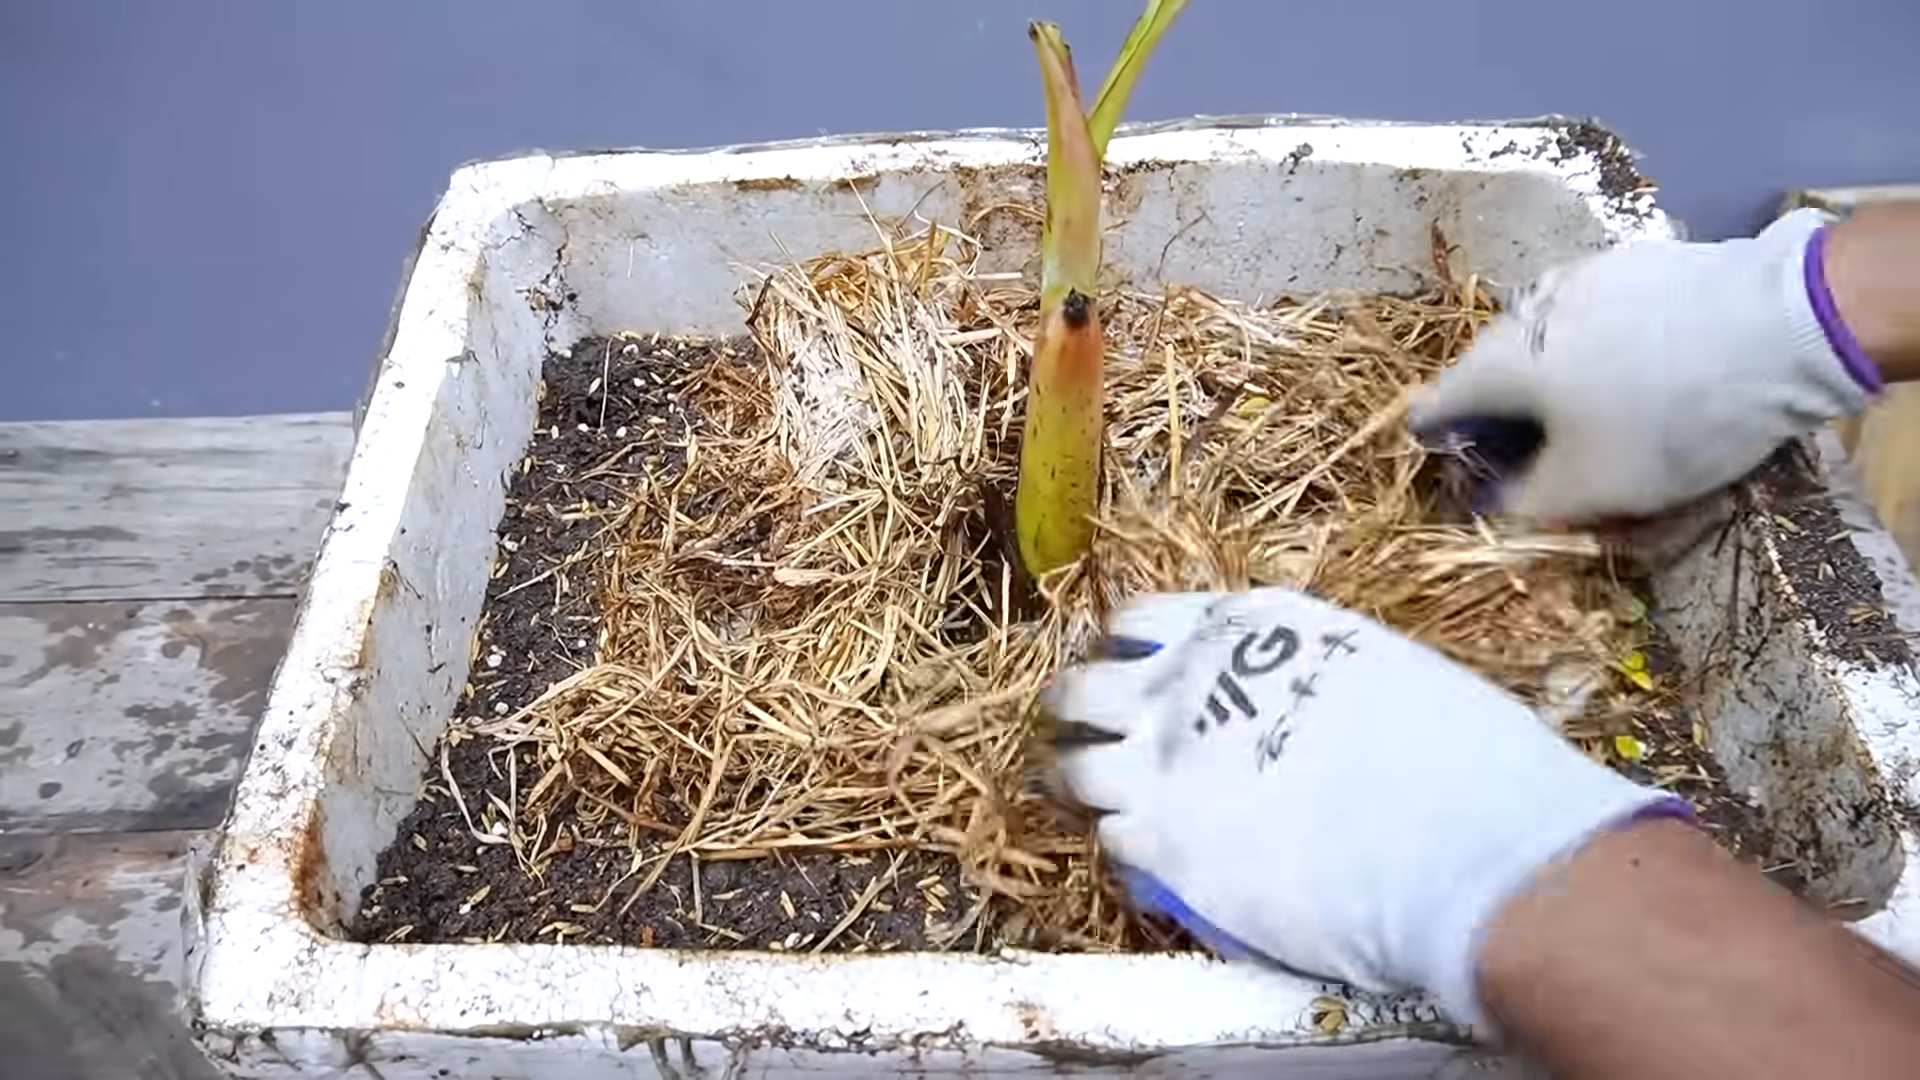
You have two main options for starting your banana plant: buying a pup (a small offshoot from a mature plant) or buying a tissue-cultured plant. I personally prefer pups because they’re often more affordable and readily available from local growers.
Step 1: Preparing the Soil
Bananas are heavy feeders, so they need rich, well-draining soil. Here’s my go-to soil mix:
1. Equal parts: Compost, potting soil, and perlite or vermiculite.
2. Mix it all together: Make sure everything is well combined. The compost provides nutrients, the potting soil provides structure, and the perlite/vermiculite improves drainage.
Step 2: Choosing the Right Pot (If Planting in a Container)
If you’re planting in a container, choose a pot that’s at least 15-20 gallons in size. Bananas have extensive root systems, so they need plenty of room to grow. Make sure the pot has drainage holes!
Step 3: Planting the Pup or Tissue-Cultured Plant
1. Dig a hole: Dig a hole that’s slightly larger than the root ball of your pup or tissue-cultured plant.
2. Place the plant: Gently place the plant in the hole, making sure the top of the root ball is level with the soil surface.
3. Backfill with soil: Fill the hole with your prepared soil mix, gently patting it down around the plant.
4. Water thoroughly: Water the plant well after planting.
Step 4: Choosing the Right Location
Bananas need plenty of sunlight – at least 6-8 hours per day. They also need protection from strong winds, which can damage the leaves.
* Outdoor Planting: Choose a sunny spot in your garden that’s sheltered from the wind.
* Indoor Planting: Place your banana plant near a sunny window. You may need to supplement with grow lights, especially during the winter months.
Caring for Your Banana Plant
Now that your banana plant is planted, it’s time to give it the TLC it needs to thrive.
Step 5: Watering
Bananas need consistent moisture, especially during the growing season. Water deeply whenever the top inch of soil feels dry to the touch. Don’t let the soil dry out completely, but also avoid overwatering, which can lead to root rot.
Step 6: Fertilizing
As I mentioned earlier, bananas are heavy feeders. Fertilize them regularly with a balanced fertilizer (e.g., 10-10-10) or a fertilizer specifically formulated for bananas.
* Frequency: Fertilize every 2-3 weeks during the growing season (spring and summer). Reduce or stop fertilizing during the winter months.
* Type: You can use a liquid fertilizer or a slow-release granular fertilizer. Follow the instructions on the fertilizer label.
Step 7: Pruning
Pruning is important for maintaining the health and productivity of your banana plant.
* Remove dead or damaged leaves: Cut off any leaves that are brown, yellow, or damaged.
* Remove suckers: Banana plants produce suckers (small offshoots) from the base of the plant. If you want to focus the plant’s energy on producing fruit, remove the suckers. You can either cut them off at the base or dig them up and transplant them to new pots. I usually leave one sucker to replace the mother plant after it fruits.
* After fruiting: Once the main stem has fruited, it will die. Cut it down to the ground to make way for the suckers to grow.
Step 8: Pest and Disease Control
Bananas are generally pest-resistant, but they can be susceptible to certain pests and diseases.
* Common Pests: Aphids, spider mites, and mealybugs.
* Common Diseases: Fusarium wilt and black sigatoka.
Prevention is key! Regularly inspect your banana plant for signs of pests or diseases. If you find any, treat them promptly with an appropriate insecticide or fungicide. I prefer using organic options whenever possible. Neem oil is a great all-purpose solution for many pests.
Encouraging Fruiting
Getting your banana plant to fruit can take some time, but it’s definitely worth the wait!
Step 9: Patience is Key
It can take anywhere from 9 months to 2 years for a banana plant to produce fruit, depending on the variety and growing conditions. Be patient and keep providing your plant with the care it needs.
Step 10: Providing the Right Conditions
Bananas need warm temperatures, plenty of sunlight, and consistent moisture to fruit. If you live in a cooler climate, you may need to provide supplemental heat or light during the winter months.
Step 11: Pollination (If Necessary)
Most banana varieties are self-pollinating, but some may benefit from hand-pollination. If you notice that your banana plant is flowering but not producing fruit, try hand-pollinating the flowers.
* How to Hand-Pollinate: Use a small paintbrush to transfer pollen from the male flowers to the female flowers. The female flowers are the ones that will eventually develop into bananas.
Harvesting Your Bananas
Finally, the moment you’ve been waiting for – harvesting your homegrown bananas!
Step 12: Knowing When to Harvest
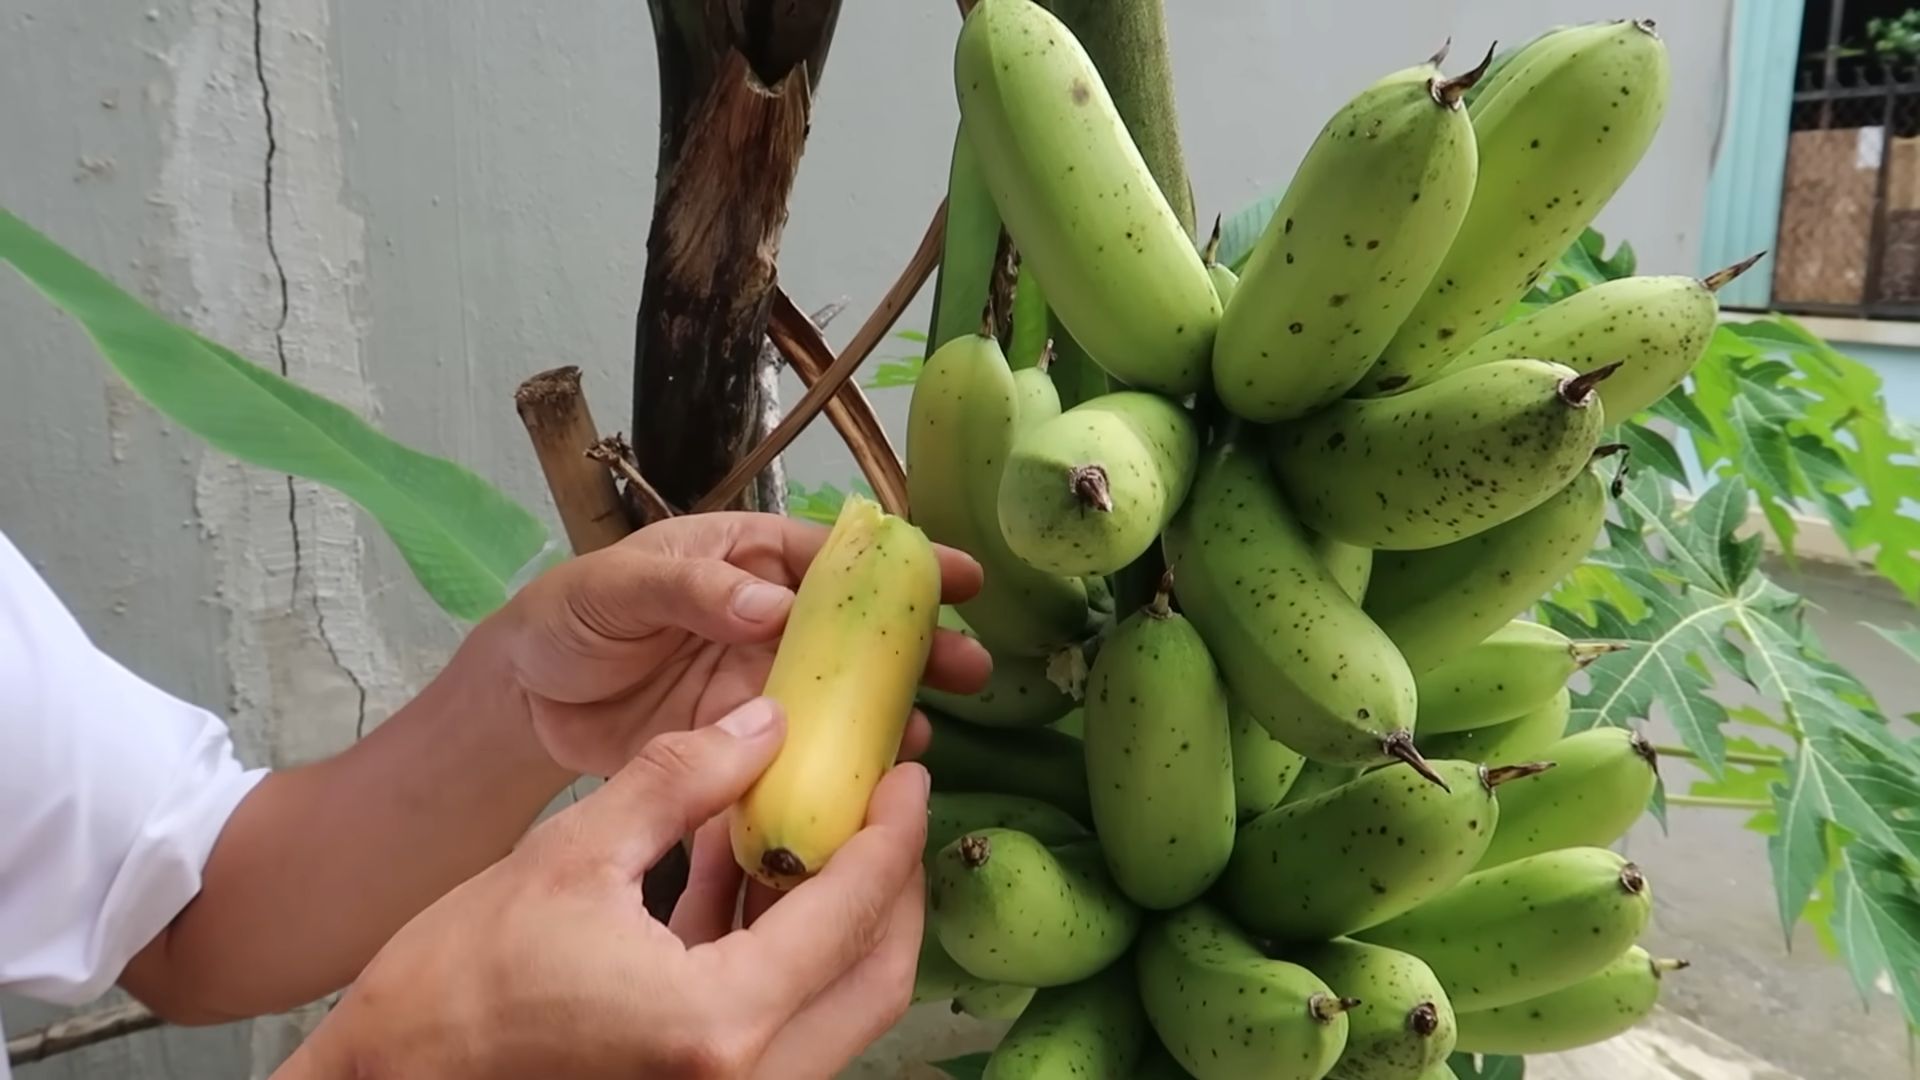
Bananas are ready to harvest when they’re still green but have started to plump up and the ridges on the fruit have become less pronounced.
Step 13: Harvesting the Bunch
1. Cut the stalk: Use a sharp knife or machete to cut the stalk of bananas from the plant.
2. Handle with care: Be careful not to bruise the bananas during harvesting.
Step 14: Ripening Your Bananas
Bananas are typically harvested green and allowed to ripen off the plant.
* Ripening at Room Temperature: Place the bunch of bananas in a warm, dry place. They should ripen in a few days to a week.
* Speeding Up Ripening: To speed up the ripening process, you can place the bananas in a paper bag with an apple or a banana. The ethylene gas produced by the apple or banana will help to ripen the bananas.
Overwintering Your Banana Plant (For Colder Climates)
If you live in a climate with cold winters, you’ll need to overwinter your banana plant.
Step 15: Bringing Your Plant Indoors (If in a Container)
If your banana plant is in a container, bring it indoors before the first frost. Place it near a sunny window and reduce watering.
Step 16: Protecting Your Plant Outdoors (If Planted in the Ground)
If your banana plant is planted in the ground, you can protect it from the cold by wrapping the trunk with burlap or blankets. You can also mulch around the base of the plant to insulate the roots.
Important Note: Even with protection, your banana plant may experience some dieback during the winter. Don’t worry, it should bounce back in the spring.
Troubleshooting
Even with the best care, you may encounter some problems along the way. Here are a few common issues
Conclusion
So, there you have it! Growing bananas at home, while it might seem like a tropical dream reserved for warmer climates, is entirely achievable with a little ingenuity and this simple DIY trick. We’ve shown you how to create a microclimate that mimics the conditions your banana plant needs to thrive, even if you’re facing cooler temperatures or limited space. This isn’t just about having a unique houseplant; it’s about experiencing the satisfaction of nurturing something from a small seedling to a fruit-bearing beauty, right in your own home.
Why is this DIY method a must-try? Because it democratizes banana growing! It removes the barriers of needing a sprawling tropical garden and puts the power of cultivation into your hands. It’s cost-effective, environmentally friendly (reducing the need for imported bananas), and incredibly rewarding. Imagine the bragging rights when you offer friends a banana grown in your living room!
But the fun doesn’t stop there. Feel free to experiment with different banana varieties. Dwarf Cavendish is a popular choice for indoor growing due to its manageable size, but you could also try ‘Rajapuri’ or ‘Ice Cream’ banana for a unique flavor profile. Consider adding companion plants to your banana’s container, such as herbs like basil or mint, which can help deter pests and add a pleasant aroma to your growing space. You can also adjust the humidity levels by grouping your banana plant with other humidity-loving plants or using a humidifier.
Don’t be afraid to get creative with your DIY setup. Use repurposed materials for your container, experiment with different lighting arrangements, and find what works best for your specific environment. The key is to provide consistent warmth, humidity, and light.
We are confident that with a little effort and this DIY trick, you’ll be enjoying homegrown bananas in no time. The taste of a banana you’ve nurtured yourself is unlike anything you’ll find in a grocery store. It’s sweeter, more flavorful, and imbued with the pride of your accomplishment.
Now, it’s your turn! We encourage you to give this DIY banana growing method a try. Document your progress, share your successes (and even your challenges!), and let us know what works best for you. Share your photos and stories on social media using #HomeGrownBananas and inspire others to embark on this exciting journey. Let’s create a community of indoor banana growers and prove that anything is possible with a little DIY spirit! We can’t wait to see your banana plants flourish!
Frequently Asked Questions (FAQ)
Q: What type of banana plant is best for growing indoors?
A: The Dwarf Cavendish banana is generally considered the best choice for indoor growing due to its smaller size, typically reaching a height of 6-10 feet. Other suitable varieties include ‘Rajapuri,’ ‘Ice Cream’ (also known as ‘Blue Java’), and ‘Goldfinger.’ When selecting a banana plant, consider the available space and the desired fruit flavor. Look for plants that are specifically labeled as “dwarf” or “indoor” varieties.
Q: How much sunlight does my indoor banana plant need?
A: Banana plants thrive in bright, indirect sunlight. Aim for at least 6-8 hours of sunlight per day. If you don’t have a spot that receives enough natural light, supplement with grow lights. Position the grow lights about 12-18 inches above the plant and use a full-spectrum bulb to provide the necessary light for healthy growth and fruit production. Rotate the plant regularly to ensure even light exposure on all sides.
Q: What is the ideal temperature and humidity for growing bananas indoors?
A: Banana plants prefer warm temperatures between 65°F and 85°F (18°C and 29°C). Avoid exposing them to temperatures below 55°F (13°C), as this can damage the plant. Humidity is also crucial. Aim for a humidity level of 50-60%. You can increase humidity by misting the plant regularly, placing a tray of water near the plant, or using a humidifier. Grouping your banana plant with other plants can also help create a more humid microclimate.
Q: What kind of soil should I use for my banana plant?
A: Banana plants need well-draining soil that is rich in organic matter. A good potting mix for bananas consists of equal parts potting soil, peat moss (or coconut coir), and perlite or vermiculite. This combination provides good drainage, aeration, and moisture retention. Avoid using heavy clay soils, as they can become waterlogged and lead to root rot.
Q: How often should I water my banana plant?
A: Water your banana plant thoroughly when the top inch of soil feels dry to the touch. Avoid overwatering, as this can lead to root rot. During the growing season (spring and summer), you may need to water more frequently than during the dormant season (fall and winter). Ensure that the pot has drainage holes to allow excess water to escape. Adjust watering frequency based on the temperature, humidity, and light levels in your home.
Q: How often should I fertilize my banana plant?
A: Banana plants are heavy feeders and require regular fertilization, especially during the growing season. Use a balanced fertilizer (e.g., 10-10-10 or 15-15-15) diluted to half strength every 2-4 weeks. You can also use a fertilizer specifically formulated for banana plants. Reduce fertilization during the dormant season. Avoid over-fertilizing, as this can burn the roots.
Q: How long does it take for a banana plant to produce fruit indoors?
A: It typically takes 9-15 months for a banana plant to produce fruit indoors, depending on the variety, growing conditions, and care provided. Be patient and consistent with your care, and you will eventually be rewarded with homegrown bananas. Once the plant flowers, it takes about 3-6 months for the fruit to mature.
Q: How do I know when my bananas are ripe?
A: Bananas are ripe when they turn yellow and the tips become rounded. You can also gently squeeze the fruit; ripe bananas will be slightly soft to the touch. Harvest the entire bunch when most of the bananas are ripe. You can then hang the bunch to allow the remaining bananas to ripen fully.
Q: What are some common problems with indoor banana plants and how can I fix them?
A: Common problems include:
* **Yellowing leaves:** This can be caused by overwatering, underwatering, nutrient deficiencies, or insufficient light. Adjust your watering and fertilization practices and ensure the plant is receiving enough light.
* **Brown leaf tips:** This is often caused by low humidity or dry air. Increase humidity by misting the plant or using a humidifier.
* **Pests:** Common pests include spider mites, aphids, and mealybugs. Treat infestations with insecticidal soap or neem oil.
* **Root rot:** This is caused by overwatering and poor drainage. Ensure the pot has drainage holes and avoid overwatering. If root rot is severe, you may need to repot the plant with fresh soil.
Q: Can I grow bananas from seed?
A: While it is possible to grow bananas from seed, it is a very slow and challenging process. Banana seeds have a hard outer coating that needs to be scarified (scratched) before planting. It can take several months for the seeds to germinate, and the resulting plants may not be true to type (i.e., they may not produce the same type of bananas as the parent plant). It is generally easier and more reliable to propagate bananas from pups (small offshoots that grow from the base of the plant).
Leave a Comment