
Mushroom Bulk Growing DIY: Unlock the secrets to cultivating a thriving mushroom haven right in your own home! Have you ever dreamt of harvesting a bounty of delicious, gourmet mushrooms without breaking the bank? I know I have! Forget those expensive grocery store prices and the limited selection. This comprehensive guide will empower you to embark on a rewarding journey into the world of mushroom cultivation, focusing on efficient and cost-effective bulk growing techniques.
Mushroom cultivation has a rich history, dating back centuries in various cultures. From ancient China, where mushrooms were revered for their medicinal properties, to Europe, where they were prized culinary delicacies, the art of growing mushrooms has been passed down through generations. Today, with increasing awareness of sustainable living and the desire for fresh, locally sourced food, mushroom bulk growing DIY is experiencing a resurgence in popularity.
Why should you dive into this DIY adventure? Well, for starters, it’s incredibly satisfying to nurture something from start to finish and then enjoy the fruits (or rather, fungi!) of your labor. More importantly, mastering these techniques allows you to control the quality and freshness of your mushrooms, ensuring you’re consuming the healthiest and most flavorful product possible. Plus, it’s a fantastic way to reduce your carbon footprint and connect with nature, even within the confines of your home. So, let’s get started and transform your space into a mushroom paradise!
DIY Mushroom Bulk Growing: A Beginner’s Guide
Hey everyone! Ever dreamed of having a constant supply of fresh, delicious mushrooms right at home? Well, you’re in the right place! I’m going to walk you through a simple and effective method for growing mushrooms in bulk using a technique called “monotub” cultivation. It might sound intimidating, but trust me, it’s totally doable, even for beginners. Let’s get started!
What You’ll Need: The Shopping List
Before we dive in, let’s gather all the necessary materials. This will save you time and frustration later.
* **Sterile Substrate:** This is the food source for your mushrooms. Coco coir is a popular and affordable option. You’ll need about 5kg (11 lbs) for a standard-sized monotub. Alternatively, you can use a mix of coco coir, vermiculite, and gypsum.
* **Spawn:** This is essentially mushroom “seed.” You can buy pre-colonized grain spawn (rye berries, millet, etc.) from a reputable vendor. Aim for about 3-5 lbs of spawn for your monotub. Oyster mushrooms are a great choice for beginners.
* **Monotub Container:** A clear plastic storage bin with a lid. A size around 50-70 quarts (50-70 liters) is ideal. Make sure it’s opaque enough to block out light from the sides, as mushrooms prefer to fruit from the top.
* **Spray Bottle:** For misting the substrate to maintain humidity.
* **Rubbing Alcohol (70% Isopropyl Alcohol):** For sterilizing everything!
* **Latex Gloves:** To keep your hands clean and prevent contamination.
* **Face Mask:** Another layer of protection against contaminants.
* **Micropore Tape:** For covering the air exchange holes in your monotub.
* **Drill (Optional):** For creating air exchange holes in your monotub.
* **Large Pot or Bucket:** For pasteurizing the substrate.
* **Thermometer:** To monitor the temperature of the substrate during pasteurization.
* **Lighter or Torch:** For sterilizing your tools.
Preparing the Monotub: Creating the Perfect Environment
This is a crucial step. A clean environment is key to preventing contamination and ensuring a successful mushroom grow.
1. **Drilling Air Exchange Holes (Optional):** If your monotub doesn’t have adequate air exchange, you’ll need to drill some holes. I usually drill four 2-inch holes, two on each of the long sides of the tub, about halfway up. You can also drill smaller holes (around 1/4 inch) and cover them with polyfill. The goal is to allow for fresh air exchange while preventing contaminants from entering.
2. **Cleaning and Sterilizing:** Thoroughly clean the inside and outside of your monotub with soap and water. Then, spray everything down with rubbing alcohol. Let it air dry completely. This is super important!
3. **Applying Micropore Tape:** Cover the air exchange holes with micropore tape. This will act as a filter, allowing air to pass through while blocking out larger contaminants.
Pasteurizing the Substrate: Eliminating the Competition
Pasteurization kills off harmful bacteria and fungi that could compete with your mushroom mycelium. It’s not the same as sterilization, which kills everything, but it’s sufficient for our purposes.
1. **Hydrating the Coco Coir:** Place the coco coir brick in a large pot or bucket. Add about 4-5 gallons of boiling water. Stir well and let it sit for several hours, or preferably overnight, to fully hydrate. The coco coir should be fully saturated and have a field capacity similar to a wrung-out sponge.
2. **Pasteurizing the Substrate:** Once the coco coir is hydrated, you need to pasteurize it. There are a couple of ways to do this:
* **Hot Water Pasteurization:** If you used a pot, you can simply heat the coco coir on the stove until it reaches a temperature of 160-170°F (71-77°C). Maintain this temperature for about 1-2 hours, stirring occasionally.
* **Bucket Pasteurization:** If you used a bucket, you can pour more boiling water over the coco coir until the temperature reaches 160-170°F (71-77°C). Insulate the bucket with blankets or towels to help maintain the temperature for 1-2 hours.
3. **Cooling the Substrate:** After pasteurization, let the substrate cool down to room temperature (below 80°F or 27°C) before moving on to the next step. This is crucial, as high temperatures can kill your mushroom spawn.
Spawning to Bulk: Mixing the Ingredients for Success
This is where the magic happens! We’re going to combine the colonized grain spawn with the pasteurized substrate to create the perfect environment for mushroom growth.
1. **Cleanliness is Key:** Put on your latex gloves and face mask. Sterilize your hands with rubbing alcohol. Work in a clean area, free from drafts and potential contaminants.
2. **Layering the Substrate and Spawn:** In your sterilized monotub, create a layer of substrate about 2-3 inches thick. Then, crumble a layer of grain spawn over the substrate. Repeat this process, layering substrate and spawn, until you’ve used up all of your spawn and substrate. The final layer should be a layer of substrate. This is often referred to as the “bulk substrate.”
3. **Leveling the Surface:** Gently level the surface of the substrate with your hands.
4. **Incubation:** Close the lid of the monotub and secure it. Place the monotub in a dark, warm place (around 70-75°F or 21-24°C). This is the incubation phase, where the mycelium will colonize the substrate.
Colonization: Watching the Mycelium Grow
During this phase, the mushroom mycelium will spread throughout the substrate, forming a white, fluffy network.
1. **Monitoring Colonization:** Check the monotub every few days. You should start to see white, fuzzy mycelium growing on the surface of the substrate.
2. **Patience is a Virtue:** The colonization process can take anywhere from 1-3 weeks, depending on the type of mushroom, the temperature, and the amount of spawn you used. Be patient and avoid opening the monotub unnecessarily, as this can increase the risk of contamination.
3. **Addressing Contamination (If Necessary):** If you see any signs of contamination (green, black, or other unusual colors), you’ll need to take action. Small spots of contamination can sometimes be carefully removed with a sterilized spoon. However, if the contamination is widespread, it’s best to discard the entire substrate to prevent it from spreading.
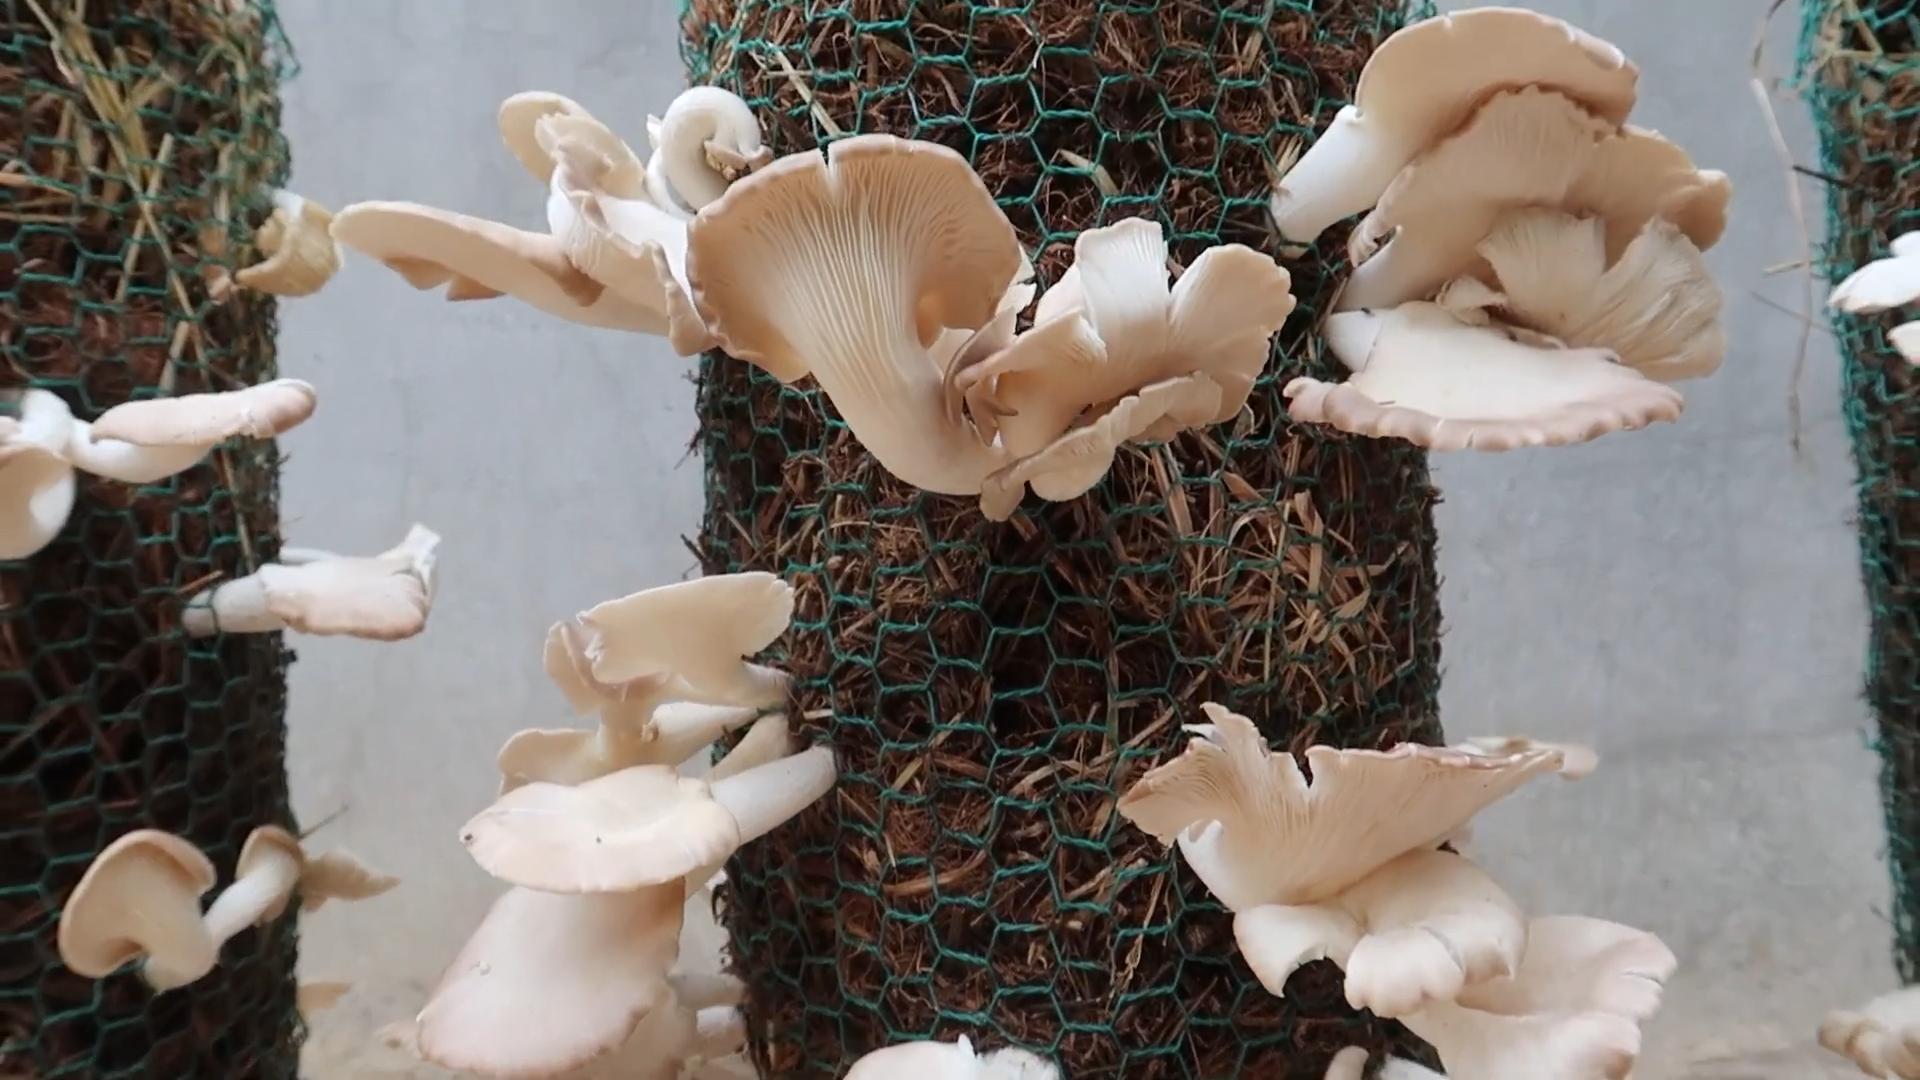
Fruiting: Harvesting Your Bounty
Once the substrate is fully colonized (the surface is almost entirely covered in white mycelium), it’s time to initiate fruiting. This involves creating the right conditions for the mushrooms to form.
1. **Introducing Fruiting Conditions:**
* **Light:** Move the monotub to a location with indirect light. Mushrooms don’t need a lot of light, but some light is necessary for them to fruit properly.
* **Air Exchange:** Increase the air exchange by fanning the monotub 2-3 times a day. This helps to remove excess carbon dioxide and encourages pinning (the formation of tiny mushroom primordia).
* **Humidity:** Maintain a high humidity level (around 90-95%) by misting the inside of the monotub with a spray bottle. Avoid spraying the mushrooms directly, as this can cause them to abort. The walls of the tub should have condensation.
2. **Pinning:** After a few days of fruiting conditions, you should start to see tiny mushroom pins forming on the surface of the substrate. These pins will eventually grow into mature mushrooms.
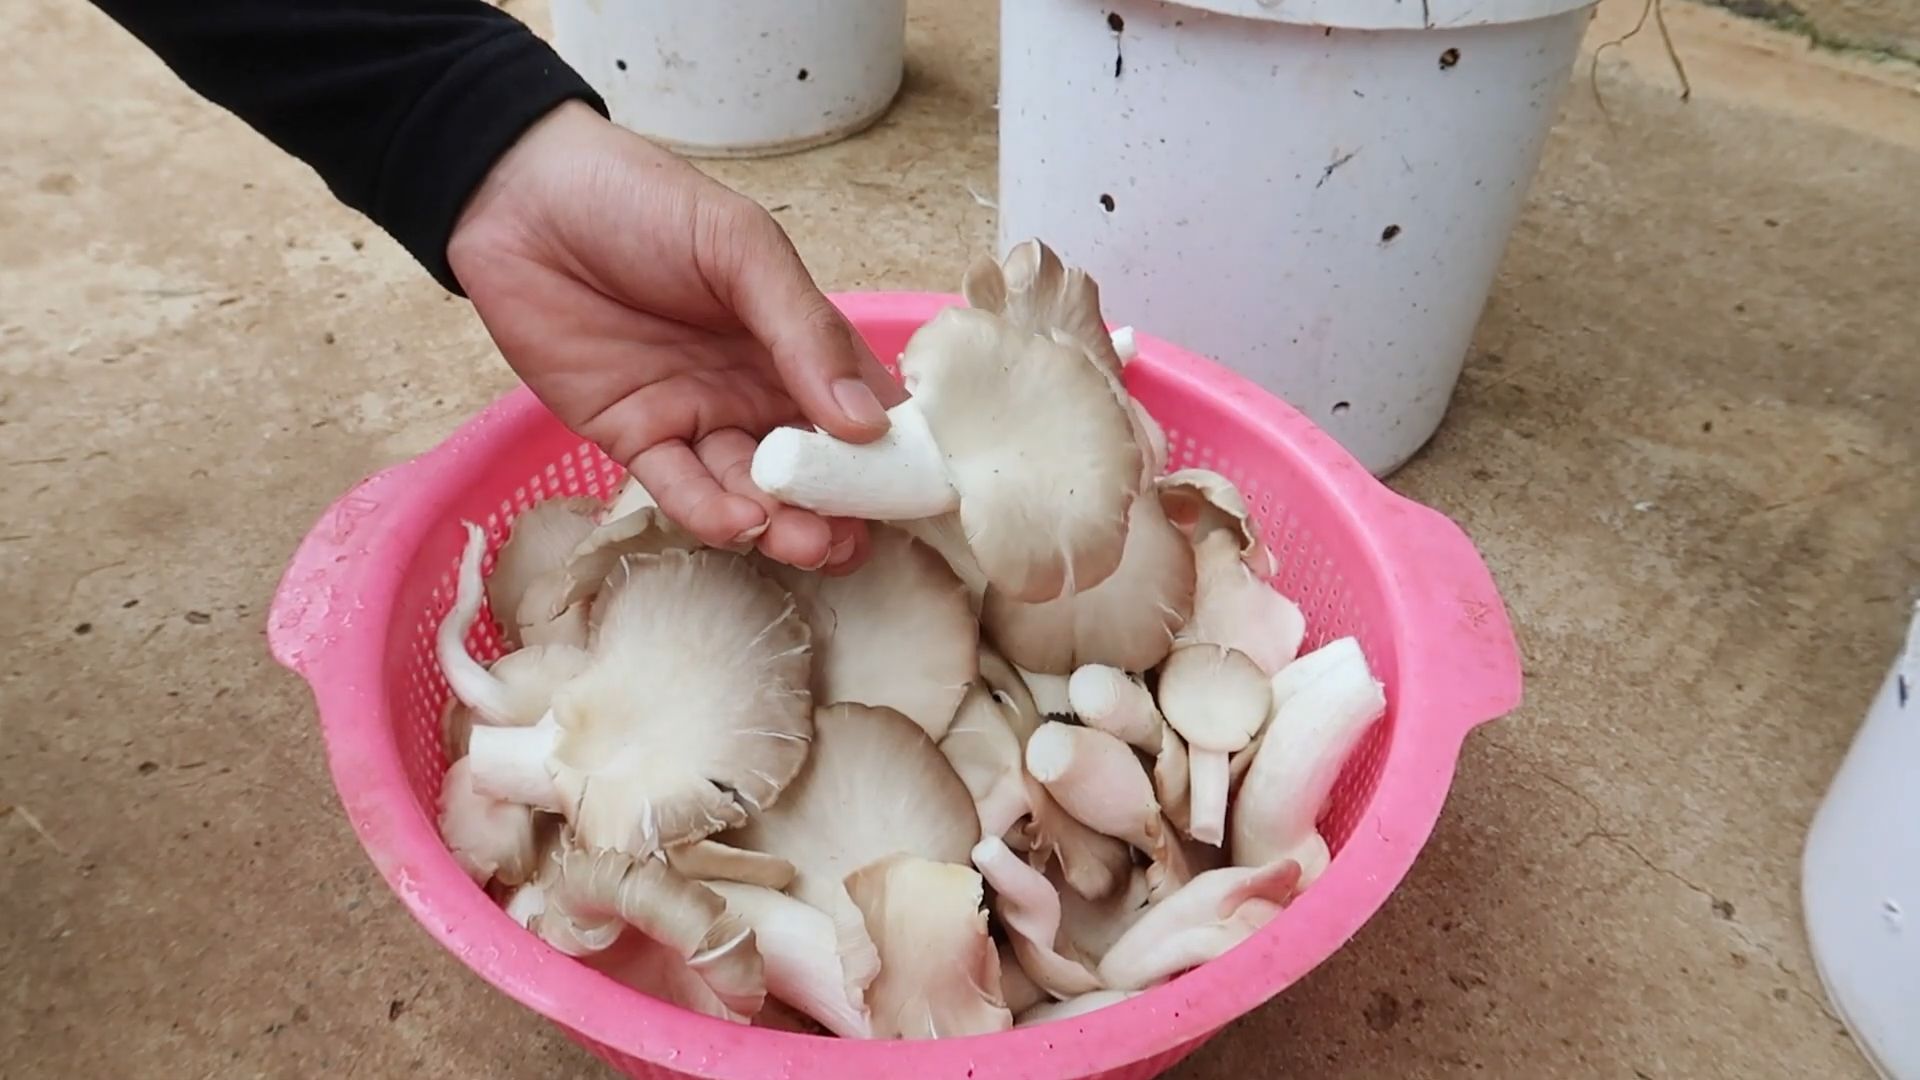
3. **Harvesting:** Harvest the mushrooms when the veils (the membrane that connects the cap to the stem) begin to break. This is the optimal time for harvesting, as the mushrooms will be at their peak flavor and potency. To harvest, gently twist and pull the mushrooms from the substrate.
4. **Subsequent Flushes:** After harvesting, you can initiate another flush of mushrooms by rehydrating the substrate. This can be done by soaking the substrate in water for a few hours, then draining off the excess water. Repeat the fruiting process as described above. You can usually get several flushes of mushrooms from a single substrate.
Troubleshooting: Common Issues and Solutions
Even with the best preparation, things can sometimes go wrong. Here are some common issues and how to address them:
* **Contamination:** As mentioned earlier, contamination is a major concern. Prevention is key. Always sterilize your equipment and work in a clean environment. If you do get contamination, try to remove it early or discard the substrate if it’s widespread.
* **Dry Substrate:** If the substrate is too
Conclusion
So, there you have it! Mastering the art of Mushroom Bulk Growing DIY is not just about saving money; it’s about taking control of your food source, connecting with nature, and experiencing the immense satisfaction of cultivating your own delicious and nutritious mushrooms. We’ve walked you through the process, highlighting the key steps and offering insights to help you avoid common pitfalls.
Why is this DIY trick a must-try? Because it empowers you to produce a substantial quantity of mushrooms, far exceeding what you might find at your local grocery store, and often at a fraction of the cost. Imagine having a constant supply of fresh oyster mushrooms for your stir-fries, shiitake mushrooms for your hearty soups, or lion’s mane for its cognitive benefits. The possibilities are endless!
Beyond the economic and practical advantages, this DIY project offers a unique learning experience. You’ll gain a deeper understanding of fungal biology, substrate preparation, and environmental control. It’s a fascinating journey that will transform your perception of the natural world.
Variations and Suggestions:
Don’t be afraid to experiment! Once you’ve mastered the basic technique, you can explore different mushroom species, each with its own unique flavor and texture. Consider trying different substrates, such as straw, sawdust, or coffee grounds, to see which works best for your chosen mushroom variety. You can also adjust the environmental conditions, such as temperature and humidity, to optimize growth.
* Oyster Mushrooms: These are incredibly versatile and relatively easy to grow, making them a great choice for beginners. Try growing different varieties, such as blue oyster, pink oyster, or golden oyster mushrooms.
* Shiitake Mushrooms: These have a rich, umami flavor that adds depth to any dish. They require a bit more patience, as they take longer to colonize the substrate, but the results are well worth the effort.
* Lion’s Mane Mushrooms: Known for their potential cognitive benefits, these mushrooms have a unique, seafood-like flavor. They can be a bit more challenging to grow, but with careful attention to detail, you can successfully cultivate them at home.
* Substrate Alternatives: Experiment with different substrates to find what works best for you. Straw is a readily available and inexpensive option, while sawdust provides a more nutrient-rich environment. Coffee grounds are a sustainable choice, as they are a waste product that can be repurposed for mushroom cultivation.
* Environmental Control: Maintaining the proper temperature and humidity is crucial for successful mushroom growth. Consider using a humidity controller or a small greenhouse to create the ideal environment.
We encourage you to embark on this exciting adventure and discover the joys of Mushroom Bulk Growing DIY. It’s a rewarding experience that will not only provide you with a delicious and sustainable food source but also connect you with the wonders of the fungal kingdom.
Don’t hesitate to share your experiences with us! We’d love to hear about your successes, challenges, and any tips or tricks you’ve discovered along the way. Post photos of your mushroom harvests on social media and tag us so we can celebrate your achievements. Together, we can build a community of passionate mushroom growers and share the knowledge and resources needed to make this DIY project accessible to everyone.
Now, go forth and grow!
Frequently Asked Questions (FAQ)
What exactly is “bulk growing” when it comes to mushrooms?
Bulk growing refers to cultivating mushrooms in a larger quantity than you would typically find in a small, pre-made kit. Instead of a single block of substrate, you’re creating a larger volume of inoculated substrate, usually in a container like a bucket, bag, or even a dedicated growing chamber. This allows for a significantly larger yield of mushrooms over time. It’s the ideal method for anyone looking to have a consistent supply of fresh mushrooms.
What are the advantages of Mushroom Bulk Growing DIY compared to buying mushroom kits?
There are several key advantages:
* Cost-Effectiveness: DIY bulk growing is significantly cheaper in the long run. While the initial investment in materials might be slightly higher, you’ll produce far more mushrooms per dollar spent compared to constantly buying pre-made kits.
* Control Over the Process: You have complete control over the substrate, sterilization methods, and environmental conditions. This allows you to optimize the growing process for your specific mushroom variety and environment.
* Sustainability: You can use locally sourced materials and recycle waste products like coffee grounds or straw, making it a more sustainable option.
* Learning Experience: You’ll gain a deeper understanding of mushroom biology and cultivation techniques, which can be incredibly rewarding.
* Larger Yields: As mentioned earlier, bulk growing allows for significantly larger and more frequent harvests.
What are the most common mistakes people make when starting with Mushroom Bulk Growing DIY, and how can I avoid them?
Several common mistakes can hinder your success:
* Insufficient Sterilization: This is the number one culprit for contamination. Ensure your substrate is thoroughly sterilized to eliminate competing organisms. Use a pressure cooker for grain spawn and pasteurize bulk substrates properly.
* Poor Ventilation: Mushrooms need fresh air exchange to thrive. Ensure your growing area has adequate ventilation to prevent the buildup of carbon dioxide.
* Incorrect Moisture Levels: Too much or too little moisture can inhibit growth. Aim for a field capacity where the substrate is moist but not dripping wet.
* Contamination: Mold and bacteria can quickly ruin your crop. Maintain a clean working environment and use proper sterile techniques.
* Ignoring Environmental Conditions: Temperature and humidity play a crucial role. Research the ideal conditions for your chosen mushroom species and try to maintain them as consistently as possible.
To avoid these mistakes, meticulously follow the instructions, prioritize cleanliness, and monitor your growing environment closely.
What kind of substrate should I use for Mushroom Bulk Growing DIY?
The best substrate depends on the mushroom species you’re growing. Some popular options include:
* Straw: A readily available and inexpensive option, especially good for oyster mushrooms.
* Sawdust: Provides a more nutrient-rich environment, suitable for shiitake and lion’s mane mushrooms.
* Coffee Grounds: A sustainable choice, often used in combination with other substrates.
* Wood Chips: Ideal for outdoor mushroom beds.
* Grain: Typically used for creating spawn, which is then used to inoculate the bulk substrate.
Research the specific needs of your chosen mushroom variety to determine the most suitable substrate.
How do I know if my mushroom culture is contaminated?
Contamination can manifest in various ways:
* Unusual Colors: Look for colors other than white mycelium, such as green, black, or orange.
* Foul Odors: A sour or moldy smell is a strong indicator of contamination.
* Slime or Goo: Any unusual slime or goo on the substrate is a sign of bacterial contamination.
* Lack of Growth: If your mycelium isn’t growing or is growing very slowly, it could be due to contamination.
If you suspect contamination, isolate the affected container immediately to prevent it from spreading to other cultures.
How long does it take to grow mushrooms using the Mushroom Bulk Growing DIY method?
The time it takes to grow mushrooms varies depending on the species, substrate, and environmental conditions. Generally, you can expect to see pins (baby mushrooms) within 2-4 weeks after inoculation. Harvesting typically occurs within a week or two after pinning. Some species, like shiitake, may take longer to colonize the substrate before fruiting.
Can I grow mushrooms outdoors using the Mushroom Bulk Growing DIY method?
Yes, certain mushroom species, such as oyster mushrooms and wine cap mushrooms, can be grown outdoors. You can create mushroom beds using wood chips or straw in a shady area of your garden. Outdoor cultivation is subject to environmental conditions, so it’s important to choose a location that provides adequate moisture and protection from extreme temperatures.
Where can I find reliable resources and information about Mushroom Bulk Growing DIY?
There are many excellent resources available online and in print:
* Online Forums: Websites like Shroomery.org and Mycotopia.net are great places to connect with other mushroom growers and ask questions.
* Books: “Growing Gourmet and Medicinal Mushrooms” by Paul Stamets is a comprehensive guide to mushroom cultivation.
* YouTube Channels: Many channels offer tutorials and demonstrations on mushroom growing techniques.
* Local Mushroom Clubs: Joining a local mushroom club is a great way to learn from experienced growers and participate in workshops.
Always cross-reference information from multiple sources to ensure accuracy.
Is Mushroom Bulk Growing DIY safe? Are there any precautions I should take?
Mushroom growing is generally safe, but it’s important to take certain precautions:
* Proper Ventilation: Ensure adequate ventilation to prevent the buildup of spores, which can cause allergic reactions in some individuals.
* Cleanliness: Maintain a clean working environment to minimize the risk of contamination.
* Identification: Only consume mushrooms that you have positively identified as edible. Never eat wild mushrooms unless you are absolutely certain of their identity.
* Allergies: Be aware of potential allergies to mushrooms. Start with small portions and
Leave a Comment