
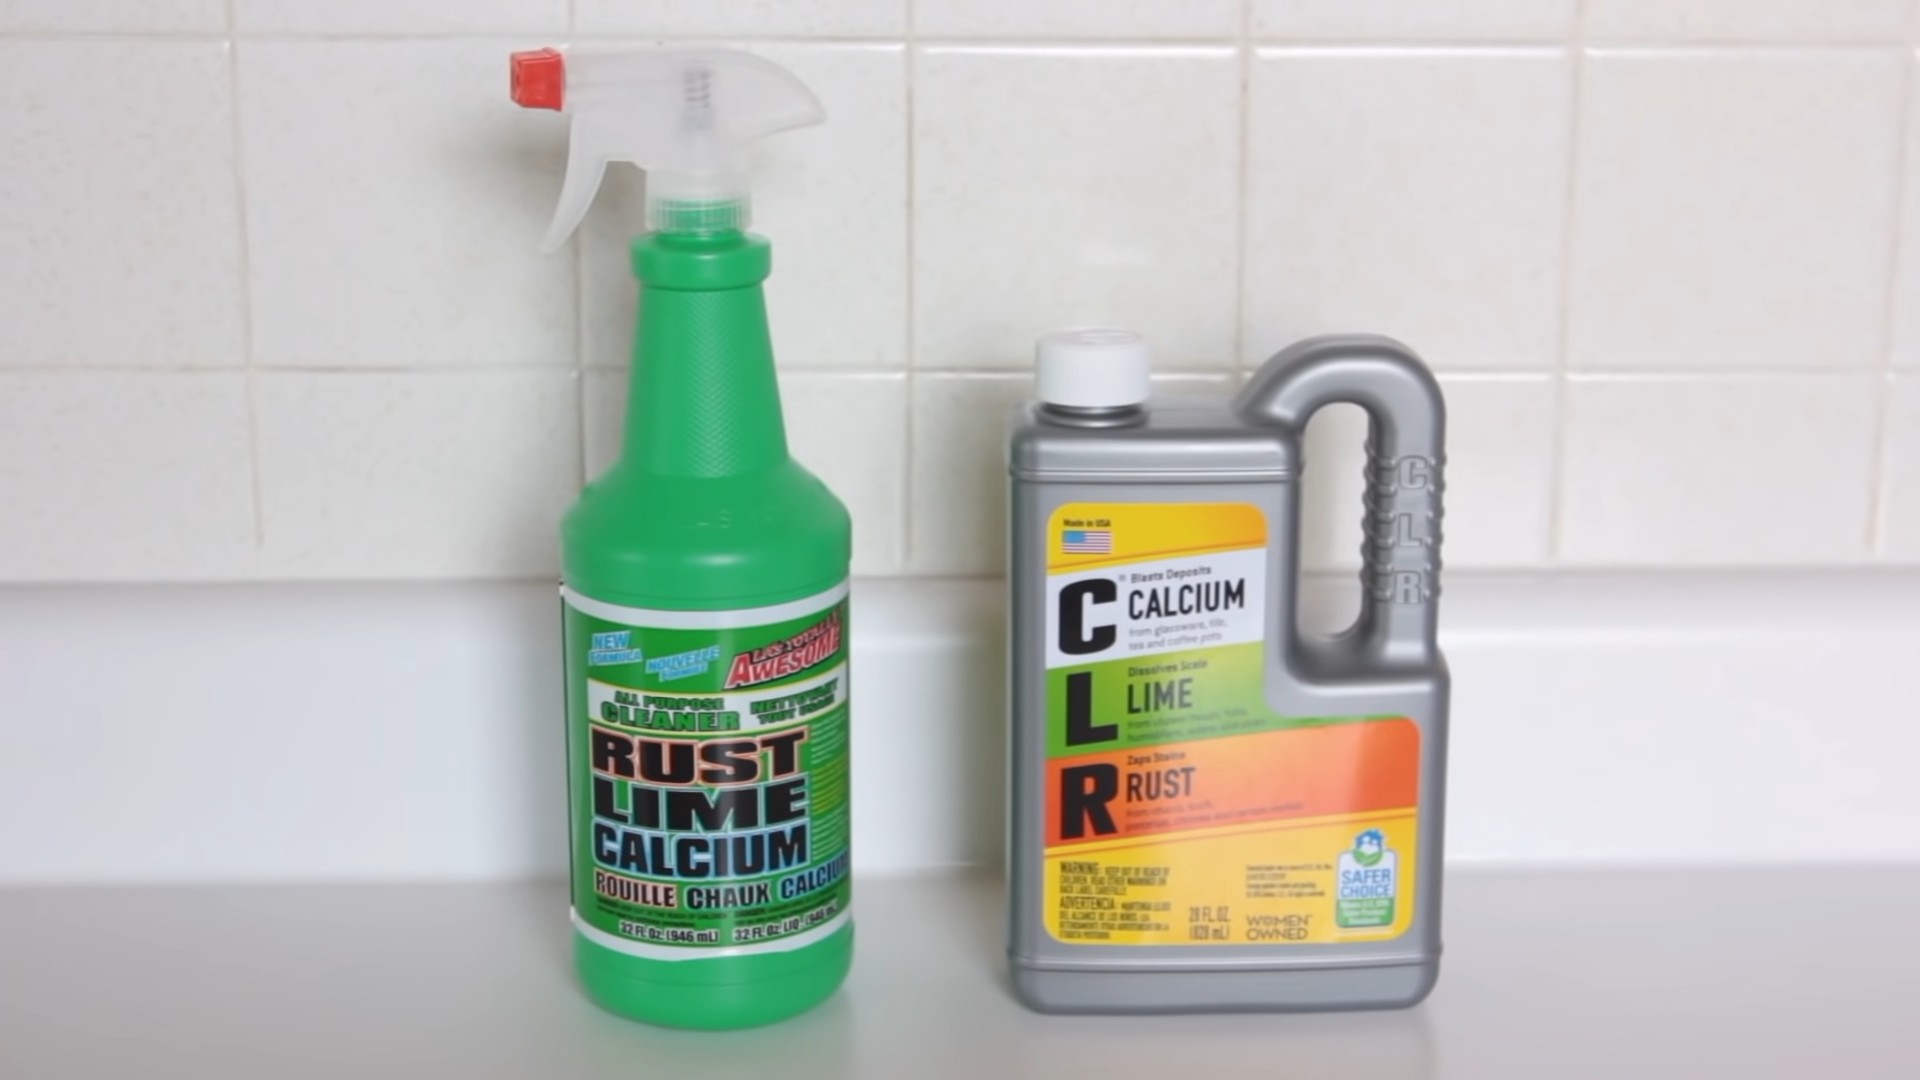
Dollar store vs big brands: The ultimate showdown for your wallet and your garden! Have you ever walked down the aisles of a dollar store, eyeing those suspiciously cheap gardening tools and seeds, and wondered if they could actually work? I know I have! We’re all looking for ways to save a few bucks, especially when it comes to hobbies like gardening, which can sometimes feel like a money pit. But are you sacrificing quality and yield by opting for the dollar store, or are the big brands just overcharging us?
The quest for affordable gardening solutions isn’t new. Historically, resourceful gardeners have always sought out budget-friendly alternatives, passing down tips and tricks through generations. From repurposing household items to bartering with neighbors, the spirit of frugality has always been intertwined with the joy of growing your own food and flowers.
In this article, we’re diving deep into the dollar store vs big brands debate. We’ll be putting various gardening products to the test, comparing their performance, durability, and overall value. Why is this important? Because knowing where to save money without compromising your garden’s health is crucial for both beginner and experienced gardeners. I’m here to help you make informed decisions, so you can spend less and grow more! Let’s get our hands dirty and find out which option truly reigns supreme!
DIY Plastic Bottle Vertical Garden: A Thrifty & Green Project
Hey there, fellow DIY enthusiasts! I’m super excited to share this project with you – a fantastic way to recycle those pesky plastic bottles and create a beautiful, space-saving vertical garden. This project is perfect for small balconies, patios, or even indoor spaces. Plus, it’s incredibly budget-friendly! Let’s dive in!
Materials You’ll Need
Before we get started, let’s gather all the necessary supplies. Trust me, having everything ready beforehand will make the process much smoother.
* Plastic Bottles: The star of the show! Aim for bottles of similar size and shape for a more uniform look. I usually use 1.5 or 2-liter bottles, but you can experiment with different sizes. Make sure they’re clean and dry.
* Scissors or Utility Knife: For cutting the bottles. Be careful and use a sharp blade for cleaner cuts.
* Drill or Awl: To create drainage holes and hanging points.
* Rope or Strong Twine: To hang the bottles. Choose a material that can withstand the weight of the soil and plants, and the weather if you’re placing it outdoors.
* Soil: Use a good quality potting mix suitable for the plants you intend to grow.
* Plants: Herbs, strawberries, succulents, flowers – the possibilities are endless! Choose plants that are appropriate for the amount of sunlight your vertical garden will receive.
* Measuring Tape or Ruler: To ensure consistent spacing.
* Marker or Pen: For marking cutting lines and hole positions.
* Gloves: To protect your hands.
* Safety Glasses: Especially when drilling or cutting. Safety first!
* Optional: Spray Paint: If you want to add a pop of color or personalize your garden. Use paint suitable for plastic.
* Optional: Landscape Fabric or Coffee Filters: To prevent soil from washing out of the drainage holes.
Preparing the Bottles
This is where the magic begins! We’ll transform those ordinary plastic bottles into mini planters.
1. Clean and Dry the Bottles: Make sure your bottles are thoroughly clean and dry inside and out. Remove any labels and sticky residue. I usually soak them in warm, soapy water and then rinse them well.
2. Mark the Cutting Line: Decide where you want to cut the bottles. I usually cut them about two-thirds of the way down, creating a larger opening for planting. Use a marker to draw a clear line around the bottle. Consistency is key for a neat look.
3. Cut the Bottles: Carefully cut along the marked line using scissors or a utility knife. If you’re using a utility knife, place the bottle on a stable surface and use a cutting board underneath to protect your work area. Be extra cautious and take your time.
4. Smooth the Edges (Optional): If the cut edges are sharp, you can smooth them down with sandpaper or a lighter. If using a lighter, be extremely careful and only melt the very edge of the plastic.
5. Drill Drainage Holes: Drill several small drainage holes in the bottom of each bottle. This is crucial for preventing waterlogging and root rot. I usually drill 4-5 holes, about ¼ inch in diameter.
6. Drill Hanging Holes: Drill two holes near the top of each bottle, on opposite sides. These holes will be used to thread the rope or twine for hanging. Make sure the holes are large enough to accommodate your chosen rope or twine.
7. Paint the Bottles (Optional): If you want to add some color, now’s the time to paint the bottles. Use spray paint specifically designed for plastic. Apply several thin coats, allowing each coat to dry completely before applying the next. This will prevent drips and ensure a smooth, even finish. Let the paint dry completely before moving on to the next step.
Assembling the Vertical Garden
Now comes the fun part – putting everything together and creating your vertical masterpiece!
1. Cut the Rope or Twine: Determine the desired length of your vertical garden. Cut the rope or twine into equal lengths, allowing extra length for tying knots and adjusting the height of each bottle. I usually add about 12-18 inches to the overall length.
2. Thread the Rope Through the Bottles: Thread the rope through the hanging holes of each bottle, starting from the bottom. Make sure the bottles are facing the same direction.
3. Secure the Bottles: Tie knots below each bottle to secure it in place. The knots will prevent the bottles from sliding down the rope. Adjust the spacing between the bottles to your liking. I usually space them about 6-8 inches apart.
4. Add Landscape Fabric or Coffee Filters (Optional): Place a small piece of landscape fabric or a coffee filter over the drainage holes inside each bottle. This will help prevent soil from washing out when you water your plants.
5. Fill the Bottles with Soil: Fill each bottle with potting mix, leaving some space at the top for planting.
6. Plant Your Plants: Gently remove your plants from their containers and plant them in the bottles. Make sure the roots are well covered with soil.
7. Water Your Plants: Water your plants thoroughly after planting.
8. Hang Your Vertical Garden: Find a suitable location to hang your vertical garden. Make sure the location receives adequate sunlight for your chosen plants. You can hang it from a balcony railing, a fence, or even a sturdy hook on a wall.
Tips and Tricks for a Thriving Vertical Garden
Here are a few extra tips to help your vertical garden flourish:
* Choose the Right Plants: Consider the amount of sunlight your vertical garden will receive and choose plants accordingly. Herbs like mint, basil, and oregano are great for sunny locations, while shade-tolerant plants like ferns and impatiens are better for shady spots.
* Water Regularly: Vertical gardens tend to dry out more quickly than traditional gardens, so it’s important to water them regularly. Check the soil moisture daily and water when the top inch of soil feels dry.
* Fertilize Regularly: Vertical gardens also require regular fertilization. Use a balanced liquid fertilizer diluted to half strength. Fertilize every 2-4 weeks during the growing season.
* Rotate Your Plants: To ensure even growth, rotate your plants regularly. This will prevent them from leaning towards the sun.
* Prune Regularly: Prune your plants regularly to encourage bushier growth and prevent them from becoming leggy.
* Protect from Extreme Weather: If you live in an area with extreme weather conditions, protect your vertical garden from frost, strong winds, and excessive heat. You can move it indoors during harsh weather.
* Consider Self-Watering Options: For a more hands-off approach, explore self-watering options. You can create a simple self-watering system by inserting a wick into the soil that draws water from a reservoir below.
* Experiment with Different Bottle Sizes and Shapes: Don’t be afraid to experiment with different bottle sizes and shapes to create a unique and visually appealing vertical garden.
* Add Decorative Elements: Personalize your vertical garden by adding decorative elements such as pebbles, shells, or small figurines.
* Monitor for Pests and Diseases: Keep an eye out for pests and diseases. Treat any problems promptly to prevent them from spreading.
Troubleshooting
Even with the best planning, you might encounter a few hiccups along the way. Here are some common issues and how to address them:
* Plants Drying Out Too Quickly: This could be due to insufficient watering, excessive sunlight, or poor soil drainage. Make sure you’re watering regularly and that the soil is well-draining. Consider adding a layer of mulch to help retain moisture.
* Plants Turning Yellow: This could be a sign of overwatering, underwatering, or nutrient deficiency. Check the soil moisture and adjust your watering schedule accordingly. Fertilize regularly with a balanced fertilizer.
* Plants Not Growing: This could be due to insufficient sunlight, poor soil quality, or lack of nutrients. Make sure your plants are receiving adequate sunlight and that the soil is rich in nutrients. Fertilize regularly.
* Bottles Falling Down: This could be due to weak rope or twine, or improperly tied knots. Use strong rope or twine and make sure the knots are secure.
* Soil Washing Out: This could be due to large drainage holes or insufficient landscape fabric. Use smaller drainage holes or add more landscape fabric to prevent soil from washing out.
Enjoy Your Green Oasis!
And there you have it! Your very own DIY plastic bottle vertical garden. I hope you found this guide helpful and inspiring. Remember, gardening is all about experimentation and learning, so don’t be afraid to try new things and have fun with it. Happy gardening!
Conclusion
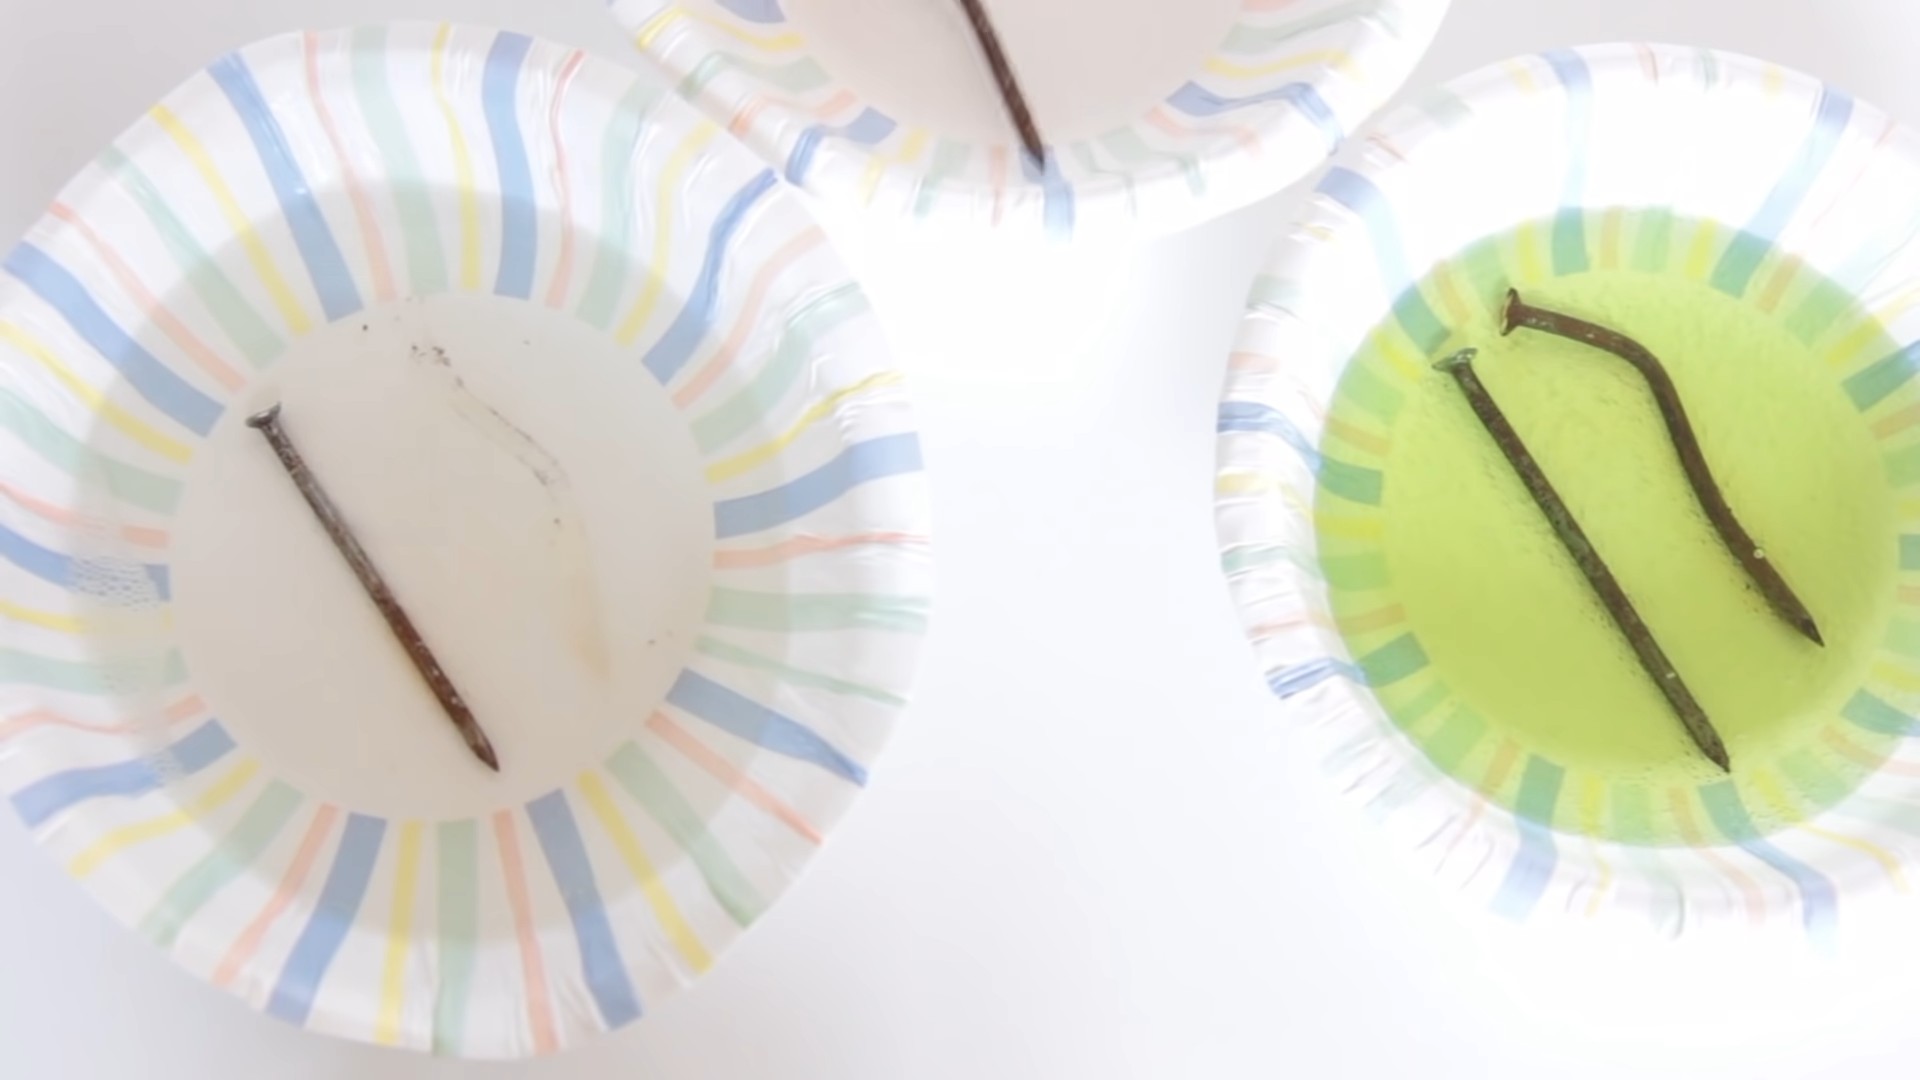
So, there you have it! We’ve explored the fascinating world of dollar store alternatives versus their big-brand counterparts, and hopefully, you’ve gained some valuable insights. The key takeaway is this: you don’t always need to break the bank to achieve fantastic results. While some big-brand products undoubtedly offer superior performance or unique formulations, many dollar store options provide surprisingly comparable results, especially when you’re willing to get a little creative and embrace the DIY spirit.
The real magic happens when you start thinking outside the box. For example, that dollar store cleaner might not be the *exact* dupe for the expensive brand, but with a few simple additions like essential oils for fragrance or a splash of vinegar for extra cleaning power, you can create a customized solution that rivals, or even surpasses, the original. This is where the fun begins!
This isn’t just about saving money; it’s about empowering yourself to be a savvy consumer and a resourceful creator. It’s about understanding the ingredients and processes behind the products you use every day and making informed choices that align with your budget and your values.
Consider this: that dollar store dish soap might be perfectly adequate for everyday cleaning, but for tougher grease stains, you could pre-treat with a baking soda paste or add a bit of washing soda to your dishwater. Similarly, that inexpensive laundry detergent might benefit from a boost of borax for extra whitening power or a fabric softener alternative made from vinegar and essential oils. The possibilities are endless!
We highly encourage you to experiment with these DIY tricks and discover the hidden potential of dollar store products. Don’t be afraid to mix and match, tweak the recipes, and find what works best for you. Remember, the goal is to achieve the desired results without sacrificing quality or breaking the bank.
And most importantly, we want to hear about your experiences! Share your favorite dollar store DIY hacks in the comments below. What products have surprised you with their effectiveness? What creative solutions have you come up with? Let’s build a community of resourceful consumers who are passionate about saving money and maximizing value.
Ultimately, the choice between dollar store and big-brand products is a personal one. There’s no right or wrong answer. But by embracing the DIY spirit and exploring the potential of dollar store alternatives, you can unlock a world of savings and creativity. So go ahead, give it a try, and let us know what you discover! You might just be surprised at how much you can achieve with a little ingenuity and a trip to your local dollar store. This dollar store vs big brands comparison has hopefully given you the confidence to try something new!
FAQ
What are some specific examples of dollar store products that work well for DIY projects?
Dollar stores are treasure troves for DIY enthusiasts! Here are a few examples to get you started:
* **Cleaning Supplies:** Dollar store cleaners, dish soap, and laundry detergent can be surprisingly effective, especially when boosted with DIY additions like vinegar, baking soda, or essential oils.
* **Craft Supplies:** From paints and brushes to beads and glitter, dollar stores offer a wide range of craft supplies for all sorts of projects.
* **Storage Containers:** Dollar store bins, baskets, and jars are perfect for organizing your home and creating DIY storage solutions.
* **Personal Care Items:** While quality can vary, some dollar store shampoos, conditioners, and lotions can be decent base products for adding your own essential oils or other beneficial ingredients.
* **Gardening Supplies:** Seeds, pots, and gardening tools can be found at dollar stores, making it easy to start a DIY garden on a budget.
How can I ensure the safety of DIY cleaning products made with dollar store ingredients?
Safety is paramount when creating DIY cleaning products. Here are some essential tips:
* **Always wear gloves and eye protection** when handling cleaning chemicals, even if they seem mild.
* **Never mix bleach with ammonia or vinegar**, as this can create toxic fumes.
* **Label all DIY cleaning products clearly** with the ingredients and instructions for use.
* **Store DIY cleaning products out of reach of children and pets.**
* **Test DIY cleaning products on a small, inconspicuous area** before using them on larger surfaces.
* **Research the properties of each ingredient** before using it in a DIY cleaning product.
* **Use caution when working with essential oils**, as some can be irritating to the skin or harmful if ingested.
What are some variations I can try with dollar store cleaning products?
The possibilities are endless! Here are a few ideas to get you started:
* **Boost dish soap with vinegar** for extra grease-cutting power.
* **Add essential oils to laundry detergent** for a natural fragrance.
* **Create a DIY all-purpose cleaner** by mixing vinegar, water, and essential oils in a spray bottle.
* **Make a DIY scrub** by combining baking soda and water.
* **Use dollar store sponges and cloths** for cleaning tasks.
Are there any dollar store products I should avoid for DIY projects?
While many dollar store products are great for DIY projects, there are a few to be cautious about:
* **Electronics:** Dollar store electronics are often of poor quality and may not last long.
* **Food:** Be careful when purchasing food from dollar stores, as the quality and freshness may not be guaranteed.
* **Medications:** Avoid purchasing medications from dollar stores, as they may not be properly regulated.
* **Products with questionable ingredients:** Always read the labels carefully and avoid products with ingredients that you are unsure about.
How can I share my dollar store DIY creations with others?
We encourage you to share your creations! Here are a few ways to do so:
* **Leave a comment below** this article with your tips and tricks.
* **Share your photos and videos** on social media using relevant hashtags.
* **Start a blog or YouTube channel** to showcase your DIY projects.
* **Join online forums and communities** dedicated to DIY and frugal living.
* **Share your creations with friends and family.**
What if my DIY project doesn’t turn out as expected?
Don’t be discouraged! DIY projects are all about experimentation and learning. If your project doesn’t turn out as expected, try to identify what went wrong and adjust your approach next time. Remember, even mistakes can be valuable learning experiences. And most importantly, have fun with it!
Where can I find more inspiration for dollar store DIY projects?
The internet is a treasure trove of inspiration! Here are a few resources to check out:
* **Pinterest:** Search for “dollar store DIY” or “frugal DIY” to find tons of ideas.
* **YouTube:** Watch videos of other DIYers creating projects with dollar store products.
* **Blogs:** Read blogs dedicated to DIY, frugal living, and home improvement.
* **Social Media:** Follow DIYers and frugal living enthusiasts on social media for daily inspiration.
How do I know if a dollar store product is a good value for the price?
Consider the following factors:
* **Compare the price per unit** to similar products at other stores.
* **Read reviews** to see what other customers have to say about the product.
* **Consider the quality** of the product and how long it is likely to last.
* **Think about how often you will use the product.**
* **Factor in the cost of any additional ingredients or supplies** needed for a DIY project.
By carefully considering these factors, you can make informed decisions about whether a dollar store product is a good value for the price. Remember, the goal is to save money without sacrificing quality or effectiveness.

Leave a Comment