
Indoor Gourd Growing Bag Hack: Ever dreamed of harvesting your own vibrant gourds right from the comfort of your home? I know I have! Forget sprawling gardens and unpredictable weather; with this simple DIY trick, you can cultivate these fascinating fruits indoors, no matter the season.
Gourds have a rich history, stretching back millennia, serving as everything from practical containers to decorative art. In many cultures, they symbolize prosperity and good fortune. But traditionally, growing them required ample space and a green thumb honed by years of experience. That’s where this game-changing hack comes in!
Let’s face it, not everyone has access to a sprawling backyard or the time to dedicate to intensive gardening. But that shouldn’t stop you from experiencing the joy of growing your own food and decorations. This indoor gourd growing bag hack is perfect for apartment dwellers, busy professionals, or anyone looking for a fun and rewarding project. I’m going to show you how to create a self-contained growing environment that’s easy to manage and yields impressive results. Get ready to impress your friends and family with your homegrown gourds – it’s easier than you think!
DIY Indoor Gourd Growing Bag Hack: From Seed to Spooky Decor!
Hey there, fellow gardening enthusiasts! Are you itching to grow your own gourds but don’t have a sprawling outdoor space? Don’t worry, I’ve got you covered! I’m going to walk you through my super successful DIY indoor gourd growing bag hack. It’s surprisingly simple, budget-friendly, and yields some seriously impressive results. Get ready to have your own mini gourd patch right inside your home!
What You’ll Need: The Gourd Growing Arsenal
Before we dive in, let’s gather our supplies. This is a list of everything I used, but feel free to adapt it based on what you have on hand.
* **Gourd Seeds:** Obviously! Choose your favorite variety. I personally love the classic ornamental gourds for their quirky shapes and colors, but you can also grow edible gourds like spaghetti squash or butternut squash.
* **Heavy-Duty Grow Bags:** These are the key! I recommend using at least 10-gallon grow bags per plant, especially for larger gourd varieties. The bigger, the better, as gourds need plenty of root space. Fabric grow bags are ideal because they allow for good drainage and aeration.
* **High-Quality Potting Mix:** Don’t skimp on this! Use a well-draining potting mix specifically formulated for vegetables. Avoid using garden soil, as it can become compacted in containers.
* **Perlite or Vermiculite:** This helps improve drainage and aeration in the potting mix.
* **Slow-Release Fertilizer:** Gourds are heavy feeders, so a slow-release fertilizer will provide them with a steady supply of nutrients throughout the growing season. Look for a fertilizer with a balanced NPK ratio (nitrogen, phosphorus, potassium).
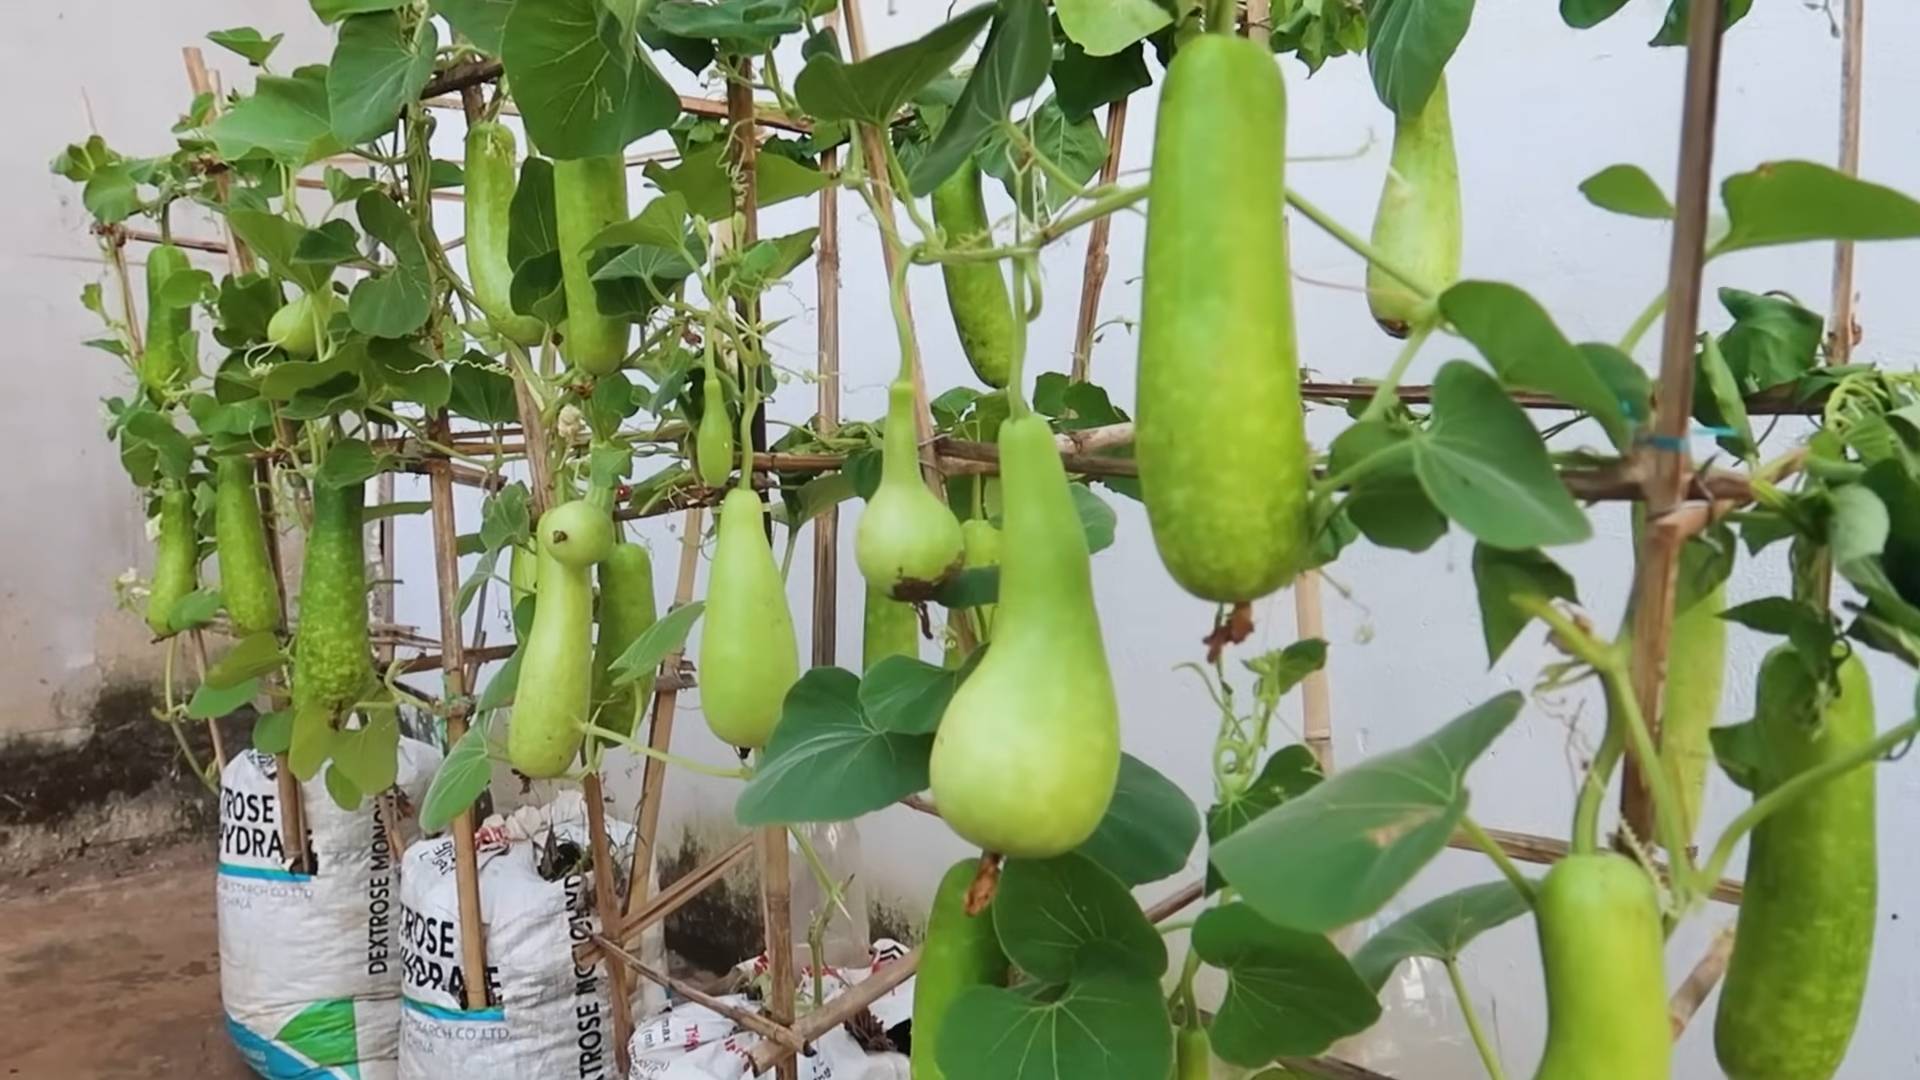
* **Trellis or Support System:** Gourds are vines, so they’ll need something to climb on. A sturdy trellis, tomato cage, or even a DIY support system made from bamboo stakes and twine will work.
* **Watering Can or Hose:** For, well, watering!
* **Spray Bottle:** For misting seedlings.
* **Grow Lights (Optional but Recommended):** If you don’t have a sunny window, grow lights will be essential for providing your gourds with enough light.
* **Scissors or Pruning Shears:** For trimming and pruning.
* **Gloves:** To keep your hands clean.
* **Seed Starting Tray (Optional):** For starting seeds indoors before transplanting.
Phase 1: Seed Starting – Giving Your Gourds a Head Start
Starting your gourd seeds indoors is a great way to get a jump start on the growing season, especially if you live in a cooler climate.
1. **Soak the Seeds:** Before planting, soak your gourd seeds in warm water for 24 hours. This helps soften the seed coat and improves germination rates.
2. **Prepare the Seed Starting Tray (Optional):** Fill your seed starting tray with a seed starting mix. Moisten the mix thoroughly.
3. **Plant the Seeds:** Plant the seeds about 1 inch deep in the seed starting mix. Place one seed per cell.
4. **Cover and Mist:** Cover the seed starting tray with a clear plastic lid or plastic wrap to create a humid environment. Mist the soil regularly to keep it moist.
5. **Provide Warmth:** Place the seed starting tray in a warm location, such as on top of a refrigerator or near a heat vent. Gourds germinate best at temperatures between 70-80°F (21-27°C).
6. **Wait for Germination:** Germination typically takes 7-14 days. Once the seedlings emerge, remove the plastic lid or wrap and place the tray under grow lights or in a sunny window.
7. **Water Regularly:** Keep the soil consistently moist, but not soggy.
8. **Harden Off Seedlings:** Before transplanting your seedlings into the grow bags, you’ll need to harden them off. This means gradually exposing them to outdoor conditions over a period of 7-10 days. Start by placing them outside for an hour or two each day, gradually increasing the amount of time they spend outdoors.
Phase 2: Planting in Grow Bags – Setting the Stage for Success
Now for the main event! It’s time to get those gourd seedlings into their grow bags.
1. **Prepare the Grow Bags:** Fill your grow bags with the high-quality potting mix. Mix in perlite or vermiculite to improve drainage. Add the slow-release fertilizer according to the package instructions.
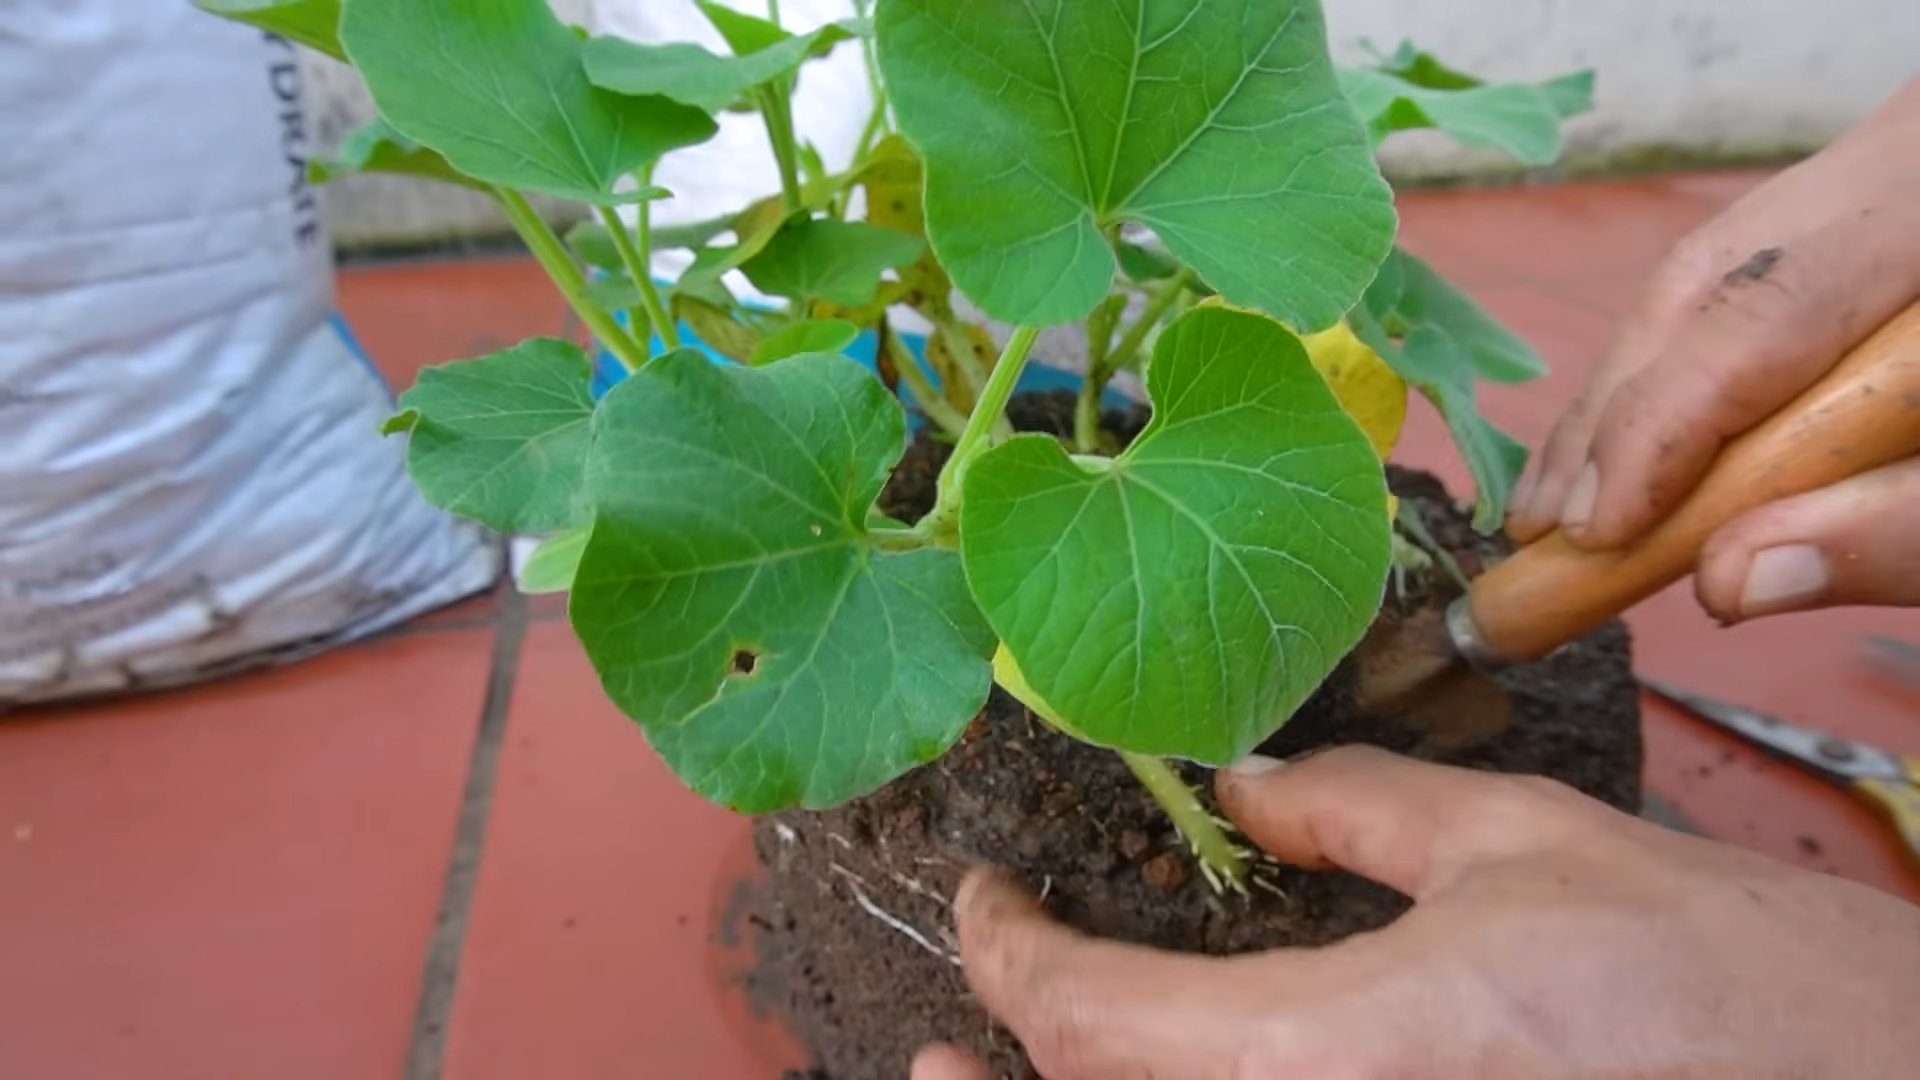
2. **Create a Planting Hole:** Dig a hole in the center of each grow bag that is large enough to accommodate the root ball of your seedling.
3. **Transplant the Seedlings:** Gently remove the seedlings from the seed starting tray. Be careful not to damage the roots. Place the seedlings in the planting holes and backfill with potting mix.
4. **Water Thoroughly:** Water the seedlings thoroughly after transplanting.
5. **Install the Trellis or Support System:** Place the trellis or support system near the grow bags. Make sure it is sturdy enough to support the weight of the growing vines and gourds.
Phase 3: Ongoing Care – Nurturing Your Gourd Patch
Growing gourds indoors requires consistent care and attention. Here’s what you need to do to keep your plants happy and healthy.
1. **Watering:** Water your gourds regularly, especially during hot weather. The soil should be consistently moist, but not soggy. Check the soil moisture by sticking your finger into the soil. If the top inch of soil is dry, it’s time to water.
2. **Fertilizing:** Gourds are heavy feeders, so you’ll need to fertilize them regularly. In addition to the slow-release fertilizer you added at planting time, you can also supplement with a liquid fertilizer every 2-3 weeks.
3. **Pruning:** Pruning is essential for controlling the size and shape of your gourd vines. Remove any dead or yellowing leaves. You can also prune back the vines to encourage branching and fruit production. I usually pinch off the ends of the vines once they reach the top of the trellis.
4. **Pollination:** Gourds are pollinated by insects, so you may need to hand-pollinate your plants if you’re growing them indoors. To hand-pollinate, use a small paintbrush to transfer pollen from the male flowers to the female flowers. Male flowers have a long, thin stem, while female flowers have a small, immature gourd at the base.
5. **Pest and Disease Control:** Keep an eye out for pests and diseases. Common gourd pests include aphids, squash bugs, and vine borers. Common diseases include powdery mildew and squash vine wilt. Treat any infestations or diseases promptly with appropriate organic pesticides or fungicides. I’ve found that a simple solution of neem oil and water can be effective against many pests.
6. **Light:** Ensure your gourds receive adequate light. If you’re using grow lights, keep them on for 14-16 hours per day. Adjust the height of the lights as the plants grow.
7. **Ai
Hey there, fellow gardening enthusiasts! Are you itching to grow your own gourds but don’t have a sprawling outdoor space? Don’t worry, I’ve got you covered! I’m going to walk you through my super successful DIY indoor gourd growing bag hack. It’s surprisingly simple, budget-friendly, and yields some seriously impressive results. Get ready to have your own mini gourd patch right inside your home!
What You’ll Need: The Gourd Growing Arsenal
Before we dive in, let’s gather our supplies. This is a list of everything I used, but feel free to adapt it based on what you have on hand.
* **Gourd Seeds:** Obviously! Choose your favorite variety. I personally love the classic ornamental gourds for their quirky shapes and colors, but you can also grow edible gourds like spaghetti squash or butternut squash.
* **Heavy-Duty Grow Bags:** These are the key! I recommend using at least 10-gallon grow bags per plant, especially for larger gourd varieties. The bigger, the better, as gourds need plenty of root space. Fabric grow bags are ideal because they allow for good drainage and aeration.
* **High-Quality Potting Mix:** Don’t skimp on this! Use a well-draining potting mix specifically formulated for vegetables. Avoid using garden soil, as it can become compacted in containers.
* **Perlite or Vermiculite:** This helps improve drainage and aeration in the potting mix.
* **Slow-Release Fertilizer:** Gourds are heavy feeders, so a slow-release fertilizer will provide them with a steady supply of nutrients throughout the growing season. Look for a fertilizer with a balanced NPK ratio (nitrogen, phosphorus, potassium).
* **Trellis or Support System:** Gourds are vines, so they’ll need something to climb on. A sturdy trellis, tomato cage, or even a DIY support system made from bamboo stakes and twine will work.
* **Watering Can or Hose:** For, well, watering!
* **Spray Bottle:** For misting seedlings.
* **Grow Lights (Optional but Recommended):** If you don’t have a sunny window, grow lights will be essential for providing your gourds with enough light.
* **Scissors or Pruning Shears:** For trimming and pruning.
* **Gloves:** To keep your hands clean.
* **Seed Starting Tray (Optional):** For starting seeds indoors before transplanting.
Phase 1: Seed Starting – Giving Your Gourds a Head Start
Starting your gourd seeds indoors is a great way to get a jump start on the growing season, especially if you live in a cooler climate.
1. **Soak the Seeds:** Before planting, soak your gourd seeds in warm water for 24 hours. This helps soften the seed coat and improves germination rates.
2. **Prepare the Seed Starting Tray (Optional):** Fill your seed starting tray with a seed starting mix. Moisten the mix thoroughly.
3. **Plant the Seeds:** Plant the seeds about 1 inch deep in the seed starting mix. Place one seed per cell.
4. **Cover and Mist:** Cover the seed starting tray with a clear plastic lid or plastic wrap to create a humid environment. Mist the soil regularly to keep it moist.
5. **Provide Warmth:** Place the seed starting tray in a warm location, such as on top of a refrigerator or near a heat vent. Gourds germinate best at temperatures between 70-80°F (21-27°C).
6. **Wait for Germination:** Germination typically takes 7-14 days. Once the seedlings emerge, remove the plastic lid or wrap and place the tray under grow lights or in a sunny window.
7. **Water Regularly:** Keep the soil consistently moist, but not soggy.
8. **Harden Off Seedlings:** Before transplanting your seedlings into the grow bags, you’ll need to harden them off. This means gradually exposing them to outdoor conditions over a period of 7-10 days. Start by placing them outside for an hour or two each day, gradually increasing the amount of time they spend outdoors.
Phase 2: Planting in Grow Bags – Setting the Stage for Success
Now for the main event! It’s time to get those gourd seedlings into their grow bags.
1. **Prepare the Grow Bags:** Fill your grow bags with the high-quality potting mix. Mix in perlite or vermiculite to improve drainage. Add the slow-release fertilizer according to the package instructions.
2. **Create a Planting Hole:** Dig a hole in the center of each grow bag that is large enough to accommodate the root ball of your seedling.
3. **Transplant the Seedlings:** Gently remove the seedlings from the seed starting tray. Be careful not to damage the roots. Place the seedlings in the planting holes and backfill with potting mix.
4. **Water Thoroughly:** Water the seedlings thoroughly after transplanting.
5. **Install the Trellis or Support System:** Place the trellis or support system near the grow bags. Make sure it is sturdy enough to support the weight of the growing vines and gourds.
Phase 3: Ongoing Care – Nurturing Your Gourd Patch
Growing gourds indoors requires consistent care and attention. Here’s what you need to do to keep your plants happy and healthy.
1. **Watering:** Water your gourds regularly, especially during hot weather. The soil should be consistently moist, but not soggy. Check the soil moisture by sticking your finger into the soil. If the top inch of soil is dry, it’s time to water.
2. **Fertilizing:** Gourds are heavy feeders, so you’ll need to fertilize them regularly. In addition to the slow-release fertilizer you added at planting time, you can also supplement with a liquid fertilizer every 2-3 weeks.
3. **Pruning:** Pruning is essential for controlling the size and shape of your gourd vines. Remove any dead or yellowing leaves. You can also prune back the vines to encourage branching and fruit production. I usually pinch off the ends of the vines once they reach the top of the trellis.
4. **Pollination:** Gourds are pollinated by insects, so you may need to hand-pollinate your plants if you’re growing them indoors. To hand-pollinate, use a small paintbrush to transfer pollen from the male flowers to the female flowers. Male flowers have a long, thin stem, while female flowers have a small, immature gourd at the base.
5. **Pest and Disease Control:** Keep an eye out for pests and diseases. Common gourd pests include aphids, squash bugs, and vine borers. Common diseases include powdery mildew and squash vine wilt. Treat any infestations or diseases promptly with appropriate organic pesticides or fungicides. I’ve found that a simple solution of neem oil and water can be effective against many pests.
6. **Light:** Ensure your gourds receive adequate light. If you’re using grow lights, keep them on for 14-16 hours per day. Adjust the height of the lights as the plants grow.
7. **Air Circulation:** Good air circulation is important for preventing diseases. Make sure your plants have plenty of space around them and that the air is circulating freely. A small fan can help improve air circulation.
8. **Support the Gourds:** As the gourds grow larger, they may need additional support. You can use slings made from pantyhose or netting to support the weight of the gourds.
Phase 4: Harvesting and Curing – The Grand Finale!
The moment you’ve been waiting for! Harvesting and curing your gourds is the final step in the process.
1. **Harvesting:** Harvest your gourds when they are fully mature and the stems have dried out. The skin of the gourd should be hard and resistant to scratching.
2. **Curing:** Curing is essential for preserving your gourds. To cure your gourds, wash them with soapy water and dry them thoroughly. Place them in a well-ventilated area, such as a garage or shed, for several weeks. Turn the gourds regularly to prevent them from rotting. The curing process can take several weeks or even months, depending on the size and thickness of the gourds.
3. **Cleaning:** Once the gourds are fully cured, you can clean them with a mild bleach solution to remove any mold or mildew.
4. **Decorating:** Now for the fun part! Decorate your gourds with paint, markers, or other craft supplies. You can also carve them into jack-o’-lanterns or other decorative shapes.
Troubleshooting Tips: When Things Go Wrong (and How to Fix Them!)
Even with the best planning, things can sometimes go wrong. Here are a few common problems and how to troubleshoot them:
* **Poor Germination:** If your seeds aren’t germinating, make sure they are fresh and that you are providing them with adequate warmth and moisture. You can also try scarifying the seeds by gently rubbing them with sandpaper before planting.
* **Yellowing Leaves:** Yellowing leaves can be a sign of overwatering,
Conclusion
So, there you have it! This simple, yet incredibly effective, DIY indoor gourd growing bag hack is a game-changer for anyone dreaming of cultivating these autumnal beauties within the comfort of their own home. Forget wrestling with cumbersome pots and struggling to provide adequate drainage. This method streamlines the entire process, offering a lightweight, breathable, and cost-effective solution that will have your gourds thriving.
Why is this a must-try? Because it addresses the core challenges of indoor gourd growing: space constraints, proper aeration, and efficient drainage. The bag’s breathable fabric allows for optimal air circulation around the roots, preventing root rot and promoting healthy growth. The integrated drainage system ensures that excess water is easily expelled, eliminating the risk of waterlogging. And let’s not forget the portability factor! Easily move your gourds to chase the sunlight or protect them from drafts.
But the beauty of this DIY project lies in its adaptability. Feel free to experiment with different types of fabric for your growing bag. Burlap offers a rustic aesthetic, while a heavy-duty landscape fabric provides exceptional durability. You can also customize the size of the bag to accommodate different gourd varieties. For smaller gourds, a smaller bag will suffice, while larger varieties will require a more substantial container.
Consider adding a layer of mulch to the top of the soil in your growing bag. This will help retain moisture, suppress weeds, and regulate soil temperature. You can use organic materials like straw, wood chips, or shredded leaves.
Another variation to explore is the addition of a trellis system. As your gourds grow, they will need support to prevent the vines from sprawling uncontrollably. A simple bamboo trellis or a wire mesh frame can provide the necessary structure.
Don’t be afraid to get creative with your gourd selection! Experiment with different shapes, sizes, and colors. From the classic orange pumpkins to the whimsical swan gourds, the possibilities are endless. Growing your own gourds indoors allows you to cultivate unique and heirloom varieties that you won’t find at your local grocery store.
This indoor gourd growing bag hack isn’t just about growing gourds; it’s about connecting with nature, fostering creativity, and experiencing the satisfaction of nurturing life from seed to harvest. It’s a project that’s both rewarding and educational, perfect for individuals, families, and classrooms alike.
We wholeheartedly encourage you to give this DIY trick a try. It’s a simple, affordable, and effective way to bring the beauty of autumn indoors. And most importantly, we want to hear about your experience! Share your photos, tips, and stories with us in the comments section below. Let’s create a community of indoor gourd growers and inspire others to embark on this rewarding journey. What worked for you? What challenges did you face? Your insights will be invaluable to fellow gardeners. So, grab your supplies, get your hands dirty, and prepare to be amazed by the magic of indoor gourd growing!
Frequently Asked Questions (FAQ)
What type of soil should I use for my indoor gourd growing bag?
The ideal soil mix for your indoor gourd growing bag is a well-draining potting mix that is rich in organic matter. A combination of peat moss, perlite, and vermiculite will provide the necessary aeration and drainage, while compost or aged manure will supply essential nutrients. Avoid using garden soil, as it can be too heavy and compact, leading to poor drainage and root rot. Look for a potting mix specifically formulated for vegetables or fruits, as these blends typically contain a balanced nutrient profile. You can also amend your potting mix with slow-release fertilizer pellets to provide a steady supply of nutrients throughout the growing season.
How often should I water my gourds in the growing bag?
Watering frequency will depend on several factors, including the size of the bag, the type of soil, the temperature, and the humidity levels. As a general rule, water your gourds when the top inch of soil feels dry to the touch. Avoid overwatering, as this can lead to root rot. When you water, water thoroughly until excess water drains out of the bottom of the bag. Check the drainage regularly to ensure that the bag is not becoming waterlogged. During hot and dry weather, you may need to water more frequently. Conversely, during cool and cloudy weather, you may need to water less often. A moisture meter can be a helpful tool for monitoring soil moisture levels.
How much sunlight do indoor gourds need?
Gourds require at least six to eight hours of direct sunlight per day to thrive. If you don’t have a sunny window, you can supplement with grow lights. Position the grow lights about 6-12 inches above the plants and keep them on for 14-16 hours per day. Rotate your gourds regularly to ensure that all sides receive adequate sunlight. Insufficient sunlight can lead to leggy growth, weak stems, and poor fruit production. Consider using reflective materials, such as aluminum foil or white paint, to maximize the amount of light that reaches your plants.
What kind of fertilizer should I use for my indoor gourds?
Gourds are heavy feeders and require regular fertilization to support their growth and fruit production. Use a balanced fertilizer with an NPK ratio of 10-10-10 or 14-14-14. Apply the fertilizer according to the package directions, typically every two to three weeks. You can also use organic fertilizers, such as compost tea or fish emulsion. Avoid over-fertilizing, as this can burn the roots and damage the plants. During the flowering and fruiting stages, you may want to switch to a fertilizer that is higher in phosphorus and potassium to promote fruit development.
How do I prevent pests and diseases in my indoor gourd growing bag?
While indoor growing reduces the risk of pests and diseases, it’s still important to take preventative measures. Inspect your plants regularly for signs of infestation or disease. Common pests that can affect gourds include aphids, spider mites, and whiteflies. Treat infestations with insecticidal soap or neem oil. To prevent fungal diseases, ensure good air circulation around your plants and avoid overwatering. Remove any dead or diseased leaves promptly. You can also use a fungicide as a preventative measure.
Can I grow different types of gourds in the same growing bag?
While it’s technically possible to grow different types of gourds in the same growing bag, it’s generally not recommended. Different gourd varieties may have different growth habits, nutrient requirements, and susceptibility to pests and diseases. Growing them together can make it difficult to provide optimal conditions for each variety. If you do decide to grow multiple varieties in the same bag, choose varieties that have similar growth requirements and monitor them closely for any signs of problems.
How long does it take for gourds to mature in an indoor growing bag?
The time it takes for gourds to mature will vary depending on the variety, the growing conditions, and the climate. Generally, gourds take between 90 and 120 days to mature. You’ll know your gourds are ready to harvest when the stems start to dry out and turn brown. The skin of the gourd should also be hard and resistant to scratching.
What do I do with my gourds after I harvest them?
After harvesting your gourds, you’ll need to cure them before you can use them for decoration or crafting. Curing involves drying the gourds slowly to prevent them from rotting. To cure your gourds, wipe them clean with a damp cloth and place them in a well-ventilated area out of direct sunlight. Turn the gourds regularly to ensure even drying. The curing process can take several weeks or even months, depending on the size and thickness of the gourds. Once the gourds are completely dry, they will be lightweight and hard. You can then decorate them with paint, carvings, or other embellishments.
Leave a Comment