
Water Saving Celery Growing: Are you dreaming of crisp, crunchy celery straight from your garden but dreading the thought of sky-high water bills? I get it! We all want a thriving garden without feeling guilty about our water usage. Celery, while delicious and nutritious, can be a bit of a water hog, which is why I’m so excited to share these incredible water-saving tricks and DIY hacks with you!
Celery has a fascinating history, dating back to ancient times where it was used medicinally before becoming a culinary staple. From the Mediterranean to our modern-day gardens, celery has always been valued, but now, more than ever, we need to find sustainable ways to cultivate it.
In today’s world, water conservation is paramount. With increasing droughts and a growing awareness of our environmental impact, finding ways to reduce water consumption in our gardens is crucial. These DIY tricks for water saving celery growing aren’t just about saving money; they’re about contributing to a healthier planet. Imagine enjoying fresh, homegrown celery knowing you’re doing your part to conserve precious resources. Let’s dive in and discover how you can have your celery and save water too!
DIY Water-Saving Celery Growing: A Self-Watering Container Project
Hey there, fellow gardening enthusiasts! I’m super excited to share a project that’s close to my heart: growing celery in a self-watering container. Not only is it a fantastic way to enjoy fresh, crunchy celery right from your backyard (or balcony!), but it’s also incredibly water-wise. We all know how important it is to conserve water, especially when gardening, and this method helps you do just that. So, let’s dive into building our very own water-saving celery haven!
What You’ll Need
Before we get started, let’s gather all the necessary materials. This will make the whole process smoother and more enjoyable.
* **Two Plastic Containers:** One larger (about 15-20 gallons) and one smaller (about 5-10 gallons) that can fit inside the larger one. Make sure they are food-grade plastic if possible. Buckets, storage totes, or even repurposed containers work great!
* **Drill with Various Drill Bits:** We’ll need this to create drainage and overflow holes.
* **PVC Pipe (about 12-18 inches long):** This will act as our watering tube. The diameter should be around 1-2 inches.
* **PVC End Cap:** To close off the bottom of the PVC pipe.
* **Landscape Fabric or Burlap:** To prevent soil from clogging the drainage holes.
* **Potting Mix:** A good quality potting mix is essential for healthy celery growth.
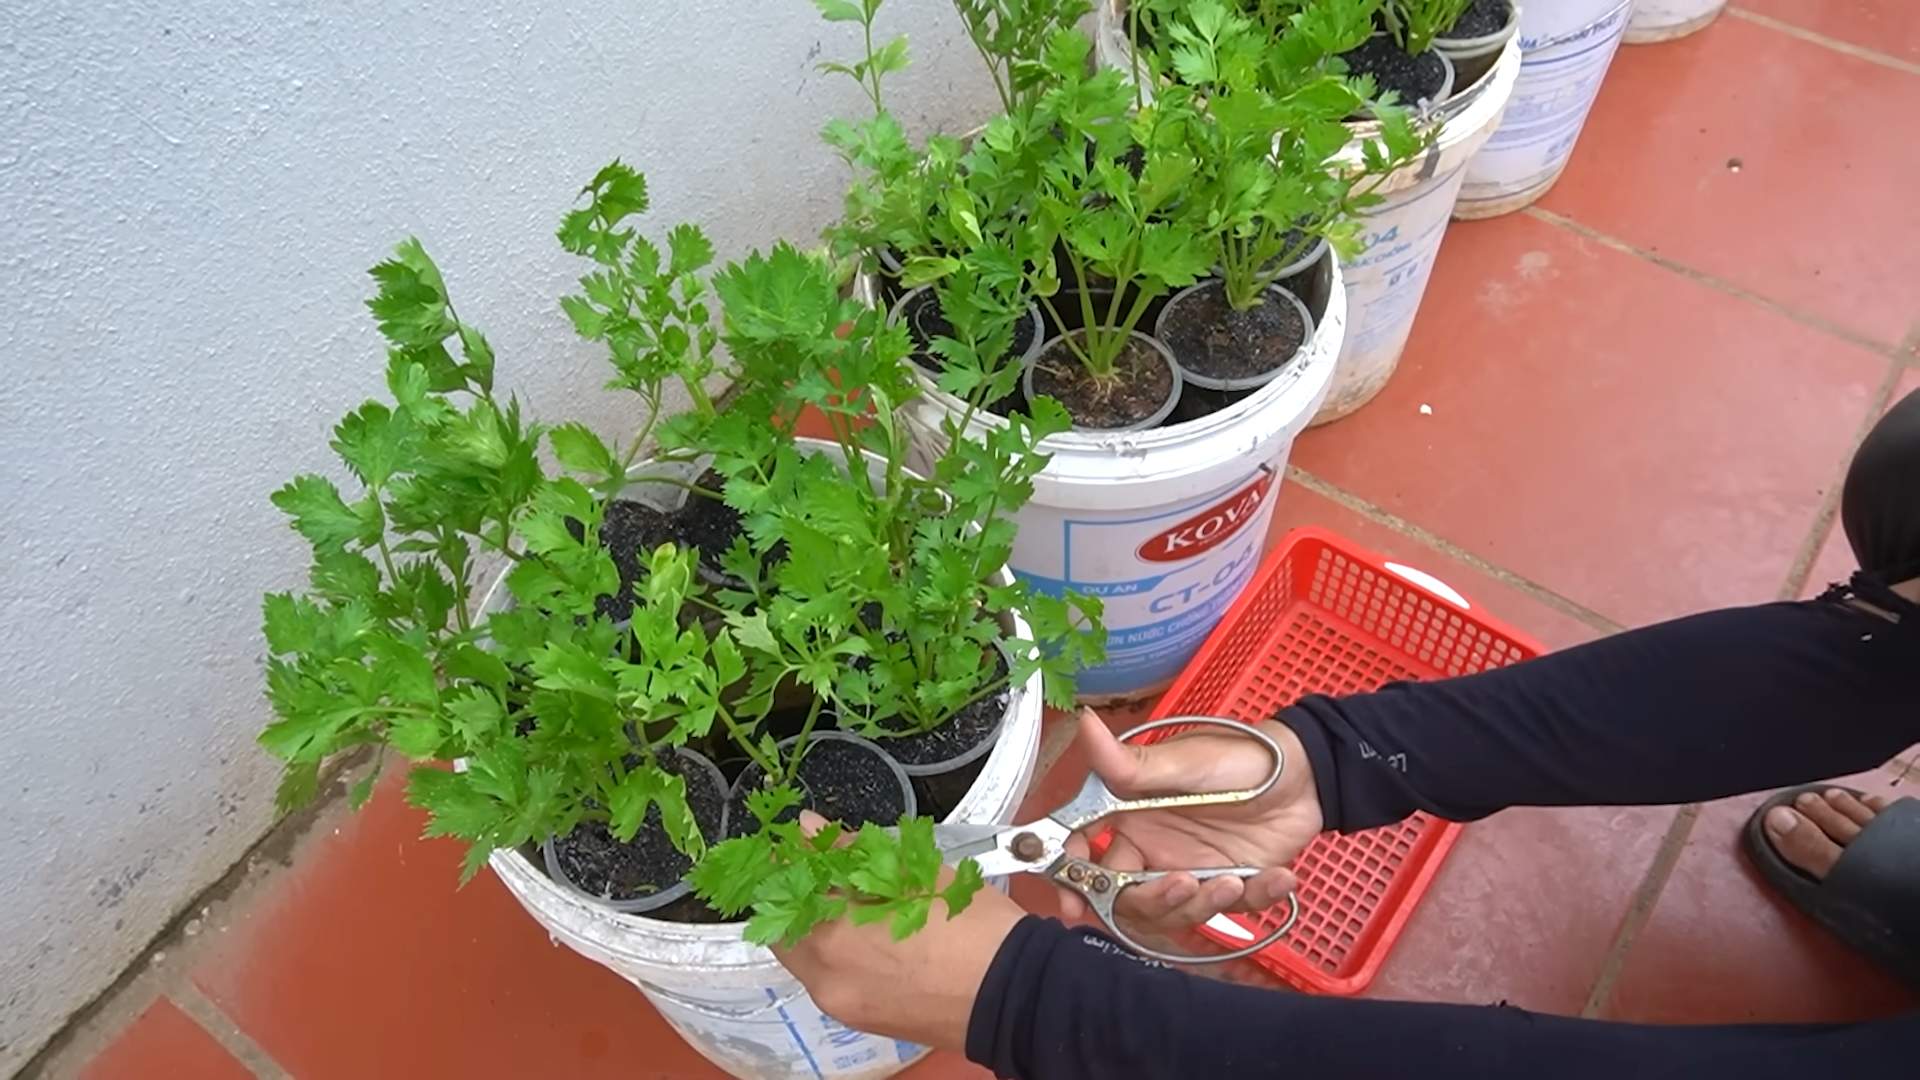
* **Celery Seedlings:** You can start your own from seed (which takes a bit longer) or purchase seedlings from a local nursery.
* **Water:** Of course!
* **Measuring Tape or Ruler:** For accurate hole placement.
* **Gloves:** To protect your hands.
* **Optional: Mulch:** To help retain moisture and suppress weeds.
* **Optional: Fertilizer:** A slow-release fertilizer can give your celery a boost.
Building the Self-Watering Container
This is where the fun begins! We’re going to transform these containers into a self-watering system that will keep your celery happy and hydrated.
1. **Prepare the Outer Container (Reservoir):**
* First, take your larger container. This will be our water reservoir.
* Using your drill, create an overflow hole about 2-3 inches from the bottom of the container. This will prevent overwatering and ensure your celery roots don’t sit in soggy soil. I usually use a 1/2 inch drill bit for this.
* Next, drill a few small drainage holes (about 1/4 inch) at the very bottom of the container. These are backup drainage in case the overflow hole gets clogged.
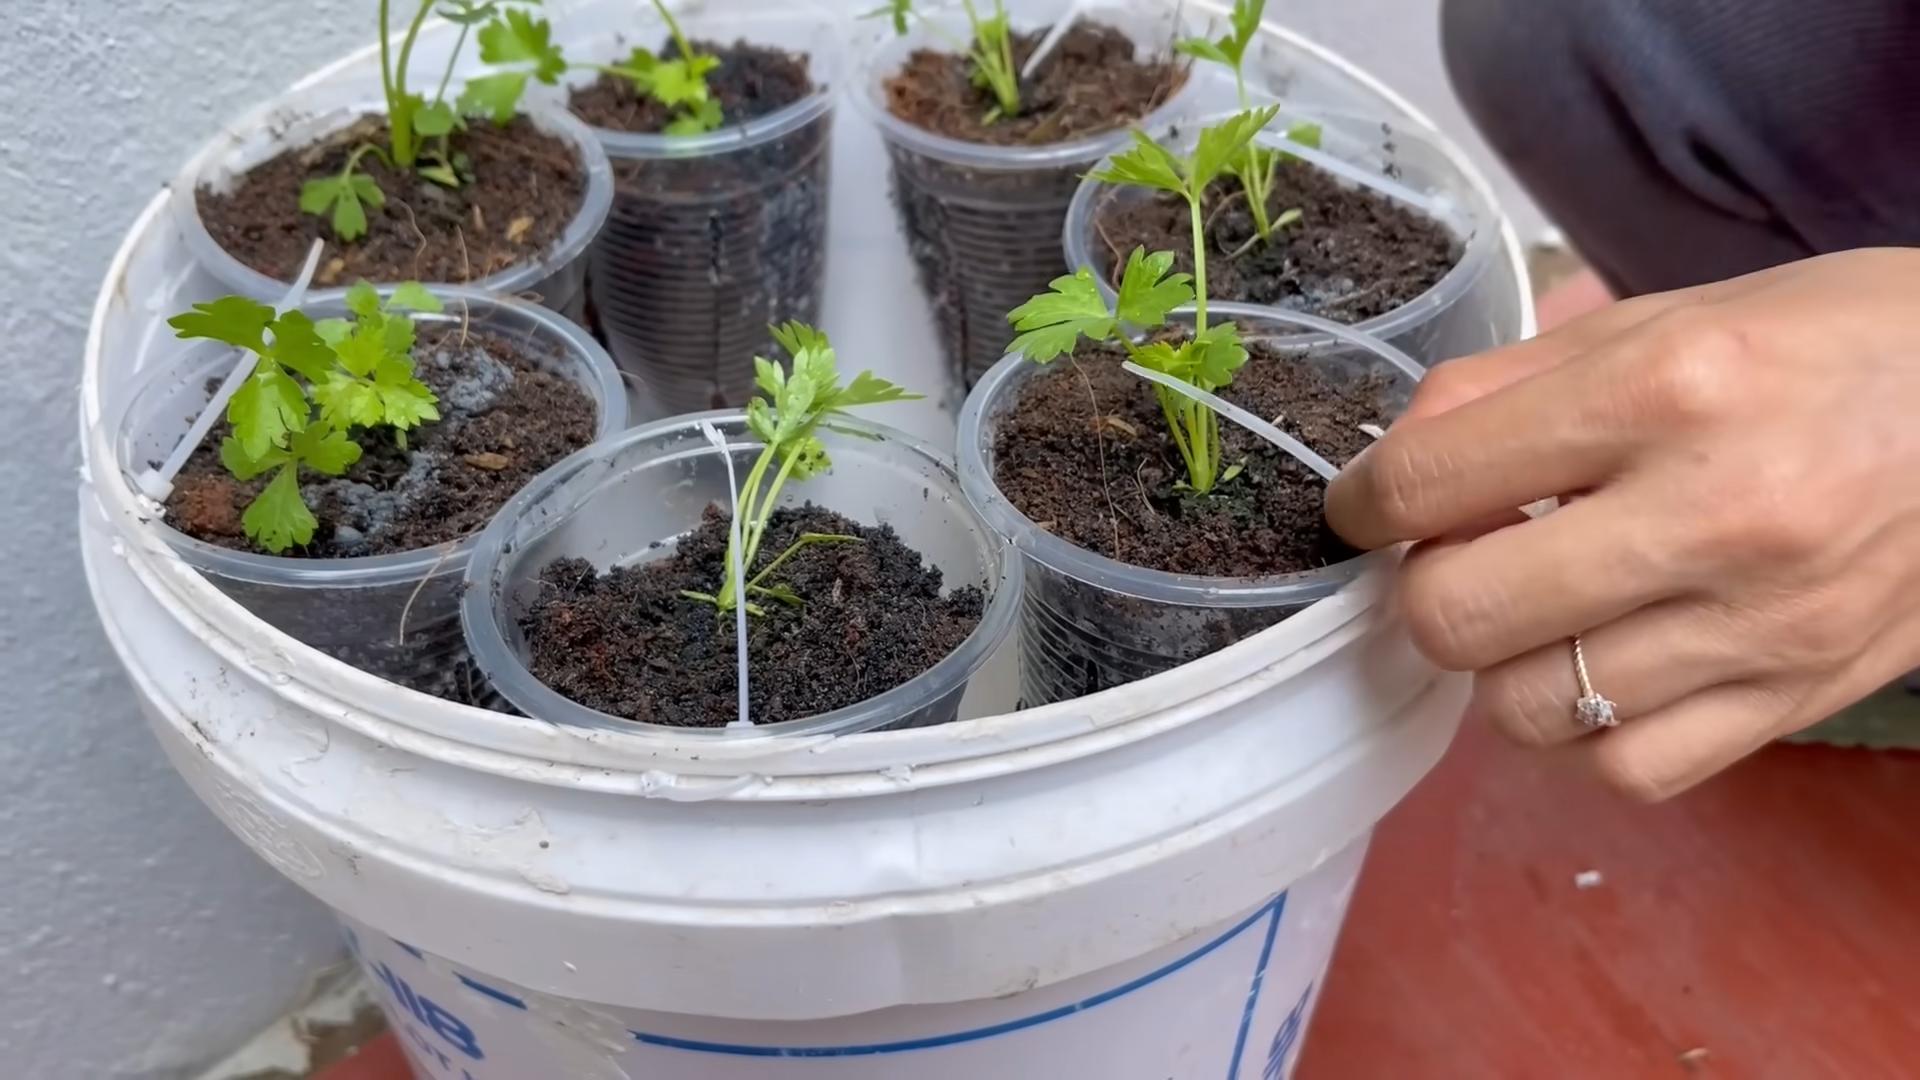
2. **Prepare the Inner Container (Planting Container):**
* Now, grab your smaller container. This is where your celery will actually grow.
* Drill plenty of drainage holes (about 1/4 inch) all over the bottom of the container. The more, the better! This allows water to wick up from the reservoir.
* Line the bottom of the inner container with landscape fabric or burlap. This will prevent the potting mix from falling through the drainage holes and clogging the reservoir. Cut the fabric slightly larger than the bottom of the container and press it down.
3. **Prepare the Watering Tube:**
* Take your PVC pipe and attach the end cap to one end. This will prevent soil from entering the pipe and clogging it.
* Drill several small holes (about 1/4 inch) along the bottom half of the PVC pipe. These holes will allow water to seep out into the potting mix.
4. **Assemble the Self-Watering Container:**
* Place the inner container inside the outer container. You might need to add some bricks or rocks to the bottom of the outer container to raise the inner container and create a sufficient water reservoir. You want about 4-6 inches of space between the bottom of the inner container and the bottom of the outer container.
* Position the PVC pipe vertically in the center of the inner container. This will be our watering tube.
5. **Add Potting Mix:**
* Fill the inner container with your potting mix, leaving a few inches of space at the top.
* If you’re using a slow-release fertilizer, mix it into the potting mix according to the package directions.
Planting Your Celery
Now that our self-watering container is ready, it’s time to plant our celery seedlings!
1. **Prepare the Seedlings:**
* Gently remove the celery seedlings from their containers.
* Loosen the roots slightly to encourage them to spread out.
2. **Plant the Seedlings:**
* Dig small holes in the potting mix, spacing them about 6-8 inches apart.
* Place the celery seedlings in the holes and gently backfill with potting mix.
* Water the seedlings thoroughly to help them settle in.
3. **Add Mulch (Optional):**
* Apply a layer of mulch around the base of the celery plants. This will help retain moisture, suppress weeds, and regulate soil temperature.
Caring for Your Celery
With a little care and attention, your celery will thrive in its self-watering container.
1. **Watering:**
* Pour water into the PVC pipe until the reservoir is full. You’ll know it’s full when water starts to come out of the overflow hole.
* Check the water level in the reservoir regularly, especially during hot weather. Refill as needed.
* The beauty of this system is that the celery will draw water up from the reservoir as needed, so you don’t have to worry about overwatering.
2. **Sunlight:**
* Celery needs at least 6 hours of sunlight per day. Place your container in a sunny location.
* If you live in a very hot climate, provide some afternoon shade to prevent the celery from bolting (going to seed).
3. **Fertilizing:**
* If you didn’t use a slow-release fertilizer, you can fertilize your celery every few weeks with a balanced liquid fertilizer. Follow the package directions.
4. **Pest Control:**
* Keep an eye out for pests like aphids and slugs.
* Handpick pests off the plants or use an organic pest control spray if necessary.
5. **Harvesting:**
* You can start harvesting celery stalks when they are about 8-10 inches long.
* Cut the outer stalks near the base of the plant, leaving the inner stalks to continue growing.
Troubleshooting
Even with the best planning, sometimes things don’t go exactly as expected. Here are a few common issues you might encounter and how to address them:
* **Celery is Bolting (Going to Seed):** This is often caused by heat stress. Make sure your celery is getting enough shade during the hottest part of the day.
* **Yellowing Leaves:** This could be a sign of nutrient deficiency. Try fertilizing with a balanced liquid fertilizer. It could also be a sign of overwatering, so check the moisture level in the reservoir.
* **Slow Growth:** This could be due to insufficient sunlight or poor soil. Make sure your celery is getting at least 6 hours of sunlight per day and that you’re using a good quality potting mix.
* **Pests:** Regularly inspect your plants for pests and take action promptly.
Why This Method is Water-Saving
The beauty of this self-watering container is that it minimizes water waste in several ways:
* **Reduced Evaporation:** The water reservoir is enclosed, which reduces evaporation compared to traditional watering methods.
* **Targeted Watering:** The water is delivered directly to the roots of the celery plants, minimizing runoff and waste.
* **Less Frequent Watering:** Because the reservoir holds a significant amount of water, you don’t have to water as frequently.
* **Water Conservation:** By using a self-watering container, you’re contributing to water conservation efforts, which is especially important in areas with limited water resources.
Additional Tips and Tricks
* **Choose the Right Celery Variety:** Some celery varieties are better suited for container gardening than others. Look for compact varieties that don’t require as much space.
* **Start with Healthy Seedlings:** Starting with healthy, vigorous seedlings will give your celery a head start.
* **Rotate Your Crops:** Avoid planting celery in the same container year after year. This can help prevent soilborne diseases.
* **Companion Planting:** Consider planting companion plants like onions, garlic, or marigolds near your celery. These plants can help deter pests and improve the overall health of your garden.
* Don’t be afraid to experiment! Gardening is all about learning and adapting. Try different potting mixes, fertilizers, and watering schedules to see what works best for your celery.
I hope you found this guide helpful! Growing celery in
Conclusion
So, there you have it! This water-saving celery growing method isn’t just a clever gardening hack; it’s a game-changer for anyone looking to enjoy fresh, homegrown celery without the guilt of excessive water usage. We’ve walked you through the simple steps, highlighting how easy it is to transform celery scraps into thriving plants, all while significantly reducing your water consumption.
Think about it: store-bought celery often travels long distances, contributing to carbon emissions and requiring significant resources for cultivation. By embracing this DIY approach, you’re not only getting fresher, tastier celery, but you’re also actively participating in a more sustainable food system. You’re reducing your environmental footprint, saving money on groceries, and gaining the satisfaction of growing your own food. It’s a win-win-win!
But the benefits don’t stop there. This method is incredibly adaptable. Feel free to experiment with different types of containers. While we’ve suggested using recycled plastic bottles, you could also try repurposed milk cartons, yogurt containers, or even old buckets. Just ensure they have adequate drainage to prevent waterlogging.
Consider also experimenting with different soil mixes. While a standard potting mix works well, you could incorporate compost or other organic matter to further enrich the soil and provide your celery with extra nutrients. You can also try different varieties of celery. Some varieties are more compact and better suited for container gardening than others.
And don’t forget about companion planting! Celery thrives alongside certain herbs and vegetables, such as onions, garlic, and tomatoes. Planting these companions together can help deter pests and improve the overall health of your garden.
The key takeaway here is that this water-saving celery growing technique is not a rigid formula, but rather a flexible framework that you can adapt to your specific needs and preferences. It’s all about experimentation and finding what works best for you and your local climate.
We truly believe that this method is a must-try for any gardener, whether you’re a seasoned pro or a complete beginner. It’s easy, affordable, and incredibly rewarding. Imagine the satisfaction of harvesting your own crisp, flavorful celery, knowing that you’ve done so in a way that’s both environmentally responsible and economically sound.
So, what are you waiting for? Gather your celery scraps, grab a container, and get started! We’re confident that you’ll be amazed at how easy it is to grow your own celery using this water-saving method.
We’re eager to hear about your experiences! Share your photos, tips, and tricks in the comments below. Let’s create a community of water-conscious gardeners who are passionate about growing their own food sustainably. Your insights could inspire others to embrace this simple yet powerful technique and make a positive impact on the environment. Let us know how your water-saving celery growing journey goes!
Frequently Asked Questions (FAQ)
What kind of celery works best for this method?
Any type of celery you buy from the grocery store will work. The key is to choose a bunch that has a healthy-looking base with visible roots. The fresher the base, the better the chances of successful regrowth. Organic celery is often a good choice, as it’s less likely to have been treated with chemicals that could inhibit growth. However, conventional celery will also work just fine. Just make sure the base is firm and not mushy or discolored.
How much sunlight does the celery need?
Celery thrives in partial to full sunlight, requiring at least 6 hours of direct sunlight per day. However, in hotter climates, it’s best to provide some afternoon shade to prevent the leaves from scorching. If you’re growing your celery indoors, place it near a sunny window or use a grow light to supplement natural light. Insufficient sunlight can lead to leggy growth and reduced yields. Observe your plants closely and adjust their position as needed to ensure they’re getting enough light.
How often should I water the celery after it’s planted in soil?
While this method is designed to save water, celery still needs consistent moisture to thrive. Water deeply whenever the top inch of soil feels dry to the touch. Avoid overwatering, as this can lead to root rot. The frequency of watering will depend on factors such as the climate, the type of soil, and the size of the container. Check the soil moisture regularly and adjust your watering schedule accordingly. A good rule of thumb is to water thoroughly until water drains out of the bottom of the container.
How long does it take to grow celery from a base?
It typically takes around 80-100 days to grow a full-sized celery stalk from a base. However, you can start harvesting individual stalks as soon as they reach a usable size. The initial regrowth of the base in water usually takes about a week or two. Once planted in soil, the celery will gradually develop new leaves and stalks. Be patient and provide the plants with proper care, and you’ll be rewarded with a bountiful harvest.
What kind of soil is best for growing celery?
Celery prefers a rich, well-draining soil that is high in organic matter. A good potting mix amended with compost or other organic materials is ideal. The soil should be able to retain moisture without becoming waterlogged. Avoid heavy clay soils, as they can impede drainage and lead to root rot. You can also add perlite or vermiculite to the soil to improve drainage and aeration. A slightly acidic to neutral soil pH (around 6.0 to 7.0) is optimal for celery growth.
Can I grow celery indoors using this method?
Yes, you can absolutely grow celery indoors using this water-saving method. In fact, it’s a great way to enjoy fresh celery year-round, especially if you live in a climate with harsh winters. Just make sure to provide your indoor celery plants with adequate sunlight or a grow light. Also, be mindful of the temperature and humidity levels. Celery prefers temperatures between 60°F and 70°F and moderate humidity. You may need to mist the plants regularly to increase humidity, especially during dry winter months.
What are some common pests and diseases that affect celery, and how can I prevent them?
Celery can be susceptible to certain pests and diseases, such as aphids, celery leaf tiers, and fungal diseases like early blight and late blight. To prevent these problems, practice good garden hygiene. Remove any dead or diseased leaves promptly. Ensure good air circulation around the plants to prevent fungal diseases. You can also use organic pest control methods, such as insecticidal soap or neem oil, to control aphids and other pests. Crop rotation can also help prevent soilborne diseases. Regularly inspect your plants for any signs of pests or diseases and take action promptly to prevent them from spreading.
Can I use fertilizer to help my celery grow?
Yes, fertilizing your celery can help promote healthy growth and increase yields. Use a balanced fertilizer that is specifically formulated for vegetables. You can also use organic fertilizers, such as compost tea or fish emulsion. Apply the fertilizer according to the package instructions. Avoid over-fertilizing, as this can lead to excessive foliage growth and reduced stalk development. A side dressing of compost or well-rotted manure can also provide a slow-release source of nutrients for your celery plants.
How do I know when my celery is ready to harvest?
Celery is ready to harvest when the stalks are at least 6-8 inches long and have reached a desirable thickness. The stalks should be firm and crisp, not limp or wilted. You can harvest individual stalks as needed, or you can harvest the entire plant at once. To harvest, simply cut the stalks at the base of the plant with a sharp knife. After harvesting, store the celery in the refrigerator to keep it fresh.
What if my celery base doesn’t sprout roots in water?
Sometimes, despite your best efforts, a celery base may not sprout roots in water. This could be due to several factors, such as the age of the celery, the presence of chemicals, or unfavorable environmental conditions. If your celery base doesn’t show any signs of root growth after a week or two, it’s likely not viable. Don’t be discouraged! Simply try again with a fresh celery base. You can also try soaking the base in water for a few hours before placing it in the container to help rehydrate it.


Leave a Comment