
Grow Romanesco Cauliflower, and unlock the secrets to cultivating this stunning fractal vegetable right in your own backyard! Have you ever seen a Romanesco cauliflower at the farmer’s market and been completely mesmerized by its intricate, almost alien-like beauty? I know I have! It’s not just a pretty face; this unique vegetable boasts a delicious, nutty flavor that elevates any dish.
While its exact origins are somewhat shrouded in mystery, Romanesco cauliflower is believed to have originated in Italy, specifically near Rome, sometime in the 16th century. Its distinctive geometric pattern, a natural example of a Fibonacci sequence, has captivated mathematicians and artists for centuries. But don’t let its sophisticated appearance intimidate you!
Many people shy away from attempting to grow Romanesco Cauliflower, assuming it’s too difficult. But with the right knowledge and a few simple DIY tricks, you can successfully cultivate this extraordinary vegetable at home. Imagine the satisfaction of harvesting your own Romanesco, knowing you nurtured it from seed to table. This guide will provide you with easy-to-follow instructions and helpful hacks to ensure a bountiful harvest. So, let’s get our hands dirty and embark on this exciting gardening adventure together!
Growing Romanesco Cauliflower: A DIY Guide to This Stunning Vegetable
Okay, let’s dive into the fascinating world of Romanesco cauliflower! This vegetable isn’t just delicious; it’s a mathematical marvel, showcasing the beauty of fractals in nature. I’m going to walk you through everything you need to know to successfully grow your own Romanesco, from seed to harvest. It might seem a little intimidating at first, but trust me, with a little patience and the right guidance, you’ll be enjoying your own homegrown Romanesco in no time!
Understanding Romanesco Cauliflower
Before we get our hands dirty, let’s understand what we’re dealing with. Romanesco cauliflower, sometimes called Romanesco broccoli, is a vibrant green vegetable with a unique, spiraling, fractal pattern. It’s a member of the Brassica family, related to broccoli, cauliflower, cabbage, and kale. It has a slightly nutty, mild flavor, making it a versatile addition to your kitchen.
Key Considerations:
* Climate: Romanesco thrives in cool weather, similar to other Brassicas.
* Soil: Well-draining, fertile soil is crucial.
* Sunlight: Requires at least 6 hours of sunlight per day.
* Timing: Proper timing is essential for successful growth.
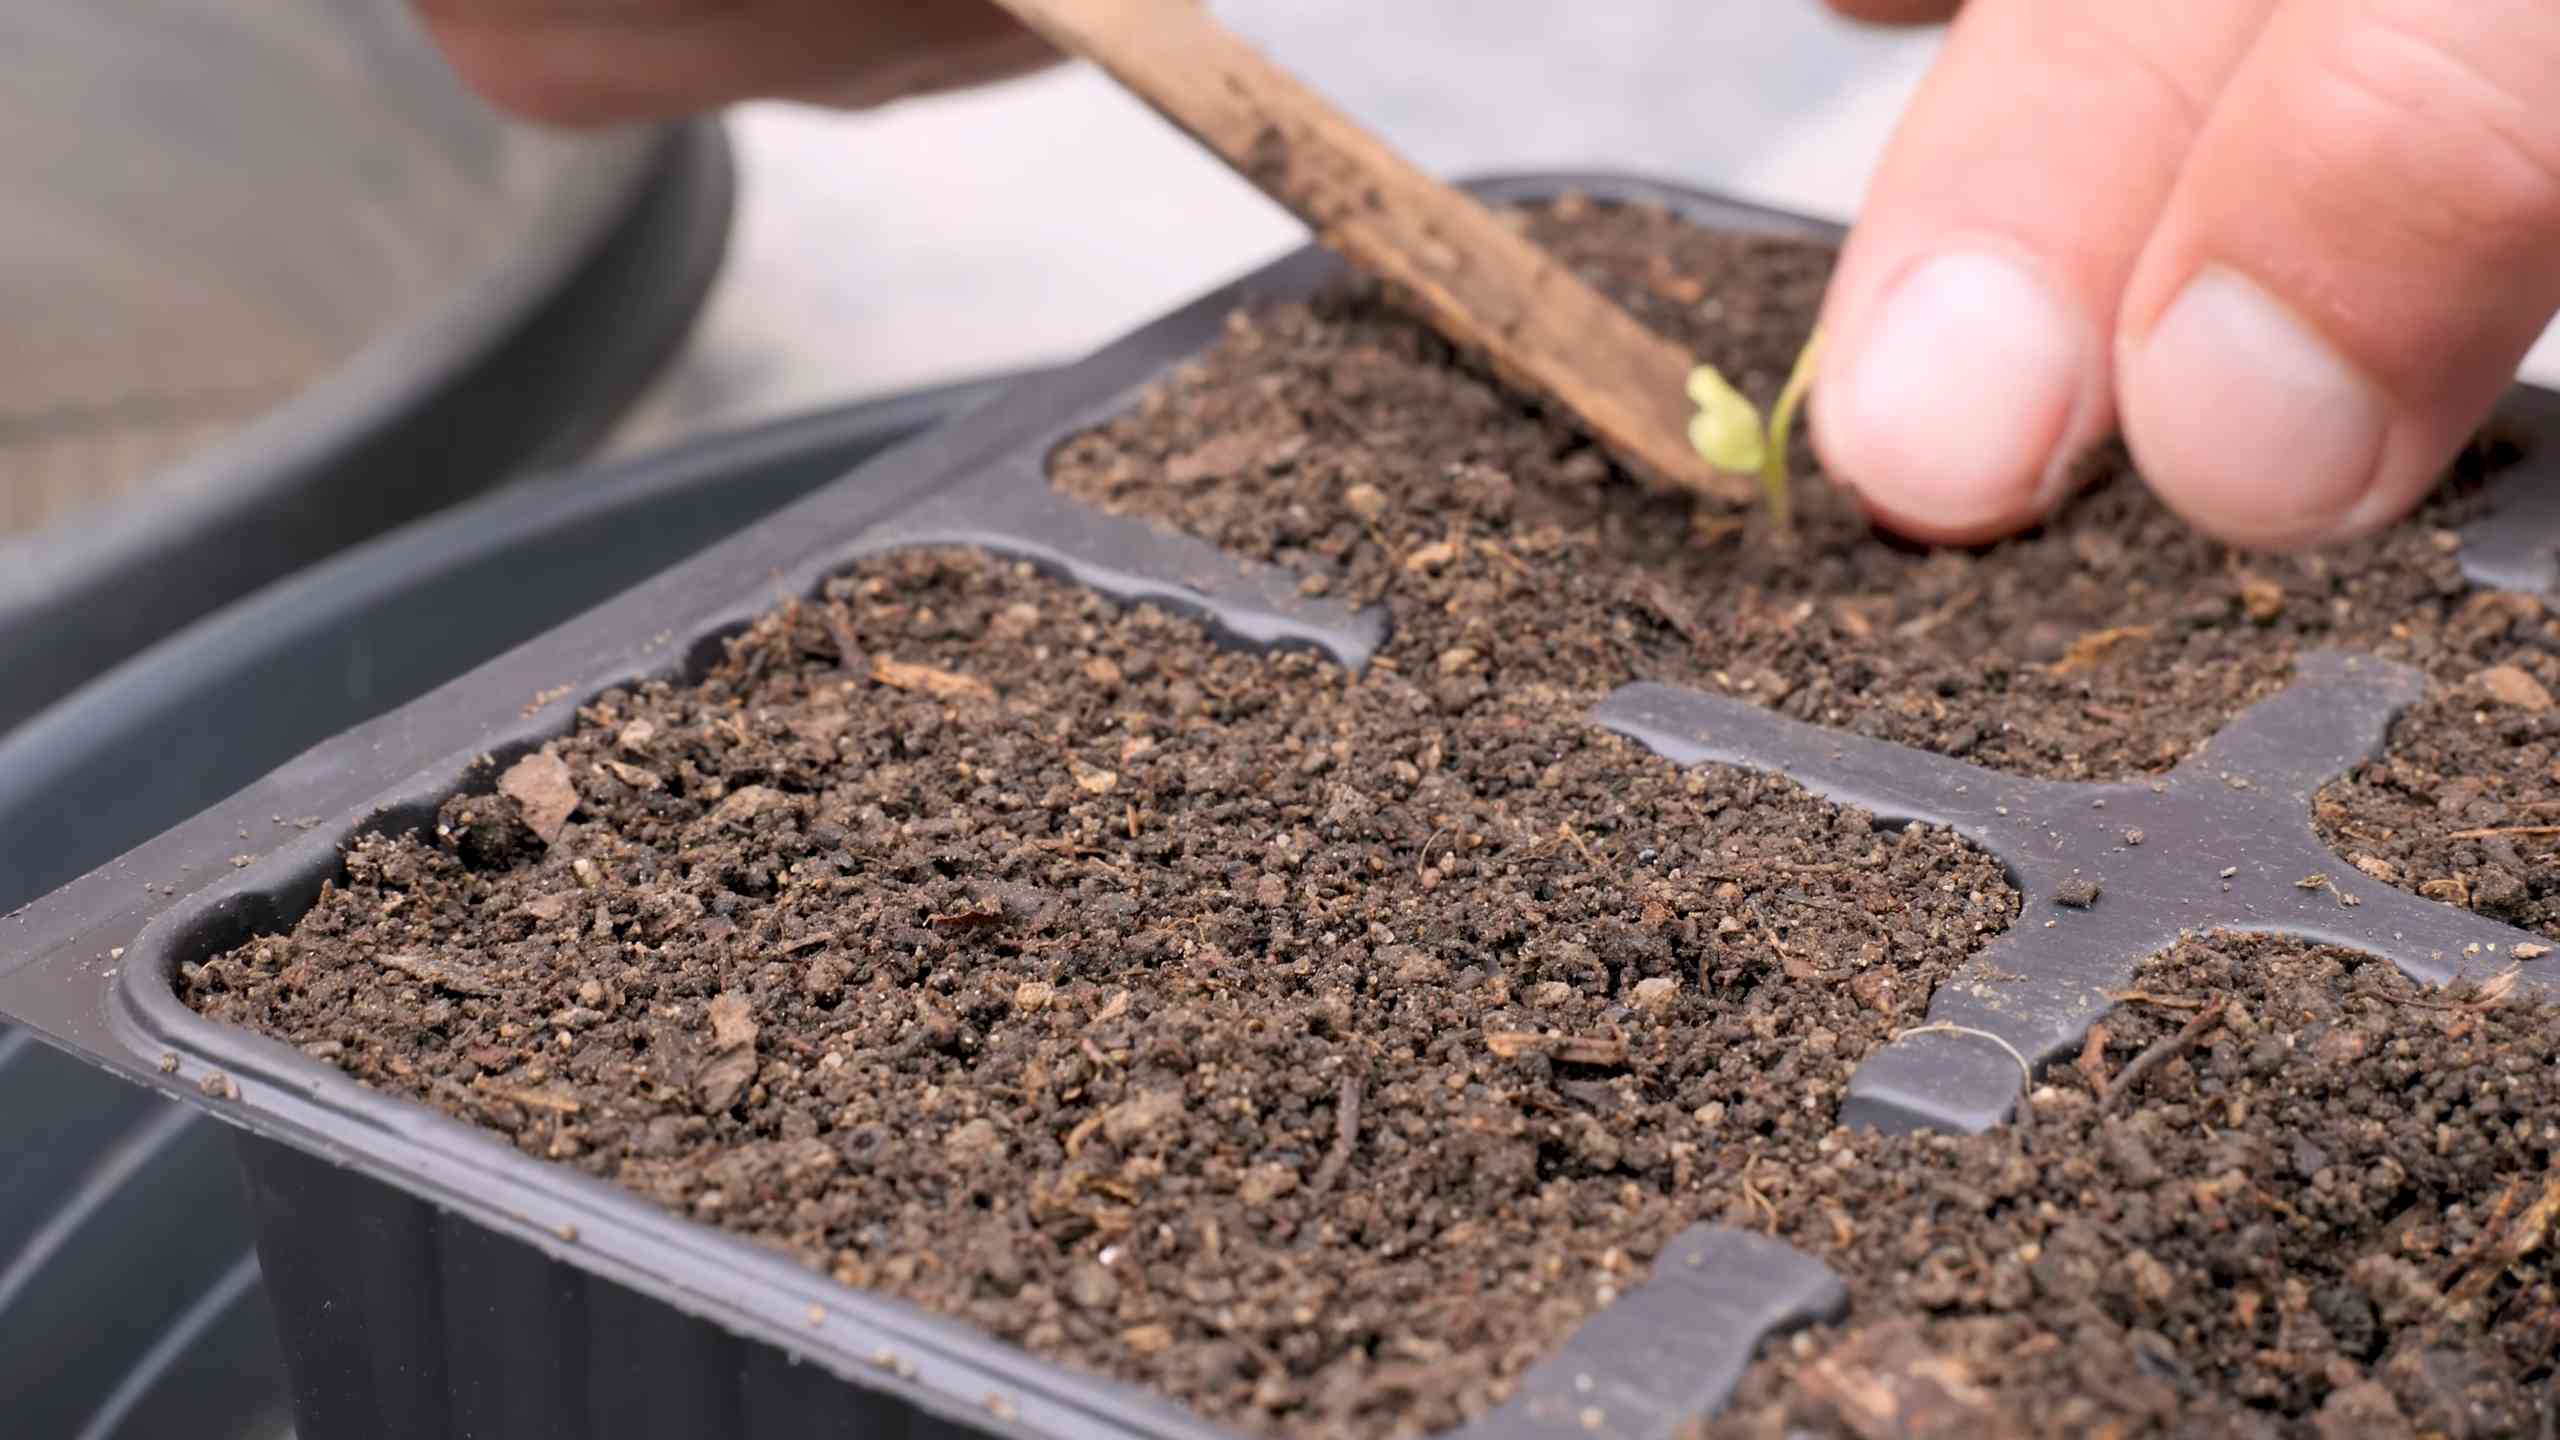
Phase 1: Starting Your Romanesco Seeds
Starting your Romanesco from seed gives you the most control over the process. I prefer this method because I can ensure the seedlings are healthy and strong before transplanting them into the garden.
Materials You’ll Need:
* Romanesco cauliflower seeds
* Seed starting trays or small pots
* Seed starting mix
* Watering can or spray bottle
* Heat mat (optional, but helpful)
* Grow lights (optional, but recommended)
Step-by-Step Instructions:
1. Prepare Your Seed Starting Trays: Fill your seed starting trays or small pots with seed starting mix. Gently press down the soil to remove any air pockets.
2. Sow the Seeds: Make a small indentation (about ¼ inch deep) in the center of each cell or pot. Place one or two Romanesco seeds in each indentation. Cover the seeds with a thin layer of seed starting mix.
3. Water Gently: Use a watering can or spray bottle to gently moisten the soil. Be careful not to overwater, as this can lead to damping off (a fungal disease that can kill seedlings).
4. Provide Warmth: Place the seed starting trays on a heat mat (if using) to maintain a soil temperature of around 70-75°F (21-24°C). This will help the seeds germinate faster.
5. Provide Light: If you don’t have a sunny windowsill, use grow lights to provide the seedlings with 14-16 hours of light per day. Position the grow lights a few inches above the seedlings.
6. Monitor and Water: Keep the soil consistently moist, but not soggy. Check the soil moisture daily and water as needed.
7. Thin Seedlings (If Necessary): Once the seedlings have emerged and have a couple of true leaves (the second set of leaves), thin them to one seedling per cell or pot. Choose the strongest, healthiest seedling and snip off the others at the soil line.
Phase 2: Preparing Your Garden Bed
While your seedlings are growing indoors, it’s time to prepare your garden bed. Romanesco needs a sunny spot with well-draining, fertile soil.
Materials You’ll Need:
* Garden fork or tiller
* Compost or well-rotted manure
* Balanced fertilizer (e.g., 10-10-10)
* pH testing kit (optional, but recommended)
Step-by-Step Instructions:
1. Choose a Sunny Location: Select a spot in your garden that receives at least 6 hours of sunlight per day.
2. Test Your Soil (Optional): Use a pH testing kit to check the pH of your soil. Romanesco prefers a slightly acidic to neutral pH of 6.0-7.0. Amend the soil as needed to adjust the pH.
3. Prepare the Soil: Use a garden fork or tiller to loosen the soil to a depth of at least 12 inches. Remove any rocks, weeds, or debris.
4. Amend the Soil: Incorporate a generous amount of compost or well-rotted manure into the soil. This will improve drainage, fertility, and water retention. I usually add about 2-3 inches of compost.
5. Add Fertilizer: Apply a balanced fertilizer (e.g., 10-10-10) according to the package directions. This will provide the plants with the nutrients they need to grow strong and healthy.
6. Create Planting Holes: Dig planting holes that are slightly larger than the root balls of your seedlings. Space the holes about 18-24 inches apart.
Phase 3: Transplanting Your Romanesco Seedlings
Once your seedlings have developed several sets of true leaves and the weather has cooled down (ideally, daytime temperatures are consistently below 75°F (24°C)), it’s time to transplant them into the garden.
Step-by-Step Instructions:
1. Harden Off Seedlings: Before transplanting, you need to “harden off” your seedlings. This means gradually exposing them to outdoor conditions over a period of 7-10 days. Start by placing them outside in a sheltered location for a few hours each day, gradually increasing the amount of time they spend outdoors.
2. Water Seedlings: Water your seedlings thoroughly before transplanting. This will help them adjust to their new environment.
3. Carefully Remove Seedlings: Gently remove the seedlings from their seed starting trays or pots. Be careful not to damage the roots.
4. Plant Seedlings: Place each seedling in a planting hole and backfill with soil. Gently firm the soil around the base of the plant.
5. Water Thoroughly: Water the transplanted seedlings thoroughly.
6. Mulch (Optional): Apply a layer of mulch around the plants to help retain moisture, suppress weeds, and regulate soil temperature. I like to use straw or wood chips.
Phase 4: Caring for Your Romanesco Plants
Now that your Romanesco plants are in the ground, it’s important to provide them with the care they need to thrive.
Key Care Tips:
* Watering: Water regularly, especially during dry periods. Aim to keep the soil consistently moist, but not soggy.
* Fertilizing: Side-dress the plants with a balanced fertilizer every 4-6 weeks.
* Weeding: Keep the garden bed free of weeds, which can compete with the plants for nutrients and water.
* Pest Control: Monitor the plants regularly for pests, such as cabbage worms, aphids, and flea beetles. Take action to control pests as needed. I prefer using organic methods, such as insecticidal soap or neem oil.
* Row Covers (Optional): Use row covers to protect the plants from pests and frost.
Common Pests and Diseases:
* Cabbage Worms: These green caterpillars can devour the leaves of your Romanesco plants. Handpick them off the plants or use Bacillus thuringiensis (Bt), a natural insecticide.
* Aphids: These small, sap-sucking insects can weaken the plants. Spray them off with a strong stream of water or use insecticidal soap.
* Flea Beetles: These tiny beetles can create small holes in the leaves. Use row covers to prevent them from reaching the plants or apply diatomaceous earth to the soil.
* Clubroot: This fungal disease can cause the roots to swell and distort, stunting the growth of the plants. Prevent clubroot by practicing crop rotation and maintaining a soil pH of 7.0 or higher.
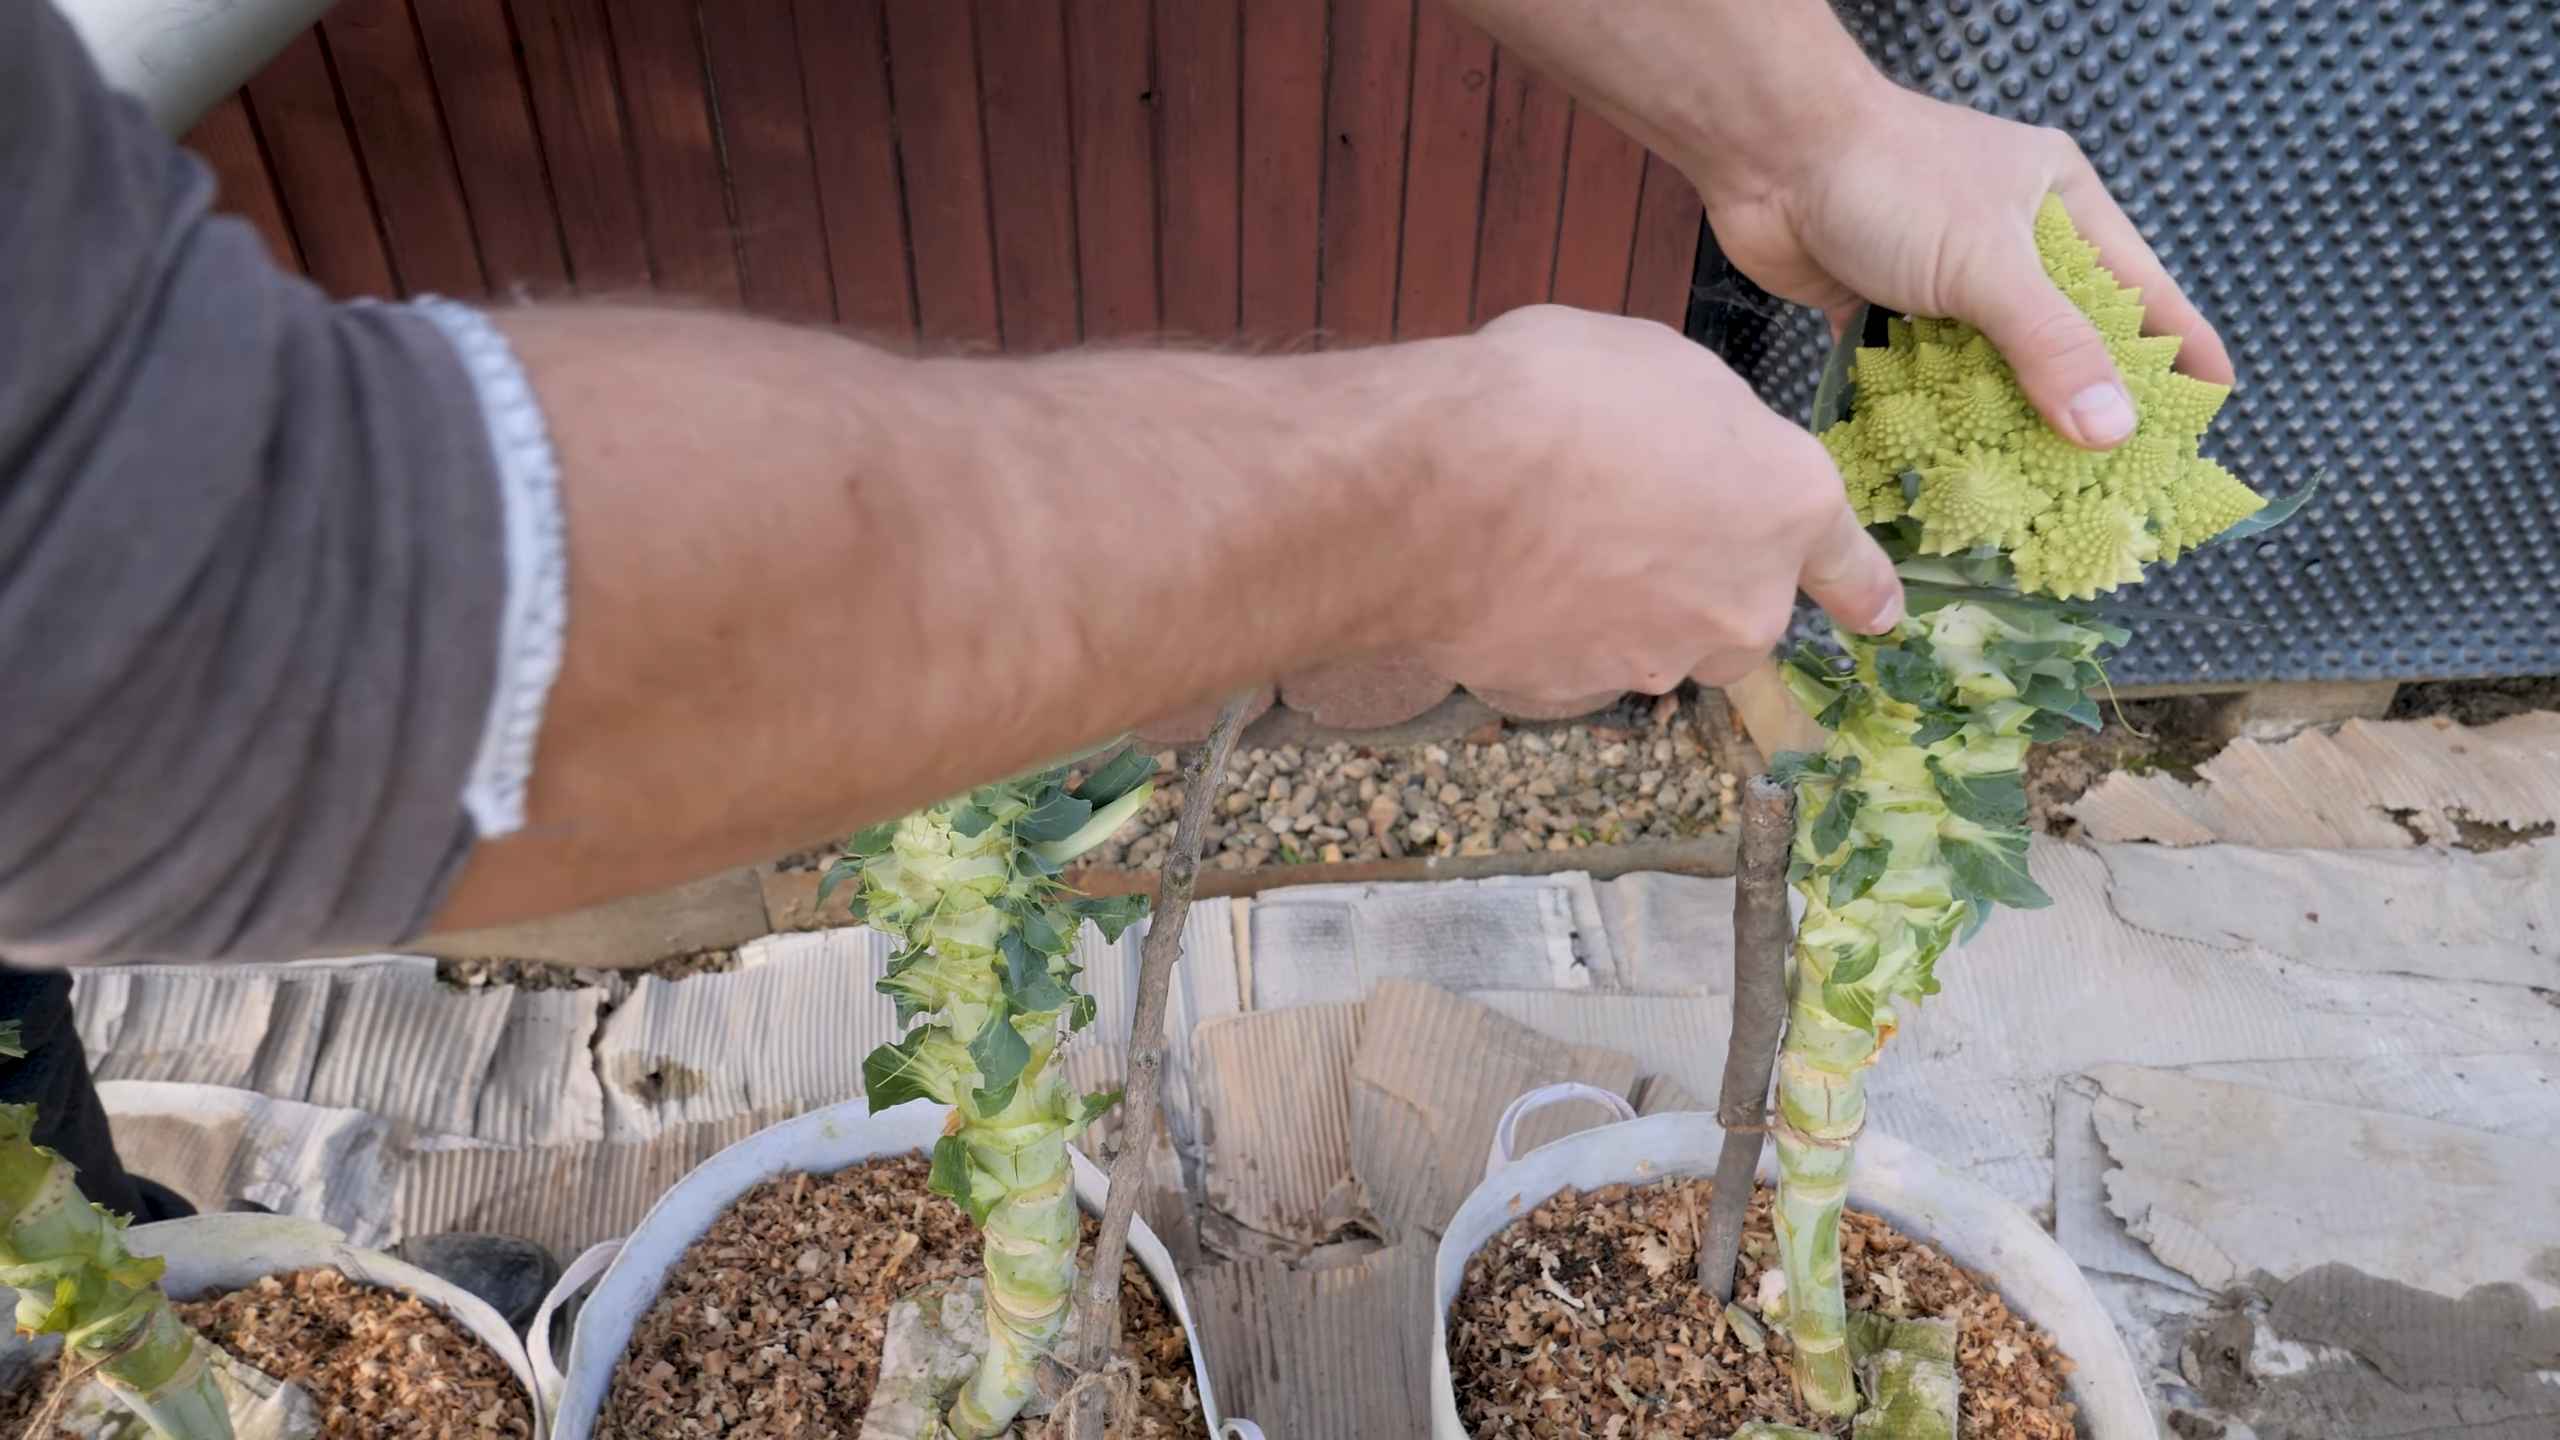
Phase 5: Harvesting Your Romanesco Cauliflower
The moment you’ve been waiting for! Romanesco cauliflower is typically ready to harvest 75-100 days after planting.
Signs of Maturity:
* The head of the Romanesco should be firm and compact.
* The individual florets should be tightly packed together.
* The head should be about 6-8 inches in diameter.
Step-by-Step Harvesting Instructions:
1. Cut the Head: Use a sharp knife to cut the head of the Romanesco from the plant. Leave a few inches of stem attached.
2. Remove Outer Leaves: Remove any large, outer leaves that are surrounding the head.
3. Store Properly: Store the harvested Romanesco in the refrigerator for up to a week.
Enjoying Your Homegrown Romanesco
Congratulations! You’ve successfully grown your own Romanesco cauliflower. Now it’s time to enjoy the fruits (or rather, vegetables
Conclusion
So, there you have it! Growing Romanesco cauliflower might seem intimidating at first glance, with its fractal florets and otherworldly appearance. But with a little patience, the right techniques, and a dash of determination, you can absolutely cultivate this stunning vegetable in your own garden. The reward? A unique and delicious addition to your table, a conversation starter, and the immense satisfaction of nurturing something so beautiful from seed to harvest.
Why is this DIY trick a must-try? Because store-bought Romanesco, when you can even find it, often comes at a premium price. Growing your own allows you to enjoy this gourmet vegetable without breaking the bank. Plus, you have complete control over the growing process, ensuring it’s free from unwanted pesticides and herbicides. You’ll also experience the unparalleled freshness and flavor that only comes from harvesting directly from your garden. Imagine the vibrant green hue and the crisp, nutty taste – a far cry from the sometimes-wilted specimens you find in supermarkets.
Beyond the basic method outlined, there’s plenty of room for experimentation. Consider companion planting to deter pests naturally. Marigolds, nasturtiums, and herbs like rosemary and thyme can all help protect your Romanesco from unwanted visitors. You could also try succession planting, sowing seeds every few weeks to ensure a continuous harvest throughout the growing season. For those in warmer climates, explore varieties specifically bred for heat tolerance. And if you’re feeling adventurous, why not try saving seeds from your best Romanesco heads to perpetuate your own unique strain?
Don’t be discouraged if your first attempt isn’t perfect. Gardening is a learning process, and even experienced growers face challenges. The key is to observe your plants closely, adapt to their needs, and learn from your mistakes. Remember to provide consistent watering, fertile soil, and protection from pests and diseases. With each season, you’ll become more adept at nurturing these fascinating vegetables.
We wholeheartedly encourage you to give this DIY trick a try. The satisfaction of harvesting your own Romanesco cauliflower is truly unparalleled. It’s a rewarding experience that connects you to nature, enhances your culinary skills, and provides you with a healthy and delicious food source.
Once you’ve successfully grown your own Romanesco, we’d love to hear about your experience! Share your tips, tricks, and photos with us in the comments below. Let’s create a community of Romanesco enthusiasts and inspire others to embark on this rewarding gardening adventure. Did you encounter any unexpected challenges? What varieties did you try? What are your favorite ways to prepare and enjoy your homegrown Romanesco? Your insights will be invaluable to fellow gardeners. So, grab your seeds, get your hands dirty, and prepare to be amazed by the beauty and bounty of your own Romanesco cauliflower patch!
Frequently Asked Questions (FAQ)
What are the most common problems when growing Romanesco cauliflower, and how can I prevent them?
The most common problems include pests like cabbage worms and aphids, diseases like clubroot and black rot, and nutrient deficiencies. To prevent these issues:
* Pests: Use row covers to protect young plants from pests. Regularly inspect your plants for signs of infestation and handpick any pests you find. Introduce beneficial insects like ladybugs and lacewings to your garden. Consider using organic pest control methods like neem oil or insecticidal soap.
* Diseases: Ensure good soil drainage to prevent fungal diseases. Practice crop rotation to avoid the buildup of soilborne pathogens. Choose disease-resistant varieties whenever possible. Remove and destroy any infected plants immediately.
* Nutrient Deficiencies: Amend your soil with compost or well-rotted manure before planting. Conduct a soil test to determine any nutrient deficiencies and amend accordingly. Use a balanced fertilizer throughout the growing season.
How long does it take to grow Romanesco cauliflower from seed to harvest?
Romanesco cauliflower typically takes 75-100 days to mature from seed to harvest. However, this can vary depending on the variety, climate, and growing conditions. Start seeds indoors 6-8 weeks before the last expected frost in your area. Transplant seedlings outdoors after the danger of frost has passed.
What is the best soil for growing Romanesco cauliflower?
Romanesco cauliflower prefers well-drained, fertile soil with a pH of 6.0-7.0. Amend your soil with compost or well-rotted manure to improve drainage and fertility. Consider adding lime to raise the pH if your soil is too acidic.
How much sun does Romanesco cauliflower need?
Romanesco cauliflower requires at least 6 hours of direct sunlight per day. Choose a sunny location in your garden for optimal growth.
How often should I water Romanesco cauliflower?
Water Romanesco cauliflower regularly, especially during dry periods. Aim to keep the soil consistently moist but not waterlogged. Water deeply and less frequently, rather than shallowly and often.
How do I know when Romanesco cauliflower is ready to harvest?
Romanesco cauliflower is ready to harvest when the head is firm, compact, and has reached its desired size. The florets should be tightly packed together and the color should be vibrant green. Use a sharp knife to cut the head from the plant, leaving a few leaves attached.
Can I grow Romanesco cauliflower in containers?
Yes, you can grow Romanesco cauliflower in containers, but you’ll need a large container (at least 12 inches in diameter) to accommodate its root system. Use a high-quality potting mix and ensure good drainage. Water and fertilize regularly.
What are some good companion plants for Romanesco cauliflower?
Good companion plants for Romanesco cauliflower include:
* Marigolds: Deter pests like nematodes and aphids.
* Nasturtiums: Attract aphids away from your Romanesco.
* Rosemary and Thyme: Repel cabbage moths.
* Beans and Peas: Fix nitrogen in the soil, benefiting the Romanesco.
* Onions and Garlic: Deter pests and improve soil health.
Can I save seeds from my Romanesco cauliflower?
Yes, you can save seeds from your Romanesco cauliflower, but it’s a biennial plant, meaning it takes two years to produce seeds. Allow a healthy plant to overwinter and flower in the second year. Collect the seeds after the seed pods have dried and turned brown.
Is Romanesco cauliflower more nutritious than regular cauliflower?
While both are highly nutritious, Romanesco cauliflower boasts a slightly higher concentration of vitamin C and carotenoids compared to regular cauliflower. It’s also a good source of fiber, vitamin K, and folate.

Leave a Comment