
Towel Bean Sprouts Growing: Ever dreamt of having fresh, crunchy bean sprouts right at your fingertips, ready to add a burst of flavor to your salads, stir-fries, or sandwiches? Forget those expensive grocery store trips and the mystery of how long they’ve been sitting on the shelf! I’m here to tell you that growing your own bean sprouts at home is not only incredibly easy but also surprisingly rewarding, and all you need is a towel!
The practice of sprouting seeds, including beans, has ancient roots, dating back thousands of years in various cultures, particularly in Asia. It’s a testament to human ingenuity – a way to access nutritious food even when resources are scarce. Think of it as a miniature, indoor garden that thrives even in the smallest of spaces.
But why should *you* try towel bean sprouts growing? Well, for starters, it’s a fantastic way to ensure you’re consuming fresh, pesticide-free produce. Plus, it’s a fun and educational project for the whole family! Imagine the satisfaction of watching those tiny sprouts emerge and knowing you nurtured them from seed to sprout. In this guide, I’ll walk you through the simple steps of growing delicious bean sprouts using just a towel, water, and a little bit of patience. Get ready to unlock a world of fresh, homegrown goodness!
Grow Bean Sprouts in a Towel: A Simple DIY Guide
Hey there, fellow DIY enthusiasts! I’m so excited to share this super easy and surprisingly effective method for growing bean sprouts right in your kitchen using just a towel! Forget fancy equipment or complicated setups. This is all about simplicity and fresh, homegrown goodness. Let’s dive in!
What You’ll Need
Before we get started, let’s gather our supplies. The beauty of this method is that you probably already have most of these things lying around:
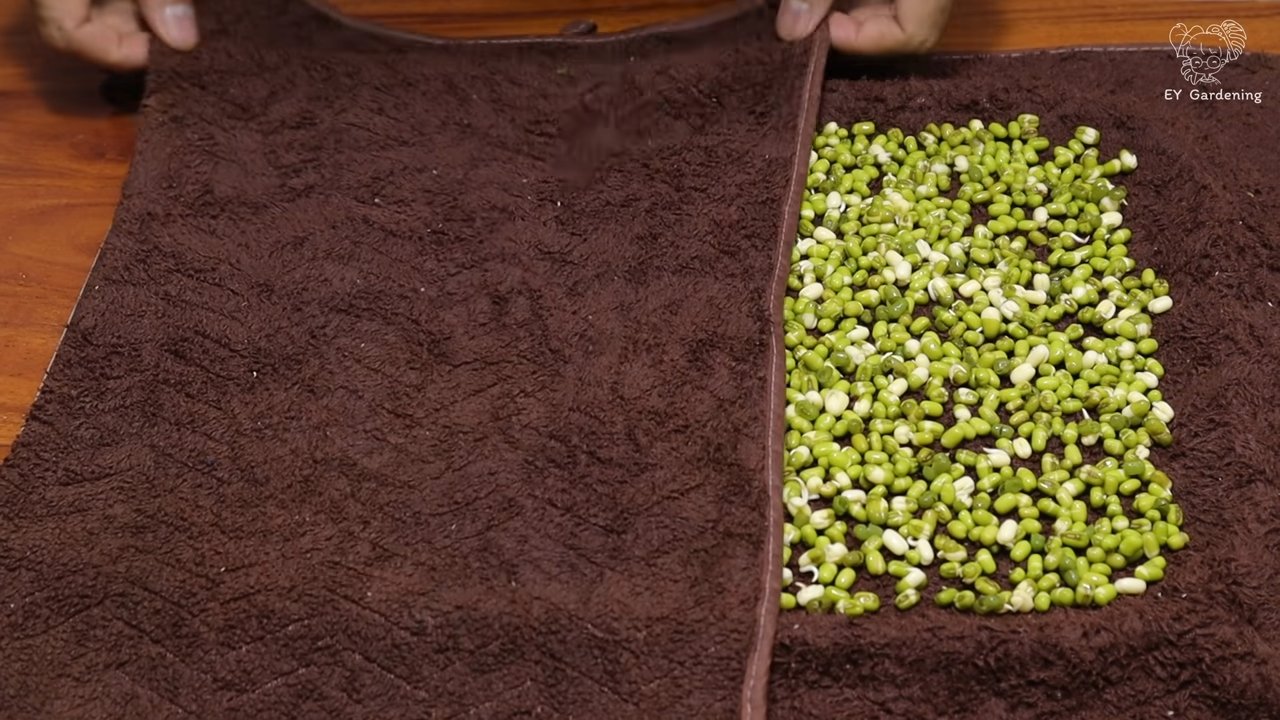
* Bean Seeds: Mung beans are the classic choice, but you can also use adzuki beans, lentils, or even chickpeas. Just make sure they’re intended for sprouting and haven’t been treated with any chemicals. About 1/2 cup of seeds is a good starting point.
* Clean Towel: A clean, lint-free kitchen towel or cheesecloth works perfectly. Avoid using towels with strong dyes or fragrances.
* Wide-Mouth Jar or Container: A mason jar, a plastic container, or even a large bowl will do. It needs to be big enough to hold the towel and the sprouting beans.
* Water: Filtered water is best, but tap water that’s been left to sit for a while to allow chlorine to dissipate is also fine.
* Rubber Band or String: To secure the towel to the jar.
* Spray Bottle (Optional): For misting the sprouts.
* Dark Location: A cupboard, pantry, or even a covered box will work.
Preparing Your Seeds
This is a crucial step to ensure successful germination. We need to wake those little seeds up!
1. Rinse the Seeds: Place your bean seeds in a colander and rinse them thoroughly under cool running water. This removes any dust, debris, or potential contaminants.
2. Soak the Seeds: Transfer the rinsed seeds to a bowl and cover them with plenty of cool water. They’ll expand quite a bit, so make sure they have enough room. Let them soak for at least 8 hours, or ideally overnight. This softens the seed coat and kickstarts the sprouting process. I usually soak mine before I go to bed so they’re ready to go in the morning.
3. Drain and Rinse Again: After soaking, drain the seeds completely and rinse them again under cool water. This removes any residual soaking water and prepares them for the next step.
Setting Up Your Sprouting Station
Now, let’s create the perfect environment for our bean sprouts to thrive.
1. Prepare the Towel: Dampen the clean towel with water. It should be thoroughly wet but not dripping. Wring out any excess water.
2. Line the Jar: Place the dampened towel inside your wide-mouth jar or container. Make sure the towel covers the entire inside surface, creating a cozy little nest for the beans.
3. Secure the Towel: Use a rubber band or string to secure the towel to the top of the jar. This will prevent it from slipping down and keep the beans snug inside.
Planting and Growing Your Bean Sprouts
This is where the magic happens!
1. Spread the Seeds: Gently spread the soaked and rinsed bean seeds evenly over the surface of the dampened towel inside the jar. Avoid overcrowding them; they need space to sprout. A single layer is ideal.
2. Cover the Seeds: Fold the towel over the seeds to completely cover them. This creates a dark and humid environment, which is essential for germination.
3. Place in a Dark Location: Put the jar in a dark, well-ventilated location. A cupboard or pantry is perfect. Darkness encourages the sprouts to grow long and white.
4. Water Regularly: This is the most important part! The towel needs to stay consistently damp. At least twice a day (morning and evening), gently remove the towel, rinse the seeds under cool water, and then re-dampen the towel before covering the seeds again. You can also use a spray bottle to mist the seeds and towel if you prefer. The key is to keep everything moist but not waterlogged.
5. Monitor Growth: Check your bean sprouts daily. You should start to see tiny sprouts emerging within 24-48 hours. Continue rinsing and dampening the towel twice a day.
6. Adjust Watering as Needed: As the sprouts grow, they’ll need more moisture. You might need to increase the frequency of watering, especially in warmer climates.
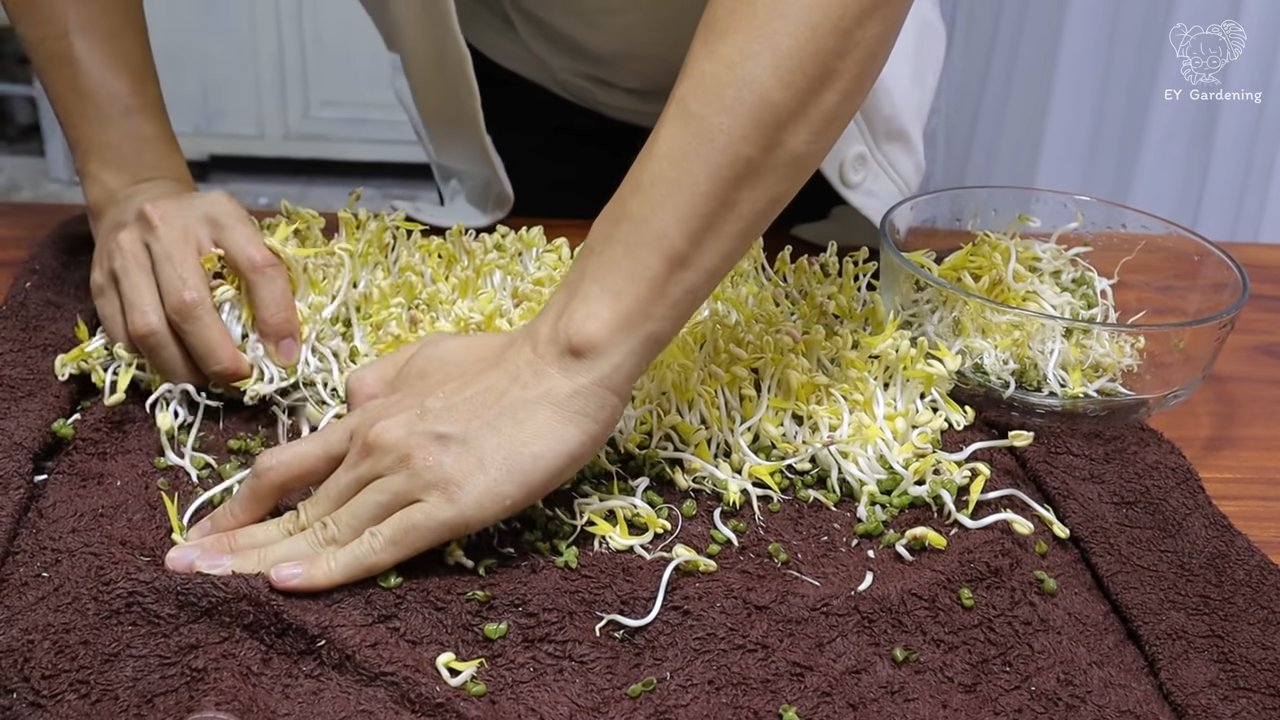
7. Harvest Time: Your bean sprouts will be ready to harvest in about 3-5 days, depending on the type of bean and your desired length. They should be about 1-2 inches long.
Harvesting and Storing Your Bean Sprouts
Congratulations! You’ve successfully grown your own bean sprouts. Now, let’s get them ready for eating.
1. Rinse Thoroughly: Remove the bean sprouts from the jar and rinse them thoroughly under cool water to remove any loose seed coats or hulls.
2. Drain Well: Drain the sprouts well in a colander. You can also gently pat them dry with a clean paper towel.
3. Store Properly: Store your bean sprouts in an airtight container in the refrigerator. They’ll stay fresh for about 3-5 days. I like to line the container with a paper towel to absorb any excess moisture.
Troubleshooting Tips
Even with the best intentions, things don’t always go as planned. Here are a few common issues and how to fix them:
* Mold Growth: If you see any mold growing on your bean sprouts, it’s usually due to poor ventilation or overwatering. Discard the affected sprouts and start a new batch, making sure to rinse and drain them thoroughly. Ensure good airflow around the jar.
* Slow Growth: Slow growth can be caused by several factors, including cold temperatures, insufficient moisture, or old seeds. Make sure the sprouts are in a warm (but not hot) location and that the towel is consistently damp. If you suspect your seeds are old, try using a fresh batch.
* Rotting Seeds: Rotting seeds are usually a sign of overwatering or poor drainage. Make sure the towel is damp but not soaking wet, and that the jar has adequate ventilation.
* Bitter Taste: A bitter taste can sometimes develop if the sprouts are exposed to too much light. Keep them in a dark location throughout the growing process.
Variations and Experimentation
Once you’ve mastered the basic towel method, feel free to experiment with different types of beans and seeds. You can also try adding a small amount of fertilizer to the water to boost growth (but be sure to use a food-grade fertilizer and rinse the sprouts thoroughly before eating).
Here are a few ideas to get you started:
* Adzuki Bean Sprouts: These have a slightly nutty flavor and are great in salads and stir-fries.
* Lentil Sprouts: These are packed with protein and fiber and are delicious in soups and stews.
* Chickpea Sprouts: These have a hearty texture and are perfect for adding to hummus or falafel.
* Spicy Sprouts: Add a pinch of chili flakes to the water during the soaking process for a little extra kick.
Why Grow Your Own Bean Sprouts?
Besides being incredibly easy and fun, growing your own bean sprouts offers a ton of benefits:
* Freshness: You can’t beat the taste of freshly grown bean sprouts. They’re so much more flavorful than store-bought ones.
* Cost-Effective: Growing your own bean sprouts is much cheaper than buying them from the store.
* Nutritious: Bean sprouts are packed with vitamins, minerals, and antioxidants.
* Sustainable: Growing your own food reduces your carbon footprint and supports a more sustainable lifestyle.
* Educational: It’s a great way to teach kids about gardening and where their food comes from.
So, there you have it! A simple and effective way to grow your own bean sprouts using just a towel. Give it a try, and I’m sure you’ll be amazed at how easy and rewarding it is. Happy sprouting!
Conclusion
So, there you have it! Growing your own bean sprouts using the towel method is not just a fun experiment; it’s a gateway to fresh, nutritious, and incredibly versatile ingredients right in your own kitchen. Forget those limp, pre-packaged sprouts from the grocery store. With minimal effort and readily available materials, you can cultivate vibrant, crunchy bean sprouts bursting with flavor and goodness.
This DIY trick is a must-try for several compelling reasons. First, it’s incredibly cost-effective. A handful of beans yields a surprisingly large harvest of sprouts, making it a budget-friendly way to add healthy greens to your diet. Second, it’s remarkably easy. The towel method eliminates the need for specialized equipment or complicated procedures. Even if you’re a complete beginner, you can achieve success with just a few simple steps. Third, it’s incredibly rewarding. There’s something deeply satisfying about watching tiny seeds transform into edible sprouts in just a few days. You’re literally growing your own food!
But the benefits don’t stop there. Homegrown bean sprouts are significantly fresher and more nutritious than store-bought varieties. You control the growing environment, ensuring optimal conditions for sprout development and minimizing the risk of contamination. Plus, you can harvest them at their peak of freshness, maximizing their flavor and nutritional value.
Ready to take your bean sprout game to the next level? Consider experimenting with different types of beans. Mung beans are the classic choice, but you can also try adzuki beans, lentils, or even chickpeas. Each variety offers a unique flavor and texture profile, allowing you to customize your sprouts to suit your taste preferences. You can also play around with the growing environment. Try placing your sprouts in a slightly warmer or cooler location to see how it affects their growth rate and flavor.
Another variation to consider is adding a touch of natural fertilizer to the water you use to moisten the towels. A diluted seaweed extract or compost tea can provide essential nutrients that promote healthy sprout growth. Just be sure to use organic fertilizers to avoid introducing harmful chemicals to your sprouts.
Don’t be afraid to get creative with how you use your homegrown bean sprouts. Add them to salads, sandwiches, stir-fries, soups, and wraps. They’re also a delicious and nutritious addition to smoothies and juices. The possibilities are endless!
We wholeheartedly encourage you to try this simple yet effective DIY trick for growing your own towel bean sprouts. It’s a fun, rewarding, and incredibly practical way to add fresh, healthy greens to your diet. And most importantly, it empowers you to take control of your food supply and connect with the natural world.
Once you’ve given it a try, we’d love to hear about your experience. Share your tips, tricks, and variations in the comments below. Let’s build a community of sprout enthusiasts and inspire others to embrace the joy of homegrown goodness! What kind of beans did you use? What dishes did you incorporate them into? Did you encounter any challenges, and how did you overcome them? Your insights can help others succeed and discover the magic of growing their own bean sprouts. So, get sprouting and share your story!
FAQ
What kind of beans are best for sprouting using the towel method?
The most common and readily available bean for sprouting is the mung bean. They sprout quickly and reliably, producing the familiar bean sprouts you find in grocery stores. However, you can also successfully sprout other types of beans and legumes using the towel method, including adzuki beans, lentils, chickpeas, and even soybeans. Each variety will have a slightly different flavor and texture, so experiment to find your favorites. Keep in mind that some beans, like kidney beans, should not be eaten raw or sprouted due to the presence of toxins that are neutralized by cooking. Always research the specific bean you’re using to ensure it’s safe to eat raw or sprouted.
How long does it take for bean sprouts to grow using the towel method?
Generally, bean sprouts will be ready to harvest in 3 to 5 days using the towel method. The exact time will depend on several factors, including the type of bean, the temperature, and the humidity. Mung beans tend to sprout the fastest, while other varieties may take a bit longer. Warmer temperatures will accelerate the sprouting process, while cooler temperatures will slow it down. It’s important to keep the towels consistently moist but not waterlogged, as this can also affect the growth rate. Check your sprouts daily and harvest them when they reach your desired length and crispness.
How do I prevent mold from growing on my bean sprouts?
Mold growth is a common concern when sprouting beans, but it can be easily prevented with a few simple precautions. First, use clean towels and containers. Wash them thoroughly with soap and hot water before each use. Second, rinse the beans thoroughly before and after sprouting. This helps to remove any bacteria or mold spores that may be present. Third, ensure adequate air circulation. Don’t pack the beans too tightly together, and make sure the container is not completely sealed. Fourth, keep the towels moist but not waterlogged. Excess moisture can create a breeding ground for mold. Finally, if you notice any signs of mold growth, discard the affected sprouts immediately and thoroughly clean the container and towels before starting a new batch.
How do I store bean sprouts after harvesting?
To store your freshly harvested bean sprouts, rinse them thoroughly with cold water and drain them well. Gently pat them dry with a clean towel or paper towel. Place the sprouts in a clean, airtight container lined with a paper towel. The paper towel will help to absorb any excess moisture and prevent the sprouts from becoming soggy. Store the container in the refrigerator for up to 3 to 5 days. Check the sprouts daily and discard any that show signs of spoilage.
Can I use tap water to sprout beans?
While tap water is generally safe to use for sprouting beans, it’s best to use filtered or purified water if possible. Tap water can contain chlorine and other chemicals that may inhibit sprout growth or affect their flavor. If you do use tap water, let it sit for a few hours to allow the chlorine to dissipate before using it to moisten the towels.
How often should I rinse the bean sprouts?
It’s important to rinse the bean sprouts at least twice a day, or even more frequently in warmer weather. Rinsing helps to remove any accumulated bacteria or mold spores and keeps the sprouts fresh and hydrated. Simply remove the sprouts from the container, rinse them thoroughly under cold water, and then return them to the container with fresh, moistened towels.
What if my bean sprouts are not sprouting?
If your bean sprouts are not sprouting, there are a few potential reasons why. First, make sure the beans are viable. Old or damaged beans may not sprout. Second, ensure that the towels are consistently moist but not waterlogged. Dry towels will prevent the beans from germinating, while waterlogged towels can lead to rot. Third, check the temperature. Bean sprouts prefer a warm environment, ideally between 70 and 80 degrees Fahrenheit. If the temperature is too cold, the sprouting process may be slowed or inhibited. Finally, make sure the beans are not exposed to direct sunlight. Bean sprouts prefer a dark environment.
Are there any health benefits to eating bean sprouts?
Yes, bean sprouts are a nutritious addition to your diet. They are a good source of vitamins, minerals, and fiber. They are also low in calories and fat. Bean sprouts are particularly rich in vitamin C, vitamin K, and folate. They also contain antioxidants that can help protect against cell damage. Eating bean sprouts can help to boost your immune system, improve digestion, and promote overall health.
Can I sprout any type of seed using the towel method?
While the towel method is primarily used for sprouting beans and legumes, it can also be used to sprout other types of seeds, such as alfalfa, radish, and broccoli seeds. However, the sprouting time and specific requirements may vary depending on the type of seed. Always research the specific seed you’re using to ensure it’s suitable for sprouting and to determine the optimal sprouting conditions.
Leave a Comment