
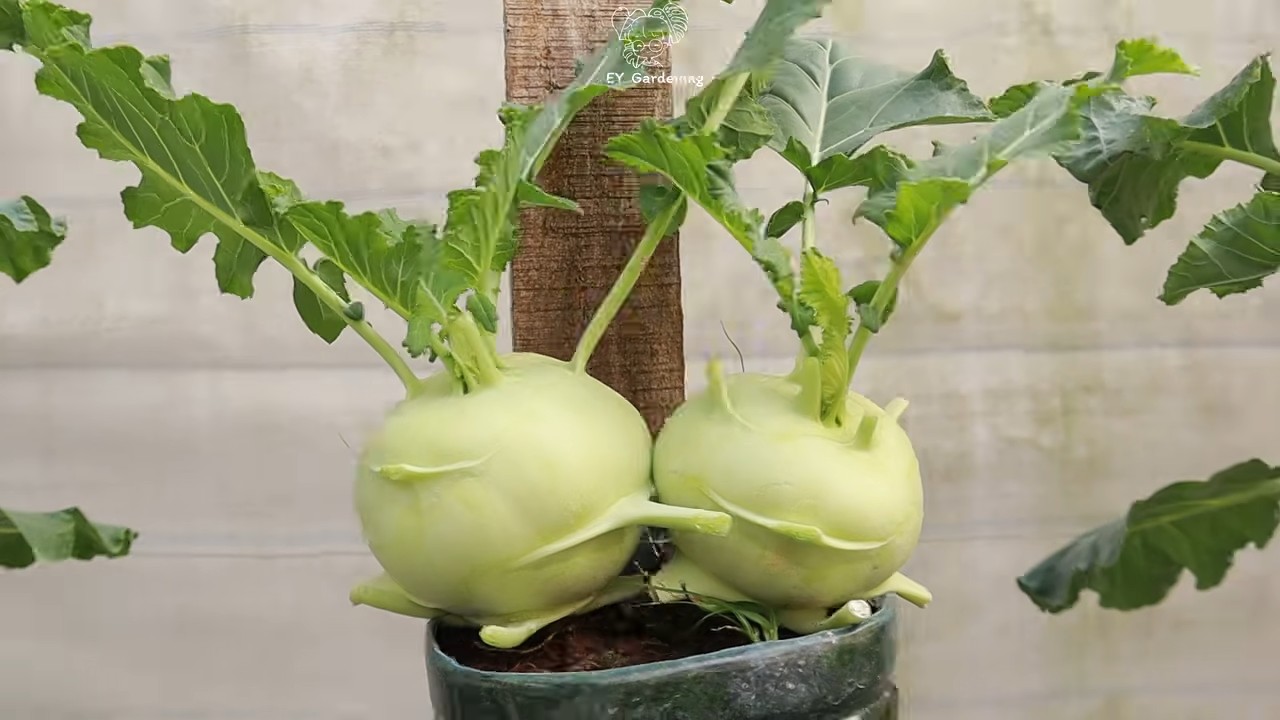
Hanging kohlrabi planters might sound like something out of a futuristic garden, but trust me, they’re surprisingly easy to create and a fantastic way to add a unique touch to your home garden! Forget boring old pots – we’re taking kohlrabi cultivation to new heights, literally!
For centuries, gardeners have been experimenting with vertical gardening techniques, from the Hanging Gardens of Babylon (one of the seven wonders of the ancient world) to the more modern espaliered fruit trees. But the idea of using a hanging planter for kohlrabi? That’s where we get to be a little innovative. Kohlrabi, with its bulbous stem and leafy greens, is a striking plant, and displaying it in a hanging basket elevates it (pun intended!) from a simple vegetable to a decorative piece.
Why should you try this DIY trick? Well, for starters, hanging kohlrabi planters are perfect for small spaces. If you’re short on garden real estate, going vertical is the way to go! Plus, hanging planters can help protect your kohlrabi from pests like slugs and snails. And let’s be honest, they just look incredibly cool! I’m excited to share my step-by-step guide to creating your own hanging kohlrabi planters, so you can enjoy fresh, homegrown kohlrabi in a stylish and space-saving way. Let’s get started!
DIY Hanging Kohlrabi Planters: A Step-by-Step Guide
Hey there, fellow gardening enthusiasts! I’m so excited to share this fun and practical DIY project with you: creating hanging kohlrabi planters. Kohlrabi, with its unique bulbous stem and delicious leaves, is a fantastic addition to any garden, and growing it in hanging planters is not only space-saving but also adds a touch of whimsy to your outdoor (or even indoor!) space. Plus, it helps keep those pesky ground-dwelling critters away from your precious veggies. Let’s get started!
What You’ll Need
Before we dive in, let’s gather all the necessary materials. Trust me, having everything ready beforehand will make the process much smoother.
* Planters: You’ll need hanging planters, of course! I recommend using planters that are at least 12 inches in diameter and 10 inches deep to give your kohlrabi enough room to grow. You can use plastic, metal, or even repurposed containers like old buckets or baskets (just make sure they have drainage holes!).
* Potting Mix: A good quality potting mix is crucial for healthy kohlrabi growth. Avoid using garden soil, as it can become compacted in containers and hinder drainage. Look for a mix that’s well-draining and contains ingredients like peat moss, perlite, and vermiculite.
* Kohlrabi Seeds or Seedlings: You can start your kohlrabi from seeds or purchase seedlings from a local nursery. If you’re starting from seeds, you’ll need to start them indoors about 4-6 weeks before the last expected frost.
* Hanging Hardware: This includes chains, hooks, or rope to hang your planters. Make sure the hardware is strong enough to support the weight of the planter, soil, and mature kohlrabi plants.
* Drill (if needed): If your chosen containers don’t already have drainage holes, you’ll need a drill to create them.
* Watering Can or Hose: For watering your kohlrabi plants.
* Slow-Release Fertilizer (optional): Adding a slow-release fertilizer to your potting mix can provide your kohlrabi plants with a steady supply of nutrients throughout the growing season.
* Gloves: To protect your hands.
* Measuring Tape: To ensure even spacing when hanging multiple planters.
Preparing Your Planters
This step is all about getting your planters ready to house your kohlrabi.
1. Drill Drainage Holes (if needed): If your planters don’t have drainage holes, use a drill to create several holes in the bottom. This is essential to prevent waterlogging, which can lead to root rot. I usually aim for at least four holes, each about 1/2 inch in diameter.
2. Line the Bottom (optional): To prevent soil from washing out through the drainage holes, you can line the bottom of the planter with a layer of landscape fabric or coffee filters. This will allow water to drain freely while keeping the soil in place.
3. Attach Hanging Hardware: Attach the chains, hooks, or rope to your planters according to the manufacturer’s instructions. Make sure the hardware is securely attached and can support the weight of the planter. I always give it a good tug to make sure it’s sturdy!
Planting Your Kohlrabi
Now for the fun part – planting your kohlrabi!
1. Fill the Planter with Potting Mix: Fill the planter with potting mix, leaving about an inch or two of space at the top. Gently pat down the soil to remove any air pockets.
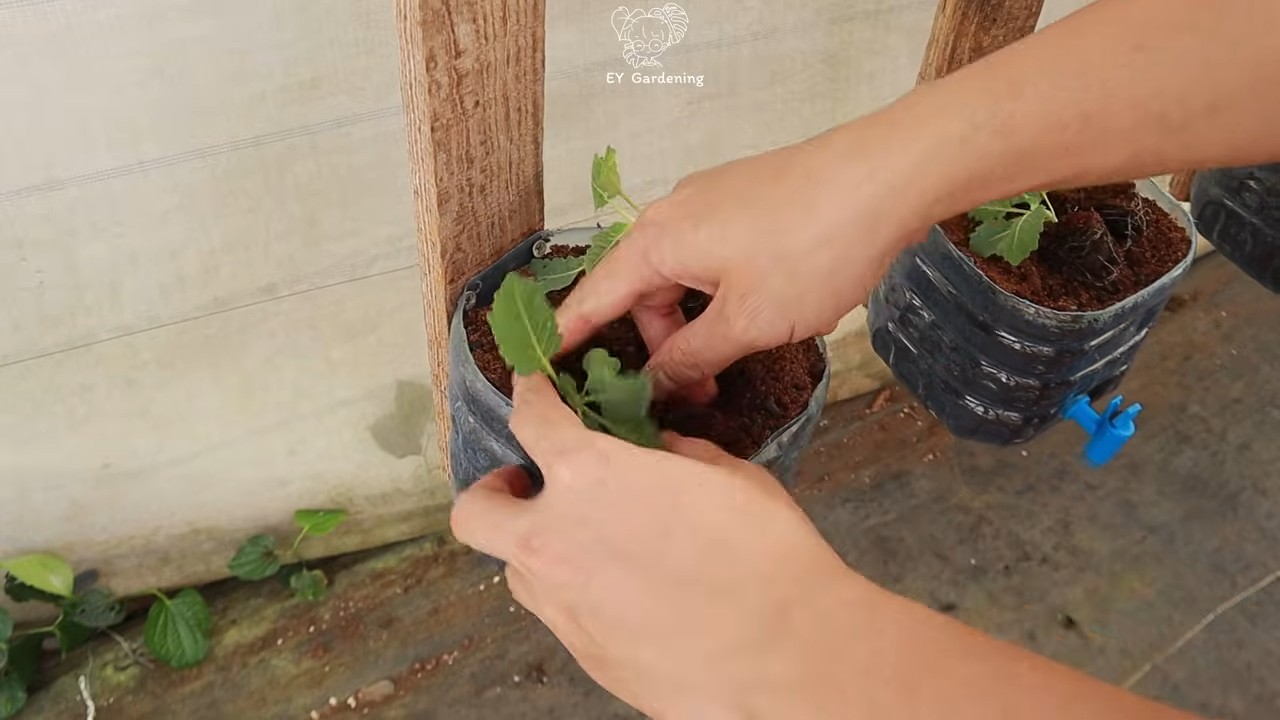
2. Plant Seeds or Seedlings:
* From Seeds: Sow kohlrabi seeds about 1/2 inch deep and 2-3 inches apart. Gently cover the seeds with soil and water thoroughly.
* From Seedlings: Carefully remove the seedlings from their containers and gently loosen the roots. Dig a hole in the potting mix that’s large enough to accommodate the root ball. Place the seedling in the hole and backfill with soil, gently patting it down. Space seedlings about 6-8 inches apart.
3. Water Thoroughly: After planting, water the kohlrabi plants thoroughly until water drains out of the drainage holes. This will help settle the soil and ensure that the roots are well-hydrated.
4. Add Slow-Release Fertilizer (optional): If you’re using a slow-release fertilizer, sprinkle it over the surface of the soil according to the manufacturer’s instructions. Gently mix it into the top layer of soil.
Hanging Your Planters
Time to get those planters hanging!
1. Choose a Location: Select a location that receives at least 6 hours of sunlight per day. Kohlrabi thrives in full sun. Also, consider the weight of the planters and make sure the hanging structure is strong enough to support them.
2. Hang the Planters: Hang the planters from hooks or brackets that are securely attached to a sturdy structure, such as a porch railing, pergola, or tree branch. Use a measuring tape to ensure that the planters are evenly spaced and at a comfortable height for watering and harvesting. I like to hang mine at eye level so I can easily admire my growing kohlrabi.
3. Adjust as Needed: Once the planters are hanging, take a step back and assess their placement. Adjust the height or spacing as needed to ensure that they are evenly distributed and receive adequate sunlight.
Caring for Your Hanging Kohlrabi
Now that your kohlrabi is planted and hanging, it’s important to provide it with the proper care to ensure a bountiful harvest.
1. Watering: Kohlrabi needs consistent moisture to thrive. Water your plants regularly, especially during hot, dry weather. Check the soil moisture by sticking your finger into the soil. If the top inch feels dry, it’s time to water. Avoid overwatering, as this can lead to root rot. I usually water deeply until water drains out of the drainage holes.
2. Fertilizing: If you didn’t add a slow-release fertilizer at planting time, you’ll need to fertilize your kohlrabi plants regularly with a balanced liquid fertilizer. Follow the manufacturer’s instructions for application rates and frequency. I like to fertilize every 2-3 weeks.
3. Pest Control: Kohlrabi can be susceptible to pests such as aphids, cabbage worms, and flea beetles. Inspect your plants regularly for signs of infestation. If you find any pests, you can control them with insecticidal soap or neem oil. I prefer to use organic pest control methods whenever possible.
4. Weeding: Keep your planters free of weeds, as they can compete with your kohlrabi plants for nutrients and water. Hand-pull any weeds that appear.
5. Sunlight: Ensure your kohlrabi receives at least 6 hours of sunlight daily. If you notice the leaves are pale or the stems are leggy, it might not be getting enough sun. Consider moving the planter to a sunnier location.
6. Rotation: Rotate the planters periodically to ensure even sunlight exposure on all sides of the plant. This will help prevent the plants from leaning towards the sun.
Harvesting Your Kohlrabi
The moment you’ve been waiting for – harvesting your kohlrabi!
1. Timing: Kohlrabi is typically ready to harvest about 50-60 days after planting. The bulb should be about 2-3 inches in diameter. Don’t let the bulb get too large, as it can become tough and woody.
2. Harvesting: To harvest kohlrabi, simply cut the bulb from the plant just above the soil line. You can also harvest the leaves, which are edible and have a mild, cabbage-like flavor.
3. Storage: Kohlrabi can be stored in the refrigerator for several weeks. Remove the leaves before storing, as they can draw moisture from the bulb.
Troubleshooting
Even with the best care, you might encounter some challenges along the way. Here are a few common problems and how to address them:
* Yellowing Leaves: This could be a sign of overwatering, nutrient deficiency, or pest infestation. Check the soil moisture and adjust your watering accordingly. Fertilize your plants with a balanced fertilizer. Inspect the leaves for pests and treat as needed.
* Leggy Stems: This is usually a sign of insufficient sunlight. Move the planter to a sunnier location.
* Small Bulbs: This could be due to poor soil, insufficient watering, or overcrowding. Make sure you’re using a good quality potting mix and watering your plants regularly. Thin out the plants if they are too close together.
* Cracked Bulbs: This can be caused by inconsistent watering. Try to maintain a consistent watering schedule and avoid letting the soil dry out completely.
Choosing the Right Kohlrabi Variety
There are several k
Conclusion
So, there you have it! Creating your own hanging kohlrabi planters is not just a fun DIY project; it’s a game-changer for anyone looking to maximize their garden space, add a unique aesthetic touch, and enjoy the freshest, most delicious kohlrabi imaginable. We’ve walked you through the process, highlighting the simplicity and affordability of this method. But why is this DIY trick a must-try?
Firstly, consider the space-saving benefits. For apartment dwellers, balcony gardeners, or anyone with limited ground space, hanging planters offer a vertical solution that allows you to cultivate kohlrabi even in the most compact environments. Imagine transforming a bare balcony into a lush, green oasis, overflowing with vibrant kohlrabi leaves and bulbs.
Secondly, think about the aesthetic appeal. These hanging planters are not only functional but also visually stunning. They add a touch of rustic charm and natural beauty to any outdoor space. You can customize the planters to match your personal style, using different materials, colors, and designs to create a truly unique and eye-catching display.
Thirdly, and perhaps most importantly, consider the quality of the kohlrabi you’ll be harvesting. Growing your own produce allows you to control every aspect of the process, from the soil composition to the watering schedule. This results in kohlrabi that is fresher, more flavorful, and free from harmful pesticides and chemicals. There’s nothing quite like the satisfaction of harvesting your own homegrown vegetables and knowing exactly where they came from.
But the possibilities don’t end there! Feel free to experiment with different variations of this DIY project. For example, you could try using repurposed materials like old buckets, tires, or even woven baskets to create your hanging planters. You could also add companion plants like marigolds or basil to deter pests and attract beneficial insects. Another idea is to create a tiered system of hanging planters, with smaller plants like herbs or strawberries cascading down from above.
Don’t be afraid to get creative and personalize your hanging kohlrabi planters to suit your own needs and preferences. The key is to have fun and enjoy the process of creating something beautiful and functional.
We are confident that once you try this DIY trick, you’ll be amazed at the results. You’ll not only have a bountiful harvest of delicious kohlrabi but also a stunning addition to your outdoor space. So, what are you waiting for? Gather your materials, follow our instructions, and get ready to transform your garden with these amazing hanging kohlrabi planters.
And finally, we encourage you to share your experiences with us! We’d love to see photos of your finished planters, hear about any challenges you encountered, and learn about any tips or tricks you discovered along the way. Share your stories on social media using #HangingKohlrabiPlanters and let’s inspire others to embrace this innovative gardening technique. Happy gardening!
Frequently Asked Questions (FAQ)
What type of kohlrabi is best suited for hanging planters?
While most kohlrabi varieties can be grown in hanging planters, smaller, more compact varieties tend to thrive best. Look for varieties like ‘Early White Vienna’ or ‘Early Purple Vienna,’ which are known for their relatively small size and quick maturity. These varieties won’t become overly heavy and are less likely to strain the hanging structure. However, don’t let that stop you from experimenting with other varieties! Just be mindful of the weight and provide adequate support if needed.
What kind of soil should I use for my hanging kohlrabi planters?
The ideal soil for hanging kohlrabi planters is a well-draining, nutrient-rich potting mix. Avoid using garden soil, as it can be too heavy and compact, hindering root growth and drainage. A good potting mix will retain moisture while allowing excess water to drain away, preventing root rot. You can also amend the potting mix with compost or other organic matter to provide additional nutrients and improve soil structure. Consider adding perlite or vermiculite to further enhance drainage.
How often should I water my hanging kohlrabi planters?
Watering frequency will depend on several factors, including the weather, the size of the planter, and the type of soil you’re using. As a general rule, water your hanging kohlrabi planters whenever the top inch of soil feels dry to the touch. Be sure to water thoroughly, allowing the water to drain out of the bottom of the planter. Avoid overwatering, as this can lead to root rot. During hot, dry weather, you may need to water more frequently. Check the soil moisture regularly and adjust your watering schedule accordingly.
How much sunlight do hanging kohlrabi planters need?
Kohlrabi thrives in full sun, which means at least six hours of direct sunlight per day. Choose a location for your hanging planters that receives ample sunlight throughout the day. If you live in a particularly hot climate, you may need to provide some afternoon shade to prevent the plants from overheating. If you don’t have a sunny spot, you can supplement with grow lights.
How do I fertilize my hanging kohlrabi planters?
Kohlrabi is a relatively heavy feeder, so regular fertilization is essential for optimal growth and bulb development. Start by incorporating a slow-release fertilizer into the potting mix at planting time. Then, supplement with a liquid fertilizer every two to three weeks during the growing season. Choose a fertilizer that is high in phosphorus and potassium, which are essential for root and bulb development. Follow the instructions on the fertilizer label carefully to avoid over-fertilizing.
How do I protect my hanging kohlrabi planters from pests and diseases?
Hanging kohlrabi planters are generally less susceptible to pests and diseases than ground-grown kohlrabi, but it’s still important to take precautions. Regularly inspect your plants for signs of pests like aphids, cabbage worms, and flea beetles. If you spot any pests, treat them with an appropriate insecticide or organic pest control method. To prevent diseases, ensure good air circulation around the plants and avoid overwatering. You can also use a fungicide to protect against fungal diseases. Companion planting with marigolds or basil can also help deter pests.
How long does it take for kohlrabi to mature in hanging planters?
The time it takes for kohlrabi to mature in hanging planters will depend on the variety you’re growing and the growing conditions. Generally, kohlrabi matures in about 50 to 60 days from planting. You can start harvesting the bulbs when they reach about 2 to 3 inches in diameter. Don’t let them get too large, as they can become tough and woody.
Can I grow kohlrabi in hanging planters indoors?
Yes, you can grow kohlrabi in hanging planters indoors, but you’ll need to provide adequate light. Place the planters near a sunny window or use grow lights to supplement natural light. You’ll also need to ensure good air circulation and maintain a consistent temperature. Indoor growing can be a great option for extending the growing season or for those who live in climates with harsh winters.
What are some creative ways to decorate my hanging kohlrabi planters?
The possibilities are endless! You can paint the planters in bright colors, add stencils or decals, or wrap them in twine or burlap. You can also add decorative elements like shells, stones, or beads. Get creative and personalize your hanging kohlrabi planters to match your own style and décor.
What if my kohlrabi bulbs don’t develop properly in the hanging planters?
Several factors can contribute to poor bulb development, including insufficient sunlight, inadequate watering, lack of nutrients, or overcrowding. Make sure your plants are getting enough sunlight, water, and fertilizer. Thin out the plants if they are overcrowded. If you’ve addressed these issues and the bulbs still aren’t developing properly, the soil may be lacking essential nutrients. Consider amending the soil with compost or other organic matter.
Leave a Comment