
Growing Cabbage in Bottles might sound a little crazy, right? But trust me, this innovative DIY gardening trick is about to revolutionize your small-space gardening game! Forget sprawling garden beds; we’re taking cabbage cultivation vertical and compact.
For centuries, cabbage has been a staple in diets across the globe, from sauerkraut in Eastern Europe to kimchi in Korea. Its resilience and nutritional value have made it a vital crop. But what if you live in an apartment, have a tiny balcony, or simply want to try something new? That’s where this ingenious bottle-growing method comes in. It’s a modern twist on a classic vegetable, adapting to the needs of urban gardeners and those with limited space.
I know what you’re thinking: “Why bottles?” Well, space is a premium for many of us, and traditional gardening can be intimidating. This method is not only space-saving but also incredibly cost-effective and fun! Imagine harvesting fresh, crisp cabbage right from your balcony, grown in recycled bottles. It’s a conversation starter, a sustainable practice, and a delicious way to enjoy homegrown goodness. Plus, growing cabbage in bottles minimizes soil-borne diseases and pests, giving you healthier, happier plants. So, let’s dive in and learn how to make this happen!
Growing Cabbage in Bottles: A Fun and Space-Saving DIY Project
Hey there, fellow gardening enthusiasts! Are you short on space but still dreaming of fresh, homegrown cabbage? Well, I’ve got a fantastic DIY project for you: growing cabbage in bottles! It’s a fun, eco-friendly way to cultivate these leafy greens, even if you only have a balcony or a small patio. Trust me, it’s easier than you think, and the results are incredibly rewarding. Let’s dive in!
What You’ll Need
Before we get started, let’s gather all the necessary materials. This will make the whole process smoother and more enjoyable. Here’s what you’ll need:
* Plastic Bottles: The bigger, the better! I recommend using 2-liter soda bottles or even larger water bottles. Make sure they’re clean and free of any residue. You’ll need one bottle per cabbage plant.
* Cabbage Seeds or Seedlings: You can start from seeds or buy small cabbage seedlings from your local nursery. If you’re a beginner, seedlings might be a bit easier to manage. Choose your favorite cabbage variety!
* Potting Mix: A good quality potting mix is crucial for healthy cabbage growth. Avoid using garden soil, as it can be too heavy and may contain pests or diseases.
* Scissors or a Utility Knife: For cutting the plastic bottles. Be careful!
* Drill or Nail: To create drainage holes in the bottles.
* Watering Can or Spray Bottle: For watering your cabbage plants.
* Fertilizer: A balanced fertilizer specifically formulated for vegetables. I prefer using organic options.
* Optional: Small pebbles or gravel for drainage.
Preparing the Bottles
This is a crucial step to ensure your cabbage plants have a comfortable and healthy home.
1. Clean the Bottles: Thoroughly wash the plastic bottles with soap and water to remove any dirt or residue. Rinse them well and let them dry completely.
2. Cut the Bottles: Using scissors or a utility knife, carefully cut the bottle in half horizontally. You’ll be using the bottom half as the container for your cabbage plant. I usually cut it about two-thirds of the way down, leaving a larger bottom portion.
3. Create Drainage Holes: This is super important! Use a drill or a nail to create several drainage holes in the bottom of the bottle. These holes will prevent water from accumulating and causing root rot. I usually make about 5-6 holes, evenly spaced.
4. Optional Drainage Layer: If you want to improve drainage even further, you can add a layer of small pebbles or gravel to the bottom of the bottle before adding the potting mix. This will help prevent the soil from becoming waterlogged.
Planting the Cabbage
Now comes the fun part – planting your cabbage!
1. Fill the Bottle with Potting Mix: Fill the prepared bottle with potting mix, leaving about an inch of space at the top. Gently press down on the soil to remove any air pockets.
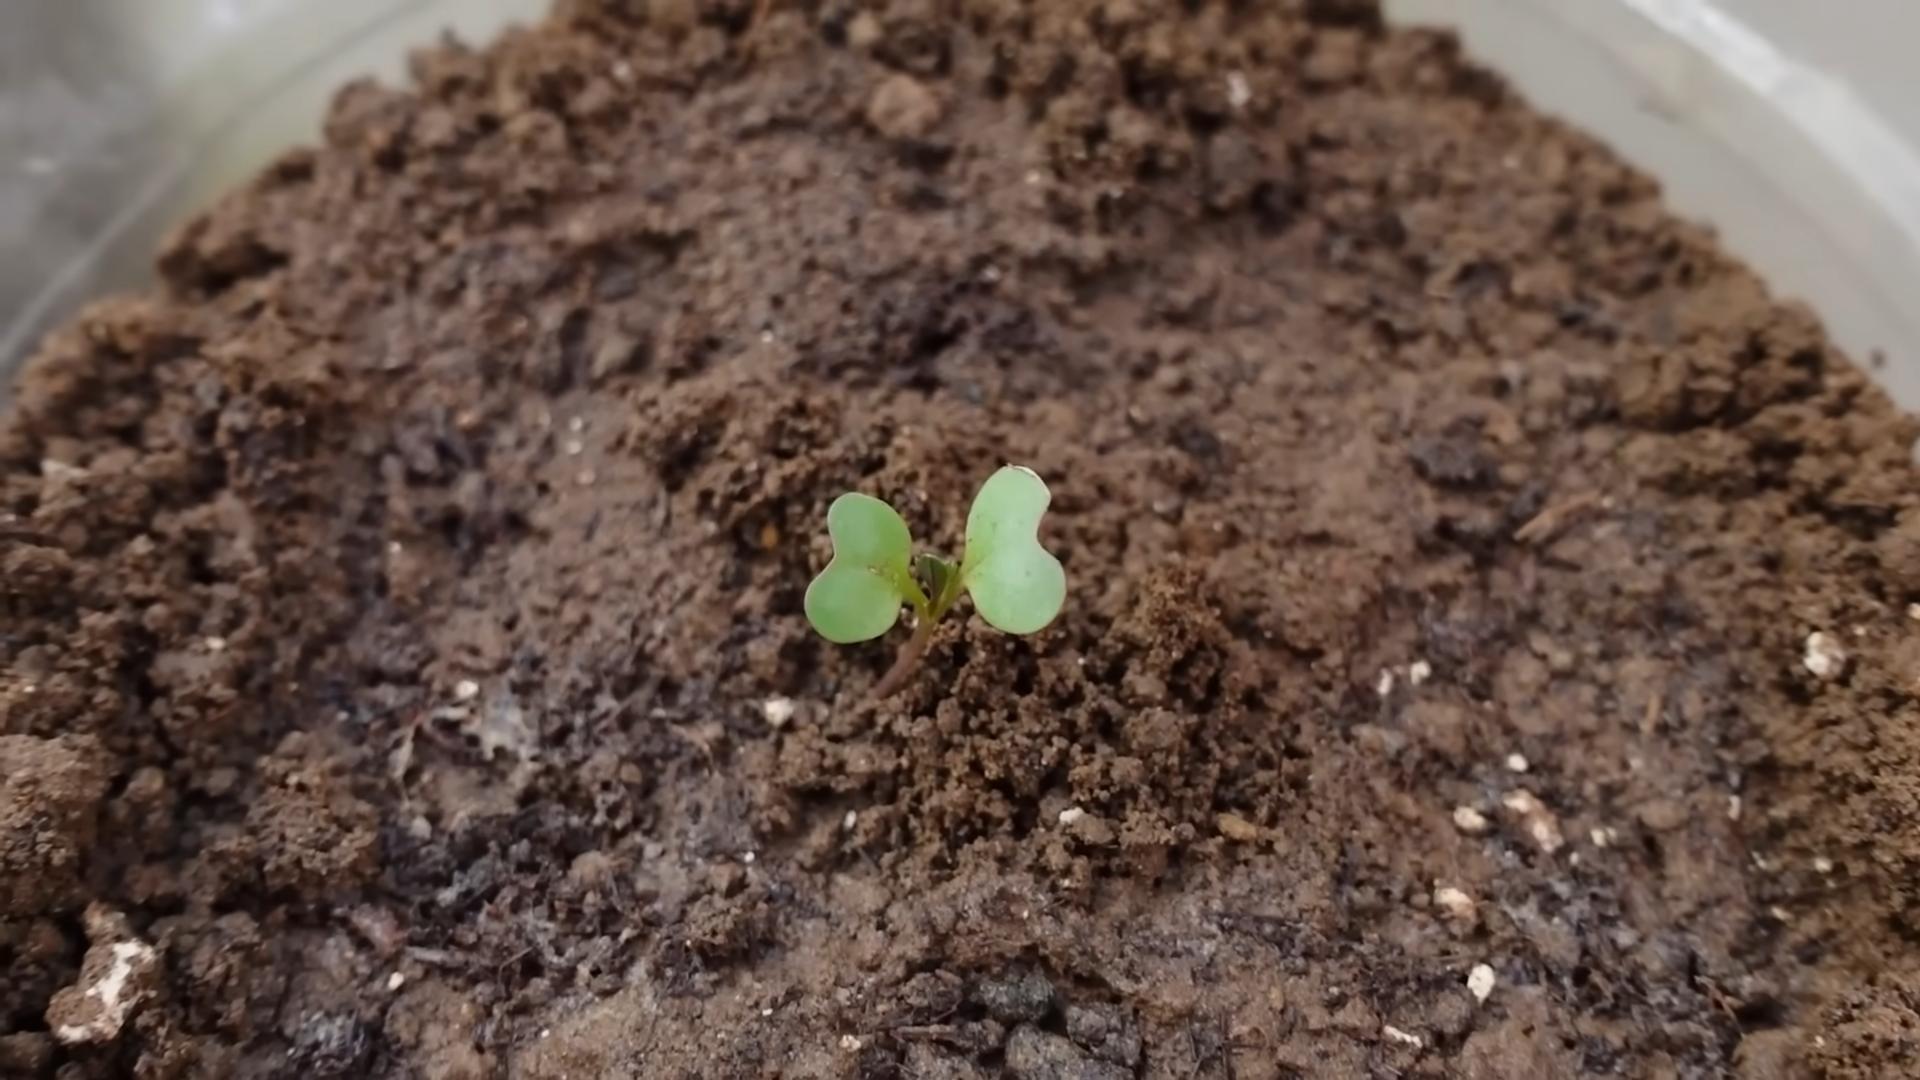
2. Plant the Seeds or Seedlings:
* From Seeds: Sow the cabbage seeds according to the instructions on the seed packet. Usually, you’ll need to plant them about half an inch deep. Water gently after planting.
* From Seedlings: Carefully remove the cabbage seedling from its container. Gently loosen the roots and place the seedling in the center of the bottle. Fill in around the seedling with potting mix, making sure the top of the root ball is level with the soil surface. Water thoroughly after planting.
3. Label Your Bottles: Use a permanent marker to label each bottle with the cabbage variety and the date of planting. This will help you keep track of your plants.
Caring for Your Cabbage Plants
Proper care is essential for healthy and productive cabbage plants.
1. Watering: Water your cabbage plants regularly, keeping the soil consistently moist but not waterlogged. Check the soil moisture by sticking your finger into the soil. If the top inch feels dry, it’s time to water. I usually water deeply, allowing the excess water to drain out of the drainage holes.
2. Sunlight: Cabbage plants need at least 6 hours of sunlight per day. Place your bottles in a sunny location, such as a balcony, patio, or windowsill. If you don’t have enough natural sunlight, you can supplement with grow lights.
3. Fertilizing: Feed your cabbage plants with a balanced fertilizer every 2-3 weeks. Follow the instructions on the fertilizer package. I prefer using organic fertilizers, such as compost tea or fish emulsion.
4. Pest Control: Keep an eye out for pests, such as aphids, cabbage worms, and slugs. If you notice any pests, take action immediately. You can use organic pest control methods, such as insecticidal soap or neem oil. Handpicking pests is also an effective method.
5. Weed Control: Remove any weeds that may grow in the bottles. Weeds can compete with your cabbage plants for nutrients and water.
6. Rotating the Bottles: If your cabbage plants are growing unevenly, rotate the bottles regularly to ensure that all sides receive equal sunlight.
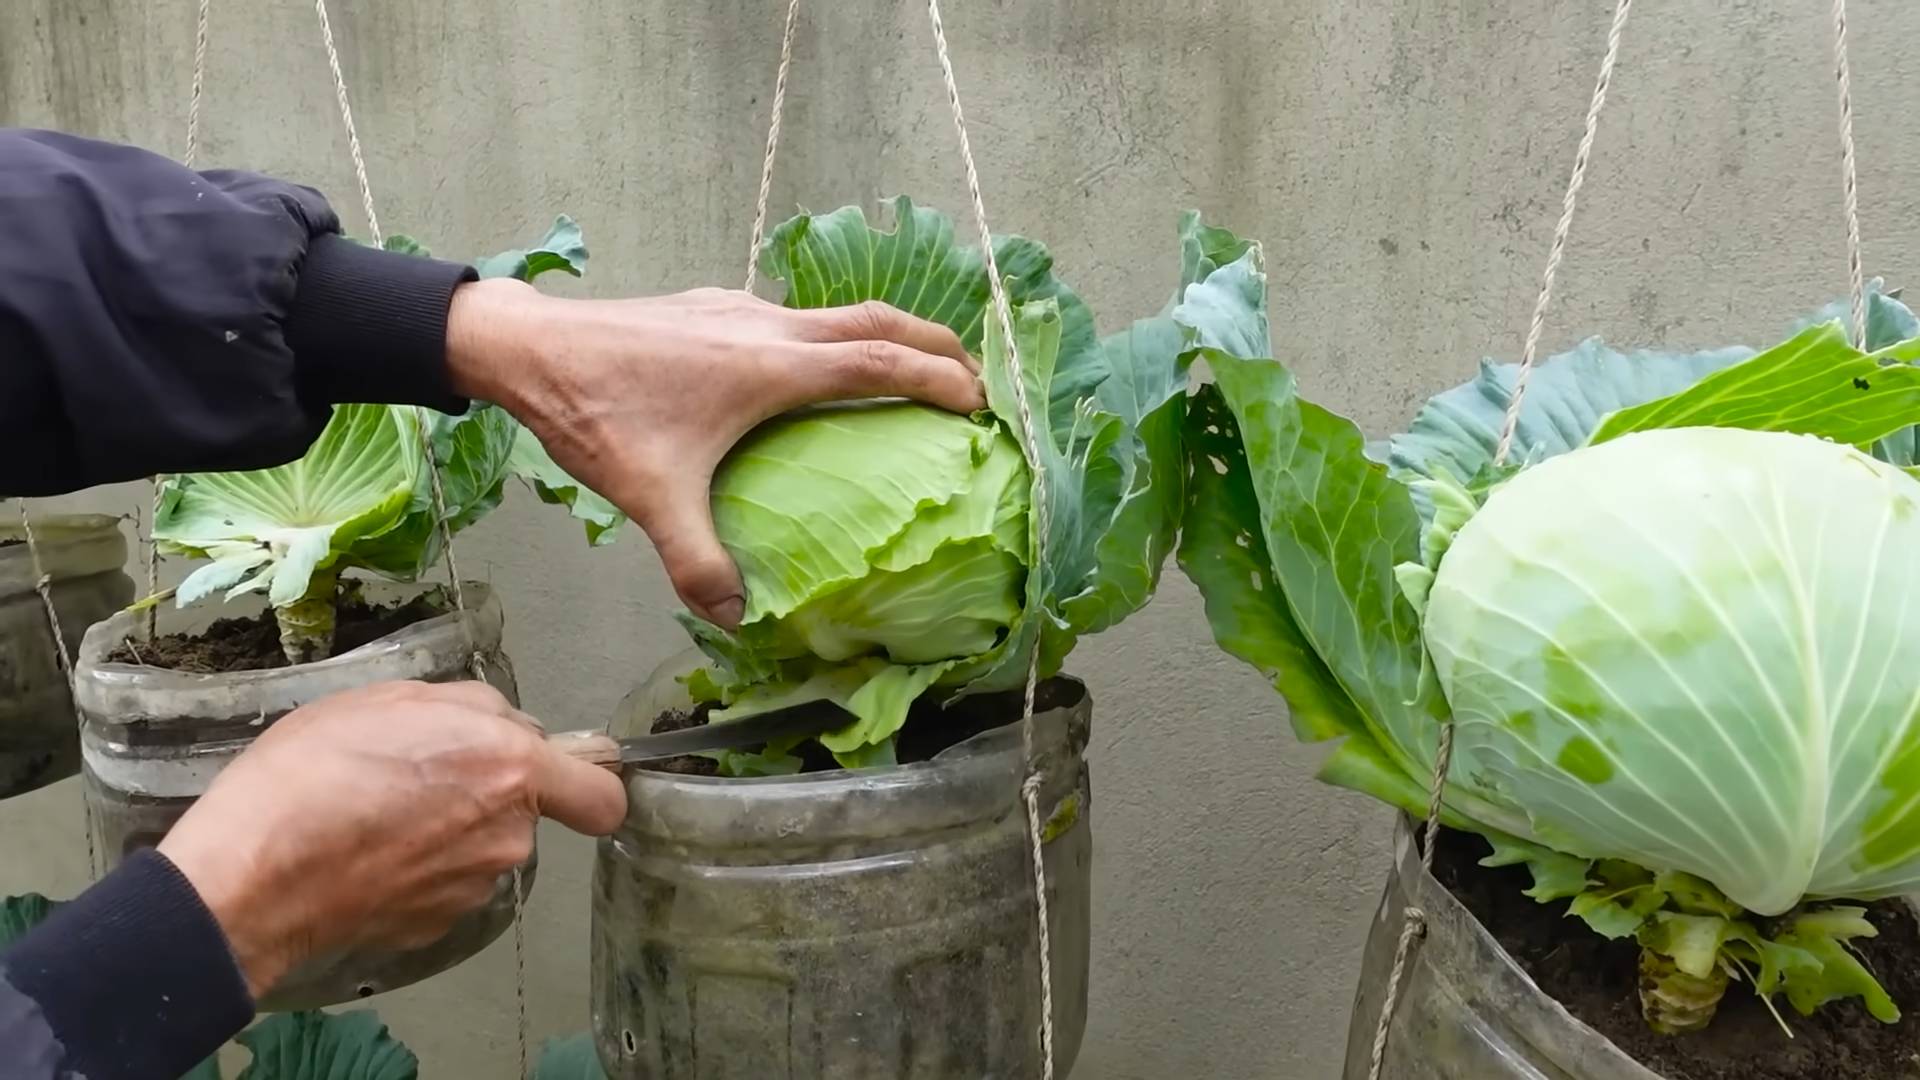
Harvesting Your Cabbage
The moment you’ve been waiting for!
1. Harvest Time: Cabbage is usually ready to harvest in 60-100 days, depending on the variety. You’ll know it’s time to harvest when the head is firm and compact.
2. Harvesting: To harvest your cabbage, use a sharp knife to cut the head from the stem. Leave a few outer leaves on the stem, as they may produce smaller heads later on.
3. Enjoy Your Harvest: Enjoy your homegrown cabbage in salads, soups, stews, or any other dish you like! Freshly harvested cabbage tastes amazing.
Troubleshooting
Even with the best care, you might encounter some challenges. Here are a few common problems and how to address them:
* Yellowing Leaves: This could be a sign of overwatering, underwatering, or nutrient deficiency. Check the soil moisture and adjust your watering accordingly. Fertilize your plants with a balanced fertilizer.
* Stunted Growth: This could be caused by insufficient sunlight, poor soil, or pests. Make sure your plants are getting enough sunlight and that the soil is well-draining and nutrient-rich. Check for pests and take action if necessary.
* Root Rot: This is caused by overwatering and poor drainage. Make sure your bottles have adequate drainage holes and avoid overwatering. If you suspect root rot, you may need to repot your plants in fresh potting mix.
* Pest Infestations: Keep a close eye on your plants for pests. Use organic pest control methods to prevent and treat infestations.
Tips for Success
Here are a few extra tips to help you succeed with growing cabbage in bottles:
* Choose the Right Variety: Select cabbage varieties that are well-suited for container gardening. Smaller varieties, such as ‘Dwarf Morden’ or ‘Golden Acre,’ are good choices.
* Start with Healthy Seedlings: If you’re using seedlings, choose healthy, vigorous plants from a reputable nursery.
* Use High-Quality Potting Mix: Don’t skimp on the potting mix! A good quality potting mix will provide your cabbage plants with the nutrients they need to thrive.
* Provide Adequate Drainage: Drainage is crucial for preventing root rot. Make sure your bottles have plenty of drainage holes and consider adding a layer of pebbles or gravel to the bottom.
* Water Regularly: Cabbage plants need consistent moisture. Water regularly, especially during hot, dry weather.
* Fertilize Regularly: Feed your cabbage plants with a balanced fertilizer every 2-3 weeks.
* Protect from Pests: Keep an eye out for pests and take action immediately if you notice any.
* Be Patient: Growing cabbage takes time. Be patient and don’t get discouraged if you don’t see results immediately.
Growing cabbage in bottles is a rewarding and space-saving way to enjoy fresh, homegrown vegetables. With a little bit of effort and attention, you can successfully cultivate these leafy greens, even if you only have a small balcony or patio. So, grab some bottles, seeds, and potting mix, and get started today! Happy gardening!
Conclusion
So, there you have it! Growing cabbage in bottles might sound unconventional, but it’s a game-changer for urban gardeners, those with limited space, or anyone looking for a fun and efficient way to cultivate this nutritious vegetable. This DIY trick isn’t just about novelty; it’s about maximizing yield, minimizing pest problems, and creating a visually appealing garden feature. Think of it as vertical farming on a miniature scale, bringing the farm-to-table experience right to your balcony or patio.
The benefits are undeniable. You’ll save precious garden space, reduce soilborne diseases, and have greater control over the growing environment. Plus, the elevated position of the bottles can deter slugs and snails, common cabbage pests that can decimate a crop overnight. Imagine harvesting crisp, healthy cabbage heads from your repurposed bottles, knowing you’ve bypassed the usual challenges of traditional gardening.
But the beauty of this method lies in its adaptability. Feel free to experiment with different bottle sizes and shapes. Smaller bottles are perfect for growing baby cabbages or ornamental varieties, while larger bottles can accommodate full-sized heads. You can also explore different growing mediums, such as coco coir or a soilless mix, to further optimize drainage and nutrient delivery. Consider adding companion plants like marigolds or nasturtiums around the base of your bottle setup to attract beneficial insects and further deter pests.
Don’t be afraid to get creative with your bottle garden! Paint the bottles with vibrant colors, arrange them in eye-catching patterns, or even create a living wall of cabbage. The possibilities are endless. This is your chance to personalize your garden and showcase your ingenuity.
Ultimately, growing cabbage in bottles is more than just a gardening technique; it’s a sustainable and rewarding experience. It’s a way to connect with nature, reduce your carbon footprint, and enjoy fresh, homegrown produce, even in the most urban environments. It’s also a fantastic conversation starter! Imagine the looks of surprise and admiration when your friends and neighbors see your thriving bottle garden.
We strongly encourage you to try this DIY trick and discover the joys of growing your own cabbage in bottles. It’s easier than you think, and the results are well worth the effort. Once you’ve given it a try, we’d love to hear about your experience! Share your photos, tips, and challenges in the comments below. Let’s build a community of bottle cabbage growers and inspire others to embrace this innovative and sustainable gardening method. Let us know what kind of cabbage you grew and what challenges you faced. Together, we can revolutionize the way we grow our food, one bottle at a time.
Frequently Asked Questions (FAQ)
What type of cabbage is best suited for growing in bottles?
While you can technically grow any type of cabbage in bottles, smaller varieties tend to thrive best. Consider varieties like ‘Dwarf Blue Vates’, ‘Golden Acre’, or even ornamental cabbages. These varieties mature quickly and don’t require as much space as larger cabbage heads. Baby cabbages are also an excellent choice for smaller bottles. Experimenting with different varieties is part of the fun, so don’t be afraid to try something new! Just be mindful of the mature size of the cabbage and choose a bottle that can accommodate its growth.
What size bottle should I use?
The ideal bottle size depends on the cabbage variety you choose. For smaller varieties like ‘Dwarf Blue Vates’, a 2-liter bottle can suffice. For larger varieties, you’ll need a larger container, such as a 3-liter or even a 5-liter bottle. Ensure the bottle has enough depth to accommodate the root system and allow for proper drainage. Remember to cut the bottle appropriately to create a wide enough opening for planting and harvesting.
How do I prepare the bottles for planting?
First, thoroughly clean the bottles with soap and water to remove any residue. Then, carefully cut a large opening in the side of the bottle, leaving enough of the bottle intact to provide structural support. Drill drainage holes in the bottom of the bottle to prevent waterlogging. You can also add a layer of gravel or small stones to the bottom of the bottle to further improve drainage. Consider painting the bottles a light color to reflect sunlight and prevent the soil from overheating.
What type of soil should I use?
A well-draining potting mix is essential for growing cabbage in bottles. Avoid using garden soil, as it can be too heavy and compact, leading to drainage problems. A mix of peat moss, perlite, and vermiculite is a good option. You can also use a soilless mix specifically designed for container gardening. Adding compost to the potting mix will provide essential nutrients for healthy cabbage growth.
How often should I water my cabbage plants in bottles?
Water your cabbage plants regularly, especially during hot and dry weather. The soil should be consistently moist but not waterlogged. Check the soil moisture by sticking your finger into the soil. If the top inch feels dry, it’s time to water. Water deeply, allowing the water to drain out of the drainage holes. Avoid overhead watering, as this can lead to fungal diseases.
How much sunlight do cabbage plants need?
Cabbage plants need at least 6 hours of sunlight per day to thrive. Choose a sunny location for your bottle garden. If you live in a hot climate, provide some afternoon shade to prevent the plants from overheating. You can also use grow lights to supplement natural sunlight, especially during the winter months.
How do I fertilize my cabbage plants in bottles?
Cabbage plants are heavy feeders and require regular fertilization. Use a balanced fertilizer, such as 10-10-10, according to the package directions. You can also use organic fertilizers, such as compost tea or fish emulsion. Fertilize your cabbage plants every 2-3 weeks during the growing season.
How do I protect my cabbage plants from pests and diseases?
Growing cabbage in bottles can help reduce pest problems, but it’s still important to monitor your plants regularly. Common cabbage pests include cabbage worms, aphids, and flea beetles. You can control these pests with insecticidal soap, neem oil, or by handpicking them off the plants. To prevent diseases, ensure good air circulation and avoid overhead watering. If you notice any signs of disease, such as yellowing leaves or spots, remove the affected leaves immediately.
When is the best time to harvest my cabbage?
Cabbage is ready to harvest when the head is firm and compact. The exact time will depend on the variety and growing conditions. Check the seed packet or plant tag for specific harvesting information. To harvest, simply cut the cabbage head off at the base of the plant with a sharp knife.
Can I reuse the bottles for future plantings?
Yes, you can reuse the bottles for future plantings. Just be sure to thoroughly clean them with soap and water before replanting. You may also want to disinfect the bottles with a bleach solution to kill any remaining pathogens. Consider rotating your crops to prevent soilborne diseases from building up in the bottles.
Leave a Comment