
Growing Brussel Sprouts Containers: Ever dreamt of harvesting your own mini cabbages right from your patio? I know I have! There’s something incredibly satisfying about nurturing a plant from seed to table, especially when it comes to those quirky, nutrient-packed Brussel sprouts. But let’s be honest, the thought of dedicating a huge garden plot to these little guys can be daunting. That’s where container gardening comes to the rescue!
For centuries, humans have cultivated food in containers, from ancient Egyptians growing herbs in pots to Renaissance gardeners creating elaborate orangeries. This tradition has evolved, and now, even with limited space, we can enjoy fresh, homegrown produce. Growing Brussel Sprouts Containers is not only possible, but it’s also a fantastic way to control the growing environment and protect your precious sprouts from pests and diseases.
Let’s face it, buying Brussel sprouts from the store can be a gamble. Sometimes they’re fresh and vibrant, other times they’re… well, less than appealing. But with this DIY guide, you’ll learn simple yet effective tricks to cultivate your own thriving Brussel sprout plants in containers. Imagine the joy of serving up a delicious, homegrown side dish that you nurtured from start to finish! So, grab your gardening gloves, and let’s dive into the wonderful world of container gardening and unlock the secrets to growing the best Brussel sprouts you’ve ever tasted!
Growing Brussels Sprouts in Containers: A Complete DIY Guide
Hey there, fellow gardening enthusiasts! I’m so excited to share my experience with growing Brussels sprouts in containers. It’s totally doable, even if you don’t have a sprawling garden. I’ve learned a few tricks along the way, and I’m here to guide you through the entire process, from choosing the right container to harvesting those delicious little sprouts. Let’s get started!
Choosing the Right Container and Soil
First things first, you need to pick the perfect home for your Brussels sprouts. Size matters! And so does the soil.
* Container Size: Brussels sprouts need room to grow, both above and below the soil. I recommend a container that’s at least 12 inches in diameter and 12 inches deep. A 5-gallon bucket or a large grow bag works great. Bigger is generally better, as it gives the roots more space to spread out and access nutrients.
* Drainage: This is crucial! Make sure your container has plenty of drainage holes. Brussels sprouts don’t like soggy feet. If your container doesn’t have enough holes, you can easily drill a few more.
* Material: Plastic, terracotta, or even fabric grow bags are all suitable. I personally prefer grow bags because they allow for excellent drainage and aeration, which helps prevent root rot.
* Soil: Forget using garden soil straight from the ground. It’s often too dense and doesn’t drain well in containers. Instead, opt for a high-quality potting mix. I like to use a mix that’s specifically formulated for vegetables. You can also make your own by combining equal parts of compost, peat moss (or coconut coir), and perlite or vermiculite. This creates a light, well-draining, and nutrient-rich environment for your Brussels sprouts.
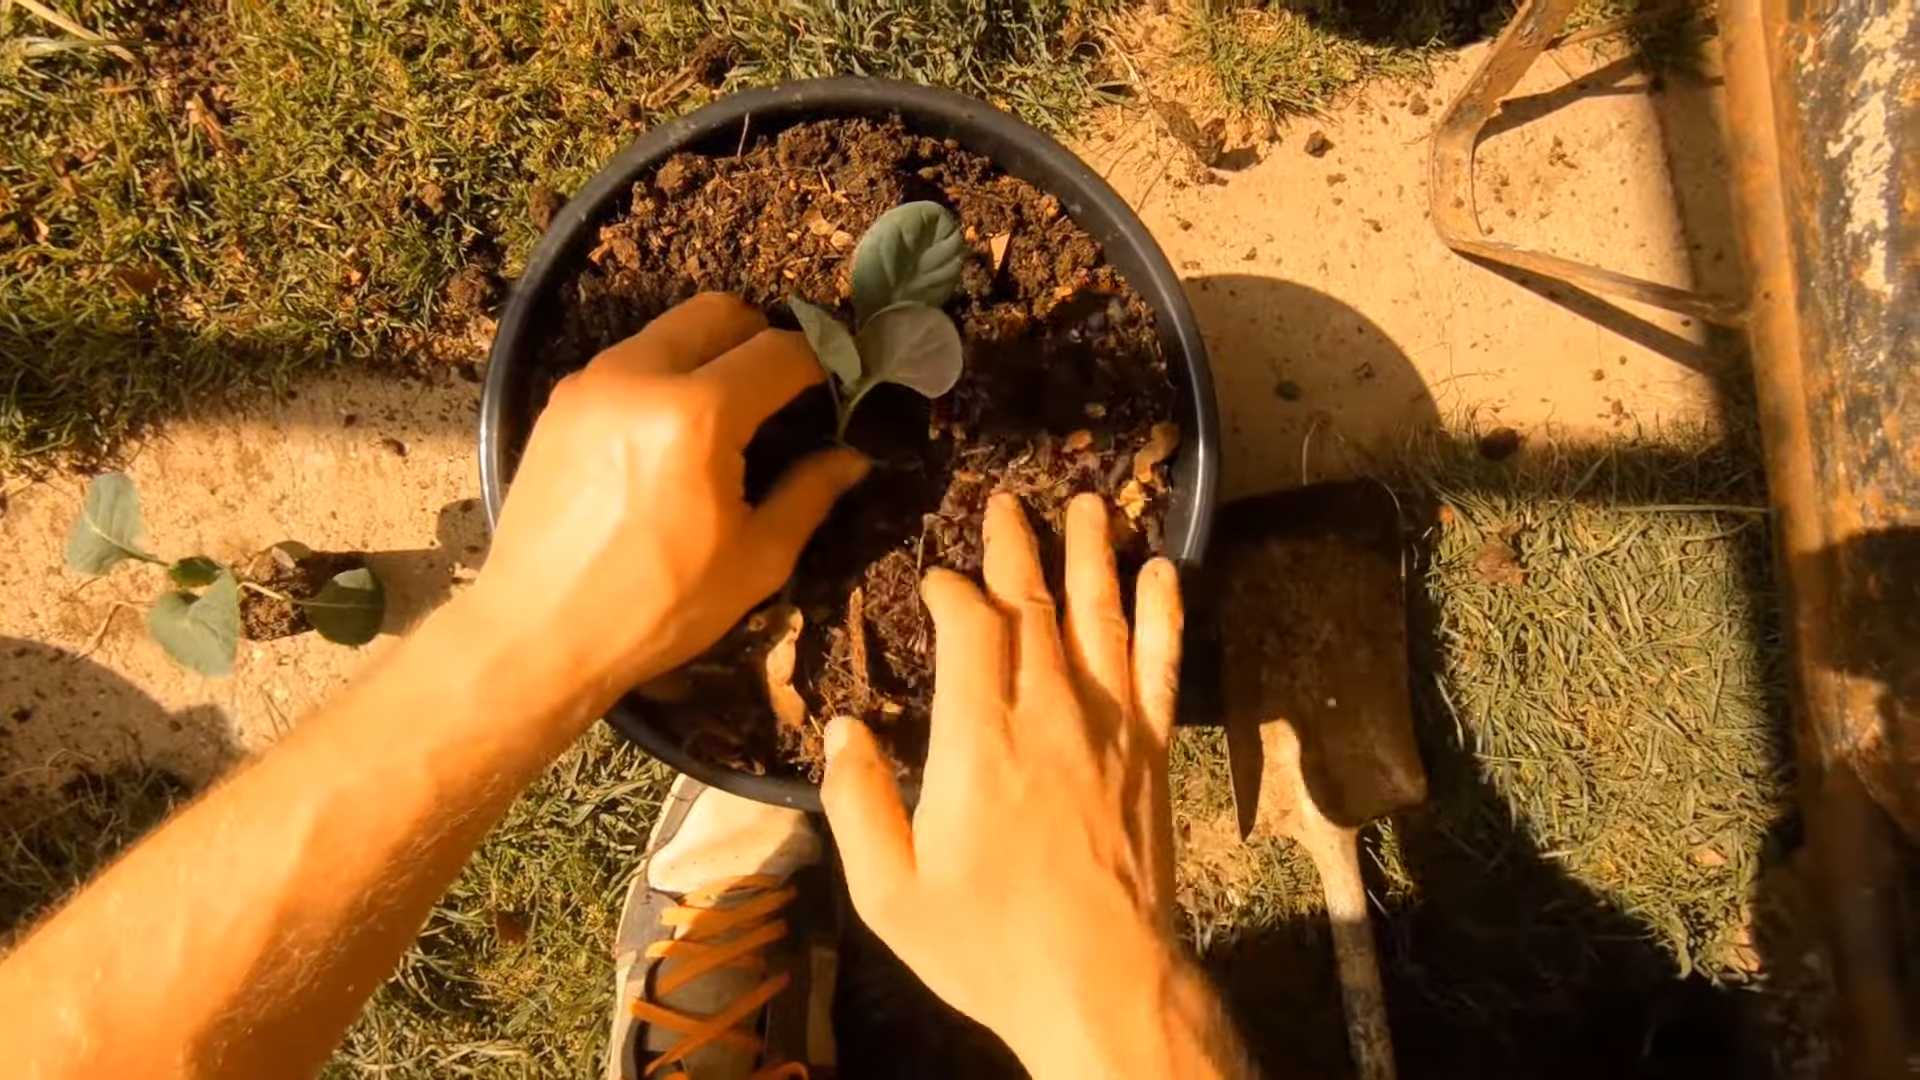
Planting Your Brussels Sprouts
Now that you’ve got your container and soil sorted, it’s time to get those sprouts in the ground!
1. Starting from Seed (Optional): You can start Brussels sprouts from seed indoors about 4-6 weeks before the last expected frost. Sow the seeds about ½ inch deep in seed-starting trays or small pots. Keep the soil moist and warm (around 70-75°F). Once the seedlings have a few sets of true leaves, you can transplant them into larger containers.
2. Buying Transplants (Recommended for Beginners): This is the easiest way to get started. Look for healthy-looking transplants at your local garden center. Choose plants that are about 4-6 inches tall and have a good green color. Avoid plants that are yellowing, wilting, or have any signs of pests or diseases.
3. Planting the Transplants: Fill your container with the potting mix, leaving about an inch or two of space at the top. Dig a hole in the center of the container that’s large enough to accommodate the root ball of the transplant. Gently remove the transplant from its container and loosen the roots slightly. Place the transplant in the hole and backfill with potting mix. Make sure the top of the root ball is level with the soil surface.
4. Spacing: If you’re planting multiple Brussels sprouts in the same container (which I don’t recommend for beginners, but it’s possible with a very large container), space them at least 18 inches apart. This gives them enough room to grow and prevents overcrowding.
5. Watering: Water the newly planted Brussels sprouts thoroughly. The soil should be moist but not soggy.
Caring for Your Brussels Sprouts
This is where the real work begins, but trust me, it’s worth it!
1. Sunlight: Brussels sprouts need at least 6 hours of sunlight per day. Place your container in a sunny spot in your yard or on your balcony. If you don’t have a spot that gets enough sunlight, you can supplement with grow lights.
2. Watering: Water regularly, especially during hot, dry weather. Check the soil moisture by sticking your finger about an inch into the soil. If it feels dry, it’s time to water. Avoid overwatering, as this can lead to root rot. I usually water deeply every few days, allowing the soil to dry out slightly between waterings.
3. Fertilizing: Brussels sprouts are heavy feeders, so they need regular fertilization. Start fertilizing about 2-3 weeks after planting. Use a balanced fertilizer (e.g., 10-10-10) or a fertilizer specifically formulated for vegetables. Follow the instructions on the fertilizer package. I like to use a slow-release fertilizer, which provides a steady supply of nutrients over time. You can also supplement with liquid fertilizer every few weeks.
4. Pest Control: Brussels sprouts are susceptible to a variety of pests, including aphids, cabbage worms, and flea beetles. Inspect your plants regularly for signs of pests. If you find any, you can try hand-picking them off or using insecticidal soap or neem oil. I prefer to use organic pest control methods whenever possible. Covering your plants with row covers can also help prevent pest infestations.
5. Supporting the Plants: As Brussels sprouts grow, they can become quite tall and top-heavy. This is especially true when they’re loaded with sprouts. To prevent them from falling over, you may need to provide support. You can use stakes, tomato cages, or even tie the plants to a trellis.
6. Removing Lower Leaves: As the Brussels sprouts start to form, you can remove the lower leaves of the plant. This helps improve air circulation and allows more sunlight to reach the sprouts. It also encourages the plant to focus its energy on producing sprouts. I usually remove the leaves that are yellowing or browning.
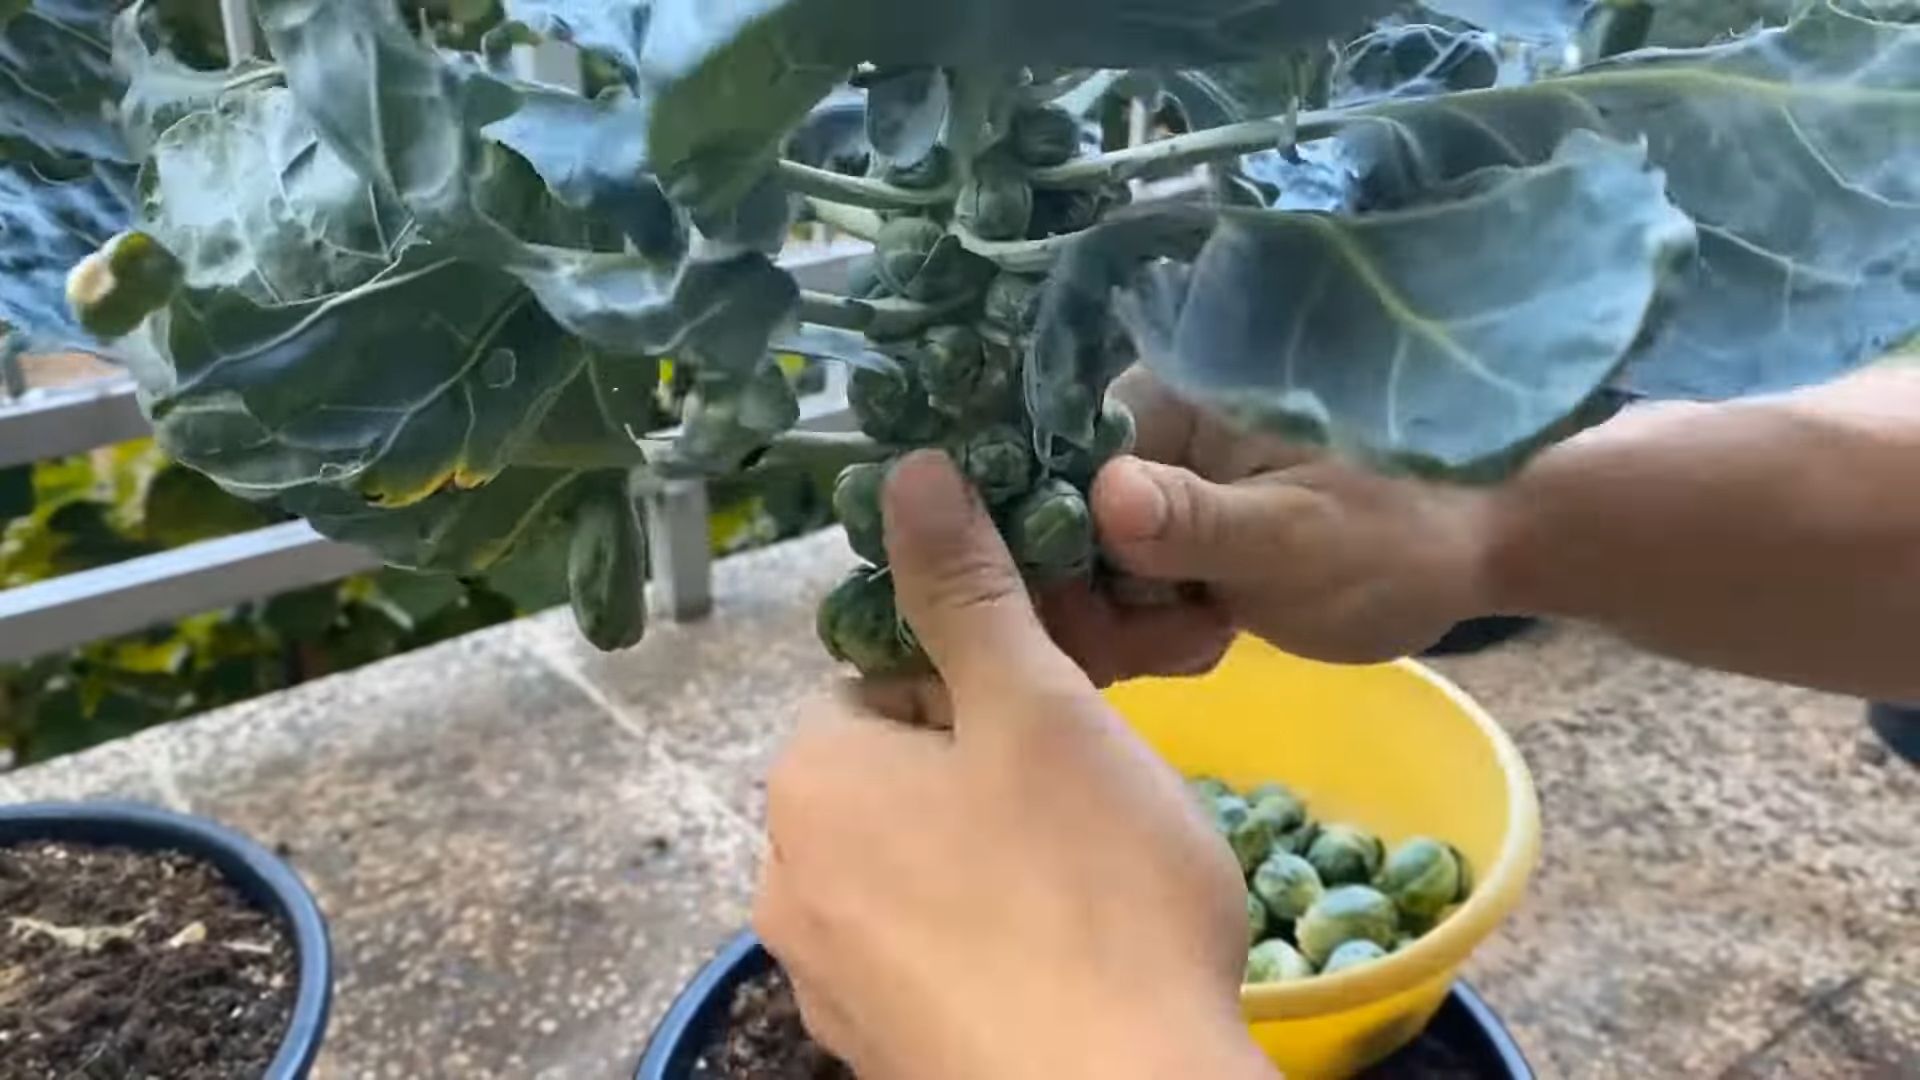
Harvesting Your Brussels Sprouts
The moment you’ve been waiting for!
1. Timing: Brussels sprouts are typically ready to harvest about 90-100 days after planting. The sprouts should be firm, green, and about 1-2 inches in diameter. They’re usually ready to harvest from the bottom of the plant upwards.
2. Harvesting Technique: To harvest, simply twist the sprouts off the stem. Start with the lowest sprouts and work your way up. You can harvest the sprouts gradually as they mature.
3. After Harvesting: After harvesting the sprouts, you can remove the remaining leaves from the plant. This will encourage the plant to produce more sprouts. You can also cut off the top of the plant to encourage the remaining sprouts to mature more quickly.
4. Storage: Brussels sprouts are best eaten fresh, but they can be stored in the refrigerator for up to a week. Store them in a plastic bag or container to prevent them from drying out.
Troubleshooting
Even with the best care, you might encounter some problems along the way. Here are a few common issues and how to deal with them:
* Yellowing Leaves: This can be caused by a variety of factors, including overwatering, underwatering, nutrient deficiencies, or pests. Check the soil moisture and adjust your watering accordingly. Fertilize regularly with a balanced fertilizer. Inspect your plants for pests and treat them as needed.
* Sprouts Not Forming: This can be caused by insufficient sunlight, poor soil, or lack of fertilization. Make sure your plants are getting at least 6 hours of sunlight per day. Use a high-quality potting mix and fertilize regularly.
* Sprouts Splitting: This is usually caused by inconsistent watering. Try to water regularly and avoid letting the soil dry out completely.
* Pest Infestations: As mentioned earlier, Brussels sprouts are susceptible to a variety of pests. Inspect your plants regularly and treat them as needed.
Extra Tips for Success
Here are a few extra tips that I’ve learned over the years:
* Choose the Right Variety: Some varieties of Brussels sprouts are better suited for container gardening than others. Look for compact varieties that don’t get too tall.
* Rotate Your Crops: Don’t plant Brussels sprouts in the same container year after year. This can deplete the soil of nutrients and increase the risk of pests and diseases.
* Companion Planting: Plant companion plants alongside your Brussels sprouts to help deter pests and attract beneficial insects. Good companion plants include marigolds, nasturtiums, and rosemary.
* Mulch: Add a layer of mulch around the base of the plants to help retain moisture and suppress weeds.
* Be Patient: Growing Brussels sprouts takes time and effort. Don’t get discouraged if you don’t see results right away. Just keep providing them with the care they need, and you’ll be rewarded with a bountiful harvest.
Growing Brussels sprouts in containers is a rewarding experience. It allows you to enjoy fresh, homegrown vegetables even if you don’t have a traditional garden. With a little bit of planning and effort, you can successfully grow Brussels sprouts in containers and enjoy a delicious harvest. Happy gardening!
Conclusion
So, there you have it! Growing Brussel sprouts in containers isn’t just a possibility; it’s a pathway to fresh, delicious, and readily available vegetables right at your fingertips. We’ve walked through the essential steps, from selecting the right container and soil to nurturing your plants and protecting them from pests. But why should you take the plunge and embark on this container gardening adventure?
Firstly, consider the sheer convenience. No more trekking to the grocery store for subpar Brussel sprouts that have been sitting on shelves for days. With container gardening, you harvest at peak ripeness, ensuring maximum flavor and nutritional value. Imagine the satisfaction of serving a side dish of perfectly roasted Brussel sprouts, knowing you nurtured them from tiny seedlings to mature, flavorful vegetables.
Secondly, container gardening offers unparalleled control. You dictate the soil composition, the watering schedule, and the level of sun exposure. This control allows you to create the ideal environment for your Brussel sprouts to thrive, even if your outdoor space isn’t traditionally suited for them. You can easily move your containers to chase the sun or shelter them from harsh weather, giving your plants the best possible chance of success.
Thirdly, let’s not forget the aesthetic appeal. A container garden brimming with healthy, vibrant Brussel sprouts adds a touch of rustic charm to any patio, balcony, or deck. The deep green foliage and the intriguing clusters of sprouts create a visually appealing display that’s sure to impress your guests. It’s a conversation starter and a testament to your green thumb.
But the benefits don’t stop there. Growing your own food, even in a small container garden, fosters a deeper connection to nature and a greater appreciation for the food we eat. It’s a rewarding experience that can reduce stress, improve your mood, and provide a sense of accomplishment. Plus, it’s a fantastic way to teach children about the importance of healthy eating and sustainable living.
Now, for a few variations to spice things up! Consider companion planting. Marigolds, for example, can help deter pests, while herbs like rosemary and thyme can enhance the flavor of your Brussel sprouts. You could also experiment with different varieties of Brussel sprouts. Some are more compact and better suited for containers, while others offer unique flavors and colors. Try ‘Redarling’ for a beautiful reddish-purple hue or ‘Long Island Improved’ for a classic, reliable variety.
Don’t be afraid to get creative with your container selection, too. While a standard plastic pot works perfectly well, you could also use repurposed items like old buckets, wooden crates, or even galvanized steel tubs. Just make sure your chosen container has adequate drainage holes.
Growing Brussel sprouts in containers is a truly rewarding experience. It’s a chance to connect with nature, enjoy fresh, delicious vegetables, and add a touch of beauty to your outdoor space. So, what are you waiting for? Grab a container, some soil, and a few Brussel sprout seedlings, and get started today!
We’re confident that you’ll be amazed by the results. And we’d love to hear about your experience! Share your photos, tips, and stories with us in the comments below. Let’s build a community of container gardening enthusiasts and inspire others to grow their own food. Happy gardening!
Frequently Asked Questions (FAQ)
What is the best size container for growing Brussel sprouts?
A good rule of thumb is to use a container that is at least 12 inches in diameter and 12 inches deep for each Brussel sprout plant. However, larger is generally better, as it provides more room for the roots to grow and access nutrients. A 5-gallon container is a good starting point, but a 10-gallon container will give your plants even more space to thrive. Consider the mature size of the variety you’re growing when making your decision.
What type of soil is best for Brussel sprouts in containers?
Brussel sprouts prefer well-draining, fertile soil with a slightly acidic to neutral pH (around 6.0 to 7.0). A good potting mix specifically formulated for vegetables is ideal. Avoid using garden soil, as it can be too heavy and compact in containers, hindering drainage and root growth. You can also amend your potting mix with compost or other organic matter to improve its fertility and water retention.
How often should I water my container-grown Brussel sprouts?
Watering frequency depends on several factors, including the weather, the size of your container, and the type of soil you’re using. Generally, you should water your Brussel sprouts whenever the top inch of soil feels dry to the touch. Water deeply, ensuring that the entire root ball is moistened. Avoid overwatering, as this can lead to root rot. During hot, dry weather, you may need to water daily, while during cooler, wetter periods, you may only need to water every few days.
How much sunlight do Brussel sprouts need?
Brussel sprouts need at least 6 hours of direct sunlight per day to thrive. Choose a location for your containers that receives plenty of sunlight. If you live in a particularly hot climate, you may need to provide some afternoon shade to prevent the plants from overheating. If you don’t have a sunny spot, you can supplement with grow lights.
How do I fertilize my container-grown Brussel sprouts?
Brussel sprouts are heavy feeders, so regular fertilization is essential. Start by incorporating a slow-release fertilizer into your potting mix at planting time. Then, supplement with a liquid fertilizer every 2-3 weeks throughout the growing season. Choose a fertilizer that is high in nitrogen, phosphorus, and potassium (NPK). You can also use organic fertilizers like compost tea or fish emulsion.
How do I protect my Brussel sprouts from pests and diseases?
Several pests and diseases can affect Brussel sprouts, including aphids, cabbage worms, and clubroot. To prevent pest problems, inspect your plants regularly and remove any pests by hand. You can also use insecticidal soap or neem oil to control infestations. To prevent diseases, ensure good air circulation around your plants and avoid overwatering. If you notice any signs of disease, remove the affected leaves immediately. Covering your plants with netting can also help to prevent pest infestations.
When are Brussel sprouts ready to harvest?
Brussel sprouts are typically ready to harvest about 90-100 days after planting. The sprouts should be firm, green, and about 1-2 inches in diameter. Start harvesting from the bottom of the plant and work your way up. You can harvest individual sprouts as needed, or you can harvest the entire stalk at once.
Can I grow Brussel sprouts in containers indoors?
While it’s possible to grow Brussel sprouts indoors, it can be challenging. They require a lot of light, so you’ll need to provide supplemental lighting with grow lights. You’ll also need to ensure good air circulation and maintain a consistent temperature. It’s generally easier to grow Brussel sprouts outdoors in containers, but if you’re determined to grow them indoors, be prepared to provide the necessary conditions.
What are some common problems when growing Brussel sprouts in containers?
Some common problems include pest infestations, diseases, nutrient deficiencies, and lack of sunlight. Be vigilant in monitoring your plants and addressing any problems promptly. Providing the right growing conditions and taking preventative measures can help to minimize these issues.
Can I save seeds from my container-grown Brussel sprouts?
Saving seeds from Brussel sprouts can be tricky because they are cross-pollinated. This means that the seeds you collect may not produce plants that are true to type. If you want to save seeds, you’ll need to isolate your plants from other members of the Brassica family (like cabbage, kale, and broccoli) to prevent cross-pollination. Even then, there’s no guarantee that the seeds will produce the same variety of Brussel sprouts. For best results, it’s generally recommended to purchase seeds from a reputable source each year.

Leave a Comment