
Mint Growing Hack: Are you dreaming of fragrant mojitos, refreshing teas, and vibrant salads, all enhanced by the delightful taste of fresh mint? But are you also battling with a mint plant that’s either struggling to thrive or, conversely, taking over your entire garden like a green, leafy monster? I totally get it! Mint, while wonderfully versatile, can be a bit of a diva in the garden.
For centuries, mint has been cherished not only for its culinary uses but also for its medicinal properties. From ancient Egyptians using it for digestive ailments to Romans crowning themselves with mint wreaths, this herb boasts a rich and fascinating history. But let’s be honest, knowing its historical significance doesn’t solve the problem of a leggy, sparse, or overly aggressive mint plant!
That’s where this mint growing hack comes in. I’m going to share a simple, yet incredibly effective DIY trick that will help you cultivate a thriving mint patch, without the headache of constant maintenance or the fear of a minty takeover. Whether you’re a seasoned gardener or just starting out, this hack will empower you to enjoy a continuous supply of fresh, flavorful mint, right at your fingertips. Say goodbye to store-bought mint and hello to a flourishing, fragrant garden!
Grow an Endless Supply of Mint Indoors: The Water Propagation Method
Hey there, fellow plant enthusiasts! Are you tired of buying those tiny, expensive bunches of mint from the grocery store, only to have them wilt away in a few days? I was too! That’s why I’m going to share my favorite DIY hack for growing an endless supply of fresh mint right in your own home, using nothing but water propagation. It’s super easy, incredibly rewarding, and perfect for anyone, even if you don’t have a green thumb. Trust me, if I can do it, you can too!
What is Water Propagation?
Water propagation is basically a way of cloning plants by encouraging them to grow roots in water. It’s a simple and effective method, especially for herbs like mint, because they root so readily. You’re essentially taking a cutting from an existing plant and giving it the perfect environment to develop its own root system, creating a brand new plant.
Why Water Propagation for Mint?
Mint is a vigorous grower, and it thrives in water propagation. Here’s why I love this method:
* It’s Cost-Effective: No need to keep buying mint! One initial purchase can give you an endless supply.
* It’s Easy: Seriously, it’s almost foolproof.
* It’s Fast: You’ll see roots forming in just a few days.
* It’s Space-Saving: You can grow mint in small containers on a windowsill.
* It’s Visually Appealing: Watching the roots grow is actually quite fascinating!
* It’s a Great Way to Expand Your Herb Garden: Once rooted, you can transplant your mint into soil and have even more plants.
Materials You’ll Need
Before we get started, let’s gather our supplies. You probably have most of these things already:
* Fresh Mint Stems: You can buy these from the grocery store (look for healthy, vibrant stems) or take cuttings from an existing mint plant if you have one. Make sure the stems are at least 4-6 inches long.
* A Clean Glass or Jar: Any glass or jar will work, as long as it’s clean. I like to use mason jars or recycled glass bottles.
* Clean Water: Tap water is fine, but let it sit out for a few hours to allow the chlorine to evaporate. Filtered water is even better.
* Sharp Scissors or Pruning Shears: Make sure they’re clean to prevent infection.
* (Optional) Rooting Hormone: This isn’t necessary, but it can speed up the rooting process. You can find it at most garden centers.
* (Optional) Small Pots and Potting Mix: For transplanting your rooted mint cuttings into soil later on.
Step-by-Step Guide to Water Propagating Mint
Alright, let’s get down to business! Here’s how I propagate mint in water:
1. Preparing the Mint Cuttings
* Choose Healthy Stems: Select mint stems that are vibrant green and free from any signs of disease or damage. Avoid stems that are wilted, yellowed, or have brown spots.
* Remove Lower Leaves: Using your scissors or pruning shears, carefully remove the leaves from the bottom 1-2 inches of each stem. This is important because the submerged leaves will rot and contaminate the water. I usually just pinch them off with my fingers.
* (Optional) Dip in Rooting Hormone: If you’re using rooting hormone, dip the cut end of each stem into the powder or liquid, following the instructions on the product label. This step isn’t essential, but it can help speed up root development.
2. Setting Up Your Water Propagation Station
* Fill Your Glass or Jar with Water: Fill your chosen container with clean water, leaving about an inch of space at the top.
* Arrange the Cuttings: Place the mint cuttings into the water, making sure that the cut ends are submerged and the remaining leaves are above the waterline. Don’t overcrowd the container; give each cutting enough space to breathe. I usually put 3-5 cuttings in a standard mason jar.
3. Finding the Right Spot
* Choose a Bright Location: Place your jar of mint cuttings in a location that receives bright, indirect sunlight. A windowsill is usually a good option, but avoid direct sunlight, which can scorch the leaves.
* Maintain a Consistent Temperature: Mint prefers a temperature between 65-75°F (18-24°C). Avoid placing the cuttings near drafts or extreme temperatures.
4. Maintaining Your Mint Cuttings
* Change the Water Regularly: This is crucial! Change the water every 1-2 days to prevent bacteria and algae from growing. Use fresh, clean water each time.
* Monitor Root Growth: Keep an eye on your cuttings for root development. You should start to see small roots emerging from the nodes (the points where the leaves were removed) within a few days.
* Be Patient: Rooting times can vary depending on the variety of mint and the environmental conditions. Don’t get discouraged if you don’t see roots right away. Just keep changing the water and providing bright, indirect light.
5. Transplanting Your Rooted Mint (Optional)
* Wait for Sufficient Root Growth: Once the roots are about 1-2 inches long, your mint cuttings are ready to be transplanted into soil.
* Prepare Your Pots: Choose small pots with drainage holes and fill them with a well-draining potting mix.
* Gently Remove the Cuttings: Carefully remove the rooted mint cuttings from the water, being careful not to damage the delicate roots.
* Plant the Cuttings: Make a small hole in the potting mix and gently place the roots into the hole. Cover the roots with soil and gently pat it down.
* Water Thoroughly: Water the newly planted mint cuttings thoroughly until the water drains out of the bottom of the pot.
* Provide Bright, Indirect Light: Place the potted mint cuttings in a location that receives bright, indirect sunlight.
* Keep the Soil Moist: Keep the soil consistently moist, but not soggy. Water when the top inch of soil feels dry to the touch.
Troubleshooting
Even with the best intentions, sometimes things don’t go as planned. Here are a few common problems you might encounter and how to fix them:
* Leaves Turning Yellow: This could be a sign of overwatering, underwatering, or lack of nutrients. Make sure you’re changing the water regularly and providing bright, indirect light. If you’ve transplanted your mint into soil, adjust your watering schedule accordingly.
* Stems Rotting: This is usually caused by bacteria or fungus. Make sure you’re using clean water and changing it regularly. You can also add a drop of hydrogen peroxide to the water to help prevent rot.
* No Root Growth: This could be due to a number of factors, including poor lighting, cold temperatures, or unhealthy cuttings. Make sure you’re providing bright, indirect light and maintaining a consistent temperature. You can also try using rooting hormone to speed up the process.
* Algae Growth in the Water: Algae growth is common in water propagation. To prevent it, make sure you’re using a clean container and changing the water regularly. You can also try using a dark-colored container to block out light, which can help inhibit algae growth.
Tips for Success
Here are a few extra tips to help you succeed with water propagating mint:
* Use Clean Tools: Always use clean scissors or pruning shears to prevent the spread of disease.
* Change the Water Regularly: This is the most important step! Changing the water every 1-2 days will prevent bacteria and algae from growing and ensure that your mint cuttings have access to fresh oxygen.
* Be Patient: Rooting times can vary, so don’t get discouraged if you don’t see roots right away. Just keep providing the right conditions and your mint cuttings will eventually root.
* Experiment with Different Varieties: There are many different varieties of mint, each with its own unique flavor and aroma. Try propagating different varieties to find your favorites.
* Enjoy Your Fresh Mint! Once your mint is rooted, you can use it in all sorts of culinary creations, from teas and cocktails to salads and desserts.
Beyond Water: Planting Your Mint in Soil
While water propagation is fantastic for starting new mint plants, eventually, you’ll want to consider planting them in soil for long-term growth and a more robust flavor. Here’s a quick rundown:
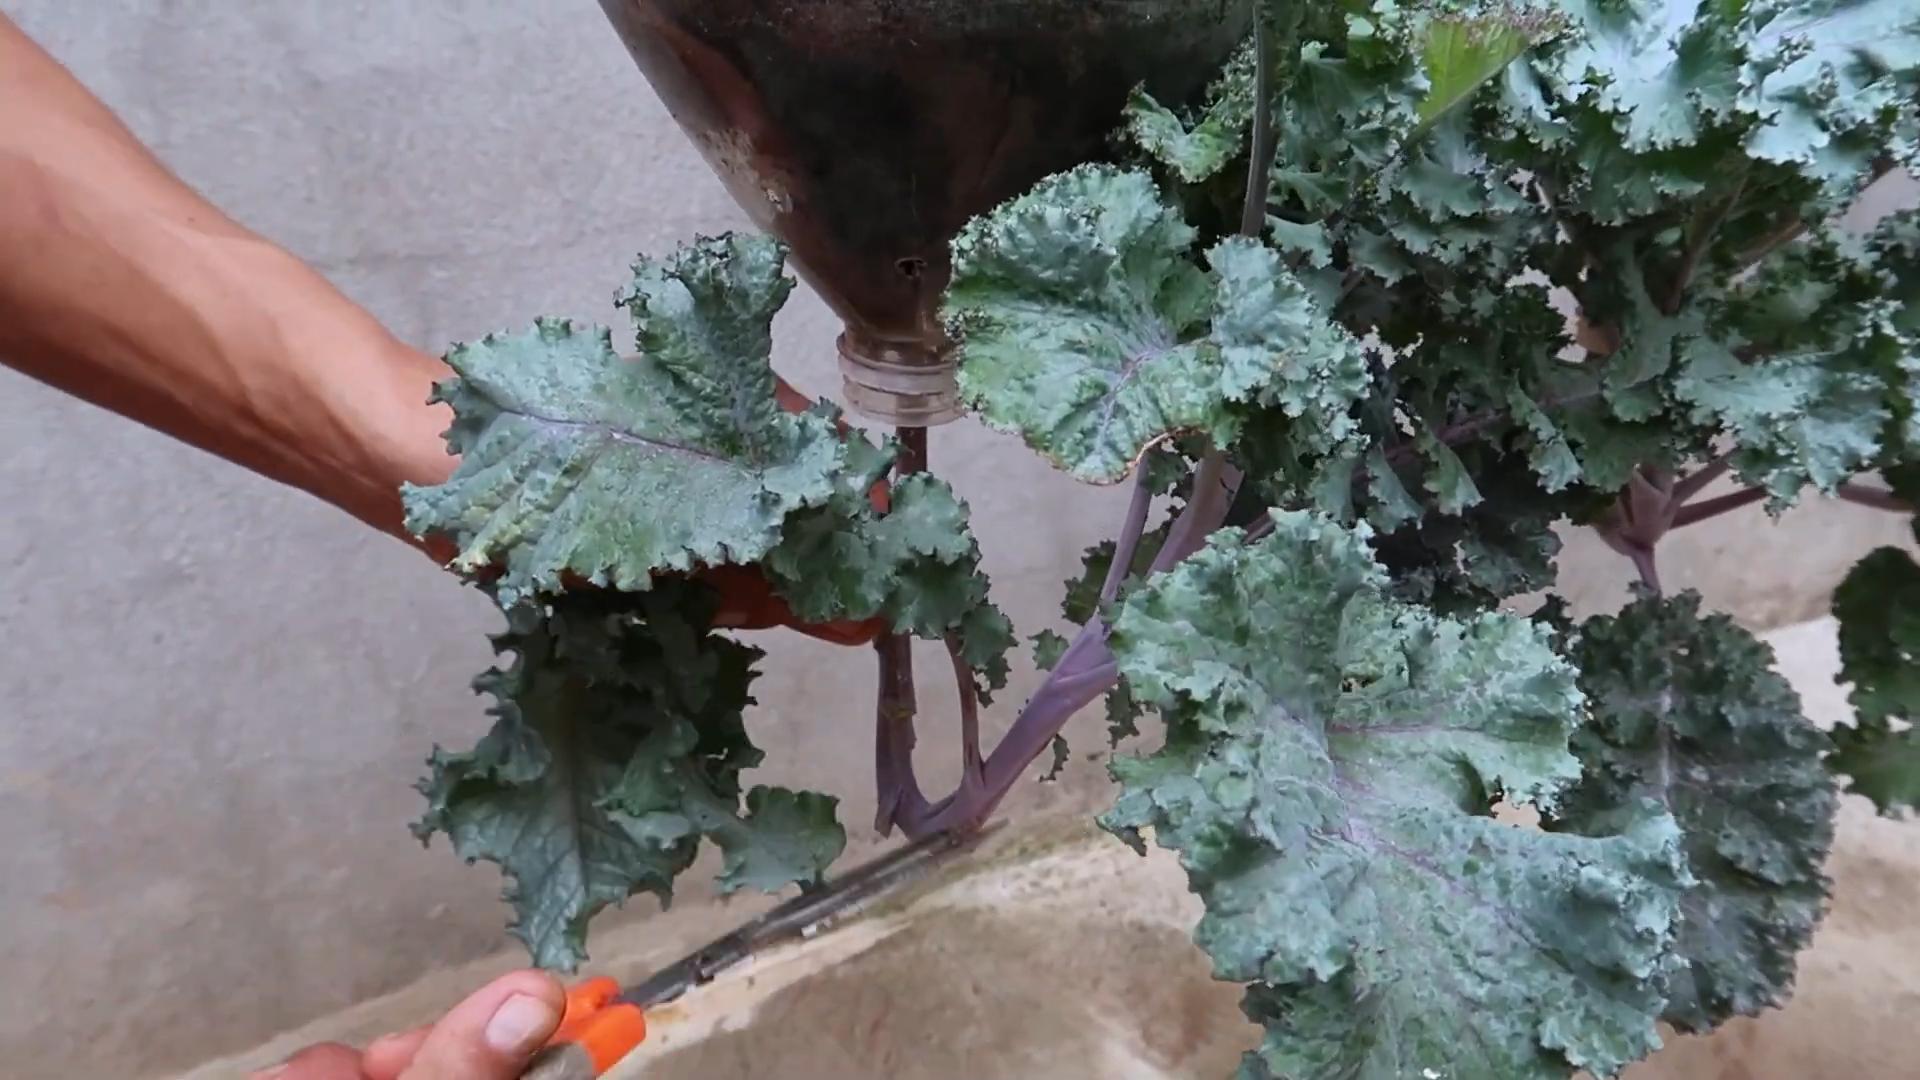
* Choosing the Right Pot: Mint can be quite invasive, so I highly recommend growing it in a container to prevent it from taking over your garden. Choose a pot that’s at least 6 inches in diameter and has good drainage.
* Selecting the Right Soil: Mint prefers
Conclusion
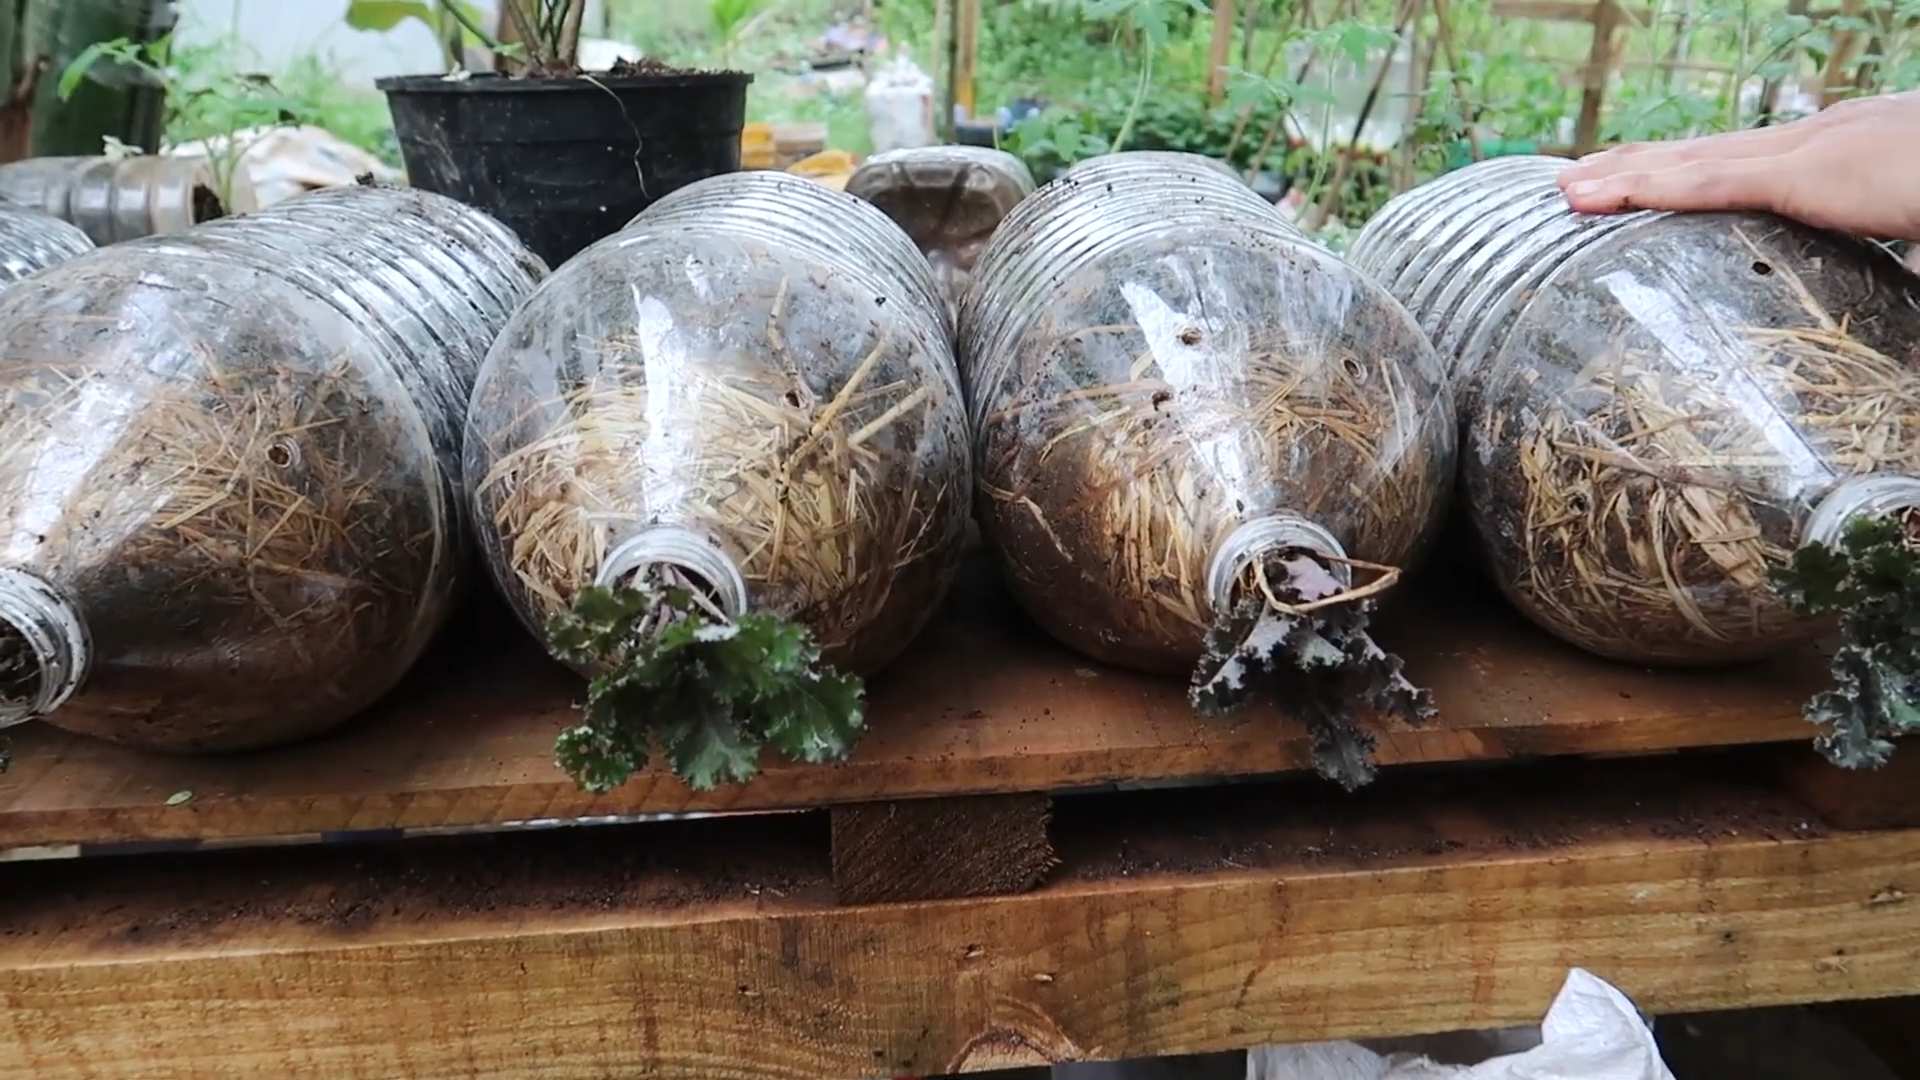
So, there you have it! This simple yet effective mint growing hack is a game-changer for anyone who loves fresh mint but struggles to keep it thriving. We’ve shown you how to transform a humble plastic bottle into a self-watering haven for your mint, preventing the dreaded root spread and ensuring a constant supply of aromatic leaves.
Why is this a must-try? Because it addresses the two biggest challenges of growing mint: its invasive nature and its need for consistent moisture. By containing the roots within the bottle and providing a reservoir of water, you’re creating the ideal environment for your mint to flourish. No more mint taking over your garden, and no more forgetting to water! This method is not only practical but also incredibly budget-friendly and eco-conscious, repurposing materials you likely already have at home.
But don’t stop there! Feel free to experiment with different types of bottles. Larger bottles will provide a bigger water reservoir and more space for your mint to grow, while smaller bottles are perfect for compact spaces like balconies or windowsills. You can also get creative with the aesthetics. Paint the bottle, decorate it with twine, or even add drainage holes to the bottom for extra aeration. Consider using different types of soil mixes to see what works best for your specific climate and mint variety. Some gardeners swear by adding a bit of compost to their soil mix for extra nutrients.
Beyond simply growing mint, this technique can be adapted for other herbs as well. Think basil, oregano, or even parsley. The key is to choose herbs that appreciate consistent moisture and are prone to spreading. Just remember to adjust the size of the bottle and the frequency of watering based on the specific needs of each herb.
We are confident that this **mint growing hack** will revolutionize your herb gardening experience. It’s easy, effective, and sustainable. So, grab a plastic bottle, some soil, and your favorite mint cuttings, and give it a try! We’re eager to hear about your results. Share your photos and experiences in the comments below. Let us know what variations you’ve tried and what worked best for you. Together, we can create a community of thriving mint growers! Happy gardening!
Frequently Asked Questions
What kind of plastic bottle should I use?
Almost any plastic bottle will work, but we recommend using a sturdy bottle that can withstand the elements. A 2-liter soda bottle or a large water bottle is ideal. Make sure the bottle is clean and free of any residue before you start. Avoid using bottles that have contained harsh chemicals, as these could leach into the soil and harm your mint. The thicker the plastic, the longer the bottle will last, especially if it’s exposed to direct sunlight. Consider using bottles made from recycled plastic for an even more eco-friendly approach.
How often should I water the mint?
The frequency of watering will depend on the climate, the size of the bottle, and the type of soil you’re using. In general, you should check the water reservoir every few days and refill it when it’s getting low. Avoid overwatering, as this can lead to root rot. A good rule of thumb is to let the top inch of soil dry out slightly between waterings. During hot, dry weather, you may need to water more frequently. Conversely, during cooler, wetter weather, you may need to water less often. Observe your mint closely and adjust your watering schedule accordingly.
What kind of soil should I use?
A well-draining potting mix is essential for growing healthy mint. Avoid using garden soil, as it can be too heavy and compact, leading to poor drainage. A good potting mix will contain a blend of peat moss, perlite, and vermiculite. You can also add some compost to the mix for extra nutrients. Mint prefers slightly acidic soil, so you can add a small amount of sulfur to the mix if your soil is alkaline. Experiment with different soil mixes to see what works best for your specific climate and mint variety.
How much sunlight does mint need?
Mint thrives in partial shade to full sun. Ideally, it should receive at least 4-6 hours of sunlight per day. However, in hot climates, it’s best to provide some afternoon shade to prevent the leaves from scorching. If you’re growing your mint indoors, place it near a sunny window or use a grow light. Insufficient sunlight can lead to leggy growth and reduced flavor. Observe your mint closely and adjust its location as needed to ensure it’s receiving the optimal amount of sunlight.
Can I use this method for other herbs?
Yes, this method can be adapted for other herbs that appreciate consistent moisture and are prone to spreading, such as basil, oregano, thyme, and parsley. However, you may need to adjust the size of the bottle and the frequency of watering based on the specific needs of each herb. For example, basil prefers warmer temperatures and more frequent watering than thyme. Research the specific needs of each herb before you start, and adjust your growing conditions accordingly.
How do I prevent root rot?
Root rot is a common problem with mint, especially when it’s grown in containers. To prevent root rot, ensure that your soil is well-draining and avoid overwatering. You can also add some perlite or vermiculite to the soil mix to improve drainage. Make sure the bottle has adequate drainage holes to allow excess water to escape. If you notice that the leaves are turning yellow or brown, or that the stems are becoming soft and mushy, this could be a sign of root rot. If this happens, remove the affected plant from the bottle, trim away any rotten roots, and replant it in fresh soil.
How do I propagate mint from cuttings?
Propagating mint from cuttings is easy and a great way to expand your mint collection. Simply take a cutting from a healthy stem, about 4-6 inches long. Remove the lower leaves and place the cutting in a glass of water. Change the water every few days. After a few weeks, roots will begin to form. Once the roots are about an inch long, you can plant the cutting in a pot of soil. Keep the soil moist until the plant is established. You can also propagate mint by dividing the roots of an existing plant.
What are some common mint pests and diseases?
Mint is generally a hardy plant, but it can be susceptible to certain pests and diseases. Common pests include aphids, spider mites, and whiteflies. These pests can be controlled with insecticidal soap or neem oil. Common diseases include powdery mildew and rust. These diseases can be prevented by ensuring good air circulation and avoiding overhead watering. If you notice any signs of pests or diseases, treat them promptly to prevent them from spreading.
How do I harvest mint?
You can harvest mint at any time, but the flavor is most intense just before the plant flowers. Simply snip off the stems with scissors or pruning shears. Avoid removing more than one-third of the plant at a time, as this can stress the plant. Regular harvesting will encourage the plant to produce more leaves. You can use fresh mint in a variety of dishes, or you can dry it for later use.
Can I grow different varieties of mint in the same bottle?
While technically possible, it’s generally not recommended to grow different varieties of mint in the same bottle. Mint is a vigorous grower, and different varieties can compete with each other for resources. Additionally, some varieties of mint can cross-pollinate, resulting in offspring with unpredictable characteristics. If you want to grow multiple varieties of mint, it’s best to keep them separated in individual containers.
Leave a Comment