
Container Brussel Sprouts: Ever dreamt of harvesting your own miniature cabbages right from your patio? I know I have! There’s something incredibly satisfying about growing your own food, and Brussel sprouts, despite their sometimes-questionable reputation, are surprisingly easy and rewarding to cultivate, especially when you embrace the magic of container gardening.
For centuries, Brussel sprouts have been a staple in European cuisine, with their cultivation tracing back to, you guessed it, Brussels, Belgium! While they might not be everyone’s favorite vegetable on the Thanksgiving table, their nutritional value and unique flavor profile are undeniable. But let’s be honest, store-bought Brussel sprouts can sometimes be a bit… underwhelming. That’s where the DIY magic comes in!
Imagine plucking fresh, vibrant green Brussel sprouts straight from your own container, knowing exactly where they came from and how they were grown. No more bland, overcooked sprouts! This article is your ultimate guide to successfully growing container Brussel sprouts, even if you have limited space or gardening experience. We’ll cover everything from choosing the right container and soil to providing the perfect amount of sunlight and water. Get ready to unlock the secrets to a bountiful harvest and impress your friends and family with your homegrown goodness!
Growing Brussels Sprouts in Containers: A DIY Guide
Hey there, fellow gardening enthusiasts! I’m so excited to share my experience with growing Brussels sprouts in containers. It’s totally doable, even if you don’t have a huge garden. I’ve had some amazing harvests using this method, and I’m confident you can too. Let’s dive in!
Choosing the Right Container and Soil
Before we even think about seeds, we need to get the foundation right. The container and soil are crucial for healthy Brussels sprouts.
* Container Size: Brussels sprouts need room to grow, both above and below ground. I recommend a container that’s at least 12 inches in diameter and 12 inches deep. A 5-gallon bucket works great, but bigger is generally better. I’ve even used half whiskey barrels with fantastic results!
* Drainage: This is non-negotiable. Brussels sprouts hate soggy feet. Make sure your container has plenty of drainage holes. If it doesn’t, drill some!
* Soil: Forget garden soil; it’s usually too heavy and compacts easily in containers. I always use a high-quality potting mix. Look for one that’s well-draining and contains ingredients like peat moss, perlite, or vermiculite. I also like to amend my potting mix with compost for extra nutrients.
Starting Your Brussels Sprouts
You have two options here: starting from seed or buying transplants. I’ve done both, and honestly, starting from seed is more rewarding (and often cheaper!).
* Starting from Seed:
* Timing: Brussels sprouts need a long growing season, so start your seeds indoors about 4-6 weeks before the last expected frost.
* Sowing: Fill seed trays or small pots with seed-starting mix. Sow seeds about ½ inch deep.
* Watering: Keep the soil consistently moist but not soggy. I use a spray bottle to gently water the seedlings.
* Light: Seedlings need plenty of light. If you don’t have a sunny windowsill, use grow lights. I keep mine on for about 14-16 hours a day.
* Hardening Off: Before transplanting your seedlings outdoors, you need to “harden them off.” This means gradually exposing them to outdoor conditions over a week or two. Start by putting them outside for an hour or two each day, gradually increasing the time.
* Buying Transplants:
* Choosing Transplants: Look for healthy, sturdy transplants with green leaves and a well-developed root system. Avoid plants that are leggy or have yellowing leaves.
* Timing: Plant transplants after the last expected frost.
Planting Your Brussels Sprouts
Okay, now for the fun part! Getting those little guys into their new homes.
1. Prepare the Container: Fill your container with your chosen potting mix, leaving a few inches of space at the top.
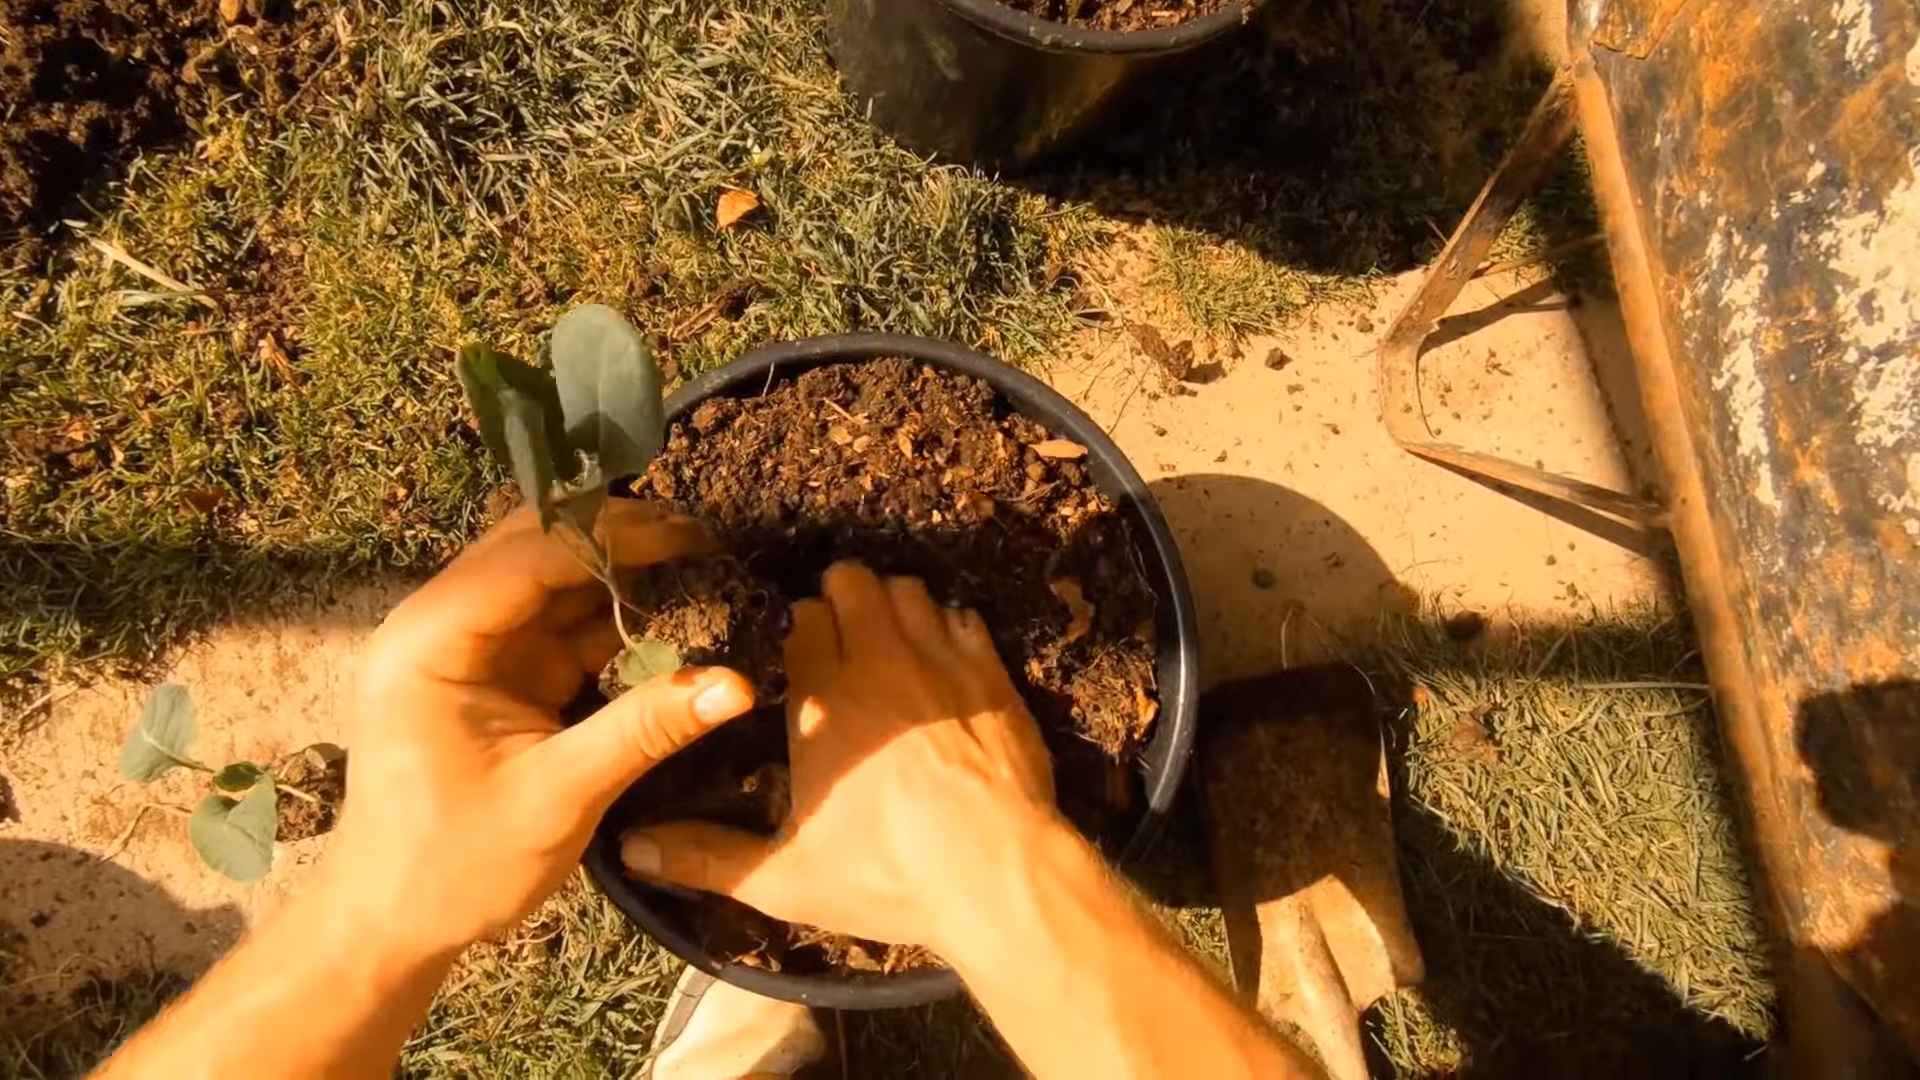
2. Planting Seedlings: If you started from seed, gently remove the seedlings from their trays or pots. If you bought transplants, carefully remove them from their containers.
3. Spacing: Plant one Brussels sprout plant per container (if using a 5-gallon container). If you’re using a larger container, you can plant multiple plants, spacing them about 18-24 inches apart.
4. Planting Depth: Plant the seedlings at the same depth they were growing in their previous containers.
5. Watering: Water thoroughly after planting.
Caring for Your Brussels Sprouts
This is where the real work begins, but trust me, it’s worth it!
* Watering: Brussels sprouts need consistent moisture, especially during hot weather. Water deeply whenever the top inch of soil feels dry. Avoid overhead watering, as this can lead to fungal diseases. I prefer to water at the base of the plant.
* Fertilizing: Brussels sprouts are heavy feeders. I fertilize them every 2-3 weeks with a balanced liquid fertilizer. You can also use a slow-release fertilizer at planting time.
* Sunlight: Brussels sprouts need at least 6 hours of sunlight per day. Place your containers in a sunny location.
* Pest Control: Keep an eye out for pests like aphids, cabbage worms, and flea beetles. I like to use organic pest control methods, such as insecticidal soap or neem oil. You can also handpick pests off the plants.
* Supporting the Plant: As your Brussels sprouts grow, they may need support, especially if they’re loaded with sprouts. You can use stakes or tomato cages to keep them upright.
* Removing Lower Leaves: As the plant matures and the lower leaves start to yellow or brown, remove them. This helps improve air circulation and prevent disease.
Harvesting Your Brussels Sprouts
The moment we’ve all been waiting for!
1. Timing: Brussels sprouts are typically ready to harvest in the fall, after a few light frosts. Frost actually improves their flavor!
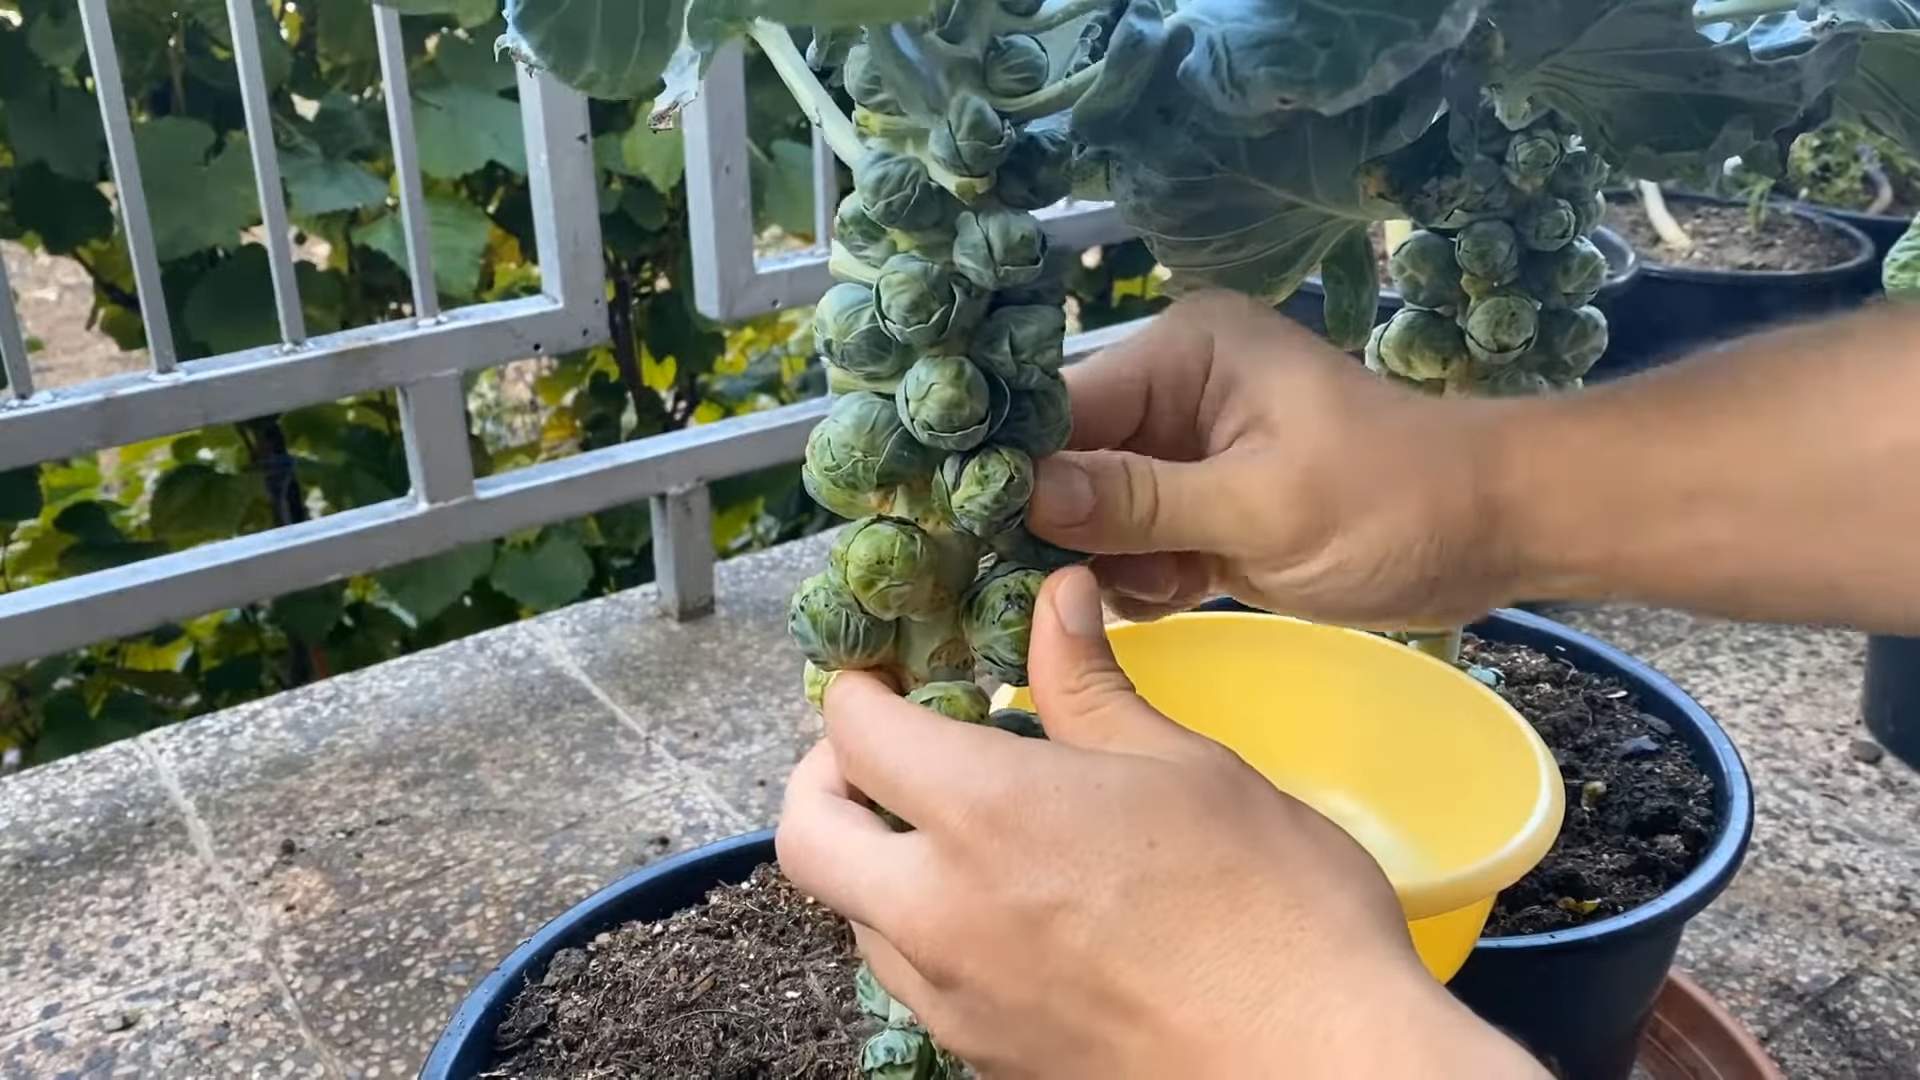
2. Harvesting Technique: Start harvesting the sprouts from the bottom of the plant first. They should be firm and about 1-2 inches in diameter. Twist or snap them off the stem.
3. Continued Harvest: Continue harvesting the sprouts as they mature, working your way up the plant.
4. Removing the Plant: Once you’ve harvested all the sprouts, you can remove the plant from the container.
Troubleshooting
Even with the best care, you might encounter some problems. Here are a few common issues and how to deal with them:
* Yellowing Leaves: This could be a sign of overwatering, underwatering, nutrient deficiency, or disease. Check the soil moisture and adjust your watering accordingly. Fertilize the plant if necessary. If you suspect disease, treat with an appropriate fungicide.
* Aphids: These tiny pests can suck the sap from your plants. Spray them with insecticidal soap or neem oil.
* Cabbage Worms: These caterpillars can devour your Brussels sprouts. Handpick them off the plants or use Bacillus thuringiensis (Bt), a natural insecticide.
* Sprouts Not Forming: This could be due to lack of sunlight, poor soil, or insufficient watering. Make sure your plants are getting enough sunlight and water, and fertilize them regularly.
Tips and Tricks for Success
Here are a few extra tips to help you grow amazing Brussels sprouts in containers:
* Choose the Right Variety: Some Brussels sprout varieties are better suited for container growing than others. Look for compact or dwarf varieties.
* Rotate Your Crops: Don’t plant Brussels sprouts in the same container year after year. Rotate your crops to prevent soilborne diseases.
* Mulch: Apply a layer of mulch around the base of the plant to help retain moisture and suppress weeds.
* Water in the Morning: Water your plants in the morning so the foliage has time to dry before nightfall. This helps prevent fungal diseases.
* Be Patient: Brussels sprouts take a long time to mature, so don’t get discouraged if you don’t see results right away. Just keep caring for your plants, and you’ll be rewarded with a delicious harvest.
Section: Dealing with Pests Organically
I’m a big believer in organic gardening, so I always
Hey there, fellow gardening enthusiasts! I’m so excited to share my experience with growing Brussels sprouts in containers. It’s totally doable, even if you don’t have a huge garden. I’ve had some amazing harvests using this method, and I’m confident you can too. Let’s dive in!
Choosing the Right Container and Soil
Before we even think about seeds, we need to get the foundation right. The container and soil are crucial for healthy Brussels sprouts.
* Container Size: Brussels sprouts need room to grow, both above and below ground. I recommend a container that’s at least 12 inches in diameter and 12 inches deep. A 5-gallon bucket works great, but bigger is generally better. I’ve even used half whiskey barrels with fantastic results!
* Drainage: This is non-negotiable. Brussels sprouts hate soggy feet. Make sure your container has plenty of drainage holes. If it doesn’t, drill some!
* Soil: Forget garden soil; it’s usually too heavy and compacts easily in containers. I always use a high-quality potting mix. Look for one that’s well-draining and contains ingredients like peat moss, perlite, or vermiculite. I also like to amend my potting mix with compost for extra nutrients.
Starting Your Brussels Sprouts
You have two options here: starting from seed or buying transplants. I’ve done both, and honestly, starting from seed is more rewarding (and often cheaper!).
* Starting from Seed:
* Timing: Brussels sprouts need a long growing season, so start your seeds indoors about 4-6 weeks before the last expected frost.
* Sowing: Fill seed trays or small pots with seed-starting mix. Sow seeds about ½ inch deep.
* Watering: Keep the soil consistently moist but not soggy. I use a spray bottle to gently water the seedlings.
* Light: Seedlings need plenty of light. If you don’t have a sunny windowsill, use grow lights. I keep mine on for about 14-16 hours a day.
* Hardening Off: Before transplanting your seedlings outdoors, you need to “harden them off.” This means gradually exposing them to outdoor conditions over a week or two. Start by putting them outside for an hour or two each day, gradually increasing the time.
* Buying Transplants:
* Choosing Transplants: Look for healthy, sturdy transplants with green leaves and a well-developed root system. Avoid plants that are leggy or have yellowing leaves.
* Timing: Plant transplants after the last expected frost.
Planting Your Brussels Sprouts
Okay, now for the fun part! Getting those little guys into their new homes.
1. Prepare the Container: Fill your container with your chosen potting mix, leaving a few inches of space at the top.
2. Planting Seedlings: If you started from seed, gently remove the seedlings from their trays or pots. If you bought transplants, carefully remove them from their containers.
3. Spacing: Plant one Brussels sprout plant per container (if using a 5-gallon container). If you’re using a larger container, you can plant multiple plants, spacing them about 18-24 inches apart.
4. Planting Depth: Plant the seedlings at the same depth they were growing in their previous containers.
5. Watering: Water thoroughly after planting.
Caring for Your Brussels Sprouts
This is where the real work begins, but trust me, it’s worth it!
* Watering: Brussels sprouts need consistent moisture, especially during hot weather. Water deeply whenever the top inch of soil feels dry. Avoid overhead watering, as this can lead to fungal diseases. I prefer to water at the base of the plant.
* Fertilizing: Brussels sprouts are heavy feeders. I fertilize them every 2-3 weeks with a balanced liquid fertilizer. You can also use a slow-release fertilizer at planting time.
* Sunlight: Brussels sprouts need at least 6 hours of sunlight per day. Place your containers in a sunny location.
* Pest Control: Keep an eye out for pests like aphids, cabbage worms, and flea beetles. I like to use organic pest control methods, such as insecticidal soap or neem oil. You can also handpick pests off the plants.
* Supporting the Plant: As your Brussels sprouts grow, they may need support, especially if they’re loaded with sprouts. You can use stakes or tomato cages to keep them upright.
* Removing Lower Leaves: As the plant matures and the lower leaves start to yellow or brown, remove them. This helps improve air circulation and prevent disease.
Harvesting Your Brussels Sprouts
The moment we’ve all been waiting for!
1. Timing: Brussels sprouts are typically ready to harvest in the fall, after a few light frosts. Frost actually improves their flavor!
2. Harvesting Technique: Start harvesting the sprouts from the bottom of the plant first. They should be firm and about 1-2 inches in diameter. Twist or snap them off the stem.
3. Continued Harvest: Continue harvesting the sprouts as they mature, working your way up the plant.
4. Removing the Plant: Once you’ve harvested all the sprouts, you can remove the plant from the container.
Troubleshooting
Even with the best care, you might encounter some problems. Here are a few common issues and how to deal with them:
* Yellowing Leaves: This could be a sign of overwatering, underwatering, nutrient deficiency, or disease. Check the soil moisture and adjust your watering accordingly. Fertilize the plant if necessary. If you suspect disease, treat with an appropriate fungicide.
* Aphids: These tiny pests can suck the sap from your plants. Spray them with insecticidal soap or neem oil.
* Cabbage Worms: These caterpillars can devour your Brussels sprouts. Handpick them off the plants or use Bacillus thuringiensis (Bt), a natural insecticide.
* Sprouts Not Forming: This could be due to lack of sunlight, poor soil, or insufficient watering. Make sure your plants are getting enough sunlight and water, and fertilize them regularly.
Tips and Tricks for Success
Here are a few extra tips to help you grow amazing Brussels sprouts in containers:
* Choose the Right Variety: Some Brussels sprout varieties are better suited for container growing than others. Look for compact or dwarf varieties.
* Rotate Your Crops: Don’t plant Brussels sprouts in the same container year after year. Rotate your crops to prevent soilborne diseases.
* Mulch: Apply a layer of mulch around the base of the plant to help retain moisture and suppress weeds.
* Water in the Morning: Water your plants in the morning so the foliage has time to dry before nightfall. This helps prevent fungal diseases.
* Be Patient: Brussels sprouts take a long time to mature, so don’t get discouraged if you don’t see results right away. Just keep caring for your plants, and you’ll be rewarded with a delicious harvest.
Section: Dealing with Pests Organically
I’m a big believer in organic gardening, so I always try to deal with pests naturally. Here are some of my favorite methods:
1. Handpicking: This is the simplest and most effective way to get rid of larger pests like cabbage worms. Just go out to your garden every day and pick them off the plants.
2. Insecticidal Soap: This is a great option for aphids and other soft-bodied insects. Just spray the affected plants thoroughly, making sure to get both sides of the leaves.
3. Neem Oil: Neem oil is a natural insecticide and fungicide. It’s effective against a wide range of pests and diseases.
4. Diatomaceous Earth (DE): DE is a powder made from fossilized algae. It’s harmless to humans and pets, but it’s deadly to insects. Sprinkle it around the base of your plants to kill crawling pests.
5. Companion Planting: Some plants can help repel pests. For example, marigolds are known to repel nematodes and other soil pests. Plant them near your Brussels sprouts to help keep pests away.
Section: Maximizing Your Harvest
Want to get the most out of your Brussels sprouts plants? Here are a few tips:
1. Pinch Off the Top: When the sprouts start to form, pinch off the top of the plant. This will encourage the plant to put more energy into developing the sprouts.
2. Fertilize Regularly: As I mentioned earlier, Brussels sprouts are heavy feeders. Fertilize them every 2-3 weeks with a balanced liquid fertilizer.
3. Water Consistently: Brussels sprouts need consistent moisture, especially during hot weather. Water deeply whenever the top inch
Conclusion
So, there you have it! Growing Brussel sprouts in containers isn’t just a quirky gardening experiment; it’s a genuinely rewarding way to enjoy fresh, delicious, and homegrown vegetables, even if you’re short on space. We’ve walked through the entire process, from selecting the right container and soil to nurturing your plants and harvesting those delectable little cabbages.
Why is this DIY trick a must-try? Because it democratizes access to fresh produce. No sprawling garden? No problem! A sunny balcony, patio, or even a well-lit deck can become your personal Brussel sprout farm. Imagine the satisfaction of plucking perfectly formed sprouts, knowing you nurtured them from tiny seedlings to culinary delights. Beyond the convenience, container gardening offers greater control over the growing environment. You can easily move your plants to chase the sun, protect them from unexpected frosts, and manage pests and diseases more effectively. Plus, let’s be honest, there’s something incredibly charming about a container overflowing with these miniature cabbages.
But the best part? The taste! Homegrown Brussel sprouts, especially when harvested at their peak, boast a sweetness and depth of flavor that store-bought varieties often lack. You’ll be amazed at the difference.
Ready to take your container Brussel sprouts game to the next level? Consider these variations:
* Experiment with different varieties: While we’ve focused on standard varieties, explore options like ‘Long Island Improved’ for a classic taste or ‘Redarling’ for a visually stunning and slightly sweeter sprout.
* Companion planting: Maximize your container space by planting compatible herbs like thyme, rosemary, or sage around your Brussel sprouts. These herbs can help deter pests and enhance the flavor of your sprouts.
* Succession planting: Extend your harvest season by planting new seedlings every few weeks. This ensures a continuous supply of fresh Brussel sprouts throughout the fall and winter.
* Fertilizer adjustments: Monitor your plants closely and adjust your fertilizer regimen based on their needs. If the leaves are pale green, they may need more nitrogen. If the sprouts are slow to develop, they may need more phosphorus.
Don’t be intimidated by the prospect of growing your own Brussel sprouts. It’s a surprisingly simple and satisfying process. The key is to start with good quality seeds or seedlings, provide adequate sunlight and water, and be patient. You’ll be rewarded with a bounty of delicious, homegrown Brussel sprouts that will elevate your meals and impress your friends and family.
So, grab a container, some soil, and a packet of Brussel sprout seeds, and get growing! We’re confident that you’ll love the experience. And most importantly, we want to hear about your journey! Share your successes, your challenges, and your delicious Brussel sprout recipes with us in the comments below. Let’s build a community of container Brussel sprout enthusiasts! We can’t wait to see what you create. Happy gardening!
Frequently Asked Questions (FAQ)
What is the best size container for growing Brussel sprouts?
A container that is at least 12 inches in diameter and 12 inches deep is generally recommended for growing a single Brussel sprout plant. However, a larger container, such as a 5-gallon bucket or a half-barrel planter, is even better, as it provides more room for the roots to grow and allows the plant to access more nutrients and water. If you plan to grow multiple plants in the same container, choose a container that is large enough to accommodate them without overcrowding. Overcrowding can lead to stunted growth and reduced yields.
How much sunlight do Brussel sprouts need when grown in containers?
Brussel sprouts require at least 6 hours of direct sunlight per day to thrive. When growing them in containers, it’s crucial to place them in a location that receives ample sunlight. If you don’t have a spot that gets at least 6 hours of sun, you may need to supplement with grow lights. Rotate the containers regularly to ensure that all sides of the plants receive adequate sunlight. Insufficient sunlight can result in leggy plants with small, underdeveloped sprouts.
What type of soil is best for container Brussel sprouts?
A well-draining potting mix that is rich in organic matter is ideal for growing Brussel sprouts in containers. Avoid using garden soil, as it can become compacted in containers and hinder drainage. Look for a potting mix that contains ingredients like peat moss, perlite, and vermiculite. You can also amend the potting mix with compost or aged manure to provide additional nutrients. The soil pH should be slightly acidic to neutral, around 6.0 to 7.0.
How often should I water my container Brussel sprouts?
Water your container Brussel sprouts regularly, especially during hot and dry weather. The soil should be kept consistently moist but not waterlogged. Check the soil moisture by sticking your finger about an inch into the soil. If it feels dry, it’s time to water. Water deeply, allowing the water to drain out of the bottom of the container. Avoid overhead watering, as this can promote fungal diseases. Mulching around the base of the plants can help retain moisture and suppress weeds.
What kind of fertilizer should I use for container Brussel sprouts?
Brussel sprouts are heavy feeders and require regular fertilization. Use a balanced fertilizer, such as a 10-10-10 or 14-14-14, according to the package directions. You can also use an organic fertilizer, such as compost tea or fish emulsion. Fertilize your plants every 2-3 weeks during the growing season. Avoid over-fertilizing, as this can lead to excessive foliage growth and reduced sprout production.
How do I deal with pests and diseases on my container Brussel sprouts?
Monitor your plants regularly for pests and diseases. Common pests that affect Brussel sprouts include aphids, cabbage worms, and flea beetles. You can control these pests with insecticidal soap, neem oil, or Bacillus thuringiensis (Bt). Common diseases include clubroot, black rot, and downy mildew. Prevent these diseases by providing good air circulation, avoiding overhead watering, and using disease-resistant varieties. If you notice any signs of disease, remove the affected leaves or plants immediately.
When are Brussel sprouts ready to harvest from containers?
Brussel sprouts are typically ready to harvest 90-100 days after planting. The sprouts should be firm, tightly closed, and about 1-2 inches in diameter. Start harvesting from the bottom of the plant and work your way up. You can harvest the sprouts as needed, or you can harvest the entire plant at once. To harvest, simply twist the sprouts off the stem. After harvesting, store the sprouts in the refrigerator for up to a week.
Can I grow Brussel sprouts in containers indoors?
While it’s possible to grow Brussel sprouts indoors, it can be challenging to provide them with the amount of sunlight they need. If you want to try growing them indoors, you’ll need to use strong grow lights and ensure that they receive at least 12 hours of light per day. You’ll also need to provide good air circulation and monitor them closely for pests and diseases. It’s generally easier and more successful to grow Brussel sprouts in containers outdoors.
What are some common problems when growing Brussel sprouts in containers?
Some common problems when growing Brussel sprouts in containers include:
* Stunted growth: This can be caused by insufficient sunlight, poor soil, or lack of nutrients.
* Small sprouts: This can be caused by overcrowding, lack of water, or insufficient fertilization.
* Pest infestations: Common pests include aphids, cabbage worms, and flea beetles.
* Diseases: Common diseases include clubroot, black rot, and downy mildew.
* Bolting: This can be caused by hot weather or stress.
By addressing these problems promptly, you can ensure a successful harvest of container Brussel sprouts.

Leave a Comment