
Grow Indoor Mushrooms Easily? Absolutely! Imagine harvesting fresh, delicious mushrooms right from your kitchen – no more trips to the grocery store or wondering about their freshness. For centuries, cultivating mushrooms has been shrouded in mystery, almost like a secret culinary art passed down through generations. From ancient civilizations in Asia who revered them for their medicinal properties to modern-day foodies seeking sustainable options, mushrooms have always held a special place in our hearts (and our stomachs!).
But let’s be honest, the thought of growing your own mushrooms can seem intimidating. I get it! You might picture complicated setups and specialized equipment. That’s where this DIY guide comes in. I’m going to show you some incredibly simple and effective tricks to grow indoor mushrooms easily, even if you have zero experience.
In today’s world, where we’re all looking for ways to connect with nature, reduce our carbon footprint, and enjoy healthier, home-grown food, mastering this skill is more relevant than ever. Plus, who wouldn’t want to impress their friends and family with their newfound mushroom-growing prowess? So, ditch the store-bought varieties and get ready to embark on a fun and rewarding journey into the fascinating world of indoor mushroom cultivation!
Grow Your Own Gourmet Mushrooms Indoors: A Beginner’s Guide
Hey there, fellow fungi fanatics! Ever dreamt of having a constant supply of fresh, delicious mushrooms right in your own home? Well, dream no more! Growing your own indoor mushrooms is surprisingly easy and incredibly rewarding. I’m going to walk you through a simple method that even a complete beginner can master. Get ready to impress your friends and family with your homegrown gourmet delights!
Choosing Your Mushroom Variety
Before we dive into the nitty-gritty, let’s talk about which mushrooms are best suited for indoor cultivation. Some varieties are much easier to grow than others, especially for beginners. Here are a few of my top recommendations:
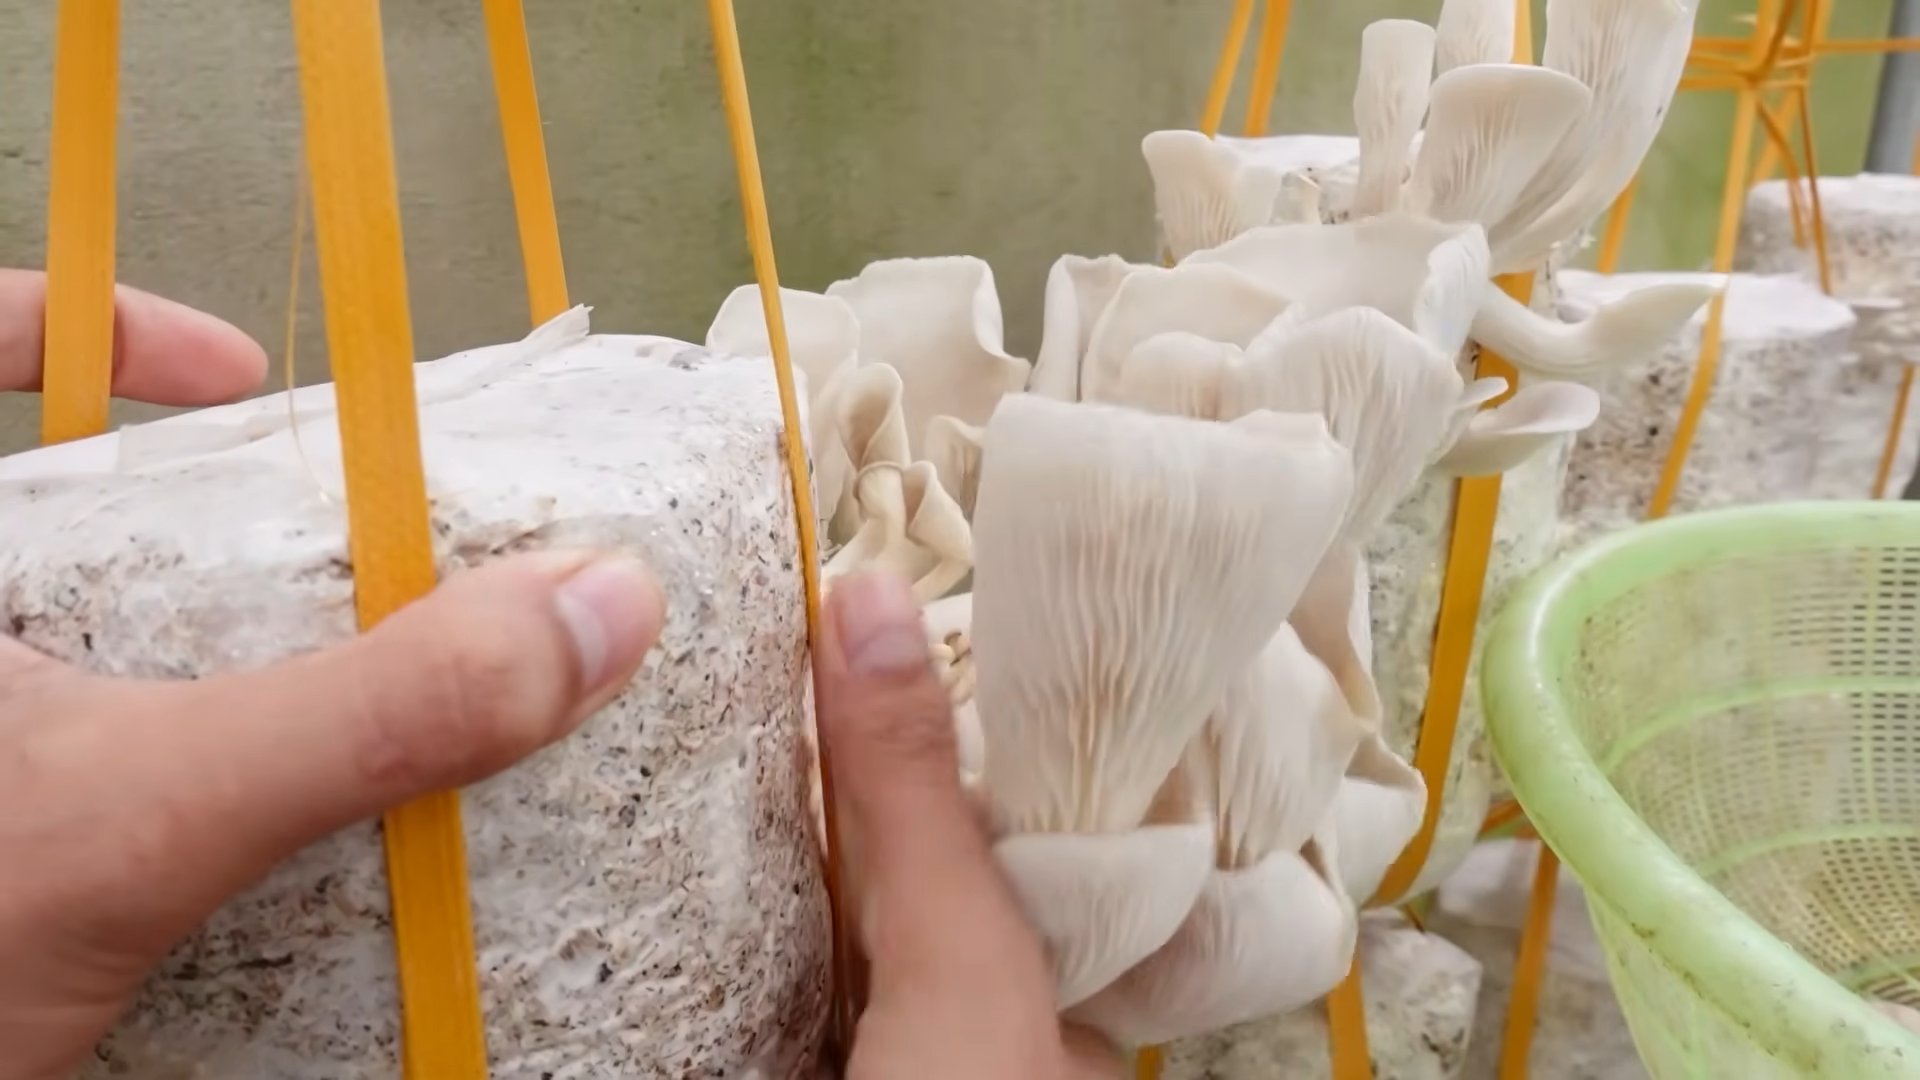
* Oyster Mushrooms (Pleurotus ostreatus): These are arguably the easiest to grow and come in a variety of colors, including pearl, blue, and pink. They’re fast growers and tolerate a wide range of conditions. Plus, they’re delicious!
* Shiitake Mushrooms (Lentinula edodes): While slightly more challenging than oyster mushrooms, shiitakes are still a great option for beginners. They have a rich, savory flavor that’s perfect for stir-fries and soups.
* Lion’s Mane (Hericium erinaceus): This unique-looking mushroom is known for its brain-boosting benefits and delicious, crab-like flavor. It’s a bit more demanding in terms of humidity, but well worth the effort.
For this guide, I’ll be focusing on growing oyster mushrooms, as they’re the most beginner-friendly. But the general principles apply to other varieties as well.
Gathering Your Supplies
Okay, let’s get our hands dirty! Here’s what you’ll need to get started:
* Oyster Mushroom Spawn: This is essentially the “seed” of the mushroom. You can purchase it online or from a local mushroom supplier. Make sure to buy spawn that’s specifically labeled for oyster mushrooms.
* Substrate: This is the material that the mushrooms will grow on. For oyster mushrooms, straw is an excellent and readily available option. You can also use coffee grounds, cardboard, or even sawdust. I’ll be using straw in this guide.
* Large Plastic Bag or Bucket: This will serve as your growing container. A large, heavy-duty plastic bag (like a contractor bag) works well, or you can use a clean bucket with a lid.
* Spray Bottle: For misting the mushrooms to maintain humidity.
* Rubbing Alcohol: For sanitizing your equipment.
* Gloves: To keep your hands clean and prevent contamination.
* Optional: A humidity tent or greenhouse (if you live in a dry climate).
Preparing the Substrate
The key to successful mushroom growing is a clean and properly prepared substrate. This step is crucial for preventing contamination from mold and other unwanted organisms.
Pasteurizing the Straw
1. Chop the Straw: Cut the straw into smaller pieces, about 2-4 inches long. This will make it easier for the mushroom mycelium to colonize.
2. Heat the Water: Fill a large pot or container with water and heat it to around 160-180°F (71-82°C). You don’t need to boil the water, just heat it enough to pasteurize the straw. A thermometer is helpful for this step.
3. Soak the Straw: Submerge the chopped straw in the hot water and let it soak for about 1-2 hours. This will kill off any competing organisms and make the straw more accessible to the mushroom mycelium.
4. Drain the Straw: After soaking, carefully drain the straw. You want it to be moist but not soaking wet. Squeeze out any excess water. The straw should feel like a wrung-out sponge.
Inoculating the Substrate
Now comes the fun part – introducing the mushroom spawn to the prepared substrate! This process is called inoculation.
1. Sanitize Your Work Area: Before you start, thoroughly clean and sanitize your work surface and your hands with rubbing alcohol. This will help prevent contamination.
2. Layer the Substrate and Spawn: In your plastic bag or bucket, create alternating layers of straw and mushroom spawn. Start with a layer of straw, then sprinkle a generous amount of spawn on top. Repeat this process until you’ve used all of the straw and spawn. Aim for about 1 part spawn to 10 parts substrate.
3. Mix Thoroughly: Gently mix the spawn and straw together to ensure that the spawn is evenly distributed throughout the substrate.
4. Seal the Bag or Bucket: If using a plastic bag, fold over the top and secure it with tape or a rubber band. If using a bucket, place the lid on top. You don’t need to seal it completely airtight, as the mushrooms need some air to breathe.
5. Create Air Exchange Holes: Using a clean knife or scissors, poke several small holes (about 1/4 inch in diameter) in the bag or bucket. These holes will allow for air exchange and prevent the buildup of carbon dioxide.
Incubation
This is the period where the mushroom mycelium (the vegetative part of the mushroom) colonizes the substrate.
1. Find a Suitable Location: Place your inoculated bag or bucket in a dark, warm, and humid location. The ideal temperature for oyster mushroom incubation is around 65-75°F (18-24°C). A closet, basement, or spare room works well.
2. Monitor the Colonization: Over the next few weeks, you’ll notice the white, thread-like mycelium spreading throughout the straw. This is a good sign!
3. Maintain Humidity: If the air in your growing area is dry, you may need to mist the bag or bucket with water periodically to maintain humidity. You can also place a humidity tent or greenhouse over the bag or bucket.
4. Be Patient: Colonization can take anywhere from 2-4 weeks, depending on the temperature and humidity. Don’t be discouraged if it takes a little longer.
Fruiting
Once the substrate is fully colonized (it will appear almost completely white), it’s time to initiate fruiting – the process of producing mushrooms.
1. Introduce Light: Move the bag or bucket to a location with indirect light. Oyster mushrooms need light to trigger fruiting. A north-facing window is ideal.
2. Increase Humidity: Oyster mushrooms need high humidity to fruit properly. Mist the bag or bucket several times a day with water, or use a humidity tent or greenhouse. Aim for a humidity level of 80-90%.
3. Maintain Airflow: Ensure that there is adequate airflow around the bag or bucket. This will help prevent the buildup of carbon dioxide and promote healthy mushroom growth.
4. Observe Pinning: After a few days, you should start to see small mushroom “pins” forming on the surface of the substrate. These are the baby mushrooms!
5. Harvest the Mushrooms: The mushrooms will grow rapidly over the next few days. Harvest them when the caps are fully formed but before they start to release spores. To harvest, simply twist or cut the mushrooms off at the base.
Second Flush and Beyond
After harvesting your first flush of mushrooms, you can often get a second (and sometimes even a third) flush.
1. Soak the Substrate: After harvesting, soak the substrate in water for 12-24 hours. This will rehydrate the substrate and encourage another flush of mushrooms.
2. Drain and Repeat: Drain the excess water and return the bag or bucket to its fruiting location. Repeat the fruiting process as described above.
3. Compost the Spent Substrate: After you’ve harvested all the mushrooms you can get, the spent substrate can be composted and used to enrich your garden soil.
Troubleshooting
Even with the best intentions, things can sometimes go wrong. Here are a few common problems and how to fix them:
* Contamination: If you see green, black, or other colored mold growing on your substrate, it’s likely contaminated. Unfortunately, there’s not much you can do at this point except discard the contaminated substrate. To prevent contamination, make sure to properly pasteurize your substrate and sanitize your equipment.
* Slow Colonization: If the mycelium is slow to colonize, it could be due to low temperature or humidity. Try moving the bag or bucket to a warmer location and increasing the humidity.
* Small or Deformed Mushrooms: This can be caused by low humidity, poor airflow, or insufficient light. Make sure to maintain high humidity, provide adequate airflow, and expose the mushrooms to indirect light.
* No Fruiting: If the substrate is fully colonized but you’re not seeing any mushrooms, try shocking the mycelium by placing the bag or bucket in the refrigerator for 24 hours. This can

Conclusion
So, there you have it! Growing indoor mushrooms easily is not just a whimsical dream for seasoned gardeners; it’s an achievable reality for anyone with a little patience and the right guidance. We’ve walked you through a simple, effective method that bypasses the complexities often associated with mushroom cultivation, allowing you to enjoy fresh, homegrown fungi right in your own home.
Why is this DIY trick a must-try? Because it empowers you to take control of your food source, reduces your reliance on store-bought produce (often shipped from afar), and offers a deeply rewarding connection to the natural world. Imagine the satisfaction of harvesting your own delicious mushrooms, knowing exactly where they came from and how they were grown. Plus, it’s a fantastic conversation starter!
But the benefits don’t stop there. This method is incredibly cost-effective, utilizing readily available materials and minimizing the need for expensive equipment. It’s also a sustainable practice, allowing you to recycle coffee grounds and other organic waste into a valuable resource. You’re not just growing mushrooms; you’re contributing to a more eco-friendly lifestyle.
Now, let’s talk about variations. While we’ve focused on a specific method, feel free to experiment! Try different types of mushroom spawn to cultivate a variety of flavors and textures. Oyster mushrooms are a great starting point, but you could also explore shiitake, lion’s mane, or even more exotic varieties as you gain experience.
Consider adjusting the substrate composition to see how it affects mushroom growth. Adding small amounts of gypsum or vermiculite can improve moisture retention and nutrient availability. You can also experiment with different containers, from repurposed buckets to specialized mushroom growing bags.
Don’t be afraid to get creative! The beauty of DIY is the freedom to adapt and personalize the process to suit your own needs and preferences.
And finally, remember that patience is key. Mushroom cultivation takes time, and you may encounter some challenges along the way. Don’t get discouraged if your first attempt isn’t perfect. Learn from your mistakes, adjust your approach, and keep trying. The rewards are well worth the effort.
We wholeheartedly encourage you to try this DIY trick for growing indoor mushrooms easily. It’s a fun, educational, and ultimately delicious experience. Once you’ve harvested your first crop, we’d love to hear about your journey! Share your photos, tips, and stories in the comments below. Let’s build a community of mushroom enthusiasts and inspire others to embrace the magic of homegrown fungi. Happy growing!
Frequently Asked Questions (FAQ)
What type of mushrooms are easiest to grow indoors?
Oyster mushrooms are generally considered the easiest type of mushroom to grow indoors for beginners. They are relatively forgiving, grow quickly, and tolerate a wider range of environmental conditions compared to other varieties. They also produce a generous yield and have a delicious, versatile flavor. Other good options for beginners include shiitake and wine cap mushrooms, although they may require slightly more attention to detail.
What is the best substrate for growing indoor mushrooms?
The best substrate depends on the type of mushroom you’re growing. For oyster mushrooms, pasteurized straw, coffee grounds, or hardwood sawdust are excellent choices. Shiitake mushrooms thrive on hardwood logs or sawdust. Wine cap mushrooms prefer wood chips or straw. It’s crucial to research the specific substrate requirements of the mushroom variety you’re cultivating to ensure optimal growth. Coffee grounds are a popular and readily available option for many beginner-friendly mushrooms.
How do I pasteurize my substrate?
Pasteurization eliminates harmful bacteria and fungi that can compete with your mushroom spawn. For straw, you can submerge it in hot water (around 160-180°F) for 60-90 minutes. For coffee grounds, simply microwaving them for a few minutes or pouring boiling water over them is usually sufficient. Make sure the substrate cools down completely before adding the mushroom spawn.
How long does it take to grow mushrooms indoors?
The time it takes to grow mushrooms indoors varies depending on the species, substrate, and environmental conditions. Oyster mushrooms typically fruit within 2-3 weeks after inoculation. Shiitake mushrooms can take several months to fruit, especially when grown on logs. Patience is essential! Monitor your growing environment closely and adjust as needed.
What are the ideal temperature and humidity for growing indoor mushrooms?
Most mushroom species prefer a temperature range of 60-75°F (15-24°C) for fruiting. Humidity is also crucial, with most species requiring 80-90% humidity. You can maintain humidity by misting the growing area regularly, using a humidity tent, or placing a humidifier nearby. A hygrometer can help you monitor humidity levels accurately.
How much light do indoor mushrooms need?
Mushrooms don’t need a lot of light. In fact, direct sunlight can be harmful. Indirect or ambient light is sufficient for fruiting. A dimly lit room or a spot near a window is usually ideal. The light primarily signals the mushrooms to start pinning (forming small mushroom bodies).
How do I know when my mushrooms are ready to harvest?
Mushrooms are typically ready to harvest when the caps have fully expanded but before they start to flatten out or drop spores. The edges of the caps may start to curl upwards slightly. Gently twist or cut the mushrooms off at the base of the stem.
Can I reuse my substrate after harvesting mushrooms?
Yes, you can often get multiple flushes (harvests) from the same substrate. After harvesting, allow the substrate to rest for a week or two, then rehydrate it by misting or soaking it in water. You may need to add some nutrients to the substrate to encourage further growth. Eventually, the substrate will become depleted and no longer produce mushrooms.
What if my mushrooms are growing in strange shapes or colors?
Abnormal growth can be caused by various factors, including insufficient humidity, poor ventilation, or contamination. Ensure your growing environment is properly humidified and ventilated. If you suspect contamination, remove the affected area immediately to prevent it from spreading. Research the specific mushroom species you’re growing to identify potential problems and solutions.
Is it safe to eat homegrown mushrooms?
Yes, it is generally safe to eat homegrown mushrooms, provided you have correctly identified the species and grown them in a clean environment. Only consume mushrooms that you are 100% certain are edible. If you are unsure, consult with a mycologist or experienced mushroom grower. Avoid growing mushrooms in areas that may be contaminated with pesticides or other harmful substances. Always cook mushrooms thoroughly before eating.
Leave a Comment