
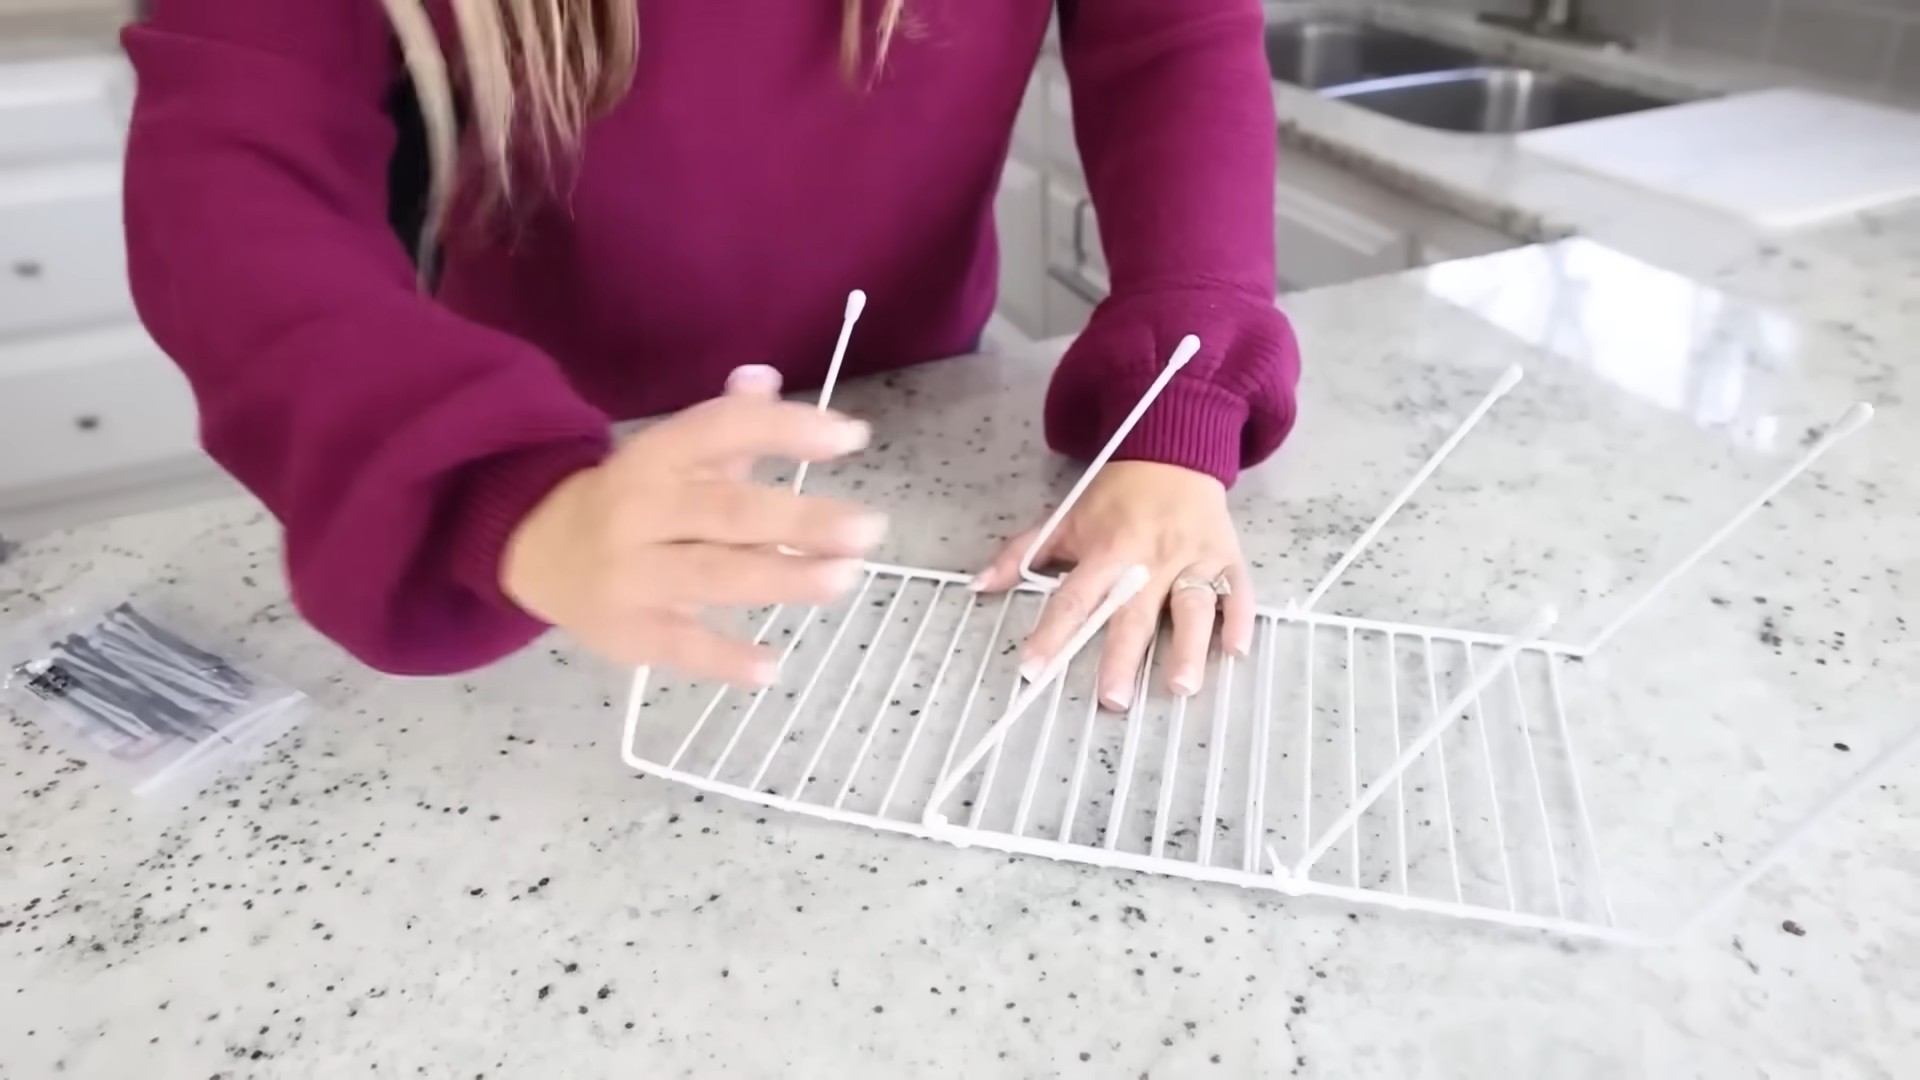
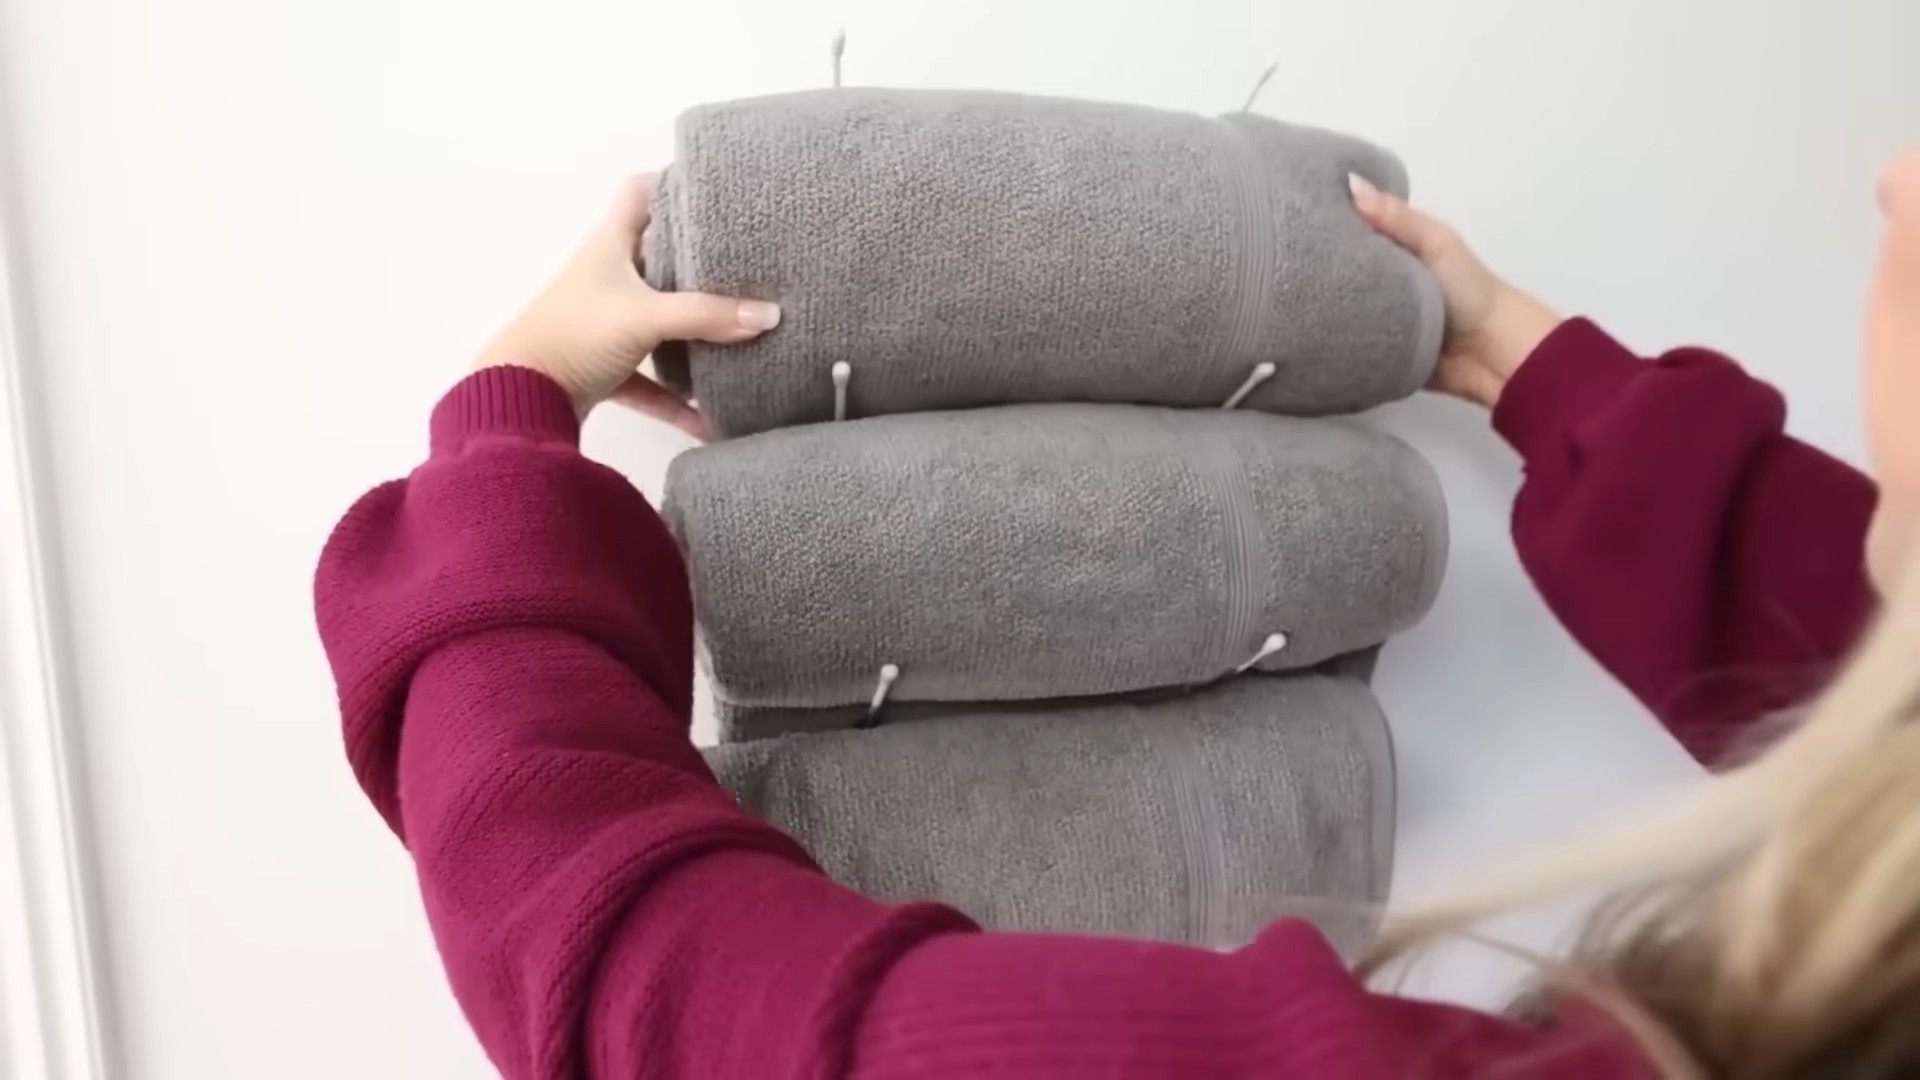
Dollar Tree Organization Hacks: Transform your home without breaking the bank! Have you ever walked into a Dollar Tree and felt overwhelmed by the sheer potential, yet unsure where to start? I know I have! It’s like a treasure trove of possibilities just waiting to be unlocked. But let’s be honest, sometimes those possibilities need a little… guidance. That’s where these amazing DIY organization hacks come in!
For generations, resourceful individuals have found creative ways to make the most of limited resources. From repurposing old containers to crafting clever storage solutions, the spirit of “making do” is deeply ingrained in our culture. Today, we’re taking that spirit and giving it a modern twist with these budget-friendly Dollar Tree organization hacks.
In today’s fast-paced world, a cluttered home can lead to a cluttered mind. Disorganization can cause stress, waste time, and even impact productivity. But fear not! You don’t need to spend a fortune on fancy organizers to create a calm and functional space. These simple, affordable, and surprisingly stylish DIY projects will help you declutter every corner of your home, from the kitchen pantry to the bathroom drawers. Get ready to unleash your inner organizing guru and discover the magic of the Dollar Tree!
Growing Carrots at Home: A Beginner’s Guide to Crunchy Success
Okay, so you want to grow carrots at home? Awesome! Let me tell you, there’s nothing quite like pulling a vibrant, homegrown carrot straight from the earth. The taste is just… different. Fresher, sweeter, and way more satisfying than anything you’ll find at the grocery store. Don’t be intimidated! Carrots are relatively easy to grow, even for beginners. This guide will walk you through everything you need to know, from choosing the right variety to harvesting your delicious bounty.
Choosing the Right Carrot Variety
Before we get our hands dirty, let’s talk about carrot varieties. Not all carrots are created equal! They come in different shapes, sizes, colors, and maturity times. Choosing the right variety for your climate and garden space is crucial for success.
* Nantes: These are classic, cylindrical carrots with a sweet flavor. They’re relatively short (6-8 inches) and mature quickly, making them a great choice for beginners.
* Danvers: These are longer, tapered carrots (7-9 inches) with a slightly stronger flavor. They’re known for their good storage qualities.
* Chantenay: These are short, thick, and conical carrots (5-6 inches). They’re a good choice for heavy or rocky soils because they don’t need as much depth.
* Imperator: These are the long, slender carrots you often see in supermarkets (8-10 inches). They require loose, well-drained soil to grow properly.
* Novelty Carrots: Don’t be afraid to experiment with colorful varieties like purple, yellow, or white carrots! They add a fun twist to your garden and your plate.
Consider your soil type, growing season length, and personal preferences when choosing your carrot variety. Read the seed packet descriptions carefully to make the best choice.
Preparing Your Carrot Bed
Carrots need loose, well-drained soil to thrive. Rocky or compacted soil will result in stunted, misshapen carrots. This is probably the most important part of the whole process.
* Sunlight: Carrots need at least 6 hours of sunlight per day. Choose a sunny spot in your garden.
* Soil Testing: Ideally, you should test your soil pH. Carrots prefer a slightly acidic soil with a pH between 6.0 and 6.8. You can purchase a soil testing kit at most garden centers.
* Soil Amendment: Amend your soil with plenty of organic matter, such as compost or well-rotted manure. This will improve drainage, aeration, and fertility.
* Remove Rocks and Debris: Remove any rocks, stones, or other debris from the soil. Even small pebbles can interfere with carrot growth.
* Loosen the Soil: Use a garden fork or tiller to loosen the soil to a depth of at least 12 inches. This will allow the carrot roots to grow freely.
* Create Raised Beds (Optional): If you have heavy clay soil, consider creating raised beds. This will improve drainage and prevent waterlogging.
Planting Carrot Seeds
Carrot seeds are tiny, so planting them can be a bit tricky. But don’t worry, I’ll walk you through it.
1. Timing: Carrots are a cool-season crop, so plant them in early spring or late summer. In most climates, you can plant carrots 2-3 weeks before the last expected frost in spring. For a fall harvest, plant carrots 10-12 weeks before the first expected frost.
2. Sowing Seeds: Sow carrot seeds directly into the ground. They don’t transplant well.
3. Creating Furrows: Create shallow furrows in the soil, about 1/4 to 1/2 inch deep.
4. Spacing: Space the furrows about 2-3 inches apart.
5. Sowing Seeds (Again!): Sprinkle the carrot seeds evenly into the furrows. Carrot seeds are notoriously small and difficult to space properly. Don’t worry too much about getting them perfectly spaced at this point. We’ll thin them later.
6. Covering Seeds: Gently cover the seeds with a thin layer of soil.
7. Watering: Water the soil gently but thoroughly. Keep the soil consistently moist until the seeds germinate.
8. Marking: Label your rows with the carrot variety and planting date.
Caring for Your Carrot Plants
Once your carrot seeds have germinated, it’s time to provide them with the care they need to thrive.
1. Thinning: This is crucial! When the seedlings are about 2 inches tall, thin them to 1-2 inches apart. When they are 4 inches tall, thin them again to 3-4 inches apart. This will give the carrots enough space to develop properly. Use small scissors to snip the seedlings at the soil line to avoid disturbing the roots of the remaining plants.
2. Watering: Carrots need consistent moisture to grow well. Water them deeply once or twice a week, depending on the weather. Avoid overwatering, which can lead to root rot.
3. Weeding: Keep your carrot bed free of weeds. Weeds compete with carrots for nutrients and water. Hand-pull weeds carefully to avoid disturbing the carrot roots.
4. Fertilizing: Carrots don’t need a lot of fertilizer, but a light feeding of a balanced fertilizer can help them grow. Apply the fertilizer according to the package directions. Avoid using fertilizers that are high in nitrogen, as this can promote leafy growth at the expense of root development.
5. Mulching: Apply a layer of mulch around your carrot plants. Mulch helps to retain moisture, suppress weeds, and regulate soil temperature. Straw, hay, or shredded leaves are good choices for mulch.
6. Pest Control: Carrots are susceptible to a few pests, such as carrot rust flies and aphids. Inspect your plants regularly for signs of pests. If you find pests, you can try using insecticidal soap or neem oil to control them.
Harvesting Your Carrots
The moment you’ve been waiting for! Harvesting your carrots is the most rewarding part of the process.
1. Timing: Carrots are typically ready to harvest 60-80 days after planting, depending on the variety. Check the seed packet for specific maturity times.
2. Signs of Maturity: The tops of the carrots will be visible above the soil line. You can gently brush away some soil to check the size of the carrots.
3. Harvesting: To harvest carrots, gently loosen the soil around the carrot with a garden fork or trowel. Then, grasp the carrot tops firmly and pull straight up. If the soil is dry, water it thoroughly before harvesting to make it easier to pull the carrots.
4. Cleaning: Brush off any excess soil from the carrots.
5. Storing: Store carrots in the refrigerator in a plastic bag or container. They will keep for several weeks. You can also store carrots in a root cellar or other cool, dark place.
Troubleshooting Common Carrot Problems
Even with the best care, you may encounter some problems when growing carrots. Here are a few common issues and how to address them:
* Forked or Misshapen Carrots: This is usually caused by rocky or compacted soil. Make sure to prepare your soil properly before planting.
* Stunted Growth: This can be caused by poor soil fertility, lack of water, or overcrowding. Make sure to amend your soil with organic matter, water regularly, and thin your seedlings properly.
* Carrot Rust Flies: These pests lay their eggs near the base of carrot plants. The larvae burrow into the carrots, causing damage. Cover your carrot bed with row covers to prevent carrot rust flies from laying their eggs.
* Cracked Carrots: This can be caused by inconsistent watering. Water your carrots regularly and deeply, especially during dry periods.
Extra Tips for Carrot Growing Success
Here are a few extra tips to help you grow the best carrots possible:
* Succession Planting: Plant carrots every 2-3 weeks to ensure a continuous harvest throughout the growing season.
* Companion Planting: Plant carrots with onions, garlic, or rosemary. These plants can help to deter pests.
* Don’t Over-Fertilize: Too much nitrogen can cause leafy growth at the expense of root development.
* Rotate Your Crops: Avoid planting carrots in the same spot year after year. This can help to prevent soilborne diseases.
* Have Fun!: Growing carrots should be a fun and rewarding experience. Don’t be afraid to experiment and learn from your mistakes.
Growing carrots at home is a rewarding experience that anyone can enjoy. With a little bit of planning and effort, you can harvest your own delicious, homegrown carrots. So get out there and get planting! You’ll be amazed at how easy and satisfying it is to grow your own food. Happy
Conclusion
So, there you have it! Transforming your home with these ingenious Dollar Tree organization hacks isn’t just about saving money; it’s about unlocking a world of creative possibilities and reclaiming your space. We’ve shown you how to turn everyday, inexpensive items into functional and stylish organizational solutions. From decluttering your pantry to maximizing closet space and creating a more efficient workspace, these hacks are designed to be simple, effective, and, most importantly, budget-friendly.
Why is this a must-try? Because it empowers you to take control of your environment without breaking the bank. Imagine the satisfaction of walking into a neatly organized home, knowing that you achieved it with a little ingenuity and a trip to the Dollar Tree. It’s about more than just tidiness; it’s about creating a sense of calm and order in your life. A well-organized space can reduce stress, improve productivity, and even boost your mood.
But the beauty of these Dollar Tree organization hacks lies in their adaptability. Feel free to experiment and customize them to suit your specific needs and preferences. For example, if you’re organizing your bathroom, consider using decorative contact paper to line the shelves of your Dollar Tree storage containers for a more polished look. Or, if you’re tackling your closet, try using Dollar Tree shower curtain rings to hang scarves or belts. The possibilities are truly endless!
Here are a few more suggestions to get your creative juices flowing:
* **Color-coding:** Use different colored bins and containers to categorize your belongings. This is especially helpful for organizing children’s toys or craft supplies.
* **Labeling:** Don’t underestimate the power of labels! Clearly label all your containers and shelves so you can easily find what you’re looking for. Dollar Tree sells packs of labels that are perfect for this.
* **Vertical Storage:** Maximize vertical space by using stackable bins and shelves. This is particularly useful in small spaces like apartments or dorm rooms.
* **Repurposing:** Think outside the box and repurpose items in unexpected ways. For example, you could use a Dollar Tree dish rack to organize your mail or a shower caddy to hold cleaning supplies under the sink.
Ultimately, the goal is to create a system that works for you and your lifestyle. Don’t be afraid to tweak and adjust these hacks until you find the perfect solution.
We’re confident that these Dollar Tree organization hacks will transform your home and your life. So, grab your shopping list, head to your local Dollar Tree, and get ready to declutter, organize, and create a space you love.
We’re eager to hear about your experiences! Share your before-and-after photos, your favorite hacks, and any creative variations you come up with in the comments below. Let’s inspire each other to create beautifully organized homes, one Dollar Tree find at a time. Remember, achieving an organized and aesthetically pleasing home doesn’t require a fortune; it just requires a little creativity and the right Dollar Tree organization hacks.
Frequently Asked Questions (FAQ)
What if my local Dollar Tree doesn’t have the exact items mentioned in the article?
That’s perfectly fine! The beauty of these hacks is their adaptability. Think of the suggestions as starting points. If your Dollar Tree doesn’t have the specific container or basket we mentioned, look for similar items that can serve the same purpose. Consider size, shape, and material when making substitutions. For example, if you can’t find the specific woven basket, a plastic storage bin or a wire basket might work just as well. The key is to find something that fits your needs and your space. Don’t be afraid to get creative and think outside the box! Sometimes, the best solutions are the ones you come up with yourself.
How do I know which organization hacks are right for my home?
Start by assessing your needs and identifying the areas in your home that need the most attention. Are you struggling with a cluttered pantry, an overflowing closet, or a disorganized workspace? Once you’ve identified the problem areas, browse through the hacks and choose the ones that seem most relevant to your situation. Consider the size of your space, the amount of storage you need, and your personal style. It’s also helpful to read reviews and see what other people have found successful. Remember, you don’t have to implement all the hacks at once. Start with a few and see how they work for you. You can always add more later.
Are these Dollar Tree organization hacks durable?
The durability of these hacks depends on the quality of the items you purchase and how you use them. Dollar Tree items are generally affordable, but they may not be as durable as more expensive alternatives. However, with proper care and maintenance, they can last for a reasonable amount of time. To increase the durability of your Dollar Tree organization hacks, consider reinforcing them with glue or tape. Avoid overloading containers and shelves, and be gentle when handling them. If you’re using these hacks in high-traffic areas, you may need to replace items more frequently.
How can I make these Dollar Tree organization hacks look more stylish?
While Dollar Tree items are functional, they may not always be the most aesthetically pleasing. However, there are several ways to make them look more stylish. Consider using decorative contact paper to line shelves and containers. Add labels with attractive fonts and colors. Use coordinating colors and patterns to create a cohesive look. You can also embellish items with ribbons, beads, or other decorative elements. Don’t be afraid to get creative and personalize your organization hacks to match your personal style. Remember, even the simplest Dollar Tree item can look chic with a little bit of effort.
What if I don’t have a Dollar Tree near me?
While the focus is on Dollar Tree, many of these hacks can be adapted using similar items from other discount stores or even repurposed items you already have at home. Look for affordable storage containers, baskets, and organizers at stores like Dollar General, Family Dollar, or even thrift stores. You can also repurpose items like cardboard boxes, glass jars, and plastic containers to create your own organization solutions. The key is to be resourceful and think creatively. The goal is to save money and create an organized space, regardless of where you source your materials.
How do I maintain my newly organized space after implementing these hacks?
Maintaining an organized space is just as important as creating one. The key is to establish a routine and stick to it. Make it a habit to put things back in their designated places after you use them. Declutter regularly and get rid of anything you no longer need or use. Set aside a few minutes each day or week to tidy up and reorganize. Involve your family members in the process and encourage them to maintain the organization as well. Remember, organization is an ongoing process, not a one-time event. With a little effort and consistency, you can keep your home organized and clutter-free.

Leave a Comment