
Rubber band home hacks – who knew these humble little loops could be the secret weapon in your gardening arsenal? I’m always on the lookout for clever, budget-friendly ways to make my gardening life easier, and trust me, these rubber band tricks are game-changers! From ancient civilizations using natural rubber-like substances for binding tools to modern-day crafters finding endless uses, the simple rubber band has a surprisingly rich history.
Let’s face it, gardening can sometimes feel like a constant battle against unruly plants, pesky pests, and the never-ending quest for the perfect support system. That’s where these DIY rubber band solutions come in. Are your tomato plants drooping? Need a gentle way to train your climbing vines? Tired of seedlings toppling over? These are just a few of the problems that rubber band home hacks can solve, saving you time, money, and a whole lot of frustration. I’m excited to share these simple yet effective techniques that will transform the way you garden!
DIY Concrete Countertops: A Step-by-Step Guide to a Stunning Kitchen Upgrade
Okay, so you’re thinking about concrete countertops? Awesome! They’re seriously stylish, surprisingly durable, and a fantastic way to add a unique, modern touch to your kitchen (or bathroom, or bar area – the possibilities are endless!). I know it might seem intimidating, but trust me, with a little patience and this guide, you can totally pull this off. I’m going to walk you through every step, from building the mold to the final sealing, so you can create a concrete countertop that you’ll be proud of for years to come.
Materials You’ll Need
Before we dive in, let’s gather our supplies. Having everything on hand will make the process so much smoother.
* Melamine Boards: This is what we’ll use to build the mold. It’s smooth, non-porous, and releases easily from the concrete. I usually go for ¾-inch thick melamine for a sturdy mold.
* Concrete Mix: You have a few options here. You can use a pre-mixed concrete countertop mix (which is specifically formulated for this purpose and often includes fibers for added strength), or you can mix your own using Portland cement, sand, and aggregate. I’ll be using a pre-mixed concrete countertop mix for this guide because it’s more beginner-friendly.
* Reinforcement: This is crucial for preventing cracks. I recommend using either rebar or wire mesh. Rebar is great for thicker countertops, while wire mesh is perfect for thinner ones.
* Concrete Sealer: This protects your countertop from stains and water damage. Choose a food-safe sealer specifically designed for concrete countertops.
* Concrete Pigment (Optional): If you want to add color to your countertop, you’ll need concrete pigment.
* Release Agent: This helps prevent the concrete from sticking to the mold. You can use a commercial release agent or even vegetable oil.
* Silicone Caulk: For sealing the seams of the mold.
* Mixing Tools: A concrete mixer (rent one if you don’t have one), buckets, shovels, and a margin trowel.
* Finishing Tools: A concrete float, a steel trowel, and sandpaper (various grits).
* Safety Gear: Safety glasses, gloves, and a dust mask are essential. Concrete dust can be harmful, so protect yourself!
* Measuring Tape, Pencil, and Saw: For measuring and cutting the melamine boards.
* Screws and Drill: To assemble the mold.
* Vibrating Sander (Optional but Recommended): This helps remove air bubbles from the concrete.
* Rubbing Alcohol and Clean Rags: For cleaning the surface before sealing.
Phase 1: Building the Mold
This is arguably the most important part of the whole process. A well-built mold will result in a beautiful, accurate countertop.
1. Measure and Plan: First, measure the area where your countertop will be installed. Add a slight overhang (usually 1-2 inches) to the front and sides. Draw a detailed plan of your countertop, including any cutouts for sinks or appliances. This plan will be your guide for building the mold.
2. Cut the Melamine: Using your measurements, cut the melamine boards to the correct sizes. You’ll need pieces for the base of the mold, the sides, and any internal forms for cutouts. Make sure your cuts are precise and square for a clean, professional look.
3. Assemble the Mold: Screw the side pieces to the base, creating a box. Make sure the screws are countersunk so they don’t interfere with the concrete. Use silicone caulk to seal all the seams of the mold. This will prevent the concrete from leaking out and creating a messy finish. Let the caulk dry completely before moving on.
4. Create Cutouts: If your countertop needs cutouts for a sink or other appliances, create internal forms using melamine. Secure these forms to the base of the mold with screws and silicone caulk. Again, make sure everything is sealed tightly.
5. Apply Release Agent: Apply a generous coat of release agent to the entire inside of the mold, including the base, sides, and any internal forms. This will make it much easier to remove the concrete countertop once it’s cured.
Phase 2: Mixing and Pouring the Concrete
Now for the fun part! Mixing and pouring the concrete can be a bit messy, so make sure you’re working in a well-ventilated area and wearing your safety gear.
1. Mix the Concrete: Follow the instructions on your concrete mix bag. Add water gradually until you achieve a thick, but pourable consistency. The mix should be similar to oatmeal. If you’re adding pigment, mix it in thoroughly at this stage.
2. Pour the First Layer: Pour a layer of concrete into the mold, about halfway up.
3. Add Reinforcement: Place your rebar or wire mesh into the concrete. Make sure it’s completely embedded and doesn’t touch the sides or bottom of the mold. This will provide maximum strength.
4. Pour the Second Layer: Pour the remaining concrete into the mold, filling it to the top.
5. Vibrate the Concrete: This is where the vibrating sander comes in handy. Run the sander along the sides of the mold to help remove air bubbles. You can also tap the sides of the mold with a rubber mallet. This will help the concrete settle and create a smoother surface.
6. Screed the Surface: Use a straight edge (like a piece of wood or metal) to screed the surface of the concrete. This will remove any excess concrete and create a level surface.
Phase 3: Curing and Demolding
Patience is key during this phase. Rushing the curing process can lead to cracks and other problems.
1. Cure the Concrete: Cover the mold with plastic sheeting to prevent the concrete from drying out too quickly. Keep the concrete damp for at least 7 days. You can do this by misting it with water a few times a day.
2. Demold the Countertop: After 7 days, carefully remove the screws from the mold. Gently tap the sides of the mold with a rubber mallet to loosen the concrete. Carefully lift the countertop out of the mold. This might require some effort, so be patient.
Phase 4: Finishing and Sealing
This is where you’ll transform your rough concrete slab into a beautiful, smooth countertop.
1. Grind the Surface: Use a concrete grinder (you can rent one) to grind the surface of the countertop. Start with a coarse grit sandpaper and gradually move to finer grits. This will remove any imperfections and create a smooth, even surface. If you don’t have a grinder, you can use a hand-held sander, but it will take longer.
2. Fill Voids (Optional): If you have any small voids or air bubbles in the concrete, you can fill them with a concrete patching compound. Follow the instructions on the patching compound and allow it to dry completely before sanding.
3. Sand the Edges: Use sandpaper to smooth the edges of the countertop. You can round them over for a softer look or leave them sharp for a more modern feel.
4. Clean the Surface: Thoroughly clean the surface of the countertop with rubbing alcohol and clean rags. This will remove any dust and debris and prepare the surface for sealing.
5. Apply Sealer: Apply several coats of concrete sealer, following the manufacturer’s instructions. Allow each coat to dry completely before applying the next. Make sure you choose a food-safe sealer if you’re using the countertop in a kitchen.
6. Buff the Surface: After the sealer has dried completely, you can buff the surface with a soft cloth to create a smooth, polished finish.
Phase 5: Installation
Almost there! Now it’s time to install your beautiful new concrete countertop.
1. Prepare the Cabinets: Make sure your cabinets are level and sturdy. You may need to add shims to level them.
2. Apply Adhesive: Apply a bead of construction adhesive to the top of the cabinets.
3. Position the Countertop: Carefully lift the countertop into place and position it on the cabinets.
4. Secure the Countertop: Use screws to secure the countertop to the cabinets from underneath.
5. Caulk the Seams: Caulk the seams between the countertop and the backsplash or walls with silicone caulk.
And that’s it! You’ve successfully created and installed your own concrete countertop. Now you can stand back and admire your handiwork. Remember to clean your countertop regularly with a mild soap and water. Avoid using harsh chemicals or abrasive cleaners, as they can damage the sealer. With proper care, your concrete countertop will last for many years to come. Enjoy!
Conclusion
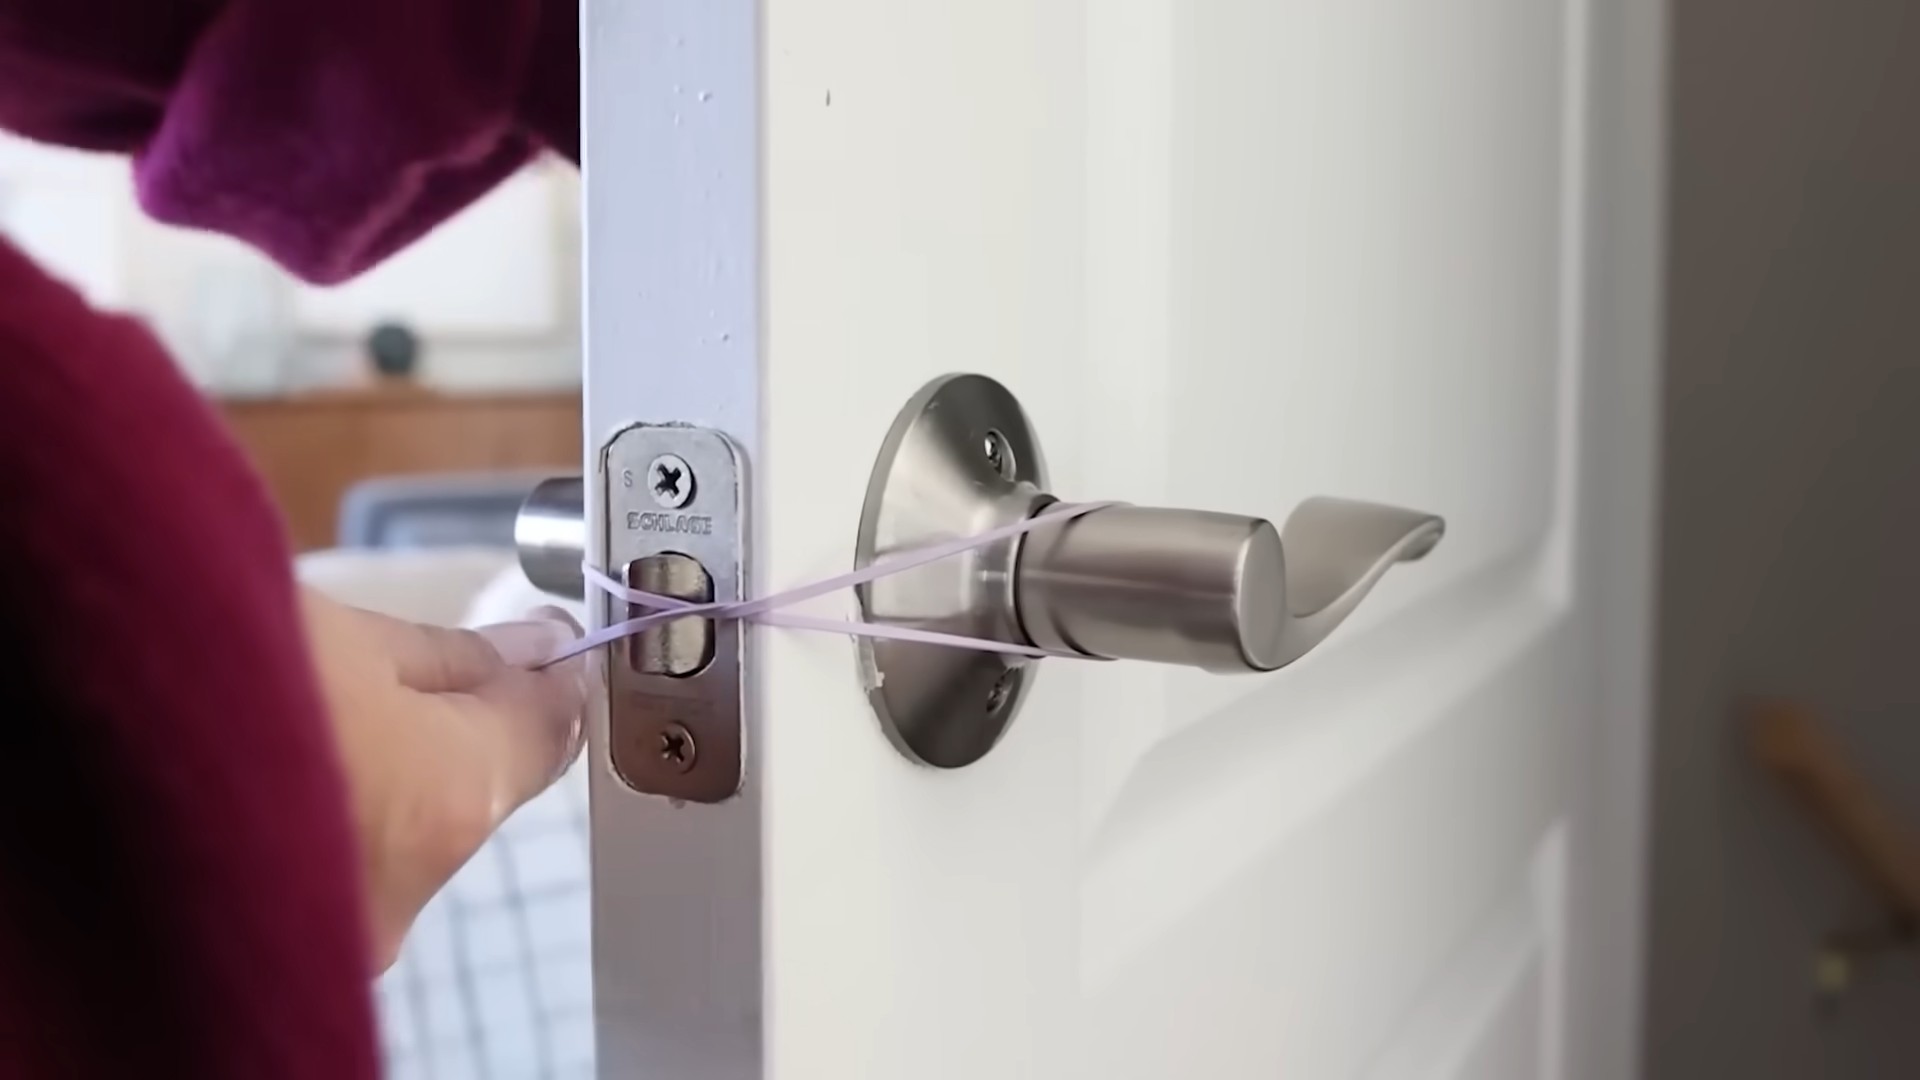
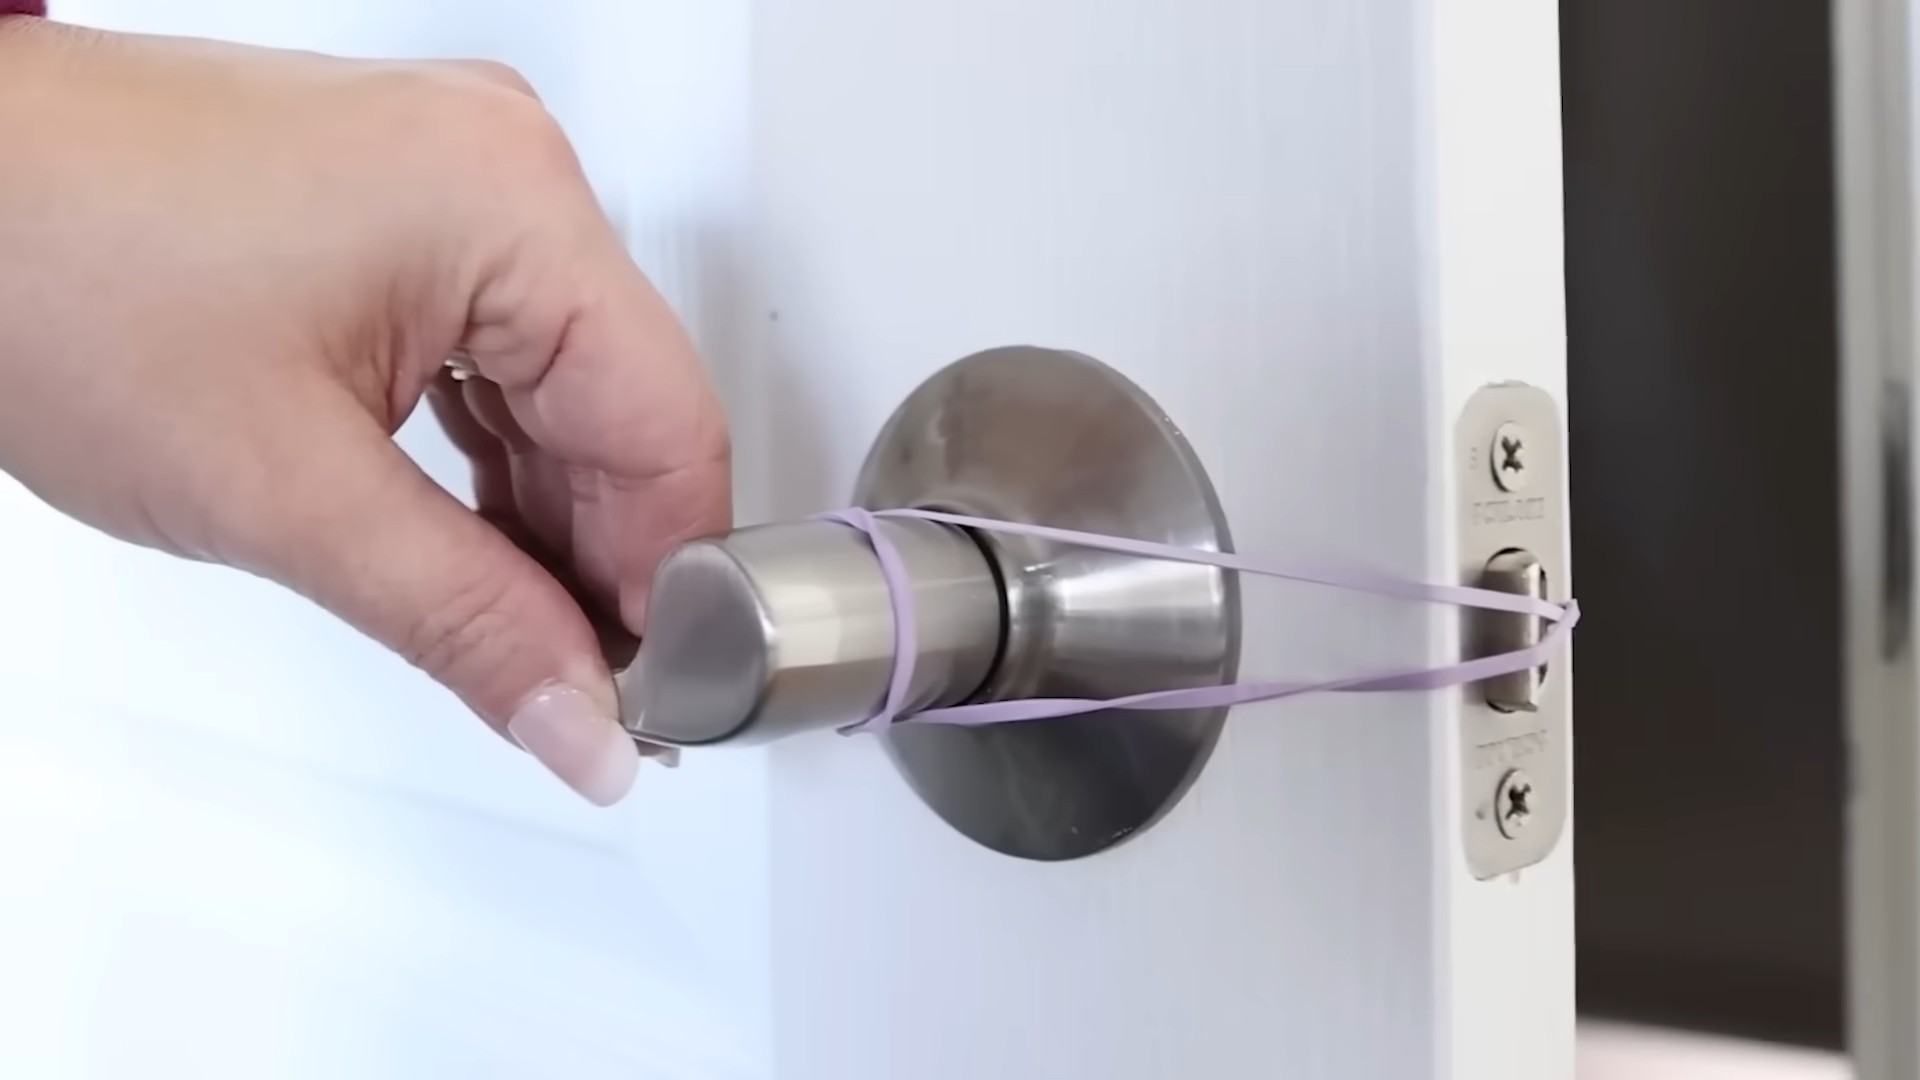
So, there you have it! These simple rubber band home hacks are more than just clever tricks; they’re a testament to the power of resourcefulness and a fantastic way to save money and reduce waste. From preventing doors from slamming shut to creating a non-slip grip on tools, the versatility of a humble rubber band is truly remarkable.
Why is this a must-try? Because it’s easy, inexpensive, and effective. You likely already have a stash of rubber bands lying around, just waiting to be put to good use. These hacks require no special skills or tools, making them accessible to everyone, regardless of their DIY experience. Plus, think of the satisfaction you’ll get from solving everyday problems with such a simple solution!
But don’t stop there! Feel free to experiment and adapt these ideas to your own needs. For example, if you’re using a rubber band to prevent a door from latching, try using a thicker band for a stronger hold, or even doubling up on thinner bands. If you’re using a rubber band to improve your grip, consider using textured rubber bands for even better traction. You can even color-code your rubber bands to organize different tools or tasks. Get creative and see what other ingenious uses you can discover!
We’ve covered a range of applications, but the possibilities are truly endless. Consider using rubber bands to:
* Secure loose cables and cords, preventing tangles and clutter.
* Create makeshift book bands to keep your favorite novels closed in your bag.
* Add extra grip to slippery hangers, preventing clothes from falling off.
* Mark your place in a notebook or planner.
* Bundle small items together for easier storage.
* Use them as a temporary fix for broken zippers.
The key is to think outside the box and look for opportunities where a little extra grip, tension, or security could make a difference.
We are confident that these rubber band home hacks will simplify your life and save you time and money. So, go ahead, give them a try! We encourage you to embrace the simplicity and effectiveness of these solutions.
And most importantly, we want to hear about your experience! Did you find these hacks helpful? Did you discover any new and innovative uses for rubber bands? Share your thoughts, tips, and tricks in the comments below. Let’s create a community of resourceful DIYers who are passionate about finding clever solutions to everyday problems. Your feedback will not only help us improve our content but also inspire others to embrace the power of the humble rubber band. Let’s unlock the full potential of these simple tools together!
Frequently Asked Questions (FAQs)
Q: What types of rubber bands work best for these hacks?
A: The best type of rubber band depends on the specific hack you’re trying. For general purposes, standard-sized rubber bands are usually sufficient. However, for tasks that require more strength or durability, such as preventing a door from slamming, thicker or wider rubber bands are recommended. You can also use multiple thinner rubber bands together to achieve the desired strength. For tasks that require extra grip, textured rubber bands or those with a higher coefficient of friction are ideal. Experiment with different sizes and types to find what works best for your needs. Consider the environment too. If the rubber band will be exposed to sunlight or extreme temperatures, choose a more durable, weather-resistant option.
Q: Are there any safety precautions I should take when using rubber bands?
A: While rubber bands are generally safe, it’s important to exercise caution to avoid injury. Never stretch a rubber band excessively, as it could snap and cause a painful sting or even eye injury. Keep rubber bands away from young children and pets, as they could be a choking hazard. When using rubber bands to secure objects, make sure they are securely fastened to prevent them from slipping or coming loose. Avoid using rubber bands on delicate or fragile items that could be damaged by the pressure. Finally, be mindful of allergies. If you have a latex allergy, use latex-free rubber bands.
Q: How long will these rubber band hacks last?
A: The lifespan of a rubber band hack depends on several factors, including the quality of the rubber band, the amount of stress it’s subjected to, and the environmental conditions. Rubber bands can degrade over time due to exposure to sunlight, heat, and moisture. Regularly inspect your rubber band hacks for signs of wear and tear, such as cracks, brittleness, or loss of elasticity. Replace the rubber band as needed to maintain its effectiveness. In general, thicker, higher-quality rubber bands will last longer than thinner, cheaper ones.
Q: Can I use these rubber band hacks on painted surfaces without damaging them?
A: While rubber bands are generally gentle, it’s always a good idea to test them on an inconspicuous area first, especially on painted or delicate surfaces. The pressure from the rubber band could potentially leave a mark or scratch the paint, particularly if the paint is old or fragile. To minimize the risk of damage, use wider rubber bands that distribute the pressure more evenly. You can also place a small piece of cloth or felt between the rubber band and the surface to provide a protective barrier. Avoid using rubber bands on freshly painted surfaces, as the paint may not be fully cured.
Q: Are there any alternatives to rubber bands for these hacks?
A: While rubber bands are a convenient and readily available option, there are several alternatives you can use for similar purposes. For example, you can use hair ties, elastic bands, or even reusable zip ties to secure objects or provide grip. For preventing doors from slamming, you can use door stoppers or soft foam pads. For improving grip on tools, you can use grip tape or rubber sleeves. The best alternative will depend on the specific hack and your personal preferences. Consider the durability, flexibility, and grip of the alternative material when making your choice.
Q: How can I store rubber bands to prevent them from drying out and cracking?
A: Proper storage is essential for extending the lifespan of your rubber bands. Store them in a cool, dark, and dry place, away from direct sunlight and heat sources. Exposure to sunlight and heat can cause rubber bands to dry out, become brittle, and lose their elasticity. You can store them in an airtight container or a resealable plastic bag to protect them from moisture and air. Adding a small amount of talcum powder to the container can also help prevent them from sticking together. Avoid storing rubber bands near sharp objects that could puncture or tear them.
Q: Can I recycle rubber bands?
A: Unfortunately, most municipal recycling programs do not accept rubber bands. Rubber bands are typically made from a type of rubber that is difficult to recycle. However, there are a few alternative options you can consider. You can try contacting local recycling centers or waste management companies to see if they have any specific programs for recycling rubber bands. You can also reuse rubber bands for other purposes, such as crafting or gardening. If you have a large quantity of rubber bands that you can’t reuse or recycle, you can dispose of them in the trash.
Q: I tried one of these hacks, and it didn’t work as well as I expected. What could be the problem?
A: There are several reasons why a rubber band hack might not work as well as you expected. First, make sure you’re using the right type and size of rubber band for the task. A rubber band that is too thin or too weak may not provide enough grip or tension. Second, check the condition of the rubber band. If it’s old, dry, or cracked, it may not be as effective. Third, make sure you’re applying the rubber band correctly. It should be snug but not too tight, and it should be positioned in the right place to provide the desired effect. Finally, consider the surface you’re working with. If the surface is too smooth or slippery, the rubber band may not be able to grip properly. Experiment with different techniques and materials to find what works best for your specific situation.


Leave a Comment