
Grow Celery Easily, even if you think you have a brown thumb! Let’s face it, store-bought celery can be a bit… blah. Limp, flavorless, and often more stalk than substance. But what if I told you that crisp, vibrant, and incredibly flavorful celery could be growing right in your own backyard (or even on your windowsill)? That’s right, we’re diving into the wonderful world of DIY celery cultivation!
Celery has a surprisingly rich history, dating back to ancient times where it was used more for medicinal purposes than culinary delight. The ancient Greeks even crowned athletes with celery leaves! While we might not be handing out celery crowns anytime soon, we can appreciate the plant’s versatility and the satisfaction of growing our own.
But why bother learning how to grow celery easily yourself? Well, beyond the superior taste and texture, home-grown celery is often more nutritious and free from the pesticides that can sometimes linger on commercially grown produce. Plus, it’s incredibly rewarding to nurture a plant from seed (or even a leftover stalk!) to a thriving, crunchy snack. In this article, I’m going to share some simple, effective DIY tricks and hacks that will have you harvesting your own delicious celery in no time. Get ready to ditch the store-bought stuff and embrace the joy of homegrown goodness!
Regrowing Celery from Kitchen Scraps: A Simple DIY Guide
Hey there, fellow gardening enthusiasts! Ever find yourself tossing out the base of your celery stalk after using the stalks for a delicious soup or salad? Well, stop right there! I’m going to show you how to easily regrow celery from that seemingly useless scrap, saving you money and giving you a fresh supply of this crunchy veggie. It’s a super simple project, perfect for beginners, and incredibly rewarding. Let’s get started!
What You’ll Need
Before we dive in, let’s gather our supplies. This is a low-cost project, so you probably already have most of these items on hand:
* The base of a celery stalk (about 2 inches from the bottom, where the stalks are connected). Make sure it looks relatively fresh and firm, not mushy or dried out.
* A shallow dish or bowl (a saucer works great).
* Water (tap water is fine).
* A sunny windowsill or well-lit area.
* Potting soil.
* A pot or container (at least 6 inches in diameter).
* A trowel or small shovel.
Phase 1: Rooting Your Celery Base
This is where the magic begins! We’re going to coax those dormant cells in the celery base to start growing roots.
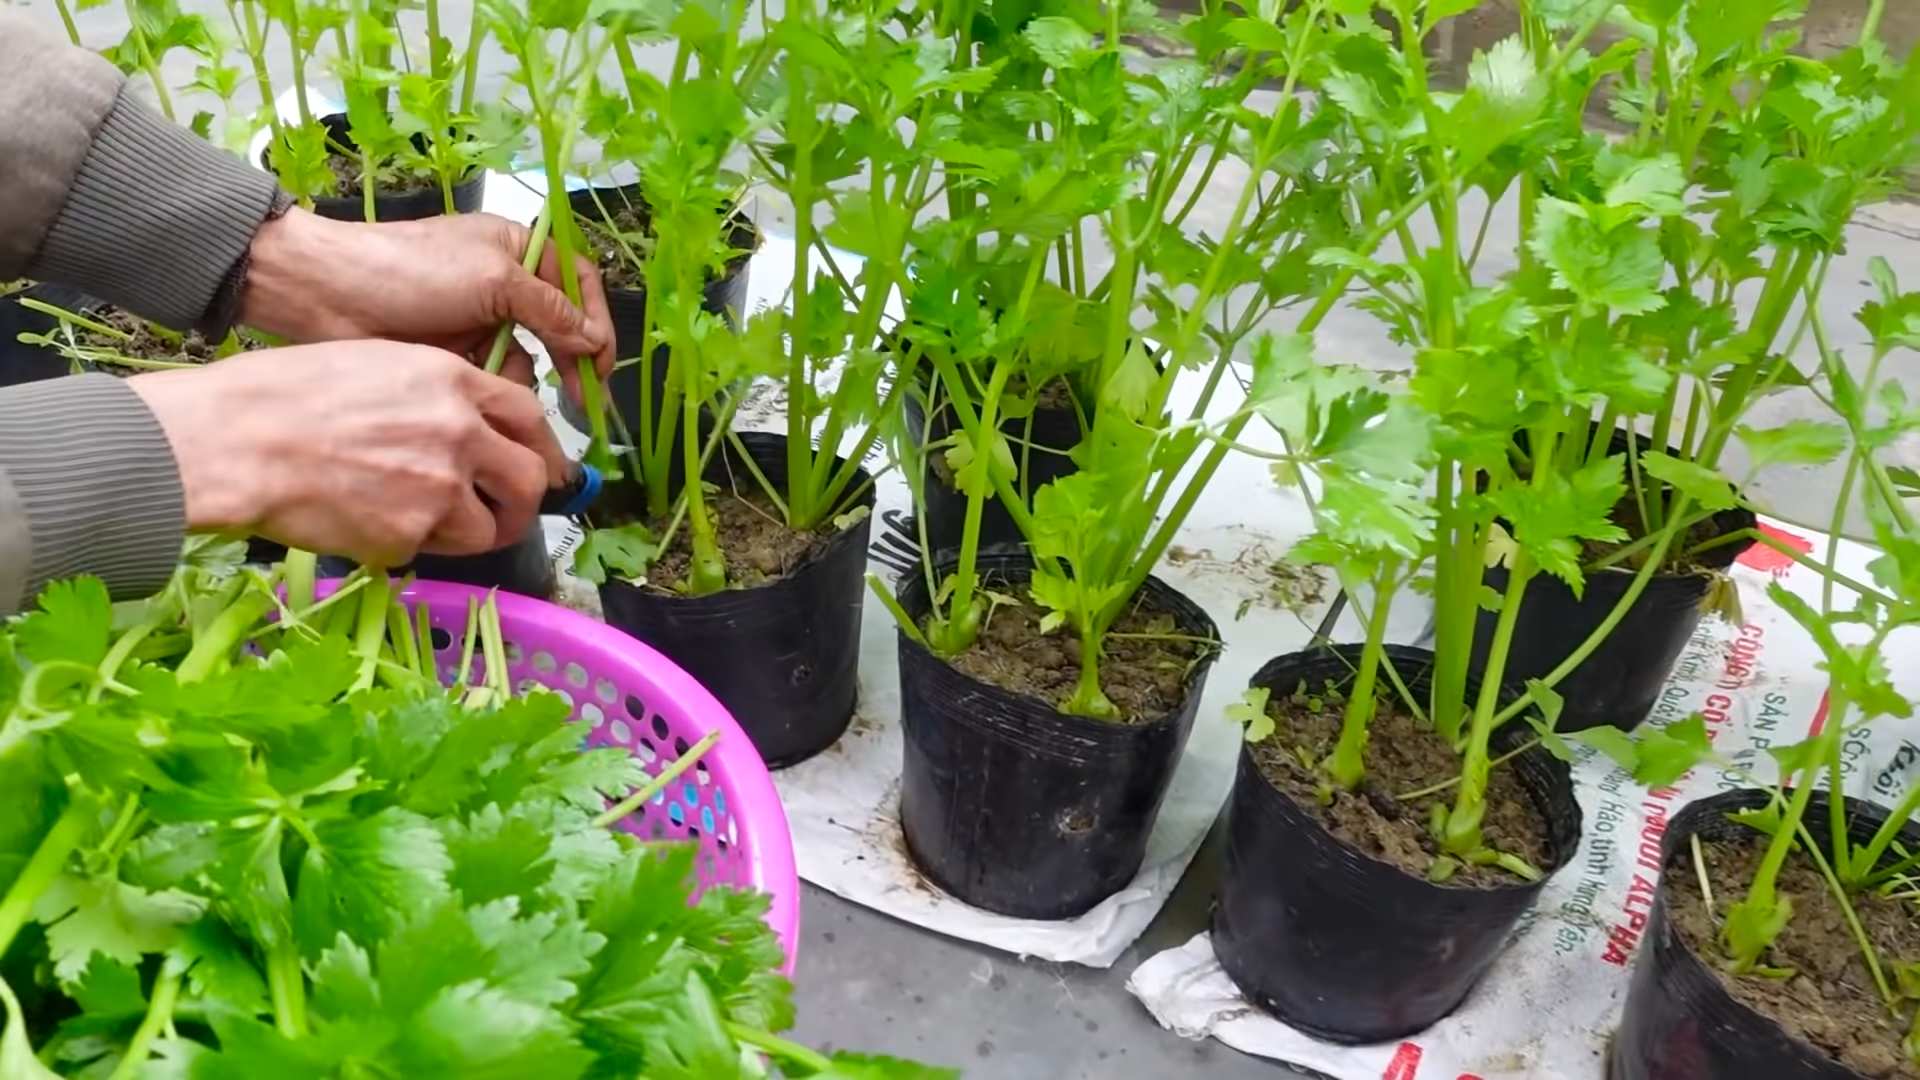
1. Prepare the Celery Base: Carefully inspect your celery base. Remove any loose or decaying outer stalks. You want to keep the core intact.
2. Place in Water: Fill your shallow dish with about an inch of water. Place the celery base in the dish, cut-side up. Make sure the water level only covers the bottom of the base; you don’t want the entire thing submerged, as this can lead to rot.
3. Find a Sunny Spot: Place the dish with the celery base on a sunny windowsill or in a well-lit area. Celery needs plenty of light to grow.
4. Change the Water Regularly: This is crucial! Change the water every 1-2 days to keep it fresh and prevent bacteria from growing. This will also provide the celery with a fresh supply of oxygen.
5. Observe and Wait: Over the next few days, you should start to see small roots emerging from the bottom of the celery base. You’ll also likely see new, small green leaves sprouting from the center. This is a sign that your celery is happy and thriving!
6. Patience is Key: It usually takes about 5-7 days for the roots to develop enough to be transplanted. You want the roots to be at least an inch long before moving on to the next phase. Don’t rush it!
Phase 2: Planting Your Celery
Now that your celery has sprouted roots, it’s time to give it a more permanent home in some soil.
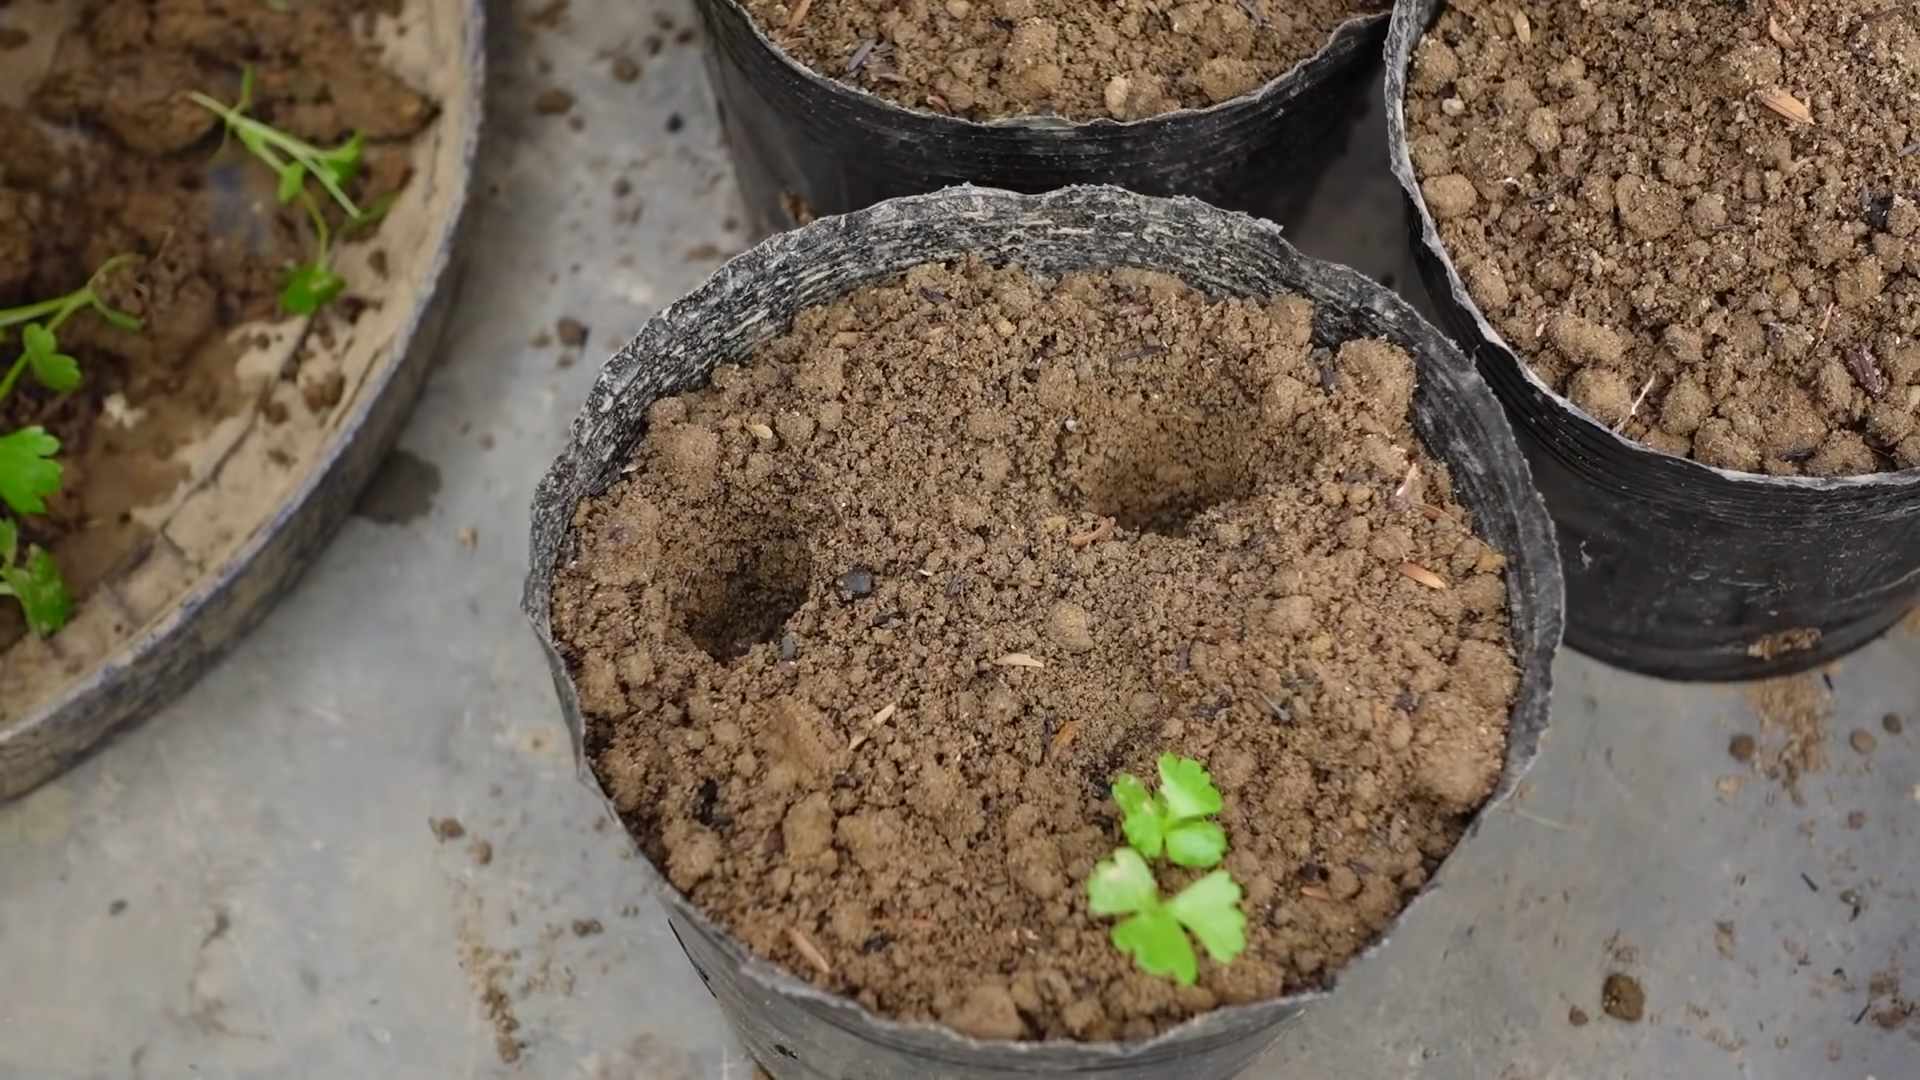
1. Prepare Your Pot: Fill your pot or container with potting soil. Make sure the pot has drainage holes at the bottom to prevent waterlogging.
2. Create a Hole: Use your trowel or fingers to create a hole in the center of the soil, large enough to accommodate the celery base and its roots.
3. Carefully Transplant: Gently remove the celery base from the water dish. Be careful not to damage the delicate roots.
4. Place in the Hole: Place the celery base in the hole, making sure the roots are spread out.
5. Cover with Soil: Gently fill the hole with soil, covering the celery base up to the point where the new leaves are emerging. Don’t bury the leaves!
6. Water Thoroughly: Water the soil thoroughly until water drains out of the bottom of the pot. This will help settle the soil and ensure the roots are properly hydrated.
Phase 3: Caring for Your Regrown Celery
Now that your celery is planted, it’s time to provide it with the care it needs to grow into a healthy plant.
1. Sunlight: Celery needs at least 6 hours of sunlight per day. Place your pot in a sunny location, such as a windowsill or balcony. If you don’t have enough natural light, you can supplement with a grow light.
2. Watering: Keep the soil consistently moist, but not soggy. Water when the top inch of soil feels dry to the touch. Avoid overwatering, as this can lead to root rot.
3. Fertilizing: Celery is a heavy feeder, meaning it needs a lot of nutrients to grow. Fertilize your celery plant every 2-3 weeks with a balanced liquid fertilizer. Follow the instructions on the fertilizer label.
4. Pest Control: Keep an eye out for pests, such as aphids and slugs. If you notice any pests, you can try spraying your plant with insecticidal soap or neem oil. You can also hand-pick pests off the plant.
5. Harvesting: You can start harvesting your celery stalks when they are about 6-8 inches long. To harvest, simply cut the stalks off at the base of the plant. The plant will continue to produce new stalks. You can harvest as needed.
6. Blanching (Optional): If you prefer milder-tasting celery, you can blanch the stalks before harvesting. To blanch, simply cover the stalks with soil or cardboard for a week or two before harvesting. This will block sunlight from reaching the stalks, making them paler and less bitter.
Troubleshooting
Sometimes, things don’t go exactly as planned. Here are a few common problems you might encounter and how to fix them:
* Celery base rots: This is usually caused by overwatering or using dirty water. Make sure to change the water regularly and avoid submerging the entire base.
* No roots develop: This could be due to a lack of sunlight or using an old or damaged celery base. Try moving the celery to a sunnier location and make sure the base is fresh and firm.
* Leaves turn yellow: This could be a sign of overwatering, underwatering, or a nutrient deficiency. Adjust your watering schedule and fertilize your plant regularly.
* Pests: As mentioned earlier, keep an eye out for pests and take action as soon as you notice them.
Tips for Success
Here are a few extra tips to help you succeed in regrowing celery:
* Start with a healthy celery base: Choose a celery base that is firm, fresh, and free from blemishes.
* Use clean water: Always use clean water when rooting your celery base.
* Provide plenty of sunlight: Celery needs at least 6 hours of sunlight per day.
* Don’t overwater: Overwatering can lead to root rot.
* Fertilize regularly: Celery is a heavy feeder and needs regular fertilization.
* Be patient: It takes time for celery to grow. Don’t get discouraged if you don’t see results immediately.
Enjoy Your Homegrown Celery!
And there you have it! You’ve successfully regrown celery from a kitchen scrap. Now you can enjoy fresh, homegrown celery in your soups, salads, and snacks. It’s a rewarding feeling to grow your own food, and this is a great way to reduce waste and save money. Happy gardening!
Conclusion
So, there you have it! Growing celery from kitchen scraps is not just a fun experiment; it’s a sustainable way to reduce food waste, save money, and enjoy fresh, homegrown celery. It’s a surprisingly simple process that yields tangible results, making it incredibly rewarding for gardeners of all levels, even those with limited space. This DIY trick transforms what would normally be tossed in the compost bin into a vibrant, leafy vegetable, ready to add a crisp, refreshing crunch to your salads, soups, and snacks.
Why is this a must-try? Because it’s a win-win situation. You’re minimizing waste, maximizing your resources, and gaining access to fresh produce right at your fingertips. Imagine the satisfaction of serving a dish featuring celery you nurtured from a humble celery base! It’s a conversation starter, a testament to your resourcefulness, and a delicious addition to your culinary repertoire.
But the fun doesn’t stop there! Feel free to experiment with different varieties of celery. While the standard green celery is readily available in most grocery stores, you might be able to find red or golden celery varieties at farmers’ markets or specialty stores. Each variety offers a slightly different flavor profile, adding a unique twist to your homegrown bounty.
Consider also experimenting with different growing mediums. While we’ve focused on water propagation followed by soil planting, you could try hydroponics for a completely soil-free approach. This method involves suspending the celery base in nutrient-rich water, providing a continuous supply of nourishment for optimal growth.
Another variation is to focus on growing celery leaves rather than the stalks. Celery leaves are often overlooked, but they are packed with flavor and nutrients. They can be used as a herb, adding a fresh, celery-like flavor to soups, stews, and salads. To encourage leaf growth, simply harvest the outer stalks as they mature, allowing the inner leaves to flourish.
Don’t be afraid to get creative with your celery cultivation! Try companion planting, pairing your celery with other vegetables and herbs that benefit from its presence. Onions, garlic, and tomatoes are all excellent companions for celery, as they help to deter pests and improve soil health.
We strongly encourage you to give this DIY trick a try. It’s an easy, affordable, and environmentally friendly way to grow your own celery. Once you’ve experienced the joy of harvesting your own homegrown celery, you’ll be hooked!
And most importantly, we want to hear about your experience! Share your photos, tips, and tricks on social media using #GrowCeleryEasily. Let’s create a community of celery enthusiasts, sharing our knowledge and inspiring others to embrace sustainable gardening practices. We are confident that with a little patience and care, you’ll be enjoying the fruits (or rather, vegetables) of your labor in no time. Happy growing!
Frequently Asked Questions (FAQ)
How long does it take to grow celery from a base?
The time it takes to grow celery from a base can vary depending on several factors, including the variety of celery, the growing conditions, and your level of care. Generally, you can expect to see new growth within a week or two of placing the celery base in water. After transferring it to soil, it can take anywhere from 2 to 4 months to grow a full-sized celery stalk. Be patient and provide consistent care, and you’ll be rewarded with a bountiful harvest.
What kind of water should I use?
It’s best to use filtered or dechlorinated water for growing celery from a base. Tap water often contains chlorine and other chemicals that can inhibit root growth. If you don’t have access to filtered water, you can let tap water sit out for 24 hours to allow the chlorine to evaporate. Change the water every 1-2 days to prevent bacterial growth and ensure the celery base stays healthy.
What kind of soil is best for growing celery?
Celery thrives in rich, well-draining soil that is high in organic matter. A good potting mix amended with compost or well-rotted manure is ideal. The soil should retain moisture but not become waterlogged, as this can lead to root rot. Before planting, loosen the soil and remove any rocks or debris.
How much sunlight does celery need?
Celery needs at least 6 hours of sunlight per day to grow properly. Choose a sunny location in your garden or on your patio where your celery plant will receive ample sunlight. If you’re growing celery indoors, place it near a sunny window or use a grow light to supplement natural light.
How often should I water my celery plant?
Celery needs consistent moisture to thrive. Water your celery plant deeply whenever the top inch of soil feels dry to the touch. Avoid overwatering, as this can lead to root rot. During hot, dry weather, you may need to water your celery plant more frequently.
What are some common pests and diseases that affect celery?
Celery can be susceptible to several pests and diseases, including aphids, celery leaf tiers, and fungal diseases like early blight and late blight. Regularly inspect your celery plants for signs of pests or diseases. If you notice any problems, take action immediately to prevent them from spreading. Organic pest control methods, such as insecticidal soap or neem oil, can be effective for controlling aphids and other pests. Fungicides can be used to treat fungal diseases.
Can I grow celery indoors year-round?
Yes, you can grow celery indoors year-round, provided you provide it with adequate light, water, and nutrients. Place your celery plant near a sunny window or use a grow light to supplement natural light. Water regularly and fertilize every few weeks with a balanced liquid fertilizer.
How do I harvest celery?
You can harvest celery stalks as they mature, starting with the outer stalks. Simply cut the stalks off at the base of the plant with a sharp knife. Leave the inner stalks to continue growing. You can also harvest celery leaves as needed for use in soups, salads, and other dishes.
Can I eat the celery leaves?
Yes, celery leaves are edible and packed with flavor and nutrients. They can be used as a herb, adding a fresh, celery-like flavor to soups, stews, salads, and other dishes. Celery leaves are also a good source of vitamins A and C.
What are some creative ways to use homegrown celery?
Homegrown celery can be used in a variety of dishes, including salads, soups, stews, stir-fries, and smoothies. It can also be used as a crudité, served with dips like hummus or ranch dressing. Celery juice is a popular health drink, known for its hydrating and detoxifying properties. You can also use celery to make celery salt, a flavorful seasoning for soups, stews, and other dishes.
My celery is bitter, what did I do wrong?
Bitterness in celery can be caused by several factors, including insufficient watering, high temperatures, and nutrient deficiencies. Ensure your celery plant receives consistent moisture and is protected from extreme heat. Fertilize regularly with a balanced fertilizer to provide essential nutrients. Also, some varieties are naturally more bitter than others.
Is growing celery from scraps really worth it?
Absolutely! While it might take a bit longer than buying celery from the store, growing celery from scraps is a rewarding and sustainable practice. You’re reducing food waste, saving money, and enjoying fresh, homegrown produce. Plus, it’s a fun and educational activity for gardeners of all ages. The satisfaction of harvesting your own celery is well worth the effort.
Leave a Comment