
Planting Garlic Successfully: Your Guide to a Bountiful Harvest
Planting garlic successfully isn’t just about throwing a few cloves in the ground and hoping for the best; it’s about understanding this versatile plant and unlocking its potential for a truly rewarding harvest. I’ve always loved the satisfying crunch of homegrown garlic, the intense flavor that simply can’t be matched by store-bought bulbs. That’s why I’m sharing my tried-and-true methods for Planting Garlic Successfully – a culmination of years of gardening experiments and lessons learned.
The history of garlic stretches back millennia, its cultivation woven into the fabric of numerous cultures. From ancient Egypt, where it was revered as a sacred plant, to its prominent role in traditional medicine and cuisine across the globe, garlic holds a significant place in our history. But you don’t need to be a historian to appreciate the simple joy of harvesting your own pungent, flavorful garlic.
Why Grow Your Own?
In today’s world, where food sourcing is a growing concern, knowing where your food comes from is increasingly important. Growing your own garlic allows you to control the quality, avoid pesticides, and savor the unparalleled taste of freshly harvested bulbs. Plus, it’s incredibly rewarding! There’s nothing quite like biting into a clove you’ve nurtured from a tiny sprout, knowing the care and attention you’ve put into planting garlic successfully.
This article will guide you through every step, from selecting the right cloves to harvesting your magnificent crop. We’ll cover soil preparation, planting techniques, pest control, and everything in between. Get ready to transform your garden into a garlic paradise!
Growing Rosemary in Small Spaces: A DIY Guide
Rosemary, with its fragrant needles and culinary versatility, is a wonderful addition to any garden, even if space is limited. This guide will walk you through creating a thriving rosemary plant, even if you only have a balcony, windowsill, or small patio.
Choosing Your Rosemary and Container
- Select a variety: There are many rosemary varieties, some more compact than others. ‘Prostratus’ or ‘Arp’ are excellent choices for small spaces, as they have a creeping habit. Consider the mature size of the variety you choose to ensure it fits your space.
- Pick the perfect pot: Choose a pot that’s at least 12 inches in diameter and has drainage holes. Terracotta pots are a good option as they allow for better air circulation and drainage, preventing root rot. However, plastic pots are also fine, especially if you live in a climate with extreme temperature fluctuations. Make sure the pot is large enough to accommodate the rosemary’s root system, allowing for growth over several years.
- Consider the material: While terracotta is popular, plastic pots are lighter and less prone to cracking in freezing temperatures. Self-watering pots can be beneficial, especially if you’re forgetful about watering. Just make sure to check the water level regularly to avoid overwatering.
Preparing for Planting
- Gather your supplies: You’ll need your chosen rosemary plant (either a seedling or cutting), your pot, potting mix, and a trowel or small garden spade.
- Choose the right potting mix: Use a well-draining potting mix. Avoid using garden soil directly, as it can be too heavy and retain too much water, leading to root rot. A good quality potting mix specifically designed for herbs is ideal. You can also amend your potting mix with perlite or vermiculite to improve drainage.
- Prepare the pot: Place a layer of gravel or broken pottery shards at the bottom of the pot to aid drainage. This prevents water from sitting at the base and causing root rot. This is especially important for terracotta pots.
Planting Your Rosemary
- Plant the rosemary: Gently remove the rosemary from its nursery pot, being careful not to damage the roots. Place it in the center of your prepared pot. The top of the root ball should be level with the top of the pot.
- Fill with potting mix: Fill the pot around the rosemary with the potting mix, gently firming it down to eliminate air pockets. Leave about an inch of space at the top of the pot to allow for watering.
- Water thoroughly: After planting, water the rosemary deeply until water drains from the drainage holes. This helps settle the soil and ensures the roots are well hydrated.
Ongoing Care for Your Rosemary
- Sunlight: Rosemary thrives in full sun. Place your pot in a location that receives at least 6-8 hours of direct sunlight per day. A south-facing window or balcony is ideal.
- Watering: Water your rosemary regularly, allowing the top inch of soil to dry out between waterings. Overwatering is a common problem, so it’s better to underwater slightly than to overwater. During hot and dry periods, you may need to water more frequently.
- Fertilizing: Feed your rosemary with a balanced liquid fertilizer once a month during the growing season (spring and summer). Avoid over-fertilizing, as this can lead to leggy growth.
- Pruning: Regular pruning will help keep your rosemary compact and bushy. Pinch back the tips of the stems to encourage branching. You can also prune lightly in late winter or early spring to remove any dead or damaged branches.
Troubleshooting Common Problems
Yellowing Leaves:
Yellowing leaves can indicate overwatering, underwatering, or nutrient deficiencies. Check the soil moisture and adjust your watering schedule accordingly. If the problem persists, consider fertilizing with a balanced liquid fertilizer.
Leggy Growth:
Leggy growth often results from insufficient sunlight. Move your rosemary to a sunnier location. Regular pruning can also help to encourage bushier growth.
Pest and Disease Problems:
Rosemary is generally pest and disease resistant. However, it can occasionally be affected by aphids or spider mites. Inspect your plant regularly and treat any infestations promptly with insecticidal soap or neem oil.
Overwintering Your Rosemary (For colder climates)
- Protection from frost: If you live in an area with freezing temperatures, you’ll need to protect your rosemary during the winter. Bring your potted rosemary indoors to a cool, bright location, or cover it with a frost blanket outdoors.
- Reduce watering: Reduce watering frequency during the winter months, as the plant’s growth slows down.
- Monitor for pests: Even indoors, pests can still be a problem. Keep an eye out for any signs of infestation.
Harvesting Your Rosemary
You can begin harvesting rosemary sprigs once the plant is well-established. Harvest by snipping off stems with fresh growth. Harvesting regularly will encourage bushier growth. You can use fresh rosemary in cooking or dry it for later use.
Propagation: Taking Cuttings
Propagating rosemary from cuttings is a simple way to increase your rosemary collection. Take 4-6 inch cuttings from healthy stems in spring or summer. Remove the lower leaves and dip the cut end in rooting hormone. Plant the cuttings in a pot filled with moist potting mix and cover with a plastic bag to maintain humidity. Keep the soil moist and in a warm location. Roots should develop within a few weeks.
Conclusion
So there you have it! A comprehensive guide to planting garlic successfully. This DIY approach to growing your own garlic isn’t just about saving money; it’s about connecting with the earth, understanding the lifecycle of a plant, and enjoying the unparalleled flavor of homegrown garlic. The satisfaction of harvesting your own pungent bulbs, knowing exactly how they were grown, is truly unmatched. This simple yet rewarding process transforms a seemingly mundane task into a fulfilling gardening experience. You’ll be amazed at the difference between store-bought garlic and the robust, flavorful cloves you cultivate yourself. This method of planting garlic successfully is a must-try for beginner and experienced gardeners alike. It’s a testament to the fact that even the most seemingly complex gardening tasks can be achieved with a little patience and the right knowledge.
Beyond the basic method outlined, there are numerous ways to personalize your garlic planting experience. Experiment with different garlic varieties – each boasts its own unique flavor profile and growing characteristics. Consider planting in raised beds for better drainage and soil control, especially if you have heavy clay soil. You can also explore companion planting, incorporating herbs like rosemary or thyme nearby to deter pests and enhance the overall health of your garlic plants. For those with limited space, consider container gardening – planting garlic in large pots allows you to grow it even on a balcony or patio. Remember to always adapt your planting techniques to your specific climate and soil conditions for optimal results. Don’t be afraid to experiment and find what works best for you and your garden. The beauty of gardening lies in its adaptability and the joy of discovery.
We strongly encourage you to try this DIY method of planting garlic successfully. It’s a rewarding journey from planting the cloves to harvesting the delicious results. Share your experiences with us! We’d love to hear about your successes, challenges, and any unique variations you’ve incorporated into your garlic-growing adventure. Post pictures of your thriving garlic plants on social media using #PlantingGarlicSuccessfully and tag us – we can’t wait to see your harvest! Let’s build a community of garlic enthusiasts, sharing tips, tricks, and the joy of homegrown goodness. Remember, the journey of planting garlic successfully is as rewarding as the delicious outcome. So, get your hands dirty, and let’s grow some amazing garlic together!
Frequently Asked Questions
What type of garlic is best for planting?
Hardneck garlic is generally preferred for planting because it produces larger bulbs and is better suited for overwintering in colder climates. Softneck garlic, while easier to braid and store, tends to produce smaller bulbs and is less winter-hardy. However, both types can be successfully planted, so choose the variety that best suits your climate and preferences.
When is the best time to plant garlic?
The optimal planting time for garlic varies depending on your location. Generally, the best time to plant garlic is in the fall, about 6-8 weeks before the first hard frost. This allows the garlic to establish a strong root system before winter. In milder climates, you might be able to plant in early spring, but fall planting is generally recommended for better yields.
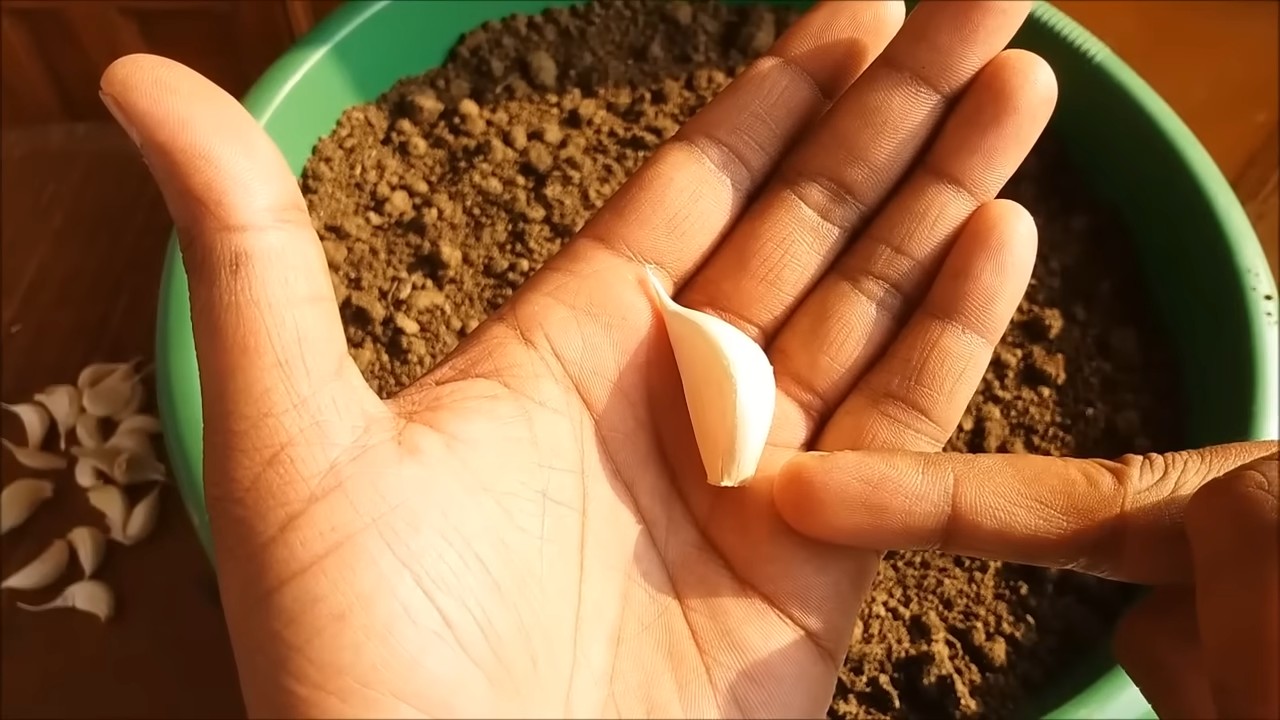
How deep should I plant garlic cloves?
Plant garlic cloves about 2-4 inches deep and 4-6 inches apart. The depth ensures proper root development, while the spacing allows for adequate growth and prevents overcrowding. Adjust spacing based on the size of the cloves and the variety of garlic you are planting.
What kind of soil does garlic need?
Garlic thrives in well-drained, loose soil rich in organic matter. Amend heavy clay soils with compost or other organic materials to improve drainage and aeration. Garlic prefers slightly acidic to neutral soil pH (6.0-7.0). A soil test can help you determine your soil’s pH and nutrient levels, allowing you to make necessary adjustments before planting.
What are some common problems when planting garlic?
Common problems include pests like garlic mites and nematodes, diseases like white rot, and poor drainage leading to root rot. Practicing crop rotation, using disease-resistant varieties, and ensuring proper soil drainage can help prevent these issues. Regularly inspect your plants for signs of pests or diseases and take appropriate action if necessary.
How do I know when my garlic is ready to harvest?
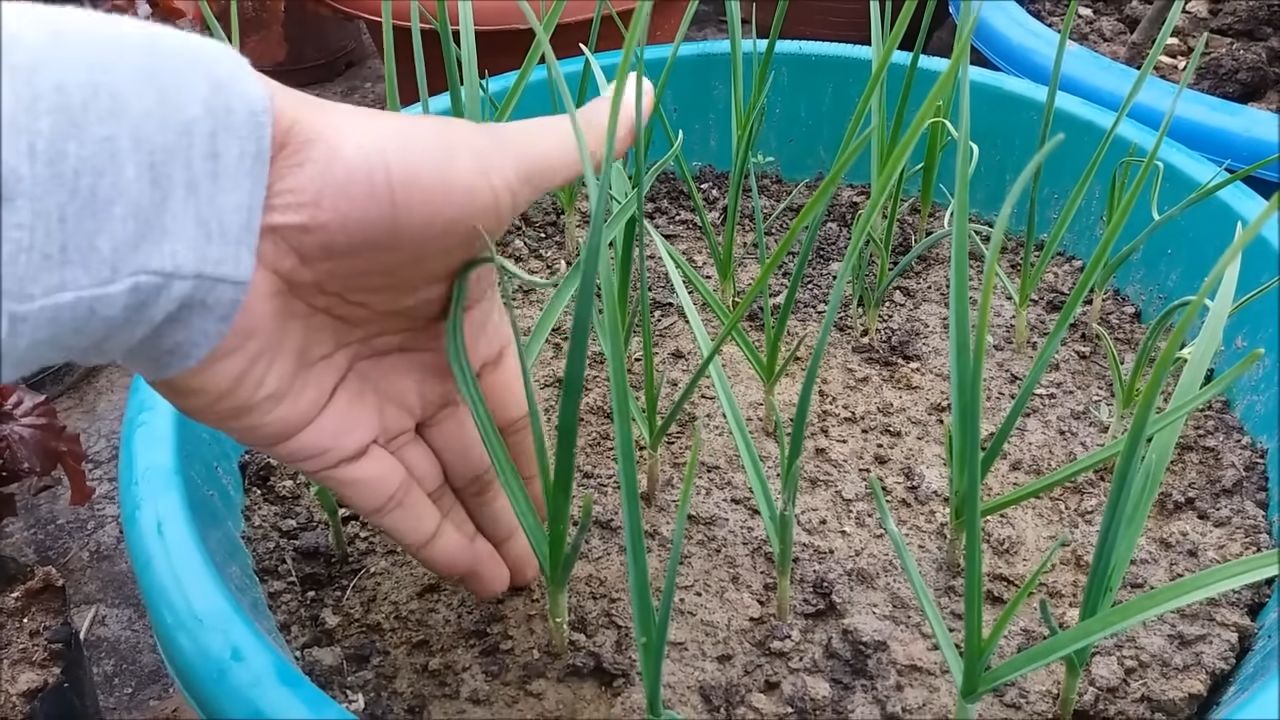
Garlic is typically ready for harvest when the leaves begin to turn brown and dry, usually around 8-10 months after planting. The tops will start to fall over, signaling that the bulbs are mature. Gently dig up the bulbs and allow them to cure in a dry, well-ventilated area for several weeks before storing.
Can I grow garlic in containers?
Yes, you can successfully grow garlic in containers. Use large containers (at least 12 inches in diameter) with drainage holes to prevent root rot. Ensure the container is filled with well-draining potting mix and follow the same planting instructions as for in-ground planting. Container-grown garlic might produce smaller bulbs than in-ground garlic, but it’s a great option for those with limited space.
What should I do with my garlic harvest?
After curing, store your garlic in a cool, dark, and dry place with good air circulation. Braiding garlic is a traditional method of storage that also adds a decorative touch to your kitchen. You can also store individual cloves in mesh bags or jars. Proper storage will help extend the shelf life of your homegrown garlic.


Leave a Comment