
Growing sweet potatoes in pots might sound like a challenge reserved for seasoned gardeners, but trust me, it’s a surprisingly simple and rewarding DIY project that anyone can tackle! Forget sprawling garden beds – we’re bringing the sweet potato harvest to your patio, balcony, or even your sunny kitchen windowsill.
For centuries, sweet potatoes have been a staple food in many cultures, particularly in South America and Asia. They were even brought to Europe by Christopher Columbus! Beyond their delicious flavor, these vibrant tubers are packed with nutrients and offer a unique connection to agricultural history. But let’s be honest, not everyone has the space or the time for traditional in-ground gardening. That’s where this DIY trick comes in.
Why should you learn how to grow sweet potatoes in pots? Well, imagine harvesting your own fresh, organic sweet potatoes right outside your door! No more trips to the grocery store for bland, mass-produced tubers. Plus, it’s a fantastic way to add a touch of green to your living space and impress your friends with your gardening prowess. I’m going to show you how to create the perfect environment for your sweet potatoes to thrive, from choosing the right pot and soil to providing the necessary sunlight and water. Get ready to embark on a fun and fulfilling gardening adventure – your taste buds (and your Instagram feed) will thank you!
Growing Sweet Potatoes in Pots: A Beginner’s Guide
Hey there, fellow gardening enthusiasts! Ever thought about growing your own sweet potatoes? It might seem daunting, but trust me, it’s totally doable, even if you’re short on space. Growing sweet potatoes in pots is a fantastic way to enjoy fresh, homegrown goodness, and I’m here to walk you through the whole process. Let’s get our hands dirty!
Choosing the Right Sweet Potato Variety
Before we dive into the nitty-gritty, let’s talk about sweet potato varieties. Not all sweet potatoes are created equal, especially when it comes to container gardening. You’ll want to choose a variety that’s well-suited for growing in pots. Here are a few of my favorites:
* ‘Bush Porto Rico’: This is a compact variety that’s perfect for containers. It produces smaller, but still delicious, sweet potatoes.
* ‘Georgia Jet’: A faster-maturing variety, ‘Georgia Jet’ is a good choice if you live in a cooler climate with a shorter growing season.
* ‘Beauregard’: A popular and reliable variety, ‘Beauregard’ produces large, orange-fleshed sweet potatoes. It can be grown in pots, but you’ll need a larger container.
* ‘Centennial’: Another classic choice, ‘Centennial’ is known for its sweet flavor and vibrant orange color.
Gathering Your Supplies
Okay, now that we’ve picked our sweet potato variety, let’s gather our supplies. Here’s what you’ll need:
* Sweet Potato Slip(s): You can either buy these online or at your local garden center, or you can sprout your own from a sweet potato (more on that later!).
* Large Pot(s): You’ll need a pot that’s at least 12 inches in diameter and 12 inches deep. Bigger is better, especially if you’re growing a larger variety like ‘Beauregard’. I personally prefer using 15-20 gallon pots.
* Potting Mix: Use a well-draining potting mix. Avoid using garden soil, as it can become compacted in pots and doesn’t drain well. I like to use a mix of compost, peat moss, and perlite.
* Water: Essential for keeping your sweet potatoes hydrated.
* Fertilizer: A balanced fertilizer (like 10-10-10) or a fertilizer specifically formulated for root vegetables will help your sweet potatoes thrive.
* Sunlight: Sweet potatoes need at least 6-8 hours of sunlight per day.
* Optional: Mulch (like straw or wood chips) to help retain moisture and suppress weeds.
Sprouting Your Own Sweet Potato Slips (Optional)
If you’re feeling adventurous, you can sprout your own sweet potato slips from a store-bought sweet potato. It’s a fun and rewarding process! Here’s how I do it:
1. Choose a Healthy Sweet Potato: Select a firm, unblemished sweet potato from your local grocery store. Organic sweet potatoes are often a better choice, as they’re less likely to be treated with sprout inhibitors.
2. Suspend the Sweet Potato in Water: There are two ways to do this. You can either use toothpicks to suspend the sweet potato over a jar of water, with the bottom half submerged, or you can bury the sweet potato horizontally in a container filled with moist potting mix, leaving the top exposed.
3. Place in a Warm, Sunny Location: Put the jar or container in a warm, sunny spot.
4. Change the Water Regularly: If you’re using the water method, change the water every few days to prevent it from getting murky.
5. Wait for Slips to Sprout: In a few weeks, you should start to see sprouts (slips) emerging from the sweet potato.
6. Harvest the Slips: Once the slips are about 6-8 inches long, gently twist them off the sweet potato.
7. Root the Slips: Place the slips in a jar of water, making sure the bottom inch or two is submerged. In a few days, they should start to develop roots.
8. Plant the Rooted Slips: Once the roots are about an inch long, you can plant the slips in your pots.
Planting Your Sweet Potato Slips
Alright, now for the main event: planting those sweet potato slips!
1. Prepare Your Pot: Fill your pot with the well-draining potting mix, leaving a few inches of space at the top.
2. Make a Hole: Dig a hole in the center of the pot, deep enough to accommodate the roots of the sweet potato slip.
3. Plant the Slip: Gently place the sweet potato slip in the hole, making sure the roots are spread out. Cover the roots with potting mix and gently firm the soil around the base of the slip.
4. Water Thoroughly: Water the pot thoroughly after planting.
5. Mulch (Optional): Add a layer of mulch around the base of the plant to help retain moisture and suppress weeds.
Caring for Your Sweet Potato Plants
Now that your sweet potato slips are planted, it’s time to give them some TLC. Here’s what you need to do:
1. Water Regularly: Sweet potatoes need consistent moisture, especially during hot weather. Water deeply whenever the top inch of soil feels dry to the touch.
2. Fertilize: Fertilize your sweet potato plants every few weeks with a balanced fertilizer or a fertilizer specifically formulated for root vegetables. Follow the instructions on the fertilizer package.
3. Provide Sunlight: Make sure your sweet potato plants are getting at least 6-8 hours of sunlight per day.
4. Control Pests and Diseases: Keep an eye out for pests and diseases. Common pests that affect sweet potatoes include aphids, flea beetles, and sweet potato weevils. Common diseases include fungal diseases like stem rot and leaf spot. Treat any problems promptly with appropriate insecticides or fungicides. I prefer using organic options whenever possible.
5. Provide Support (Optional): As your sweet potato vines grow, they may start to trail over the sides of the pot. You can provide support by using a trellis or staking the vines. This isn’t strictly necessary, but it can help keep the plants tidy and prevent them from sprawling too much.
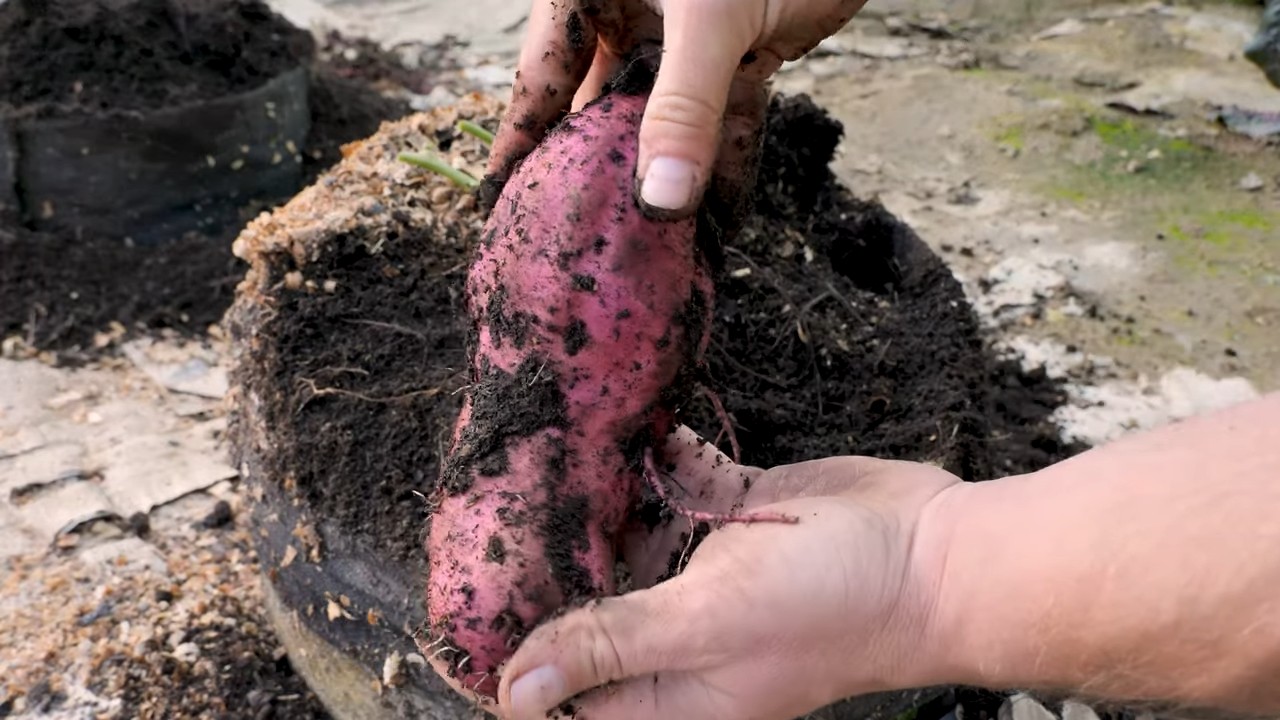
Harvesting Your Sweet Potatoes
The moment we’ve all been waiting for: harvesting! Sweet potatoes typically take about 90-120 days to mature, depending on the variety and your climate. Here’s how to know when it’s time to harvest:
1. Check the Foliage: The foliage will start to turn yellow and die back when the sweet potatoes are ready to harvest.
2. Test Dig: Gently dig around the base of one of the plants to check the size of the sweet potatoes. If they’re a good size (usually a few inches long), you can harvest the rest.
3. Harvest Carefully: Gently dig around the base of the plant, being careful not to damage the sweet potatoes. Lift the plant out of the pot and carefully remove the sweet potatoes from the soil.
4. Cure the Sweet Potatoes: Curing is an important step that helps to improve the flavor and storage life of your sweet potatoes. To cure them, place them in a warm, humid place (around 80-85°F and 85-90% humidity) for about a week. A greenhouse or a warm, sunny room with a humidifier works well.
5. Store the Sweet Potatoes: After curing, store your sweet potatoes in a cool, dry place (around 55-60°F). They should keep for several months.
Troubleshooting Common Problems
Even with the best care, you might encounter some problems while growing sweet potatoes in pots. Here are a few common issues and how to address them:
* Yellowing Leaves: This could be a sign of overwatering, underwatering, or nutrient deficiency. Check the soil moisture and adjust your watering accordingly. Fertilize with a balanced fertilizer.
* Stunted Growth: This could be caused by poor soil, lack of sunlight, or pests. Make sure your sweet potatoes are getting enough sunlight and are planted in well-draining potting mix. Check for pests and treat them promptly.
* Small Sweet Potatoes: This could be due to a short growing season, lack of nutrients, or overcrowding. Choose a faster-maturing variety if you live in a cooler climate. Fertilize regularly and make sure you’re not planting too many slips in one pot.
* Pests: Aphids, flea beetles, and sweet potato weevils can all attack sweet potato plants. Use insecticidal soap or neem oil to control these pests.
Enjoying Your Homegrown Sweet Potatoes
Congratulations! You’ve successfully grown your own sweet potatoes in pots. Now it’s time

Conclusion
So, there you have it! Growing sweet potatoes in pots isn’t just a gardening trend; it’s a genuinely rewarding experience that brings the joy of fresh, homegrown produce right to your doorstep, even if you’re short on space. We’ve walked you through the process, from selecting the right slip to harvesting your delicious bounty. But why is this DIY trick a must-try?
First and foremost, it’s incredibly accessible. You don’t need acres of land or specialized equipment. A sunny balcony, patio, or even a well-lit indoor space can become your sweet potato haven. This makes it perfect for apartment dwellers, urban gardeners, or anyone looking to maximize their gardening potential in a limited area.
Secondly, growing sweet potatoes in pots allows for greater control over the growing environment. You can carefully manage the soil quality, watering schedule, and pest control, leading to healthier plants and a more abundant harvest. This is particularly beneficial if you live in an area with poor soil conditions or a short growing season.
Thirdly, it’s a fantastic learning experience. From nurturing the slips to witnessing the tubers develop beneath the soil, you’ll gain a deeper appreciation for the miracle of plant growth. It’s a hands-on activity that connects you to nature and provides a sense of accomplishment.
But the real magic lies in the taste. Homegrown sweet potatoes, nurtured with your own care, boast a flavor that far surpasses anything you can find in the supermarket. The sweetness is more pronounced, the texture is creamier, and the overall experience is simply divine.
Don’t be afraid to experiment with different varieties! While we’ve focused on general guidelines, there’s a whole world of sweet potato cultivars to explore. Try Beauregard for its classic orange flesh and sweet flavor, or go for a Japanese sweet potato with its purple skin and nutty taste. You can also adjust the size of your pot to influence the size of your sweet potatoes. Smaller pots will yield smaller, more manageable tubers, while larger pots will allow for larger, more impressive specimens.
Consider adding companion plants to your sweet potato pots. Herbs like basil and rosemary can help deter pests and enhance the flavor of your sweet potatoes. Marigolds are also a great choice for their pest-repelling properties and vibrant color.
Finally, remember that gardening is a journey, not a destination. There will be challenges along the way, but don’t let them discourage you. Embrace the learning process, adapt to your specific environment, and most importantly, have fun!
We wholeheartedly encourage you to give this DIY trick a try. Imagine the satisfaction of harvesting your own sweet potatoes, knowing that you nurtured them from slip to tuber. Share your experiences with us! Post photos of your sweet potato plants, tell us about your favorite varieties, and let us know what challenges you faced and how you overcame them. Your insights can help other gardeners embark on their own sweet potato adventures. Let’s build a community of pot-grown sweet potato enthusiasts! So, grab a pot, some slips, and get ready to experience the joy of growing your own delicious sweet potatoes. You won’t regret it!
Frequently Asked Questions (FAQ)
What is the best size pot for growing sweet potatoes?
The ideal pot size for growing sweet potatoes is at least 10 gallons, but larger is generally better. A 15-20 gallon pot will provide ample space for the tubers to develop and maximize your yield. The pot should also be at least 12 inches deep to accommodate the root system. If you’re limited on space, you can use a smaller pot (around 5 gallons), but expect a smaller harvest. Remember that the larger the pot, the larger the sweet potatoes can potentially grow.
What type of soil should I use for growing sweet potatoes in pots?
Sweet potatoes thrive in well-draining, sandy loam soil that is rich in organic matter. Avoid heavy clay soils, as they can become waterlogged and hinder tuber development. You can create your own potting mix by combining equal parts of potting soil, compost, and perlite or vermiculite. This will provide good drainage, aeration, and nutrients for your sweet potato plants. Ensure the soil pH is between 5.5 and 6.5 for optimal growth.
How often should I water my sweet potato plants in pots?
Water your sweet potato plants regularly, especially during hot and dry weather. The soil should be kept consistently moist, but not waterlogged. Check the soil moisture by sticking your finger about an inch deep into the soil. If it feels dry, it’s time to water. Water deeply, allowing the water to drain out of the bottom of the pot. Reduce watering frequency during cooler weather or when the plants are not actively growing. Overwatering can lead to root rot, so be mindful of drainage.
How much sunlight do sweet potato plants need?
Sweet potato plants need at least 6-8 hours of direct sunlight per day to thrive. Choose a sunny location for your pots, such as a south-facing balcony or patio. If you’re growing sweet potatoes indoors, place them near a sunny window or supplement with grow lights. Insufficient sunlight can result in leggy growth, reduced tuber production, and pale foliage.
How do I fertilize my sweet potato plants in pots?
Sweet potatoes are relatively light feeders, but they still benefit from regular fertilization. Use a balanced fertilizer (e.g., 10-10-10) or a fertilizer specifically formulated for root vegetables. Apply the fertilizer according to the package instructions, typically every 2-3 weeks during the growing season. Avoid over-fertilizing, as this can lead to excessive foliage growth at the expense of tuber development. You can also amend the soil with compost or aged manure to provide a slow-release source of nutrients.
When is the best time to harvest my sweet potatoes?
Sweet potatoes are typically ready to harvest about 90-120 days after planting the slips. The leaves will start to turn yellow and the vines may begin to die back. To check for maturity, carefully dig around the base of the plant and feel for the tubers. If they are a good size and have a firm skin, they are ready to harvest. Harvest before the first frost, as frost can damage the tubers.
How do I cure sweet potatoes after harvesting?
Curing sweet potatoes is essential for improving their flavor and storage life. After harvesting, gently brush off any excess soil and allow the sweet potatoes to dry in a warm, humid place (80-85°F and 85-90% humidity) for 7-10 days. This process allows the skins to harden and heal any minor cuts or bruises. After curing, store the sweet potatoes in a cool, dry, and well-ventilated place (55-60°F) for several months. Avoid storing them in the refrigerator, as this can cause them to develop a hard core.
Can I grow sweet potatoes from store-bought sweet potatoes?
Yes, you can grow sweet potatoes from store-bought sweet potatoes, but it’s not always guaranteed to be successful. Choose organic sweet potatoes, as non-organic ones may have been treated with sprout inhibitors. Suspend the sweet potato in a jar of water, with the bottom half submerged. Place the jar in a warm, sunny location. After a few weeks, sprouts (slips) will emerge from the sweet potato. Once the slips are 6-8 inches long, gently twist them off and root them in water before planting them in pots.
What are some common pests and diseases that affect sweet potato plants?
Common pests that can affect sweet potato plants include aphids, flea beetles, and sweet potato weevils. Diseases include fungal diseases like stem rot and root rot. Regularly inspect your plants for signs of pests or diseases. Treat infestations with insecticidal soap or neem oil. Prevent fungal diseases by ensuring good drainage and avoiding overwatering. Crop rotation can also help prevent soilborne diseases.
Can I grow sweet potatoes indoors year-round?
Yes, you can grow sweet potatoes indoors year-round, but you’ll need to provide adequate light and warmth. Use grow lights to supplement natural sunlight, especially during the winter months. Maintain a consistent temperature of 70-80°F. You may also need to hand-pollinate the flowers to ensure tuber development. While indoor growing is possible, expect a smaller harvest compared to outdoor growing.

Leave a Comment