
Grow Sweet Melons like a pro, even if you think you have a brown thumb! Have you ever dreamed of biting into a juicy, sun-ripened melon that you grew yourself? It’s more achievable than you think, and this DIY guide is packed with simple tricks to help you cultivate the sweetest, most flavorful melons right in your backyard. Forget those bland, store-bought melons – we’re about to unlock the secrets to homegrown deliciousness!
Melons have a rich history, dating back to ancient civilizations in Africa and Asia, where they were prized for their refreshing taste and nutritional benefits. For centuries, cultivating these sweet fruits was an art passed down through generations. Now, you can tap into that ancient wisdom with modern techniques tailored for the home gardener.
Why do you need these DIY tricks? Because growing melons can be tricky! They require specific conditions to thrive, and without the right knowledge, you might end up with small, tasteless fruits. But don’t worry, I’m here to guide you through every step, from choosing the right variety to providing the perfect soil and sunlight. With these easy-to-follow tips, you’ll be harvesting your own bounty of sweet melons in no time. So, let’s dive in and discover how to grow sweet melons that will impress your friends and family!
Growing Sweet Melons: A DIY Guide to Juicy Success
Hey there, fellow gardening enthusiasts! I’m so excited to share my tried-and-true method for growing incredibly sweet and juicy melons right in your own backyard. Forget those bland, store-bought melons – we’re going for flavor explosions! This guide will walk you through every step, from seed to harvest, ensuring you’re enjoying homegrown goodness in no time.
Choosing Your Melon Variety
Before we get our hands dirty, let’s talk melons! The variety you choose will significantly impact your success and the sweetness of your harvest. Here are a few of my favorites, perfect for home gardens:
* Cantaloupe: Classic and reliable, cantaloupes are known for their orange flesh and distinct aroma. Look for varieties like ‘Athena’ or ‘Hales Best Jumbo’ for consistent results.
* Watermelon: Who doesn’t love a juicy watermelon on a hot summer day? ‘Sugar Baby’ is a compact variety perfect for smaller gardens, while ‘Crimson Sweet’ offers a classic watermelon flavor and larger size.
* Honeydew: With its pale green flesh and subtle sweetness, honeydew is a refreshing choice. ‘Honeycrisp’ is a popular and reliable variety.
* Galia Melon: A cross between a cantaloupe and a honeydew, Galia melons offer a unique flavor profile and a beautiful netted rind.
Important Considerations:
* Climate: Make sure the variety you choose is suitable for your climate. Melons need plenty of sunshine and warm temperatures to thrive.
* Space: Consider the size of your garden. Some melon varieties, like watermelons, can take up a lot of space. Bush varieties are available for smaller gardens.
* Days to Maturity: This is the number of days it takes for the melon to mature after planting. Choose varieties with shorter maturity times if you have a shorter growing season.
Starting Your Melon Seeds
You can either direct sow your melon seeds into the garden or start them indoors. I prefer starting them indoors, especially if you live in an area with a shorter growing season. This gives your plants a head start and protects them from early-season pests and diseases.
Materials You’ll Need:
* Melon seeds (of course!)
* Seed starting trays or small pots
* Seed starting mix
* Watering can or spray bottle
* Heat mat (optional, but helpful)
* Grow lights (optional, but recommended)
Step-by-Step Instructions:
1. Prepare Your Seed Starting Trays: Fill your seed starting trays or pots with seed starting mix. Gently tap the trays to settle the mix.
2. Sow Your Seeds: Plant 2-3 seeds per cell or pot, about ½ inch deep.
3. Water Gently: Water the soil gently using a watering can or spray bottle. Avoid overwatering, as this can lead to damping off.
4. Provide Warmth: Place the trays on a heat mat (if using) to maintain a soil temperature of around 70-80°F (21-27°C). This will help the seeds germinate faster.
5. Provide Light: Place the trays under grow lights (if using) or in a sunny window. If using a window, rotate the trays regularly to ensure even growth.
6. Keep the Soil Moist: Keep the soil consistently moist, but not soggy. Check the soil moisture daily and water as needed.
7. Thin Seedlings: Once the seedlings have emerged and have their first true leaves (the second set of leaves), thin them to one seedling per cell or pot. Choose the strongest and healthiest seedling.
Preparing Your Garden Bed
Melons are heavy feeders, meaning they need a lot of nutrients to grow and produce sweet, juicy fruit. Preparing your garden bed properly is crucial for success.
Sunlight: Melons need at least 6-8 hours of direct sunlight per day. Choose a location in your garden that receives plenty of sunshine.
Soil: Melons prefer well-drained soil that is rich in organic matter. Amend your soil with compost or well-rotted manure before planting.
pH: The ideal soil pH for melons is between 6.0 and 6.8. You can test your soil pH using a soil testing kit.
Step-by-Step Instructions:
1. Clear the Area: Remove any weeds, rocks, or debris from the planting area.
2. Amend the Soil: Spread a 2-3 inch layer of compost or well-rotted manure over the planting area.
3. Till the Soil: Till the soil to a depth of 12-18 inches, incorporating the compost or manure into the soil.
4. Create Mounds or Rows: Melons grow best on mounds or rows. This helps with drainage and warms the soil. Create mounds that are about 12 inches high and 2-3 feet wide, or rows that are spaced 3-4 feet apart.
5. Water the Soil: Water the soil thoroughly before planting.
Transplanting Your Melon Seedlings
Once your melon seedlings have developed several sets of true leaves and the weather has warmed up (soil temperature above 60°F/15°C), it’s time to transplant them into the garden.
Hardening Off: Before transplanting, you’ll need to harden off your seedlings. This process gradually acclimates them to outdoor conditions. Start by placing the seedlings outdoors in a sheltered location for a few hours each day, gradually increasing the amount of time they spend outdoors over the course of a week.
Step-by-Step Instructions:
1. Choose a Cloudy Day: Transplant your seedlings on a cloudy day or in the late afternoon to minimize stress.
2. Dig Holes: Dig holes in the mounds or rows that are slightly larger than the root balls of your seedlings. Space the holes according to the recommended spacing for your chosen melon variety (usually 2-3 feet apart).
3. Remove Seedlings from Trays: Gently remove the seedlings from their trays or pots, being careful not to damage the roots.
4. Plant Seedlings: Place the seedlings in the holes and backfill with soil. Gently firm the soil around the base of the plants.
5. Water Thoroughly: Water the seedlings thoroughly after planting.
6. Mulch: Apply a layer of mulch around the plants to help retain moisture, suppress weeds, and regulate soil temperature. Straw, hay, or black plastic mulch are all good options.
Caring for Your Melon Plants
Once your melon plants are in the ground, it’s important to provide them with proper care to ensure a bountiful harvest.
Watering: Melons need consistent watering, especially during hot, dry weather. Water deeply and regularly, aiming for about 1-2 inches of water per week. Avoid overhead watering, as this can lead to fungal diseases. Drip irrigation is an excellent option for watering melons.
Fertilizing: Melons are heavy feeders and benefit from regular fertilization. Use a balanced fertilizer (e.g., 10-10-10) every 2-3 weeks. You can also side-dress your plants with compost or well-rotted manure.
Weeding: Keep the area around your melon plants free of weeds. Weeds compete with the melon plants for nutrients and water.
Pest and Disease Control: Monitor your melon plants regularly for pests and diseases. Common melon pests include aphids, squash bugs, and cucumber beetles. Common melon diseases include powdery mildew, downy mildew, and fusarium wilt. Use organic pest and disease control methods whenever possible.
Pollination: Melons require pollination to produce fruit. Bees are the primary pollinators of melons. If you don’t have enough bees in your garden, you may need to hand-pollinate your melon flowers.
Pruning: Pruning melon vines can improve air circulation and reduce the risk of disease. Remove any dead or diseased leaves and vines. You can also prune the tips of the vines to encourage branching.
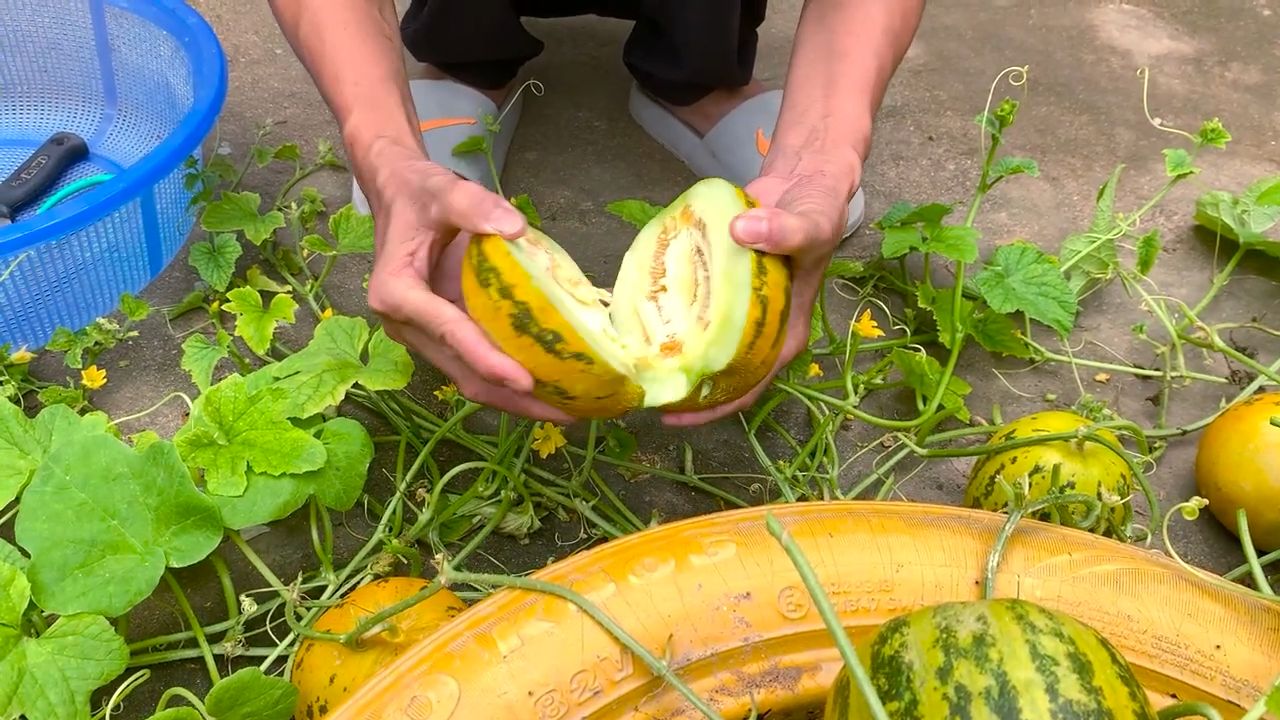
Harvesting Your Melons
Knowing when to harvest your melons is crucial for getting that perfect sweetness. Here are some tips for determining when your melons are ripe:
* Cantaloupe: The stem should slip easily from the vine when the melon is ripe. The skin should also turn from green to tan or yellow. The melon should have a strong, sweet aroma.
* Watermelon: The underside of the melon (where it rests on the ground) should turn from white to yellow. The tendril closest to the melon should be brown and dry. When you thump the melon, it should sound hollow.
* Honeydew: The skin should turn from green to creamy yellow. The melon should have a slightly soft feel.
* Galia Melon: The skin should turn from green to yellow. The melon should have a strong, sweet aroma.
Step-by-Step Instructions
Conclusion
So, there you have it! Growing sweet melons at home, bursting with flavor and sunshine, is not just a dream; it’s an achievable reality with this simple yet effective DIY trick. We’ve walked you through the process, highlighting how this method can significantly improve your chances of a bountiful harvest, even if you’re a beginner gardener. Forget those bland, store-bought melons that lack that authentic, juicy sweetness. With a little effort and this clever technique, you can cultivate melons that are truly exceptional.
This DIY approach isn’t just about saving money; it’s about taking control of your food source and enjoying the unparalleled satisfaction of nurturing something delicious from seed to table. Imagine the pride you’ll feel serving up slices of your homegrown melon, knowing you played an integral role in its creation. The taste difference alone is worth the effort. You’ll experience a depth of flavor and sweetness that commercially grown melons simply can’t match.
But the benefits extend beyond just taste. By growing your own melons, you’re also reducing your carbon footprint, supporting sustainable practices, and ensuring that your family is consuming produce free from harmful pesticides and chemicals. It’s a win-win situation for you and the environment.
Don’t be afraid to experiment with different varieties of melons to find your favorites. Try cantaloupe, honeydew, watermelon, or even some of the more exotic varieties like Galia or Charentais. Each type offers a unique flavor profile and texture, allowing you to tailor your melon patch to your specific preferences. You can also adjust the DIY trick to suit your specific growing conditions. If you live in a particularly hot climate, consider providing extra shade during the hottest part of the day. If you’re in a cooler region, you might want to start your seeds indoors earlier to give them a head start.
We encourage you to embrace this DIY trick and embark on your own melon-growing adventure. It’s a rewarding experience that will connect you with nature and provide you with a delicious and healthy treat. Don’t hesitate to adapt the method to your specific needs and resources. The key is to be patient, observant, and willing to learn from your experiences.
And most importantly, we want to hear about your success! Share your photos, tips, and stories with us in the comments section below. Let us know which varieties you tried, what challenges you faced, and what you learned along the way. Your feedback will not only help us improve this guide but also inspire other gardeners to try their hand at growing sweet melons. Together, we can create a community of passionate melon growers who are dedicated to cultivating delicious and sustainable food. So, grab your seeds, get your hands dirty, and get ready to enjoy the sweet taste of success!
Frequently Asked Questions (FAQ)
What exactly is the DIY trick you’re referring to?
The core of the DIY trick involves creating a raised bed or mound of well-draining, nutrient-rich soil specifically for your melon plants. This elevated planting area helps to improve drainage, preventing root rot, a common problem with melons. It also allows the soil to warm up more quickly in the spring, giving your plants a head start. Furthermore, incorporating compost and other organic matter into the soil provides essential nutrients that melons need to thrive. The specific amendments and construction of the raised bed can be tailored to your local climate and soil conditions.
What kind of soil is best for growing sweet melons?
Melons thrive in well-draining soil that is rich in organic matter. A sandy loam is ideal, but you can amend heavier clay soils by adding compost, aged manure, and other organic materials. The soil pH should be between 6.0 and 6.8. Before planting, it’s a good idea to test your soil to determine its pH and nutrient levels. This will allow you to make any necessary adjustments to ensure that your melons have the best possible growing conditions.
How much sunlight do melons need?
Melons are sun-loving plants and require at least 6-8 hours of direct sunlight per day. Choose a planting location that receives full sun throughout the growing season. If you live in a particularly hot climate, you may want to provide some afternoon shade to prevent the fruits from scorching.
How often should I water my melon plants?
Water deeply and regularly, especially during hot, dry weather. Aim to keep the soil consistently moist but not waterlogged. Avoid overhead watering, as this can promote fungal diseases. Instead, water at the base of the plants or use a soaker hose. As the melons ripen, you can reduce watering slightly to concentrate the sugars and enhance their sweetness.
What are some common pests and diseases that affect melons, and how can I prevent them?
Common pests include aphids, squash bugs, and vine borers. Diseases include powdery mildew, fusarium wilt, and anthracnose. To prevent these problems, practice good garden hygiene, such as removing plant debris and weeds. Use insecticidal soap or neem oil to control pests. Choose disease-resistant varieties and provide good air circulation to prevent fungal diseases. Crop rotation can also help to reduce the buildup of soilborne pathogens.
When is the best time to plant melons?
Melons are warm-season crops and should be planted after the last frost when the soil has warmed to at least 60°F (15°C). In cooler climates, you can start seeds indoors 4-6 weeks before the last frost and transplant them outdoors once the weather is warm enough.
How do I know when my melons are ripe?
The signs of ripeness vary depending on the type of melon. Generally, look for the following:
* **Cantaloupe:** The stem should slip easily from the fruit, leaving a smooth, round scar. The skin should turn from green to tan or yellow, and the melon should have a sweet aroma.
* **Honeydew:** The skin should turn from green to creamy yellow, and the blossom end should be slightly soft.
* **Watermelon:** The underside of the melon (where it rests on the ground) should turn from white to yellow. The tendril closest to the fruit should be brown and dry. When you thump the melon, it should sound hollow.
Can I grow melons in containers?
Yes, you can grow melons in containers, but you’ll need to choose a large container (at least 20 gallons) and use a well-draining potting mix. Dwarf or bush varieties of melons are best suited for container gardening. Be sure to provide adequate support for the vines as they grow.
What are some good companion plants for melons?
Beneficial companion plants for melons include marigolds, nasturtiums, and basil, which can help to repel pests. Other good companions include beans, corn, and radishes. Avoid planting melons near potatoes or members of the cabbage family.
How can I improve the sweetness of my melons?
Several factors can influence the sweetness of melons, including sunlight, water, and soil nutrients. Ensure that your plants receive plenty of sunlight and water them regularly, but reduce watering slightly as the fruits ripen. Amend the soil with compost and other organic matter to provide essential nutrients. You can also try adding a small amount of Epsom salts to the soil, as magnesium can help to increase sugar production.
Leave a Comment