
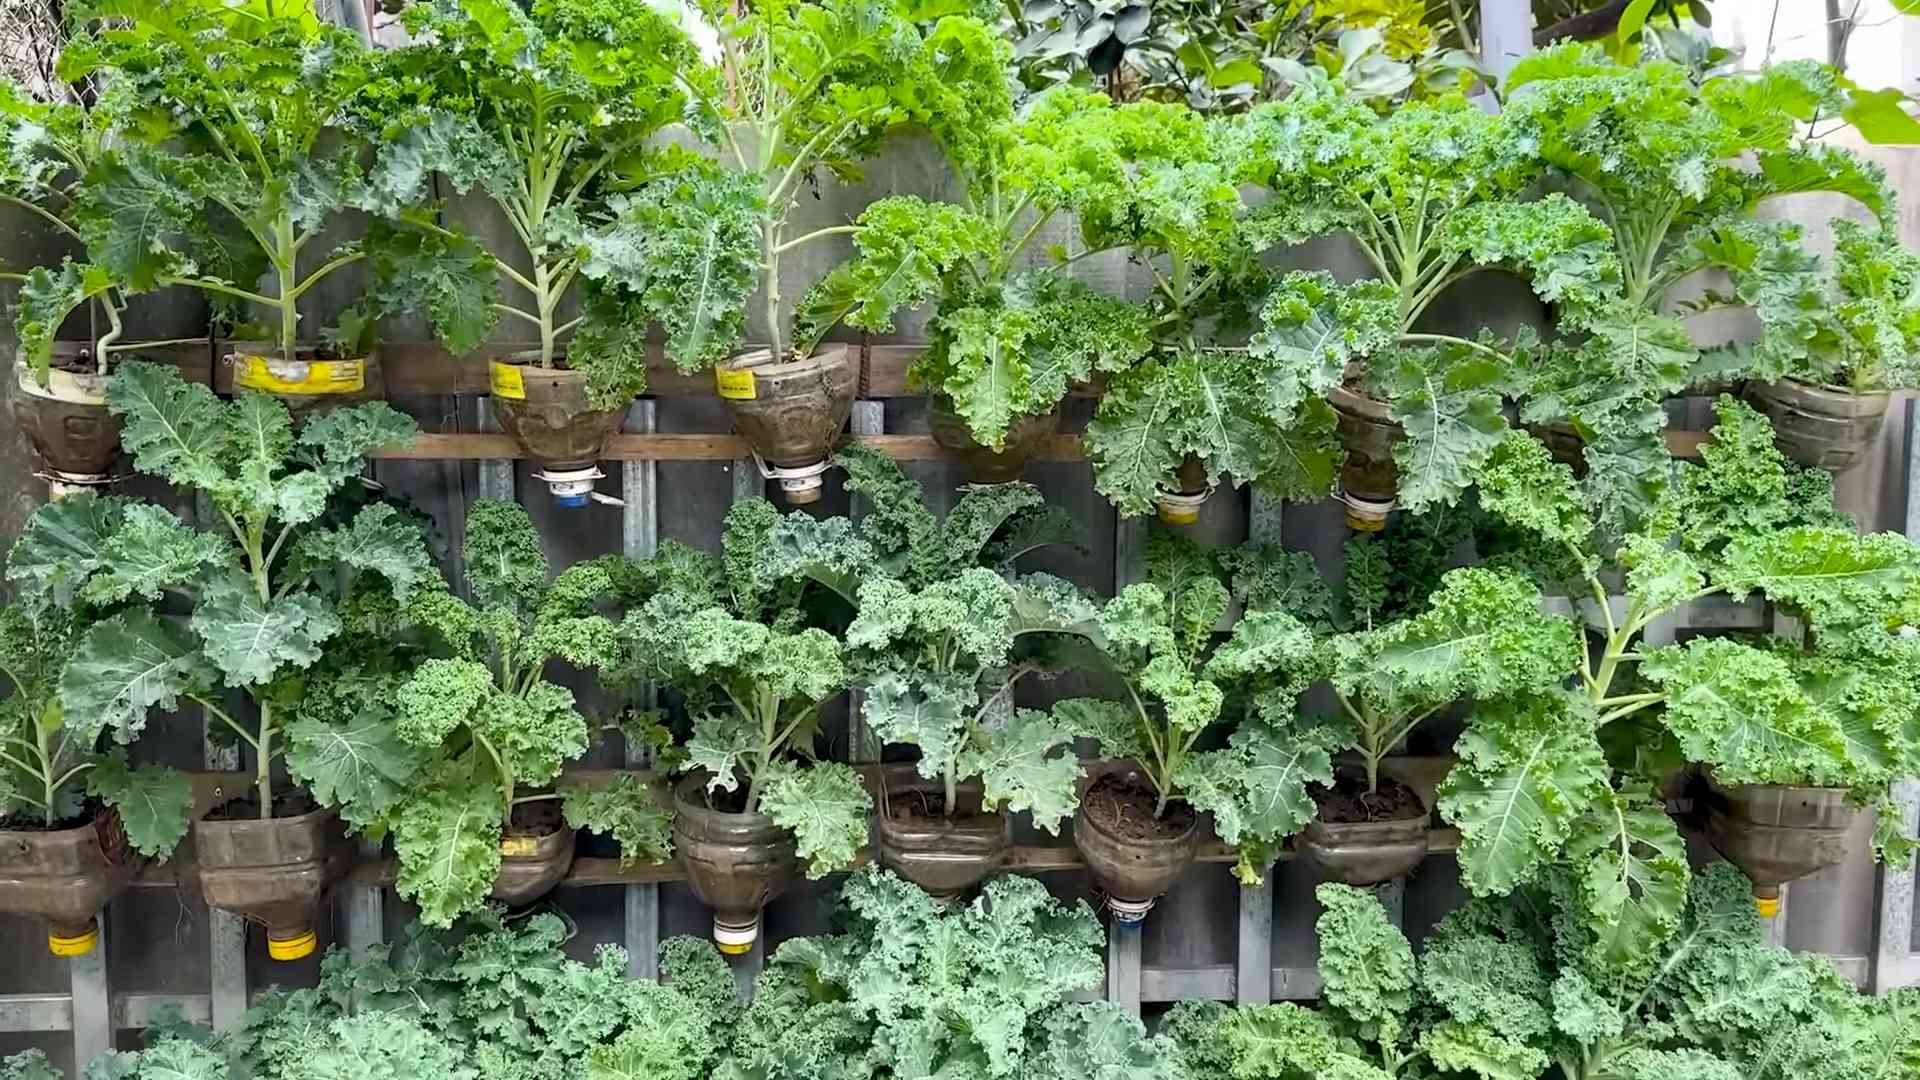
Growing Kale in Bottles: Sounds a little unconventional, right? But trust me, this DIY project is about to revolutionize your small-space gardening game! Forget sprawling gardens and endless rows – we’re taking kale cultivation vertical, sustainable, and seriously stylish.
For centuries, humans have sought innovative ways to cultivate food, adapting to diverse environments and limited resources. From ancient terraced farming to modern hydroponics, the drive to nurture life from the earth (or, in our case, from recycled bottles!) is deeply ingrained. While I can’t pinpoint the exact origin of bottle gardening, the spirit of resourcefulness and ingenuity it embodies resonates with generations of gardeners who’ve made the most of what they have.
Why should you embrace this quirky yet practical method? Well, think about it: are you dreaming of fresh, homegrown greens but lack the garden space? Or maybe you’re tired of battling pests and weeds in a traditional garden bed? Perhaps you’re simply looking for a fun, eco-friendly project to brighten up your balcony or patio. Whatever your reason, growing kale in bottles offers a fantastic solution. It’s space-saving, cost-effective, and allows for better control over soil conditions and pest management. Plus, let’s be honest, a wall of vibrant kale cascading from repurposed bottles is a total conversation starter! So, grab your empty bottles, some potting mix, and let’s get started on this exciting DIY adventure!
Growing Kale in Bottles: A Fun and Space-Saving DIY Project
Hey there, fellow gardening enthusiasts! Are you short on space but still dreaming of fresh, homegrown kale? Well, I’ve got the perfect solution for you: growing kale in bottles! It’s a super fun, eco-friendly, and surprisingly productive way to enjoy this leafy green. Plus, it looks pretty cool too! Let’s dive in!
What You’ll Need
Before we get started, let’s gather our supplies. Here’s what you’ll need to embark on this kale-growing adventure:
* Plastic Bottles: Think soda bottles, water bottles, juice bottles – anything that’s relatively sturdy and at least 2 liters in size. The bigger, the better, as it gives the kale roots more room to grow.
* Kale Seeds or Seedlings: You can start from seeds or buy small kale seedlings from your local nursery. I personally prefer starting from seeds because it’s more rewarding to watch them sprout and grow.
* Potting Mix: A good quality potting mix is crucial for healthy kale growth. Avoid using garden soil directly, as it can be too dense and may not drain well.
* Drill or Utility Knife: We’ll need this to create drainage holes and a planting opening in the bottles.
* Scissors: For trimming and shaping the bottle.
* Watering Can or Spray Bottle: To keep your kale plants hydrated.
* Optional:
* Liquid Fertilizer: To give your kale a nutrient boost.
* Gloves: To keep your hands clean.
* Labels: To mark the type of kale you’re growing (if you’re growing multiple varieties).
* Twine or Wire: For hanging the bottles (if you choose to hang them).
Preparing the Bottles
This is where we transform those ordinary plastic bottles into mini kale gardens!
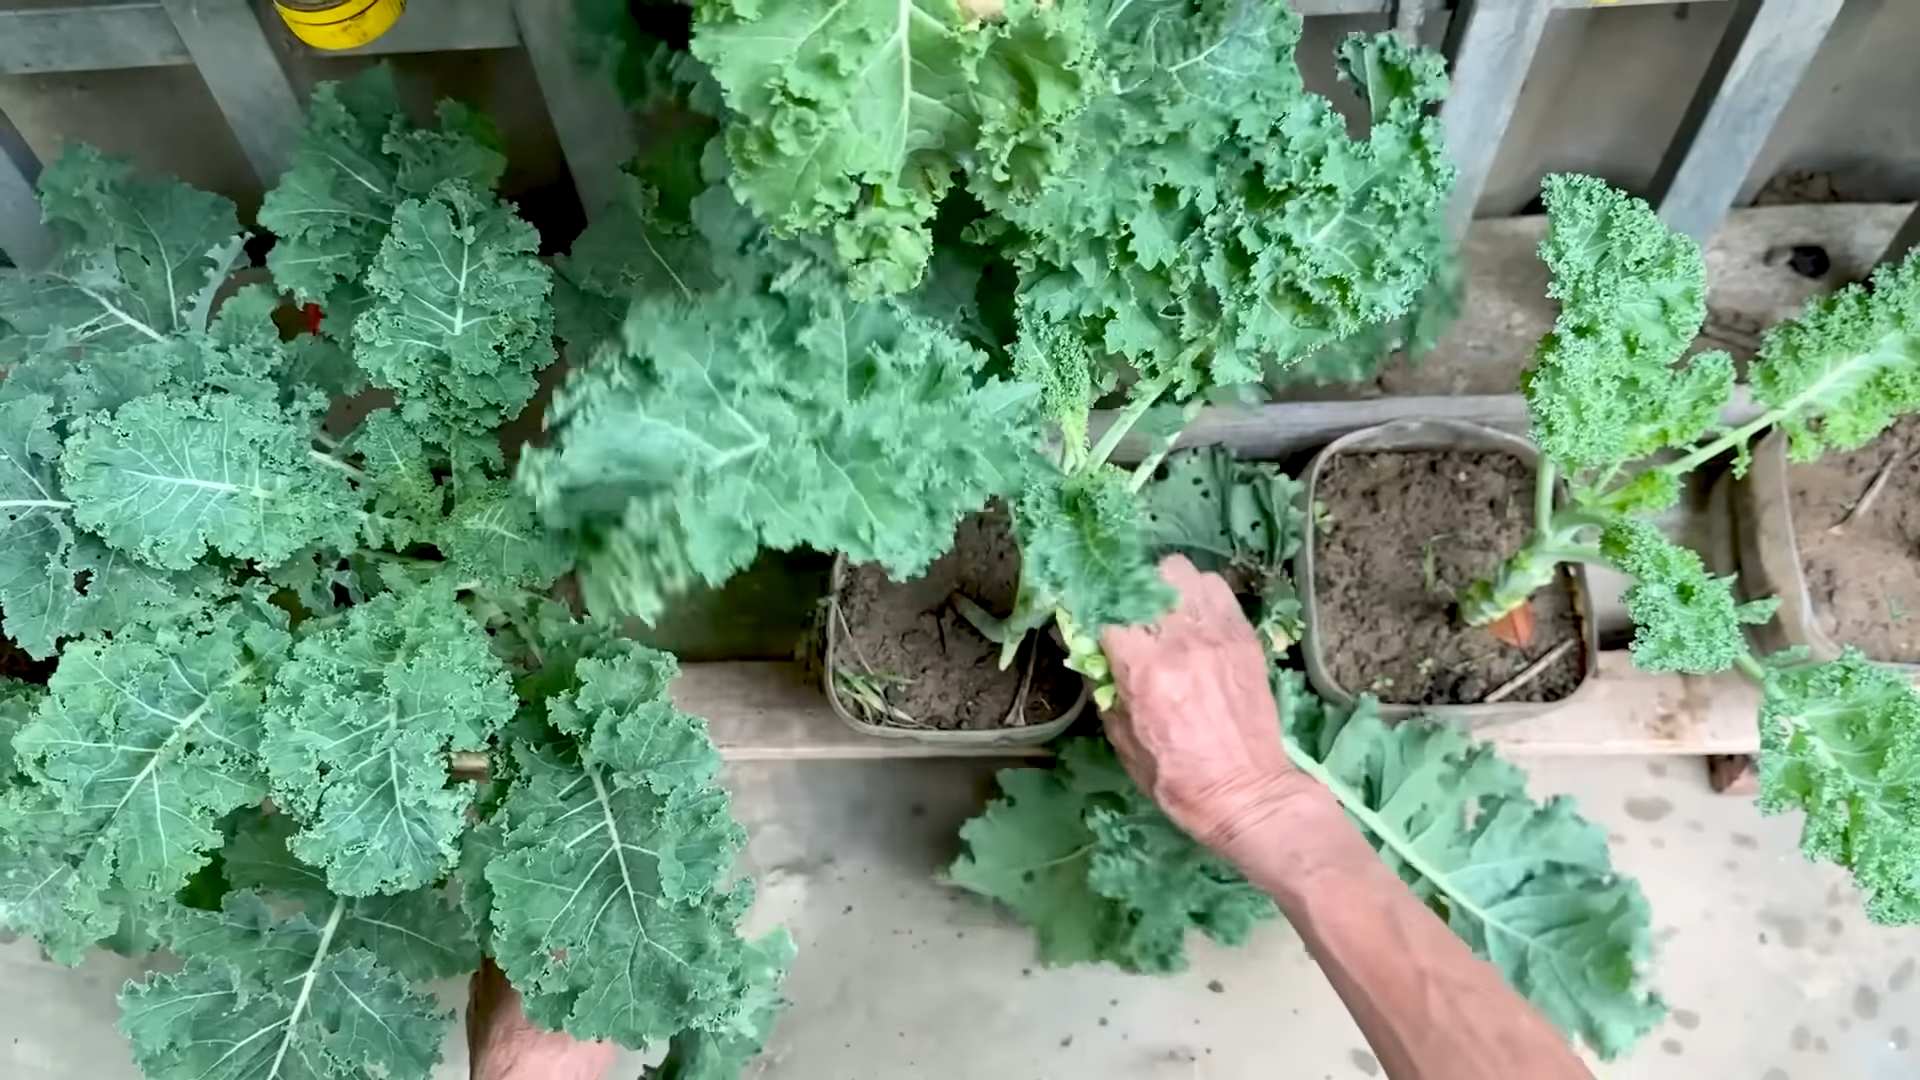
1. Clean the Bottles: Thoroughly wash the bottles with soap and water to remove any residue. Rinse them well and let them dry completely. This is important to prevent any contamination that could harm your kale plants.
2. Cut the Bottles: There are a couple of ways you can cut the bottles, depending on how you want to grow your kale.
* Option 1: Horizontal Planting: Cut a rectangular opening along the side of the bottle, leaving the top and bottom intact. This creates a trough-like space for planting. I usually cut an opening that’s about 4-6 inches wide and 6-8 inches long.
* Option 2: Vertical Planting: Cut the bottle in half horizontally. Discard the top half (or save it for another project!). The bottom half will be your planting container.
3. Create Drainage Holes: This is super important! Kale needs well-draining soil to thrive. Use a drill or utility knife to create several drainage holes in the bottom of the bottle. I usually make about 5-7 holes, each about ¼ inch in diameter.
4. Smooth the Edges: Use scissors to smooth any sharp edges around the opening you created. This will prevent you from accidentally cutting yourself when handling the bottles.
Planting the Kale
Now for the fun part – planting the kale!
1. Fill with Potting Mix: Fill the prepared bottle with potting mix, leaving about an inch of space at the top. Gently pat down the soil to remove any air pockets.
2. Sowing Seeds (if starting from seeds):
* Make Small Indentations: Use your finger to create small indentations in the soil, about ½ inch deep.
* Sow the Seeds: Place 2-3 kale seeds in each indentation.
* Cover with Soil: Gently cover the seeds with a thin layer of potting mix.
* Water Gently: Water the soil gently using a watering can or spray bottle. Be careful not to dislodge the seeds.
3. Transplanting Seedlings (if using seedlings):
* Gently Remove Seedlings: Carefully remove the kale seedlings from their original containers.
* Create a Hole: Dig a hole in the potting mix that’s large enough to accommodate the seedling’s root ball.
* Place the Seedling: Gently place the seedling in the hole, making sure the top of the root ball is level with the surrounding soil.
* Fill with Soil: Fill in the hole with potting mix and gently pat down the soil.
* Water Thoroughly: Water the seedling thoroughly.
4. Label Your Bottles: If you’re growing multiple varieties of kale, label each bottle so you know which is which.
Caring for Your Kale
Now that your kale is planted, it’s time to provide it with the care it needs to flourish!
1. Sunlight: Kale needs at least 6 hours of sunlight per day. Place your bottles in a sunny location, such as a windowsill, balcony, or patio. If you don’t have enough natural sunlight, you can supplement with grow lights.
2. Watering: Keep the soil consistently moist, but not soggy. Water when the top inch of soil feels dry to the touch. Avoid overwatering, as this can lead to root rot. I usually water my kale every 2-3 days, depending on the weather.
3. Fertilizing: Kale is a heavy feeder, so it benefits from regular fertilization. Use a liquid fertilizer diluted to half strength every 2-3 weeks. Look for a fertilizer that’s specifically formulated for leafy greens.
4. Pest Control: Keep an eye out for pests, such as aphids, cabbage worms, and slugs. If you spot any pests, you can try removing them by hand or using an organic insecticide. I’ve found that a strong spray of water can often dislodge aphids.
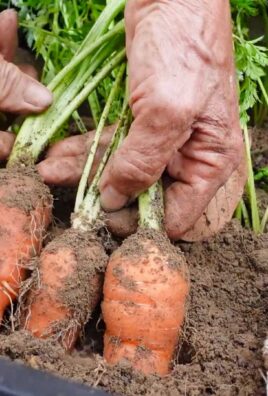
5. Harvesting: You can start harvesting kale leaves when they are about 4-6 inches long. Simply cut off the outer leaves, leaving the inner leaves to continue growing. This will encourage the plant to produce more leaves.
Hanging Your Kale Bottles (Optional)
If you want to get really creative, you can hang your kale bottles! This is a great way to save even more space and add a unique touch to your garden.
1. Drill Hanging Holes: Drill two small holes near the top of the bottle, on opposite sides.
2. Thread Twine or Wire: Thread twine or wire through the holes, creating a loop for hanging.
3. Hang the Bottles: Hang the bottles from a sturdy hook or railing. Make sure the bottles are securely attached and won’t fall.
Troubleshooting
Even with the best care, you might encounter a few challenges along the way. Here are some common problems and how to address them:
* Yellowing Leaves: This could be a sign of overwatering, underwatering, or nutrient deficiency. Check the soil moisture and adjust your watering schedule accordingly. If the soil is consistently moist, you might be overwatering. If the soil is dry, you might be underwatering. If the leaves are yellowing all over, it could be a sign of nutrient deficiency. Try fertilizing with a liquid fertilizer.
* Leggy Growth: This means the kale plants are stretching towards the light and becoming tall and spindly. This is usually caused by insufficient sunlight. Move the bottles to a sunnier location or supplement with grow lights.
* Pest Infestation: As mentioned earlier, keep an eye out for pests. If you spot any, take action immediately to prevent them from spreading.
Enjoying Your Homegrown Kale
Congratulations! You’ve successfully grown kale in bottles! Now it’s time to enjoy the fruits (or rather, leaves) of your labor. Freshly harvested kale is delicious in salads, smoothies, soups, and stir-fries. You can also sauté it with garlic and olive oil for a simple and healthy side dish.
Growing kale in bottles is a rewarding and sustainable way to enjoy fresh, homegrown produce, even if you’re short on space. So, grab some bottles, seeds, and potting mix, and get started today! Happy gardening!
Conclusion
So, there you have it! Growing kale in bottles isn’t just a quirky gardening experiment; it’s a genuinely practical and rewarding way to cultivate fresh, nutritious greens, even if you’re short on space or dealing with less-than-ideal soil conditions. We’ve walked you through the process, from selecting the right bottles and preparing your growing medium to planting your kale seeds and providing the necessary care.
But why is this DIY trick a must-try? Firstly, it’s incredibly space-efficient. Vertical gardening with bottles allows you to maximize your yield in a minimal footprint, making it perfect for balconies, patios, or even indoor spaces with sufficient sunlight. Secondly, it’s a fantastic way to recycle and repurpose plastic bottles, contributing to a more sustainable lifestyle. You’re not just growing food; you’re also reducing waste! Thirdly, it’s a surprisingly low-maintenance method. Once established, your bottle kale garden requires minimal watering and weeding compared to traditional gardening.
Beyond the basic method, there are countless ways to customize your bottle kale garden. Consider experimenting with different varieties of kale. Curly kale, Lacinato kale (also known as dinosaur kale), and Red Russian kale all thrive in bottle gardens. You can also add companion plants like herbs (thyme, oregano) or flowers (marigolds, nasturtiums) to your bottles to attract beneficial insects and deter pests. Another variation is to create a tiered system using multiple bottles stacked on top of each other, creating a visually appealing and highly productive vertical garden. Think about painting your bottles with bright colors or adding decorative elements to personalize your garden and make it a true reflection of your style.
Growing kale in bottles is more than just a gardening project; it’s an opportunity to connect with nature, learn new skills, and enjoy the satisfaction of harvesting your own fresh produce. It’s a chance to be creative, resourceful, and environmentally conscious.
We wholeheartedly encourage you to give this DIY trick a try. Don’t be afraid to experiment, adapt the method to your specific needs and resources, and most importantly, have fun! Once you’ve harvested your first batch of homegrown kale, we’d love to hear about your experience. Share your photos, tips, and challenges in the comments below. Let’s build a community of bottle kale gardeners and inspire others to embrace this innovative and sustainable way of growing food. Your success story could be the inspiration someone else needs to start their own bottle garden journey! So, grab some bottles, some soil, and some kale seeds, and get ready to experience the joy of growing your own fresh, delicious greens. Happy gardening!
Frequently Asked Questions (FAQ)
What type of bottles are best for growing kale?
The ideal bottles are sturdy plastic bottles, such as those used for water, soda, or juice. Look for bottles that are at least 2 liters in size to provide enough space for the kale roots to develop. Avoid bottles that are too thin or flimsy, as they may not be able to support the weight of the soil and plants. Clear or translucent bottles are preferable, as they allow you to monitor the moisture level of the soil. Thoroughly clean the bottles with soap and water before using them to remove any residue.
What kind of soil should I use for growing kale in bottles?
A well-draining potting mix is essential for growing kale in bottles. Avoid using garden soil, as it can become compacted and waterlogged in containers. A good potting mix should contain a blend of peat moss, perlite, and vermiculite. You can also add compost to the mix to provide additional nutrients. Consider using a soilless mix if you want to minimize the risk of soilborne diseases. Ensure the pH of the soil is between 6.0 and 7.5 for optimal kale growth.
How often should I water my bottle kale garden?
The frequency of watering will depend on the weather conditions, the size of the bottles, and the type of soil you’re using. Generally, you should water your kale plants when the top inch of soil feels dry to the touch. Avoid overwatering, as this can lead to root rot. Ensure the bottles have drainage holes to allow excess water to escape. During hot and dry weather, you may need to water your plants more frequently. Check the moisture level of the soil regularly and adjust your watering schedule accordingly.
How much sunlight does kale need when grown in bottles?
Kale requires at least 6 hours of direct sunlight per day to thrive. Place your bottle garden in a sunny location where it will receive ample sunlight. If you’re growing kale indoors, you may need to supplement with artificial lighting, such as grow lights. Rotate the bottles regularly to ensure that all sides of the plants receive equal sunlight. Insufficient sunlight can result in leggy growth and reduced yields.
How do I fertilize my kale plants in bottles?
Kale is a heavy feeder and requires regular fertilization to produce healthy growth. You can use a balanced liquid fertilizer, such as a 10-10-10 formula, diluted to half strength. Fertilize your plants every 2-3 weeks during the growing season. You can also add compost tea to the soil to provide additional nutrients. Avoid over-fertilizing, as this can burn the roots of the plants. Monitor the growth of your kale plants and adjust your fertilization schedule accordingly.
How do I protect my kale plants from pests and diseases?
Kale can be susceptible to various pests and diseases, such as aphids, cabbage worms, and powdery mildew. Regularly inspect your plants for signs of infestation or disease. You can use insecticidal soap or neem oil to control aphids and cabbage worms. Ensure good air circulation around your plants to prevent powdery mildew. Remove any infected leaves promptly to prevent the spread of disease. Consider using companion planting to deter pests and attract beneficial insects.
When is the best time to harvest kale from my bottle garden?
You can start harvesting kale leaves when they are about 4-6 inches long. Harvest the outer leaves first, leaving the inner leaves to continue growing. Avoid harvesting more than one-third of the plant at a time. Regular harvesting will encourage the plant to produce more leaves. Kale leaves are best harvested in the morning, when they are crisp and fresh. Wash the leaves thoroughly before using them.
Can I grow kale in bottles during the winter?
Yes, you can grow kale in bottles during the winter, especially in milder climates. Kale is a cold-hardy vegetable and can tolerate temperatures down to 20°F (-6°C). In colder climates, you may need to protect your plants from frost by covering them with a blanket or moving them indoors. Provide adequate sunlight or artificial lighting to ensure continued growth. Reduce watering during the winter months, as the plants will require less moisture.
How long will my kale plants last in bottles?
With proper care, kale plants can last for several months in bottles. Kale is a biennial plant, meaning it typically lives for two years. However, in some cases, kale plants may bolt (produce flowers and seeds) in their first year, especially during hot weather. To prolong the life of your kale plants, provide them with adequate sunlight, water, and nutrients. Regularly harvest the leaves to encourage continued growth. Remove any yellowing or dead leaves promptly.
Can I reuse the bottles for growing other plants after harvesting the kale?
Absolutely! Once you’ve harvested your kale and the plant has reached the end of its life cycle, you can certainly reuse the bottles for growing other plants. Just make sure to thoroughly clean the bottles and replace the soil with fresh potting mix. The bottles can be used to grow a variety of other vegetables, herbs, and flowers. This makes bottle gardening a truly sustainable and eco-friendly way to cultivate your own food and beautify your space.
Leave a Comment