
Grow Kohlrabi Easily and unlock a world of culinary possibilities right in your own backyard! Have you ever seen those alien-looking vegetables at the farmers market and wondered what they were? That’s kohlrabi, and trust me, it’s much easier to cultivate than you might think. For centuries, kohlrabi has been a staple in European and Asian cuisines, prized for its crisp texture and mild, slightly sweet flavor. It’s a member of the cabbage family, but don’t let that scare you off – it’s far more approachable than its sometimes pungent cousins.
I know what you’re thinking: “I don’t have a green thumb!” But that’s where this DIY guide comes in. I’m going to share some simple, effective tricks and hacks that will have you harvesting your own delicious kohlrabi in no time. Imagine adding freshly grown kohlrabi to your salads, stir-fries, or even enjoying it raw as a crunchy snack. This DIY project is perfect for beginner gardeners and seasoned pros alike. Plus, growing your own food is incredibly rewarding, knowing exactly where your produce comes from and reducing your carbon footprint. So, let’s dive in and learn how to grow kohlrabi easily and enjoy the fruits (or rather, vegetables) of your labor!
Grow Kohlrabi Easily: A DIY Guide for a Bountiful Harvest
Hey there, fellow gardening enthusiasts! I’m so excited to share my tried-and-true method for growing kohlrabi. This often-overlooked vegetable is surprisingly easy to cultivate, and the reward of fresh, crunchy bulbs is well worth the effort. Trust me, once you taste homegrown kohlrabi, you’ll be hooked! This guide will walk you through every step, from seed to table.
Why Grow Kohlrabi?
Before we dive in, let’s talk about why kohlrabi deserves a spot in your garden. It’s not just another pretty face (or bulb!).
* Nutrient-Packed: Kohlrabi is a nutritional powerhouse, loaded with Vitamin C, potassium, and fiber.
* Versatile in the Kitchen: You can eat the bulb raw, roasted, steamed, or even stir-fried. The leaves are also edible and taste similar to collard greens.
* Fast-Growing: Kohlrabi matures quickly, often in as little as 45-60 days, making it a great option for succession planting.
* Unique Flavor: The taste is mild and slightly sweet, reminiscent of a cross between a turnip and a cabbage.
* Pest Resistant: Generally, kohlrabi is less susceptible to pests than other members of the brassica family.
Getting Started: What You’ll Need
To embark on your kohlrabi-growing adventure, gather these essential supplies:
* Kohlrabi Seeds: Choose a variety that suits your climate and taste preferences. I personally love ‘Early White Vienna’ and ‘Purple Vienna’ for their reliable performance.
* Seed Starting Trays or Pots: If you’re starting seeds indoors.
* Seed Starting Mix: A light and airy mix specifically designed for seedlings.
* Garden Soil: Well-draining, fertile soil is crucial for healthy kohlrabi growth.
* Compost or Aged Manure: To enrich the soil and provide essential nutrients.
* Fertilizer: A balanced fertilizer (10-10-10) or one formulated for vegetables.
* Watering Can or Hose: For consistent watering.
* Gardening Gloves: To protect your hands.
* Trowel or Garden Fork: For planting and cultivating.
* Row Covers (Optional): To protect against pests and frost.
* Measuring Tape or Ruler: To ensure proper spacing.
Phase 1: Starting Your Seeds (Indoors or Direct Sowing)
You have two options for starting your kohlrabi: indoors or direct sowing. Starting indoors gives you a head start, especially in colder climates.
Starting Seeds Indoors:
1. Sow the Seeds: Fill your seed starting trays or pots with seed starting mix. Moisten the mix thoroughly. Sow the kohlrabi seeds about ¼ inch deep, placing 2-3 seeds per cell or pot.
2. Provide Warmth and Light: Kohlrabi seeds germinate best at temperatures between 65-75°F (18-24°C). Place the trays in a warm location or use a heat mat. Provide ample light, either from a sunny window or a grow light. If using a grow light, keep it a few inches above the seedlings and provide 14-16 hours of light per day.
3. Keep the Soil Moist: Water gently to keep the soil consistently moist but not waterlogged. Use a spray bottle or watering can with a gentle nozzle.
4. Thin the Seedlings: Once the seedlings emerge (usually in 5-7 days), thin them to one strong seedling per cell or pot. Snip off the weaker seedlings at the soil line with scissors.
5. Harden Off the Seedlings: About a week before transplanting, gradually acclimate the seedlings to outdoor conditions. Start by placing them outside for a few hours each day in a sheltered location, gradually increasing the time and exposure to sunlight.
Direct Sowing:
1. Prepare the Soil: Choose a sunny location with well-draining soil. Amend the soil with compost or aged manure to improve fertility and drainage.
2. Sow the Seeds: Sow the kohlrabi seeds about ½ inch deep, spacing them 1-2 inches apart in rows.
3. Water Gently: Water the soil gently to keep it moist.
4. Thin the Seedlings: Once the seedlings emerge, thin them to 4-6 inches apart.
Phase 2: Transplanting Your Kohlrabi Seedlings
Once your seedlings have developed a few sets of true leaves (about 4-6 weeks after sowing), they’re ready to be transplanted into the garden.
1. Prepare the Garden Bed: Choose a sunny location with well-draining soil. Amend the soil with compost or aged manure to improve fertility and drainage. Kohlrabi prefers a soil pH between 6.0 and 7.5.
2. Dig the Holes: Dig holes that are slightly larger than the root balls of your seedlings, spacing them 6-8 inches apart in rows. Allow 12-18 inches between rows.
3. Transplant the Seedlings: Gently remove the seedlings from their trays or pots, being careful not to damage the roots. Place each seedling in a hole and backfill with soil, gently firming around the base.
4. Water Thoroughly: Water the transplanted seedlings thoroughly to help them settle in.
5. Apply Fertilizer: Apply a balanced fertilizer (10-10-10) or one formulated for vegetables according to the package directions.
6. Add Mulch (Optional): Mulch around the plants with straw, wood chips, or shredded leaves to help retain moisture, suppress weeds, and regulate soil temperature.
Phase 3: Caring for Your Kohlrabi Plants
Consistent care is key to a successful kohlrabi harvest.
1. Water Regularly: Kohlrabi needs consistent moisture to thrive. Water deeply whenever the top inch of soil feels dry. Avoid overhead watering, which can promote fungal diseases. Aim for about 1 inch of water per week.
2. Fertilize as Needed: Kohlrabi is a heavy feeder. Side-dress the plants with compost or a balanced fertilizer every 2-3 weeks.
3. Weed Regularly: Keep the garden bed free of weeds, which can compete with the kohlrabi plants for nutrients and water. Hand-pull weeds carefully to avoid disturbing the roots.
4. Protect from Pests: Kohlrabi can be susceptible to pests such as cabbage worms, aphids, and flea beetles. Inspect your plants regularly for signs of infestation.
* Cabbage Worms: Handpick them off the plants or use Bacillus thuringiensis (Bt), a natural insecticide.
* Aphids: Spray the plants with a strong stream of water or use insecticidal soap.
* Flea Beetles: Cover the plants with row covers or use diatomaceous earth.
5. Monitor for Diseases: Kohlrabi can be affected by diseases such as clubroot and black rot. Choose disease-resistant varieties and practice crop rotation to prevent these problems. Ensure good air circulation around the plants.
Phase 4: Harvesting Your Kohlrabi
The moment you’ve been waiting for! Kohlrabi is typically ready to harvest 45-60 days after planting, depending on the variety.
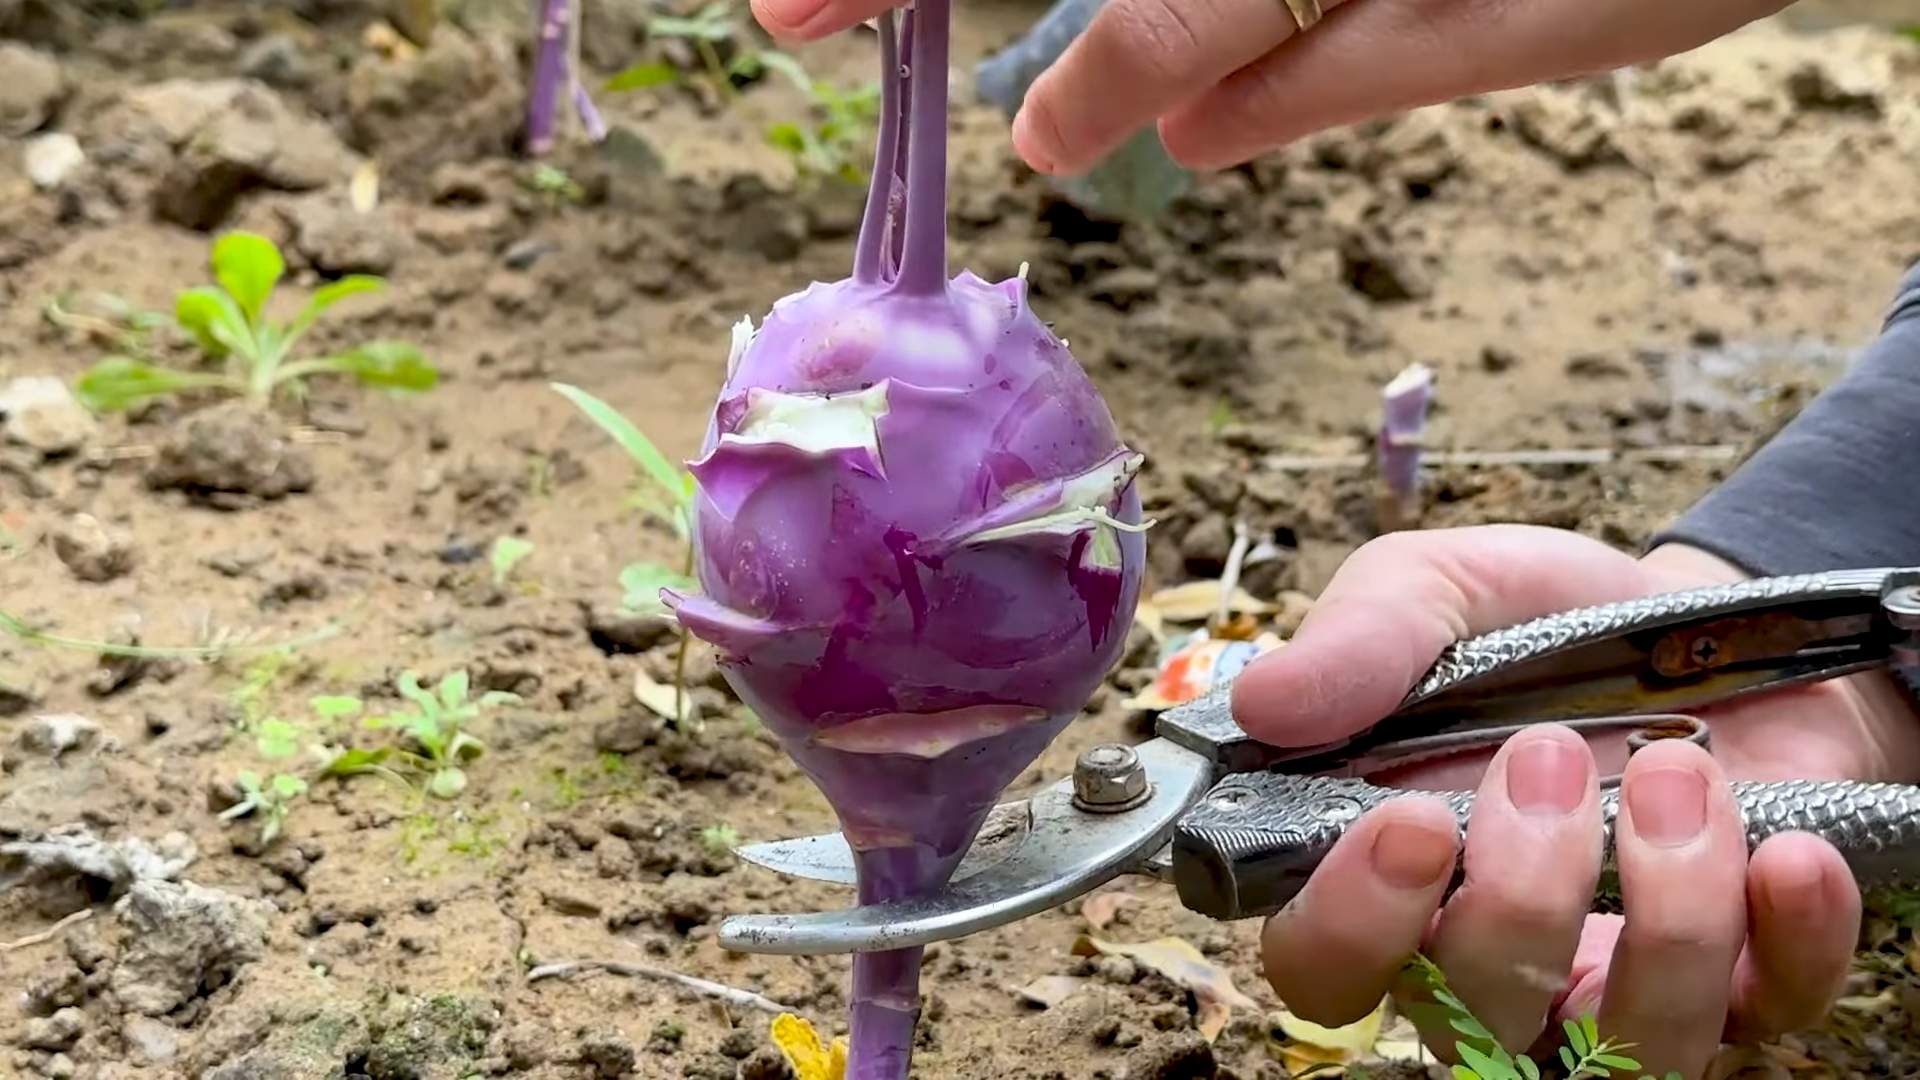
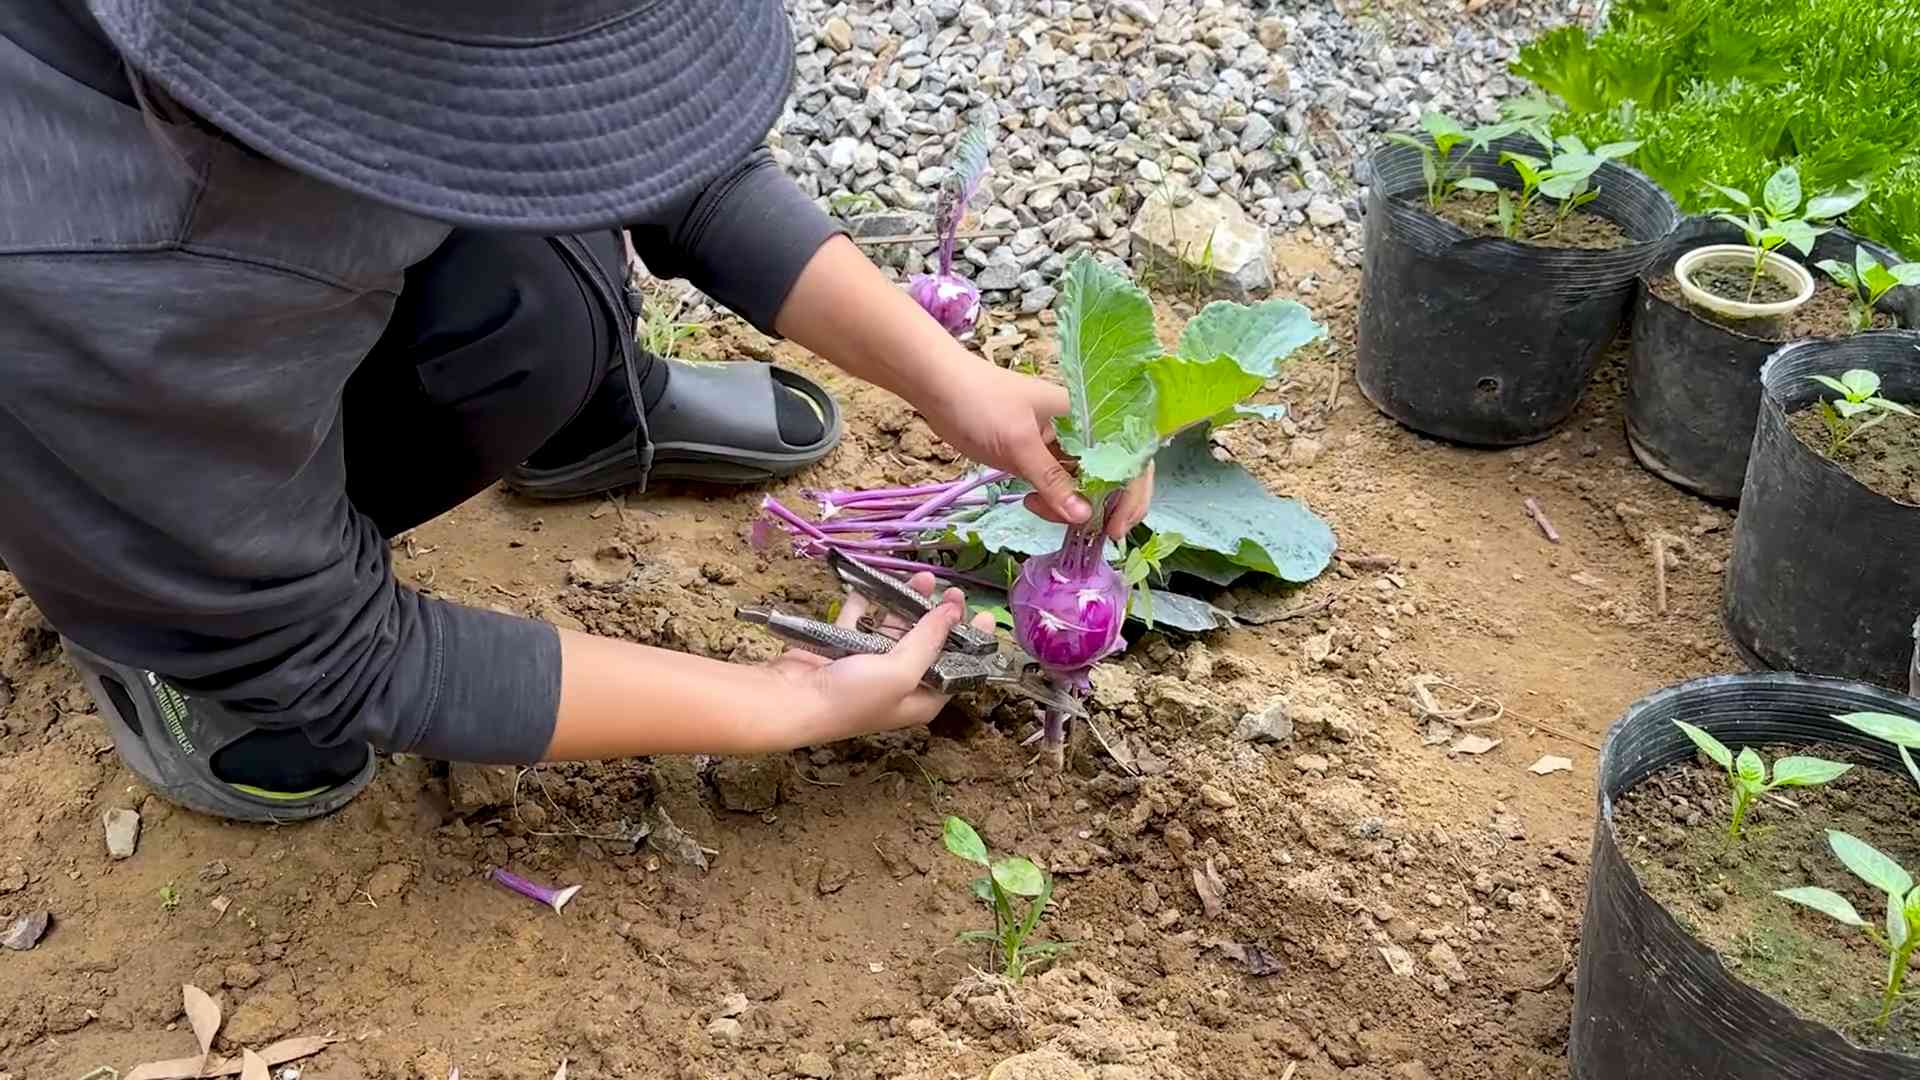
1. Harvest at the Right Size: Harvest the bulbs when they are about 2-3 inches in diameter. Larger bulbs can become tough and woody.
2. Harvesting Technique: Use a sharp knife to cut the bulb from the stem just above the soil line.
3. Remove the Leaves: Remove the leaves from the bulb. The leaves are also edible and can be cooked like collard greens.
4. Store Properly: Store the kohlrabi bulbs in the refrigerator for up to several weeks.
Troubleshooting Common Kohlrabi Problems
Even with the best care, you might encounter a few challenges. Here’s how to address them:
* Bulbs Splitting: This is usually caused by inconsistent watering. Ensure consistent moisture levels, especially during hot, dry periods.
* Tough or Woody Bulbs: This can be due to harvesting too late or growing conditions that are too hot or dry. Harvest the bulbs when they are young and tender, and provide consistent moisture.
* Pest Infestations: As mentioned earlier, monitor your plants regularly for pests and take appropriate action.
* Disease Problems: Choose disease-resistant varieties and practice crop rotation to prevent disease problems.
Enjoying Your Harvest
Now for the best part: enjoying the fruits (or rather, bulbs!) of your labor. Here are a few ideas:
* Raw
Conclusion
So, there you have it! Growing kohlrabi easily at home is not only achievable but also incredibly rewarding. From seed to table, you’ve gained the knowledge to cultivate this unique and delicious vegetable, adding a touch of homegrown goodness to your meals. This DIY approach empowers you to control the quality of your produce, ensuring it’s free from unwanted chemicals and bursting with fresh flavor.
But why is this DIY trick a must-try? Beyond the satisfaction of nurturing your own food, growing kohlrabi offers several compelling advantages. Firstly, you’ll have access to kohlrabi varieties that are often unavailable in supermarkets. Imagine enjoying the subtle sweetness of ‘White Vienna’ or the vibrant purple hue of ‘Purple Vienna’ – options that expand your culinary horizons. Secondly, homegrown kohlrabi tastes significantly better than store-bought counterparts. The freshness translates into a crisper texture and a more pronounced, slightly sweet flavor that elevates salads, slaws, and stir-fries. Finally, growing your own kohlrabi is an environmentally friendly choice. You’re reducing your carbon footprint by minimizing transportation and supporting sustainable practices.
Don’t be afraid to experiment with variations! Consider companion planting to enhance your kohlrabi’s growth. Marigolds can deter pests, while dill attracts beneficial insects. You can also explore different growing methods, such as container gardening, if you have limited space. For a spicier twist, try growing kohlrabi alongside radishes. The possibilities are endless!
Embrace the Journey of Growing Kohlrabi
We encourage you to embark on this exciting journey of growing kohlrabi easily. It’s a simple yet fulfilling project that connects you with nature and provides you with a delicious and nutritious vegetable. Remember to start with good quality seeds, provide adequate sunlight and water, and protect your plants from pests.
Share Your Kohlrabi Adventures!
We’d love to hear about your experiences! Share your tips, tricks, and photos of your homegrown kohlrabi in the comments below. Let’s create a community of kohlrabi enthusiasts and inspire others to discover the joys of gardening. What varieties did you try? What challenges did you face, and how did you overcome them? Your insights can help fellow gardeners succeed in their kohlrabi-growing endeavors.
So, grab your seeds, prepare your soil, and get ready to enjoy the fruits (or rather, vegetables) of your labor. Happy gardening!
Frequently Asked Questions (FAQ)
Q: How long does it take to grow kohlrabi from seed?
A: Kohlrabi is a relatively fast-growing vegetable. From seed to harvest, it typically takes about 55-60 days. However, this can vary slightly depending on the variety, growing conditions, and climate. Starting seeds indoors 4-6 weeks before the last expected frost can give you a head start and allow for an earlier harvest.
Q: What are the best growing conditions for kohlrabi?
A: Kohlrabi thrives in cool weather and requires at least 6 hours of sunlight per day. The ideal soil is well-drained, fertile, and rich in organic matter. A slightly acidic to neutral pH (6.0-7.5) is optimal. Consistent watering is crucial, especially during dry periods, to prevent the kohlrabi bulbs from becoming tough and woody.
Q: What are some common pests and diseases that affect kohlrabi?
A: Common pests that can affect kohlrabi include cabbage worms, aphids, flea beetles, and root maggots. Diseases such as clubroot and downy mildew can also be problematic. To prevent pest infestations, consider using row covers or organic insecticides like neem oil or insecticidal soap. Ensure good air circulation and avoid overcrowding to minimize the risk of fungal diseases. Crop rotation can also help prevent soilborne diseases.
Q: How do I know when kohlrabi is ready to harvest?
A: Kohlrabi is best harvested when the bulb is about 2-3 inches in diameter. At this size, it will be tender and flavorful. Larger bulbs can become tough and woody. To harvest, simply cut the bulb from the stem just above the soil line. The leaves are also edible and can be harvested at any time.
Q: Can I grow kohlrabi in containers?
A: Yes, kohlrabi can be successfully grown in containers, making it a great option for gardeners with limited space. Choose a container that is at least 12 inches deep and wide to allow for adequate root development. Use a high-quality potting mix and ensure good drainage. Water regularly and fertilize every few weeks with a balanced fertilizer.
Q: What are some ways to use kohlrabi in cooking?
A: Kohlrabi is a versatile vegetable that can be enjoyed in various ways. It can be eaten raw, sliced or grated into salads and slaws. It can also be cooked by steaming, boiling, roasting, or stir-frying. Kohlrabi has a mild, slightly sweet flavor that pairs well with other vegetables, herbs, and spices. The leaves can be cooked like spinach or kale.
Q: Can I store kohlrabi after harvesting?
A: Yes, kohlrabi can be stored in the refrigerator for several weeks. Remove the leaves and store them separately. Place the bulbs in a plastic bag or container to prevent them from drying out. The leaves can be stored in a similar manner for a few days.
Q: What are the nutritional benefits of kohlrabi?
A: Kohlrabi is a nutritious vegetable that is low in calories and high in fiber, vitamin C, and potassium. It also contains antioxidants and other beneficial compounds. Eating kohlrabi can contribute to a healthy diet and may help reduce the risk of chronic diseases.
Q: What are some different varieties of kohlrabi I can grow?
A: There are several varieties of kohlrabi available, each with its own unique characteristics. Some popular varieties include ‘White Vienna,’ ‘Purple Vienna,’ ‘Grand Duke,’ and ‘Superschmelz.’ ‘White Vienna’ and ‘Purple Vienna’ are classic varieties with good flavor and texture. ‘Grand Duke’ is an early-maturing variety that is resistant to bolting. ‘Superschmelz’ is a large variety that can grow to impressive sizes without becoming tough.
Q: Can I grow kohlrabi in the fall or winter?
A: Yes, kohlrabi can be grown as a fall or winter crop in regions with mild climates. Start seeds in late summer or early fall and harvest before the first hard frost. In colder climates, you can extend the growing season by using row covers or cold frames.
Q: How do I prevent kohlrabi from becoming woody?
A: To prevent kohlrabi from becoming woody, ensure consistent watering, especially during dry periods. Harvest the bulbs when they are still young and tender, typically around 2-3 inches in diameter. Avoid over-fertilizing, as this can also contribute to woody growth. Choose varieties that are known for their good texture and resistance to woodiness.
Leave a Comment