
Growing Rosemary Indoors Soil Free might sound like something out of a science fiction movie, but trust me, it’s totally achievable and incredibly rewarding! Have you ever dreamed of snipping fresh rosemary sprigs right from your kitchen windowsill, even when the snow is piling up outside? Well, dream no more! This DIY guide will unlock the secrets to cultivating this fragrant herb without ever getting your hands dirty with soil.
Rosemary, with its piney aroma and culinary versatility, has a rich history. Ancient civilizations revered it for its medicinal properties and symbolic significance, often associating it with remembrance and fidelity. From wreaths adorning Roman scholars to flavoring dishes in Mediterranean kitchens, rosemary has always held a special place in our lives.
But let’s face it, traditional gardening can be messy and time-consuming. That’s where this soil-free method comes in! Imagine bypassing the need for potting mixes, repotting, and worrying about soil-borne pests. This DIY trick is perfect for apartment dwellers, busy individuals, or anyone who simply wants a cleaner, more convenient way to enjoy fresh herbs. I’m excited to show you how easy it is to start growing rosemary indoors soil free and bring a touch of the Mediterranean into your home!
Growing Rosemary Indoors: A Soil-Free Adventure!
Hey there, fellow plant enthusiasts! Ever dreamt of having fresh rosemary at your fingertips, ready to spice up your culinary creations, even when the weather outside is frightful? Well, you’re in the right place! Today, I’m going to walk you through a super cool DIY project: growing rosemary indoors, completely soil-free! Yes, you read that right. We’re ditching the dirt and diving into the world of hydroponics, or rather, a simplified version perfect for beginners.
This method is not only fun and surprisingly easy, but it also allows you to monitor your rosemary’s growth more closely and minimize the risk of soil-borne diseases. Plus, it’s a fantastic conversation starter! So, grab your supplies, and let’s get started!
What You’ll Need
Before we jump into the nitty-gritty, let’s gather our supplies. Don’t worry, you probably have most of these lying around already!
* Rosemary Cuttings: You can either take cuttings from an existing rosemary plant (about 4-6 inches long) or purchase them from a reputable nursery. Make sure they look healthy and vibrant!
* A Clean Glass Jar or Container: This will be our hydroponic reservoir. A mason jar, a recycled glass jar, or even a plastic container will work just fine. Just make sure it’s clean!
* Rockwool Cubes or Coco Coir Plugs: These will act as our growing medium, providing support and moisture to the rosemary cuttings. You can find these at most garden centers or online.
* Hydroponic Nutrients: Specifically, a balanced nutrient solution formulated for herbs or leafy greens. This is crucial for providing the rosemary with the essential nutrients it needs to thrive without soil.
* pH Testing Kit: This is important for maintaining the correct pH level of the nutrient solution. Rosemary prefers a slightly acidic pH, around 6.0-6.5.
* pH Up and pH Down Solutions (Optional): These will help you adjust the pH of the nutrient solution if needed.
* Distilled or Filtered Water: Tap water can sometimes contain chlorine and other chemicals that can harm your rosemary cuttings.
* A Sharp, Clean Knife or Scissors: For taking cuttings, if you’re not buying them.
* Rooting Hormone (Optional): This can help speed up the rooting process, but it’s not strictly necessary.
* Grow Lights (Optional but Recommended): Rosemary needs plenty of light, so if you don’t have a sunny windowsill, grow lights will be your best friend.
* Spray Bottle: For misting the cuttings.
Taking Rosemary Cuttings (If Needed)
If you’re starting from an existing rosemary plant, here’s how to take cuttings:
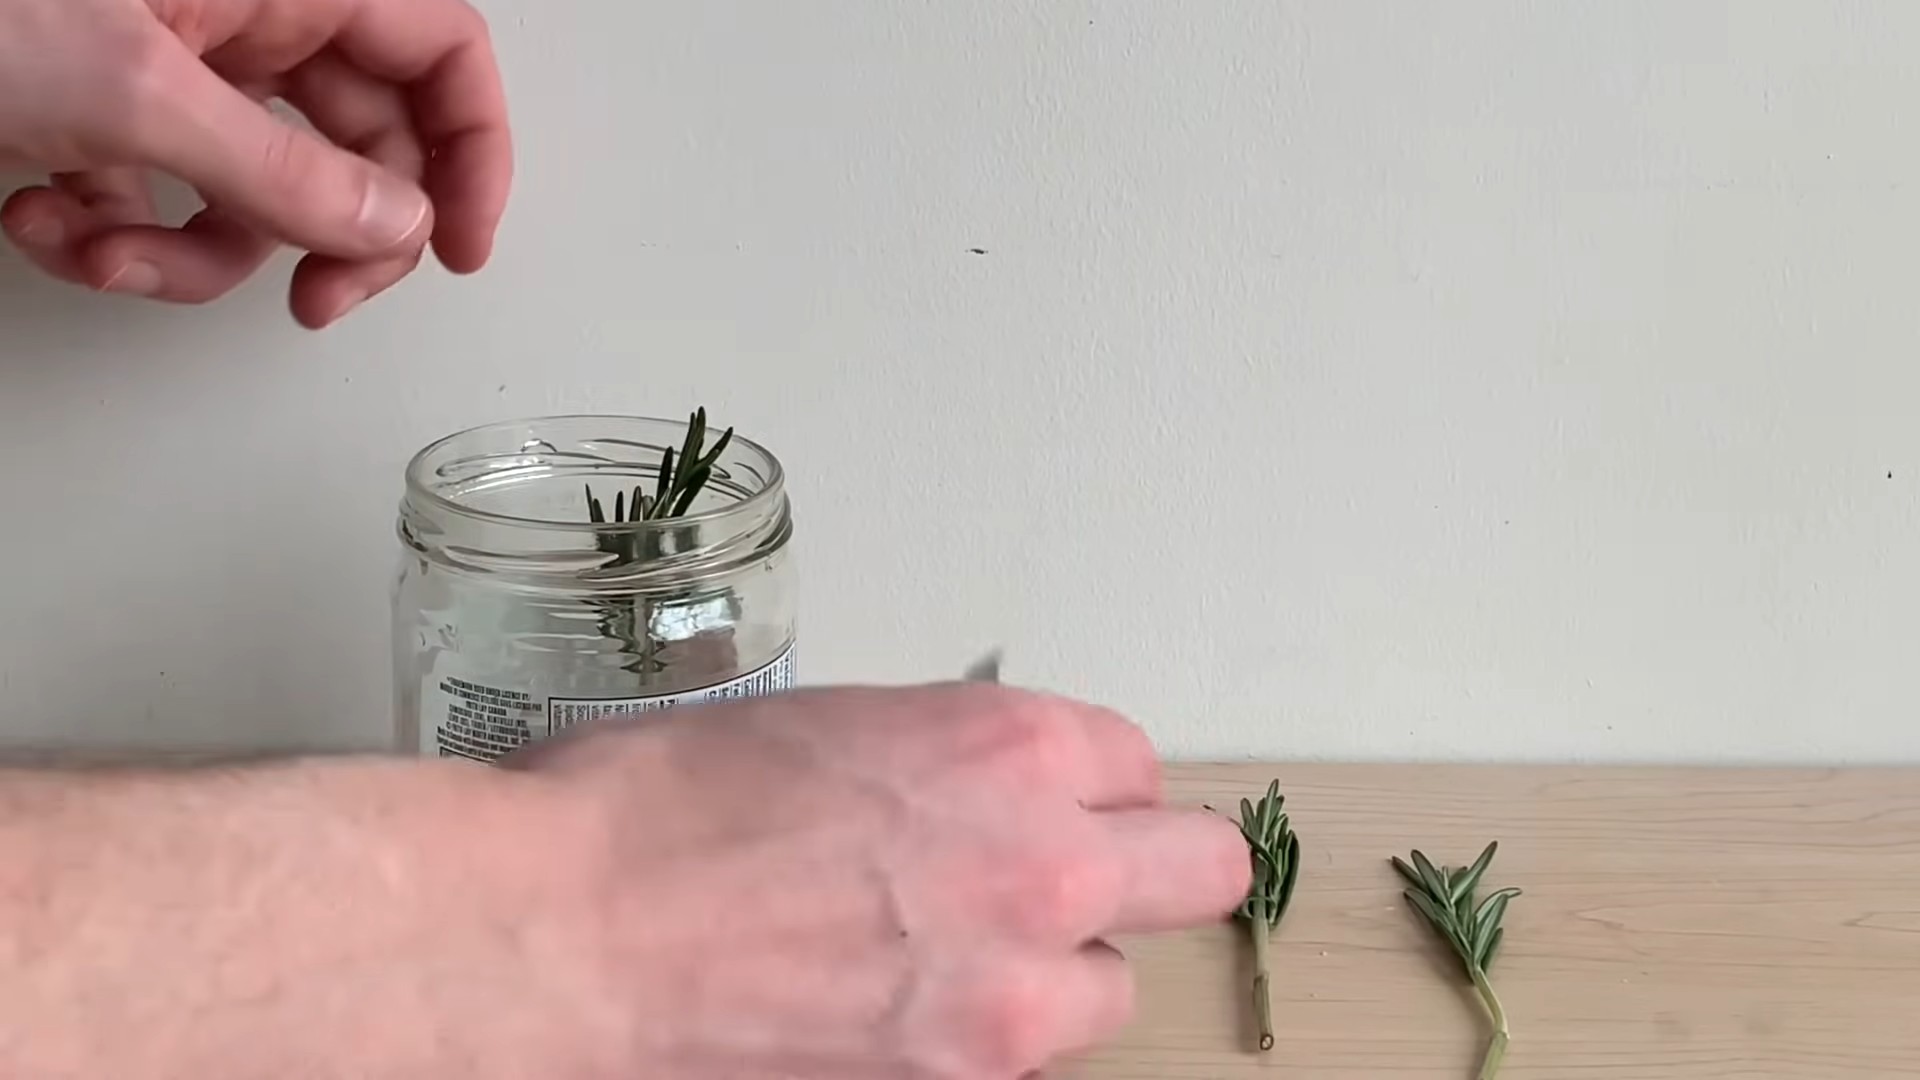
1. Choose Healthy Stems: Select healthy, non-flowering stems from your rosemary plant. These should be about 4-6 inches long.
2. Make the Cut: Using a sharp, clean knife or scissors, make a clean cut just below a leaf node (the point where a leaf grows from the stem).
3. Remove Lower Leaves: Remove the leaves from the bottom inch or two of the stem. This will expose the nodes where roots will develop.
4. Optional: Dip in Rooting Hormone: If you’re using rooting hormone, dip the cut end of the stem into the powder or liquid.
5. Prepare the Cuttings: Place the prepared cuttings in a glass of water for a few hours to prevent them from drying out before planting.
Preparing the Growing Medium
Now, let’s get our growing medium ready:
1. Soak the Rockwool Cubes or Coco Coir Plugs: Submerge the rockwool cubes or coco coir plugs in distilled or filtered water for about 15-20 minutes. This will saturate them with moisture.
2. Gently Squeeze Out Excess Water: Once the cubes or plugs are fully saturated, gently squeeze out any excess water. They should be moist but not dripping wet.
Setting Up the Hydroponic System
Alright, time to assemble our soil-free rosemary haven!
1. Prepare the Nutrient Solution: Follow the instructions on your hydroponic nutrient solution to mix it with distilled or filtered water. Start with a diluted solution, especially for young cuttings.
2. Test and Adjust the pH: Use your pH testing kit to check the pH of the nutrient solution. Aim for a pH of 6.0-6.5. If the pH is too high, add a small amount of pH Down solution. If it’s too low, add a small amount of pH Up solution. Always test the pH after each adjustment.
3. Fill the Jar or Container: Pour the nutrient solution into your clean glass jar or container. The level of the solution should be high enough to reach the bottom of the rockwool cubes or coco coir plugs when they are placed in the container.
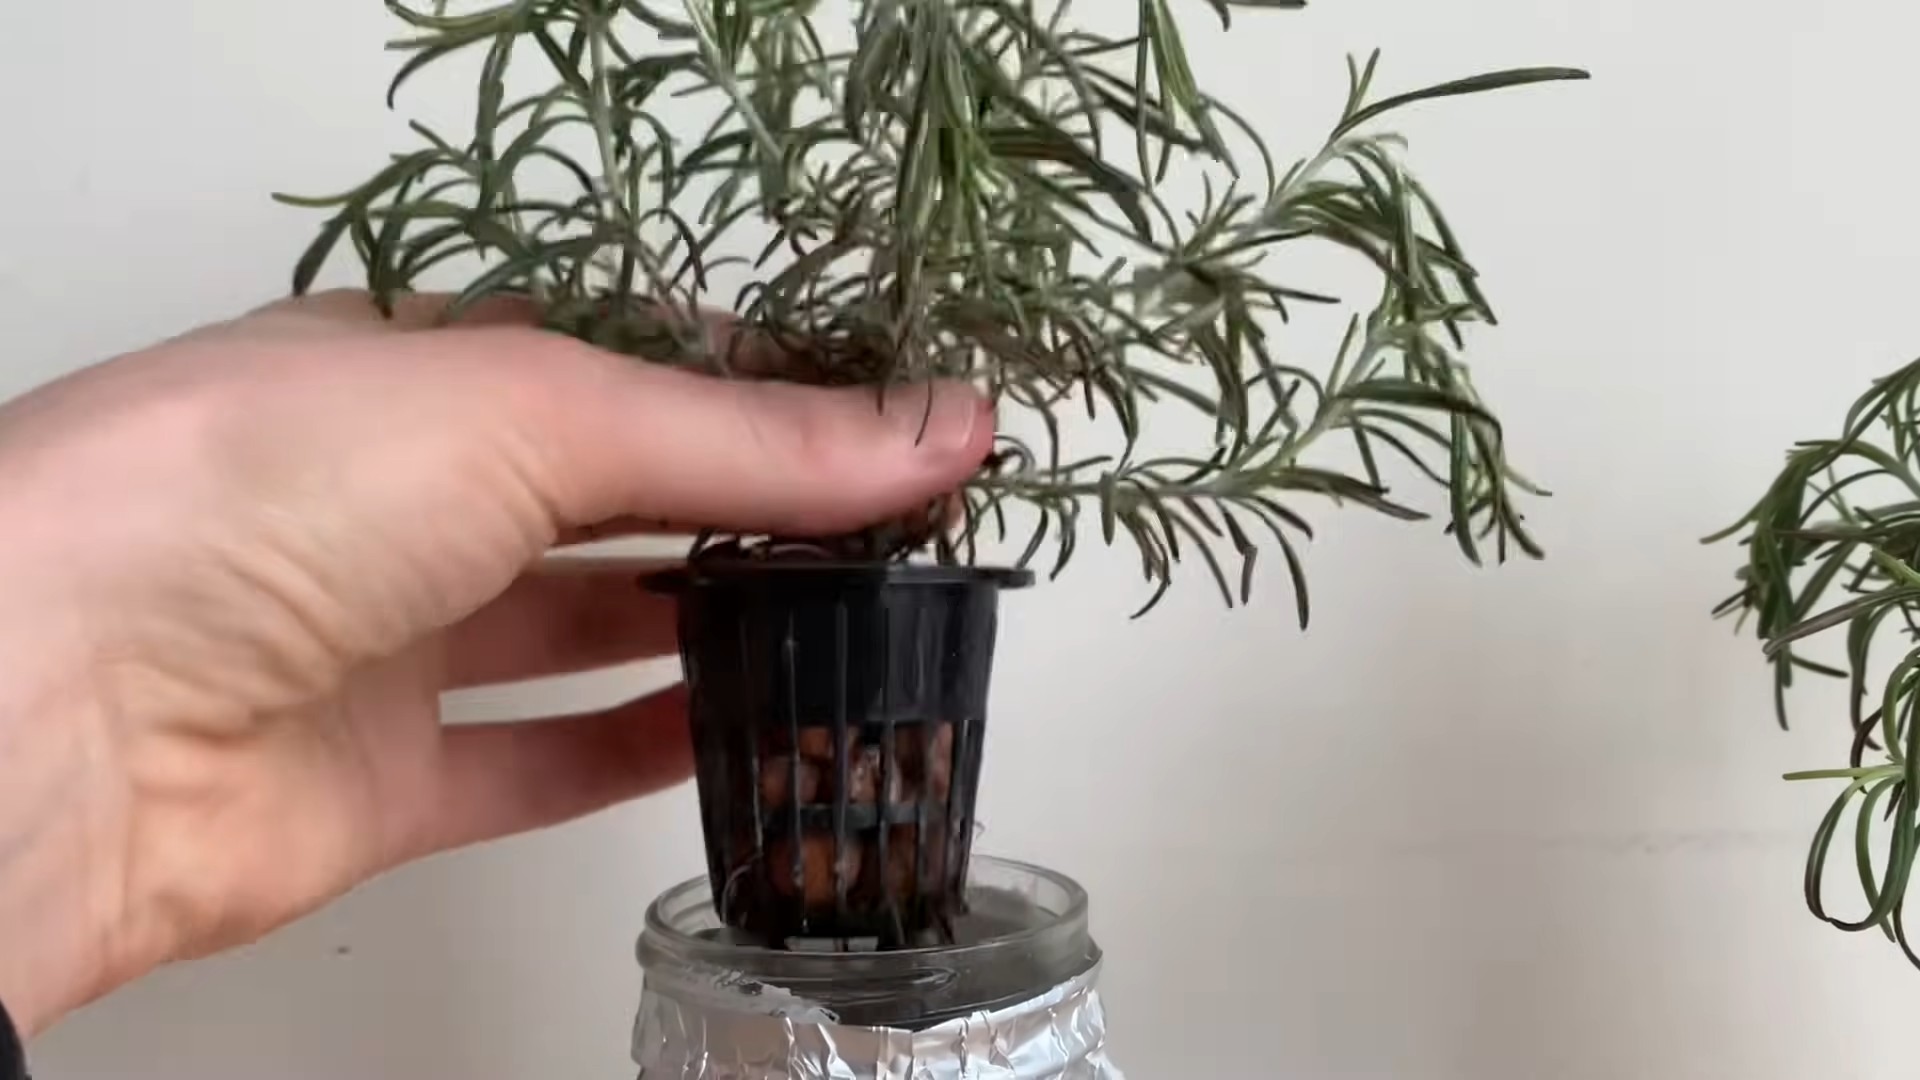
4. Insert the Cuttings: Gently insert each rosemary cutting into a pre-soaked rockwool cube or coco coir plug. Make sure the cut end of the stem is in contact with the growing medium.
5. Place the Cubes/Plugs in the Container: Arrange the rockwool cubes or coco coir plugs in the container, ensuring that the bottom of the cubes/plugs is submerged in the nutrient solution. You can use a net pot or a piece of Styrofoam with holes to suspend the cubes/plugs above the solution if you prefer, but it’s not essential for this simple setup.
Caring for Your Soil-Free Rosemary
Now comes the fun part: watching your rosemary thrive!
1. Provide Adequate Light: Rosemary needs at least 6-8 hours of sunlight per day. If you don’t have a sunny windowsill, use grow lights. Position the grow lights about 6-12 inches above the rosemary cuttings.
2. Maintain Humidity: Rosemary prefers moderate humidity. Mist the cuttings with water a few times a day, especially during the first few weeks, to help them stay hydrated.
3. Monitor the Nutrient Solution: Check the nutrient solution every few days. Add more solution as needed to maintain the water level. Replace the entire solution every 1-2 weeks to prevent nutrient buildup.
4. Check and Adjust the pH Regularly: Continue to monitor the pH of the nutrient solution and adjust it as needed to maintain a pH of 6.0-6.5.
5. Watch for Root Development: After a few weeks, you should start to see roots emerging from the rockwool cubes or coco coir plugs. This is a sign that your rosemary cuttings are successfully rooting.
6. Prune as Needed: Once your rosemary plants are established, prune them regularly to encourage bushier growth. You can use the pruned stems for cooking or propagation.
7. Acclimatize Before Transplanting (Optional): If you eventually want to transplant your rosemary to soil, gradually acclimatize it to outdoor conditions by exposing it to increasing amounts of sunlight and fresh air over a period of a week or two.
Troubleshooting
Even with the best care, you might encounter a few challenges along the way. Here are some common issues and how to address them:
* Yellowing Leaves: This could be a sign of nutrient deficiency, overwatering, or underwatering. Check the nutrient solution and adjust as needed. Make sure the rockwool cubes or coco coir plugs are moist but not waterlogged.
* Slow Growth: This could be due to insufficient light, low temperatures, or an imbalanced nutrient solution. Provide more light, ensure the temperature is warm enough, and check the pH and nutrient levels.
* Root Rot: This is caused by overwatering or poor drainage. Make sure the rockwool cubes or coco coir plugs are not waterlogged. Replace the nutrient solution regularly.
* Pests: While less common in hydroponic systems, pests can still be a problem. Inspect your rosemary plants regularly for signs of pests and treat them with an appropriate insecticide if necessary.
Harvesting Your Rosemary
Once your rosemary plants are established, you can start harvesting the leaves. Simply snip off sprigs of rosemary as needed. Regular harvesting will encourage bushier growth and keep your plants healthy.
Why This Method Works
The beauty of this soil-free method lies in its simplicity and efficiency. By providing the rosemary cuttings with a consistent supply of water, nutrients, and light, we create an optimal environment for root development and growth. The rockwool cubes or coco coir plugs provide support and moisture, while the hydroponic nutrient solution delivers the essential nutrients that the rosemary needs to thrive.
Benefits of Growing Rosemary Soil-Free
* Reduced Risk of Soil-Borne Diseases: Without soil, there’s less risk of your rosemary plants being affected by soil-borne diseases.
* Faster Growth: Hydroponic systems can often result in faster growth rates compared to traditional soil-based gardening.
*
Conclusion
So, there you have it! Growing rosemary indoors soil free, using the Kratky method, is not just a quirky experiment; it’s a game-changer for herb enthusiasts, space-conscious gardeners, and anyone looking for a low-maintenance way to enjoy fresh rosemary year-round. We’ve walked you through the simple steps, highlighting the ease and efficiency of this hydroponic approach. Forget the constant watering, the battling of soil-borne pests, and the guesswork of traditional potting. This method offers a clean, controlled environment where your rosemary can thrive.
But why is this a must-try? Because it unlocks a level of convenience and success that traditional methods often struggle to achieve. Imagine having a constant supply of fragrant, flavorful rosemary right at your fingertips, ready to enhance your culinary creations or infuse your home with its invigorating scent. The Kratky method minimizes the risk of overwatering, a common pitfall for indoor rosemary cultivation, and provides a consistent nutrient supply, leading to healthier, more robust growth.
Don’t be afraid to experiment with variations! Try different nutrient solutions to see what works best for your rosemary. Some gardeners have found success with diluted seaweed extract or compost tea, while others prefer commercially available hydroponic nutrients. You can also play around with the size of your container and the amount of nutrient solution. Just remember to leave an air gap between the water level and the base of the stem to prevent rot. Consider using a small air pump and air stone to further oxygenate the nutrient solution, especially in warmer climates. This can significantly boost growth and prevent issues with algae.
Furthermore, think about the lighting. While rosemary loves sunlight, a supplemental grow light can be incredibly beneficial, especially during the darker winter months. LED grow lights are energy-efficient and provide the full spectrum of light that rosemary needs to flourish. You can even automate the lighting with a timer to ensure consistent exposure.
This soil-free rosemary growing technique is more than just a trend; it’s a sustainable and efficient way to cultivate this beloved herb. It’s a testament to the power of innovation in gardening and a pathway to fresh, homegrown flavor, regardless of your living space or gardening experience.
We wholeheartedly encourage you to give this DIY trick a try. It’s a rewarding project that will not only provide you with fresh rosemary but also deepen your understanding of plant growth and hydroponics. Once you’ve experienced the joy of harvesting your own soil-free rosemary, we’re confident you’ll be hooked!
And most importantly, we want to hear about your experience! Share your successes, your challenges, and your tips with us in the comments below. Let’s build a community of soil-free rosemary growers and learn from each other. What nutrient solution did you use? What lighting setup did you find most effective? What challenges did you encounter, and how did you overcome them? Your insights will be invaluable to other readers who are embarking on this exciting journey. So, grab your supplies, follow the steps, and get ready to enjoy the bounty of your own indoor rosemary garden! Let’s cultivate a greener, more flavorful world, one soil-free rosemary plant at a time.
Frequently Asked Questions (FAQ)
What exactly is the Kratky method, and why is it good for growing rosemary indoors?
The Kratky method is a passive hydroponic system, meaning it doesn’t require pumps or electricity to circulate the nutrient solution. It’s a simple setup where the plant’s roots are suspended in a nutrient-rich water solution, with an air gap above the water line. This air gap allows the roots to access oxygen, which is crucial for healthy growth. It’s particularly well-suited for growing rosemary indoors because it’s low-maintenance, requires minimal equipment, and eliminates the need for frequent watering, which can be a common problem with rosemary in soil. The consistent nutrient supply also promotes strong, healthy growth.
What kind of container should I use for growing rosemary using the Kratky method?
You can use a variety of containers, but opaque containers are generally recommended to prevent algae growth in the nutrient solution. A dark-colored plastic container, a glass jar wrapped in dark paper, or even a repurposed bucket will work. The size of the container will depend on the size of your rosemary plant, but a container that holds at least a gallon of water is a good starting point. Make sure the container is food-grade if you’re concerned about chemicals leaching into the nutrient solution. The container should also have a lid or cover with a hole large enough to hold the net pot or support system for your rosemary cutting.
What kind of nutrient solution should I use for my soil-free rosemary?
There are several options for nutrient solutions. You can use commercially available hydroponic nutrient solutions specifically formulated for herbs or leafy greens. These solutions typically contain a balanced blend of macronutrients (nitrogen, phosphorus, potassium) and micronutrients (iron, manganese, zinc, etc.) that rosemary needs to thrive. Follow the instructions on the nutrient solution label for dilution rates. Alternatively, you can experiment with organic options like diluted seaweed extract or compost tea. However, these organic solutions may not provide as precise a nutrient balance as commercial hydroponic solutions. It’s important to monitor your rosemary plant for signs of nutrient deficiencies (e.g., yellowing leaves) and adjust the nutrient solution accordingly.
How often should I change the nutrient solution?
The frequency of nutrient solution changes depends on several factors, including the size of your container, the growth rate of your rosemary plant, and the type of nutrient solution you’re using. As a general guideline, change the nutrient solution every 2-4 weeks. However, if you notice the solution becoming cloudy, discolored, or developing an unpleasant odor, it’s time to change it sooner. When changing the solution, gently rinse the roots of your rosemary plant with fresh water to remove any accumulated debris.
How much light does my soil-free rosemary need?
Rosemary thrives in bright sunlight, so aim to provide at least 6-8 hours of direct sunlight per day. If you don’t have access to enough natural light, supplement with a grow light. LED grow lights are a great option because they’re energy-efficient and provide the full spectrum of light that rosemary needs. Position the grow light about 6-12 inches above the rosemary plant. You can also use a timer to automate the lighting schedule.
What are some common problems I might encounter when growing rosemary using the Kratky method, and how can I fix them?
Some common problems include algae growth, root rot, and nutrient deficiencies. Algae growth can be prevented by using an opaque container and keeping the nutrient solution clean. Root rot can occur if the roots are constantly submerged in water without adequate oxygen. Make sure there’s a sufficient air gap between the water level and the base of the stem. You can also add an air stone and air pump to oxygenate the nutrient solution. Nutrient deficiencies can be addressed by adjusting the nutrient solution according to the plant’s needs. Yellowing leaves, stunted growth, or unusual leaf discoloration can be signs of nutrient deficiencies.
Can I start rosemary from seed using the Kratky method?
While it’s possible to start rosemary from seed using the Kratky method, it’s generally easier and faster to start with a cutting. Rosemary seeds can be slow to germinate and require specific conditions. Starting with a cutting allows you to bypass the germination stage and get a head start on growing your rosemary plant.
How do I take a rosemary cutting for the Kratky method?
To take a rosemary cutting, select a healthy stem that’s about 4-6 inches long. Remove the leaves from the bottom inch or two of the stem. Place the cutting in a glass of water until roots develop, which usually takes a few weeks. Once the roots are about an inch long, you can transfer the cutting to your Kratky setup.
Is the Kratky method suitable for other herbs besides rosemary?
Yes, the Kratky method is suitable for growing a variety of herbs, including basil, mint, oregano, thyme, and chives. The principles are the same: provide a nutrient-rich water solution, ensure adequate oxygenation, and provide sufficient light. However, you may need to adjust the nutrient solution and lighting conditions based on the specific needs of each herb.
How do I know when my rosemary is ready to harvest?
You can start harvesting rosemary once the plant is established and has grown to a reasonable size. Simply snip off sprigs of rosemary as needed. Regular harvesting will encourage the plant to bush out and produce more foliage. Avoid removing more than one-third of the plant at a time to prevent stressing it.


Leave a Comment