
Growing Potatoes Indoors might sound like a whimsical dream, especially if you’re staring out at a snow-covered garden! But trust me, it’s not only possible, it’s incredibly rewarding. Imagine harvesting your own fresh, earthy potatoes right from your kitchen windowsill – a true testament to the power of DIY and a delightful conversation starter.
The history of potato cultivation is rich and fascinating, dating back thousands of years to the Andes Mountains. While our ancestors likely weren’t sprouting spuds in their living rooms, their ingenuity in cultivating this versatile crop paved the way for us to experiment with techniques like growing potatoes indoors today. It’s a fun way to connect with that agricultural heritage, even on a small scale.
Why would you want to embark on this indoor potato adventure? Well, for starters, it’s a fantastic way to extend your growing season, providing you with fresh produce even when the weather outside is frightful. Plus, it’s a great solution for those with limited outdoor space, like apartment dwellers or city folk. But beyond the practical benefits, it’s simply a fun and educational project, especially for kids! I’m excited to share my favorite DIY tricks and hacks to help you successfully grow potatoes indoors, turning your home into a mini-farm and bringing a touch of nature into your everyday life.
Growing Potatoes Indoors: A Spud-tacular DIY Guide!
Hey there, fellow gardening enthusiasts! Ever thought about growing your own potatoes, but don’t have a sprawling garden? Well, I’m here to tell you that you absolutely can grow potatoes indoors! It’s a fun, rewarding, and surprisingly easy project. I’ve been doing it for a while now, and I’m excited to share my secrets with you. Get ready to harvest your own homegrown goodness, right from the comfort of your home!
What You’ll Need: The Potato Powerhouse Starter Kit
Before we dive in, let’s gather our supplies. This is what you’ll need to create your indoor potato paradise:
* Seed Potatoes: These aren’t your regular grocery store potatoes. Seed potatoes are specifically grown for planting and are certified disease-free. You can find them at your local garden center or online. Choose varieties that are known to do well in containers, like Yukon Gold or fingerling potatoes.
* Large Container: Think big! You’ll need a container that’s at least 10 gallons in size. A 20-gallon container is even better. The deeper the container, the more potatoes you’ll be able to grow. Buckets, large pots, or even repurposed trash cans (cleaned thoroughly, of course!) work great.
* Well-Draining Potting Mix: This is crucial! Regular garden soil is too heavy and won’t drain properly. Use a high-quality potting mix that’s light and airy. A mix specifically formulated for vegetables is ideal.
* Grow Lights (Optional but Recommended): While potatoes can grow indoors with natural light, they’ll thrive with supplemental grow lights, especially during the shorter days of winter.
* Watering Can or Hose: For keeping your potato plants hydrated.
* Fertilizer: A balanced, slow-release fertilizer will provide your potatoes with the nutrients they need to grow strong.
* Sharp Knife: For cutting the seed potatoes (if necessary).
* Spray Bottle: For misting the foliage.
Getting Started: Preparing Your Seed Potatoes
Okay, let’s get those seed potatoes ready for planting! This is a crucial step for ensuring a healthy and bountiful harvest.
1. Chitting (Sprouting) Your Seed Potatoes: This is optional, but I highly recommend it. Chitting encourages the seed potatoes to sprout before planting, giving them a head start. About 4-6 weeks before you plan to plant, place your seed potatoes in a cool, bright location (but not in direct sunlight). An egg carton or a tray works well. You’ll notice small “eyes” or sprouts starting to form. This is exactly what we want!
2. Cutting the Seed Potatoes (If Necessary): If your seed potatoes are large (bigger than an egg), you can cut them into smaller pieces. Each piece should have at least 2-3 “eyes” or sprouts. Use a clean, sharp knife to cut the potatoes.
3. Curing the Cut Pieces: After cutting, let the pieces sit out for a day or two to allow the cut surfaces to callous over. This helps prevent rot.
Planting Your Potatoes: From Seed to Sprout
Now for the fun part – planting! This is where the magic begins.
1. Prepare Your Container: Make sure your container has drainage holes. If not, drill some!
2. Add Potting Mix: Fill the container with about 4-6 inches of potting mix.
3. Plant the Seed Potatoes: Place the seed potatoes (sprouts facing up) on top of the potting mix, spacing them about 8-10 inches apart. If you’re using a very large container, you can plant more than one seed potato.
4. Cover with Potting Mix: Cover the seed potatoes with another 4-6 inches of potting mix.
5. Water Thoroughly: Water the soil until it’s evenly moist, but not soggy.
The “Hilling” Process: Building Your Potato Mountain
This is where the magic really happens! “Hilling” is the process of adding more soil to the container as the potato plants grow. This encourages the plants to produce more potatoes along the stems.
1. Wait for Sprouts: After a week or two, you’ll start to see sprouts emerging from the soil.
2. Add More Soil: When the sprouts are about 6-8 inches tall, add more potting mix to the container, covering the stems up to the bottom set of leaves. This is the “hilling” process.
3. Repeat: Continue to add more soil every few weeks as the plants grow, always covering the stems up to the bottom set of leaves. You’ll eventually fill the container almost to the top.
Caring for Your Indoor Potato Plants: Nurturing Your Spuds
Now that your potatoes are planted, it’s time to provide them with the care they need to thrive.
1. Light: Potatoes need plenty of light, at least 6-8 hours per day. If you’re not using grow lights, place your container in a sunny window. Rotate the container regularly to ensure even growth. If you are using grow lights, position them about 6-12 inches above the plants.
2. Watering: Water your potato plants regularly, keeping the soil consistently moist but not soggy. Check the soil moisture by sticking your finger into the soil. If the top inch feels dry, it’s time to water. Avoid overwatering, as this can lead to root rot.
3. Fertilizing: Feed your potato plants every 2-3 weeks with a balanced, slow-release fertilizer. Follow the instructions on the fertilizer package.
4. Temperature: Potatoes prefer temperatures between 60-70°F (15-21°C). Avoid placing your plants near drafts or sources of extreme heat or cold.
5. Pest Control: Keep an eye out for pests like aphids or spider mites. If you spot any, treat them with an insecticidal soap or neem oil.
6. Misting: Misting the foliage occasionally can help increase humidity and keep the plants healthy.
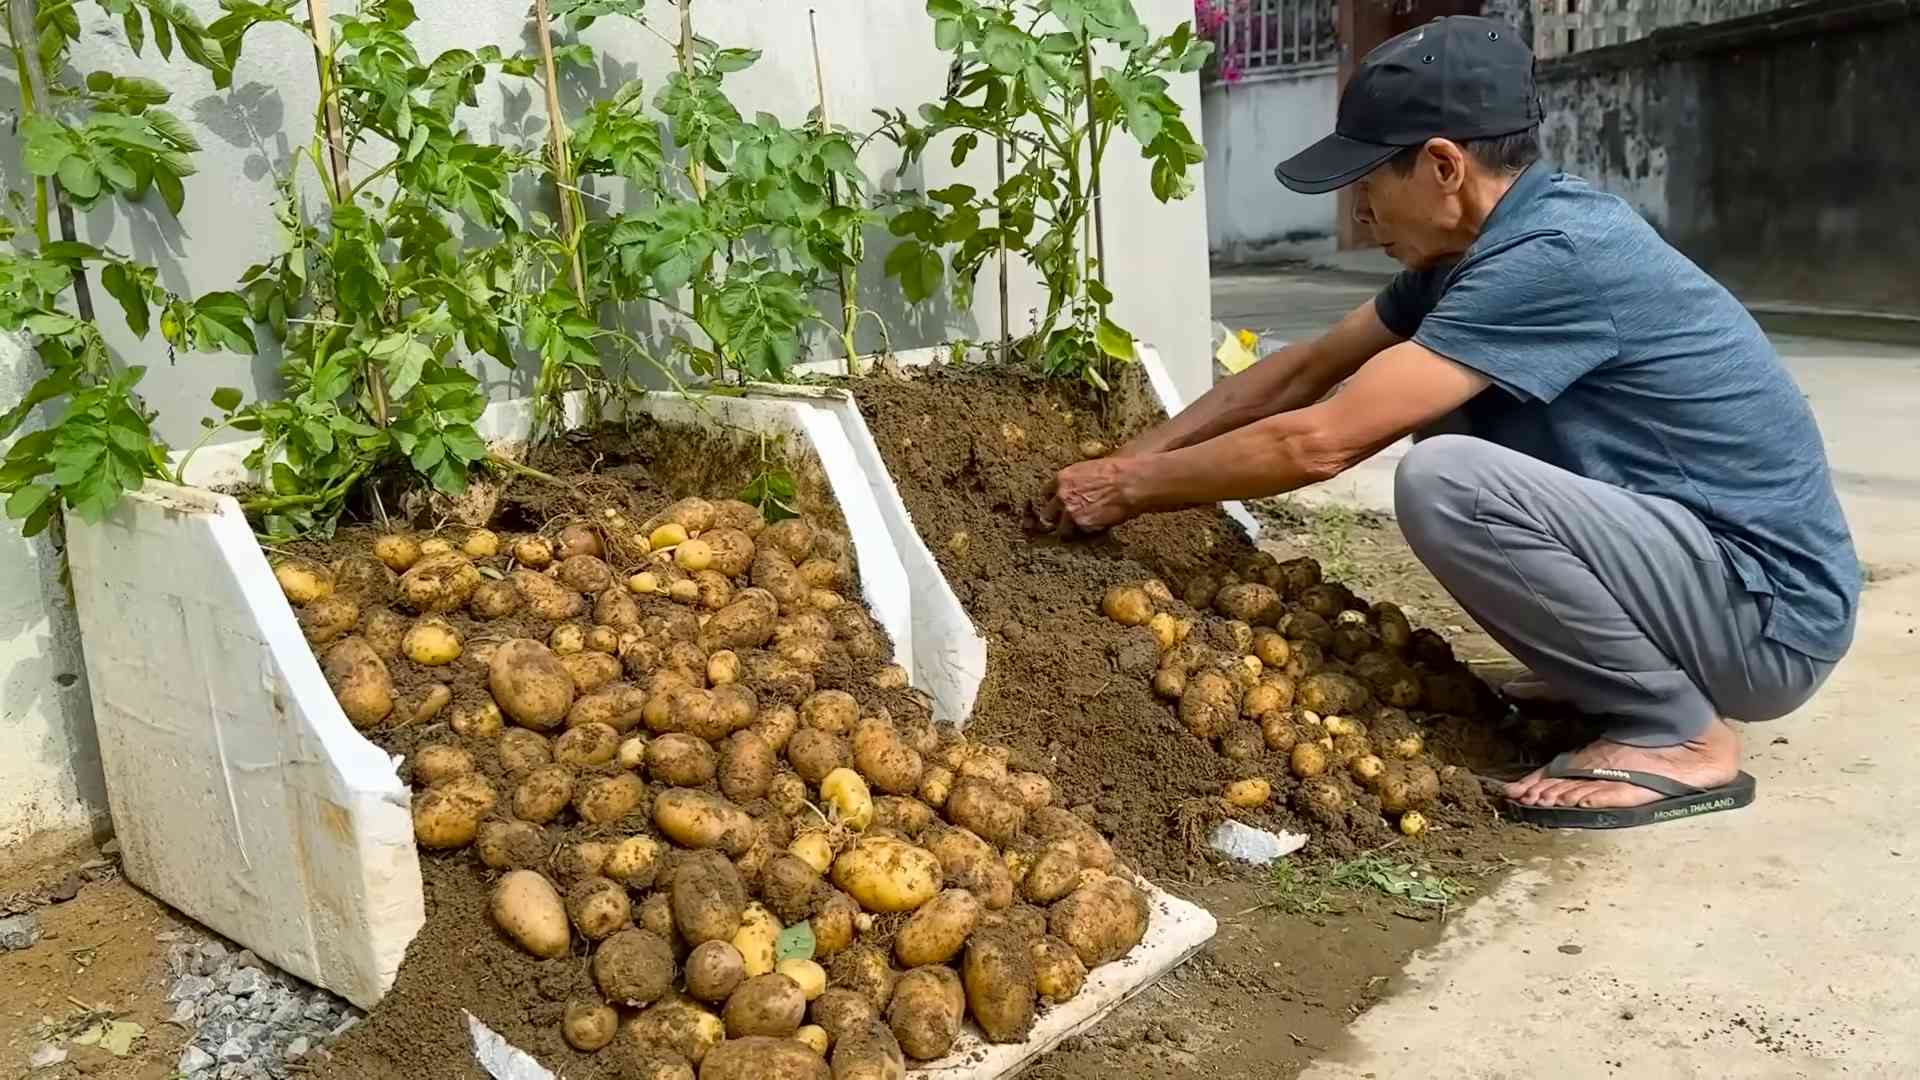
Harvest Time: Digging Up Your Treasure
After about 80-100 days, your potatoes should be ready to harvest! Here’s how to know when it’s time:
1. Observe the Foliage: The foliage will start to turn yellow and die back. This is a sign that the potatoes are maturing.
2. Test Dig: Gently dig around the base of the plant to check the size of the potatoes. If they’re the size you want, it’s time to harvest!
3. Harvesting: Carefully dig up the potatoes, being careful not to damage them. You can either harvest all the potatoes at once or harvest them gradually as needed.
4. Curing (Optional): If you plan to store your potatoes, cure them for a week or two in a cool, dark, and well-ventilated place. This will help them develop a thicker skin and prevent rot.
Troubleshooting: Common Potato Problems and Solutions
Even with the best care, you might encounter some problems along the way. Here are a few common issues and how to fix them:
* Yellowing Leaves: This could be a sign of overwatering, underwatering, or nutrient deficiency. Check the soil moisture and adjust your watering accordingly. Fertilize your plants if they’re not getting enough nutrients.
* Leggy Growth: This means your plants aren’t getting enough light. Move them to a sunnier location or provide supplemental grow lights.
* Small Potatoes: This could be due to insufficient hilling, lack of nutrients, or overcrowding. Make sure you’re hilling regularly and fertilizing your plants. If you have too many plants in one container, consider thinning them out.
* Rotting Potatoes: This is usually caused by overwatering or poor drainage. Make sure your container has drainage holes and avoid overwatering.
Choosing the Right Potato Variety for Indoor Growing
Not all potato varieties are created equal, especially when it comes to indoor growing. Some varieties are better suited for container gardening than others. Here are a few of my favorites:
* Yukon Gold: A classic choice known for its creamy texture and buttery flavor. It’s a reliable producer and does well in containers.
* Fingerling Potatoes: These long, slender potatoes are perfect for salads and roasting. They’re also relatively compact, making them a good choice for indoor growing.
* Red Potatoes: These potatoes have a thin, red skin and a waxy texture. They’re great for boiling and adding to stews.
* Irish Cobbler: An early-maturing variety that produces round, white potatoes. It’s a good choice if you want a quick harvest.
Tips for Maximizing Your Indoor Potato Harvest
Want to get the most out of your indoor
Conclusion
So, there you have it! Growing potatoes indoors is not only possible, but it’s also a surprisingly rewarding experience. Forget the limitations of outdoor space or seasonal constraints. With this simple DIY trick, you can enjoy fresh, homegrown potatoes year-round, right from the comfort of your home.
Why is this a must-try? Because it offers a unique connection to your food, a fascinating glimpse into the life cycle of a plant, and a delicious harvest at the end. Imagine the satisfaction of serving potatoes you nurtured from sprout to spud, knowing exactly where they came from and how they were grown. Plus, it’s a fantastic educational opportunity for kids (and adults!), teaching them about botany and sustainable living.
But the best part? The possibilities are endless! Experiment with different potato varieties to discover your favorites. Try using different containers, from traditional grow bags to repurposed buckets or even stylish baskets lined with burlap. Consider adding companion plants like basil or marigolds to your potato containers to deter pests and enhance growth. You can even try succession planting, starting new potatoes every few weeks to ensure a continuous harvest.
For a fun twist, try growing fingerling potatoes indoors. Their unique shape and delicate flavor make them a gourmet treat. Or, if you’re feeling adventurous, experiment with colored potatoes like purple or red varieties for a visually stunning and flavorful addition to your meals.
Don’t be intimidated by the process. Growing potatoes indoors is easier than you might think. With a little patience, attention, and the right conditions, you’ll be harvesting your own homegrown spuds in no time.
We’re confident that once you try this DIY trick, you’ll be hooked. The joy of watching your potato plants thrive, the anticipation of the harvest, and the delicious taste of homegrown potatoes are all incredibly satisfying.
So, what are you waiting for? Grab some seed potatoes, gather your supplies, and get ready to embark on your indoor potato-growing adventure. We encourage you to try this method of growing potatoes indoors and share your experiences with us! Post photos of your potato plants, share your tips and tricks, and let us know what varieties you’re growing. We can’t wait to see your indoor potato gardens flourish! Happy growing!
Frequently Asked Questions (FAQs)
What kind of potatoes are best for growing indoors?
While you can technically grow any type of potato indoors, some varieties tend to perform better than others. Look for “seed potatoes” specifically sold for planting. These are certified disease-free and have multiple “eyes” from which sprouts will emerge. Smaller varieties like fingerling potatoes, Yukon Gold, and red potatoes are often good choices for indoor growing due to their shorter growing season and manageable size. Avoid using potatoes from the grocery store, as they may have been treated to prevent sprouting.
How much light do indoor potato plants need?
Potatoes need a significant amount of light to thrive. Aim for at least 6-8 hours of direct sunlight per day. If you don’t have a sunny window, you’ll need to supplement with artificial grow lights. Fluorescent or LED grow lights are excellent options. Position the lights a few inches above the plants and adjust as they grow. Insufficient light can lead to leggy, weak plants and a poor harvest.
What kind of soil should I use for growing potatoes indoors?
Potatoes prefer well-draining, slightly acidic soil. A good potting mix specifically formulated for vegetables is ideal. You can also create your own mix by combining equal parts of potting soil, compost, and perlite or vermiculite. The compost provides nutrients, while the perlite or vermiculite improves drainage and aeration. Avoid using garden soil, as it can be too heavy and may contain pests or diseases.
How often should I water my indoor potato plants?
Water your potato plants regularly, keeping the soil consistently moist but not waterlogged. Check the soil moisture by sticking your finger about an inch deep. If it feels dry, it’s time to water. Avoid overwatering, as this can lead to root rot. Ensure your container has drainage holes to allow excess water to escape. During hot weather, you may need to water more frequently.
How do I “hill” potatoes indoors?
“Hilling” is the process of adding more soil around the potato stems as they grow. This encourages the plant to produce more potatoes along the buried stem. As your potato plants grow taller, gradually add more soil to the container, burying the lower portion of the stems. Leave only the top few sets of leaves exposed. Repeat this process every few weeks until the container is nearly full.
When will my indoor potatoes be ready to harvest?
The time it takes to harvest potatoes indoors depends on the variety and growing conditions. Generally, you can expect to harvest in about 70-90 days after planting. A good indicator that your potatoes are ready is when the foliage starts to turn yellow and die back. You can also gently dig around the edges of the container to check the size of the potatoes. If they are large enough for your liking, you can harvest them.
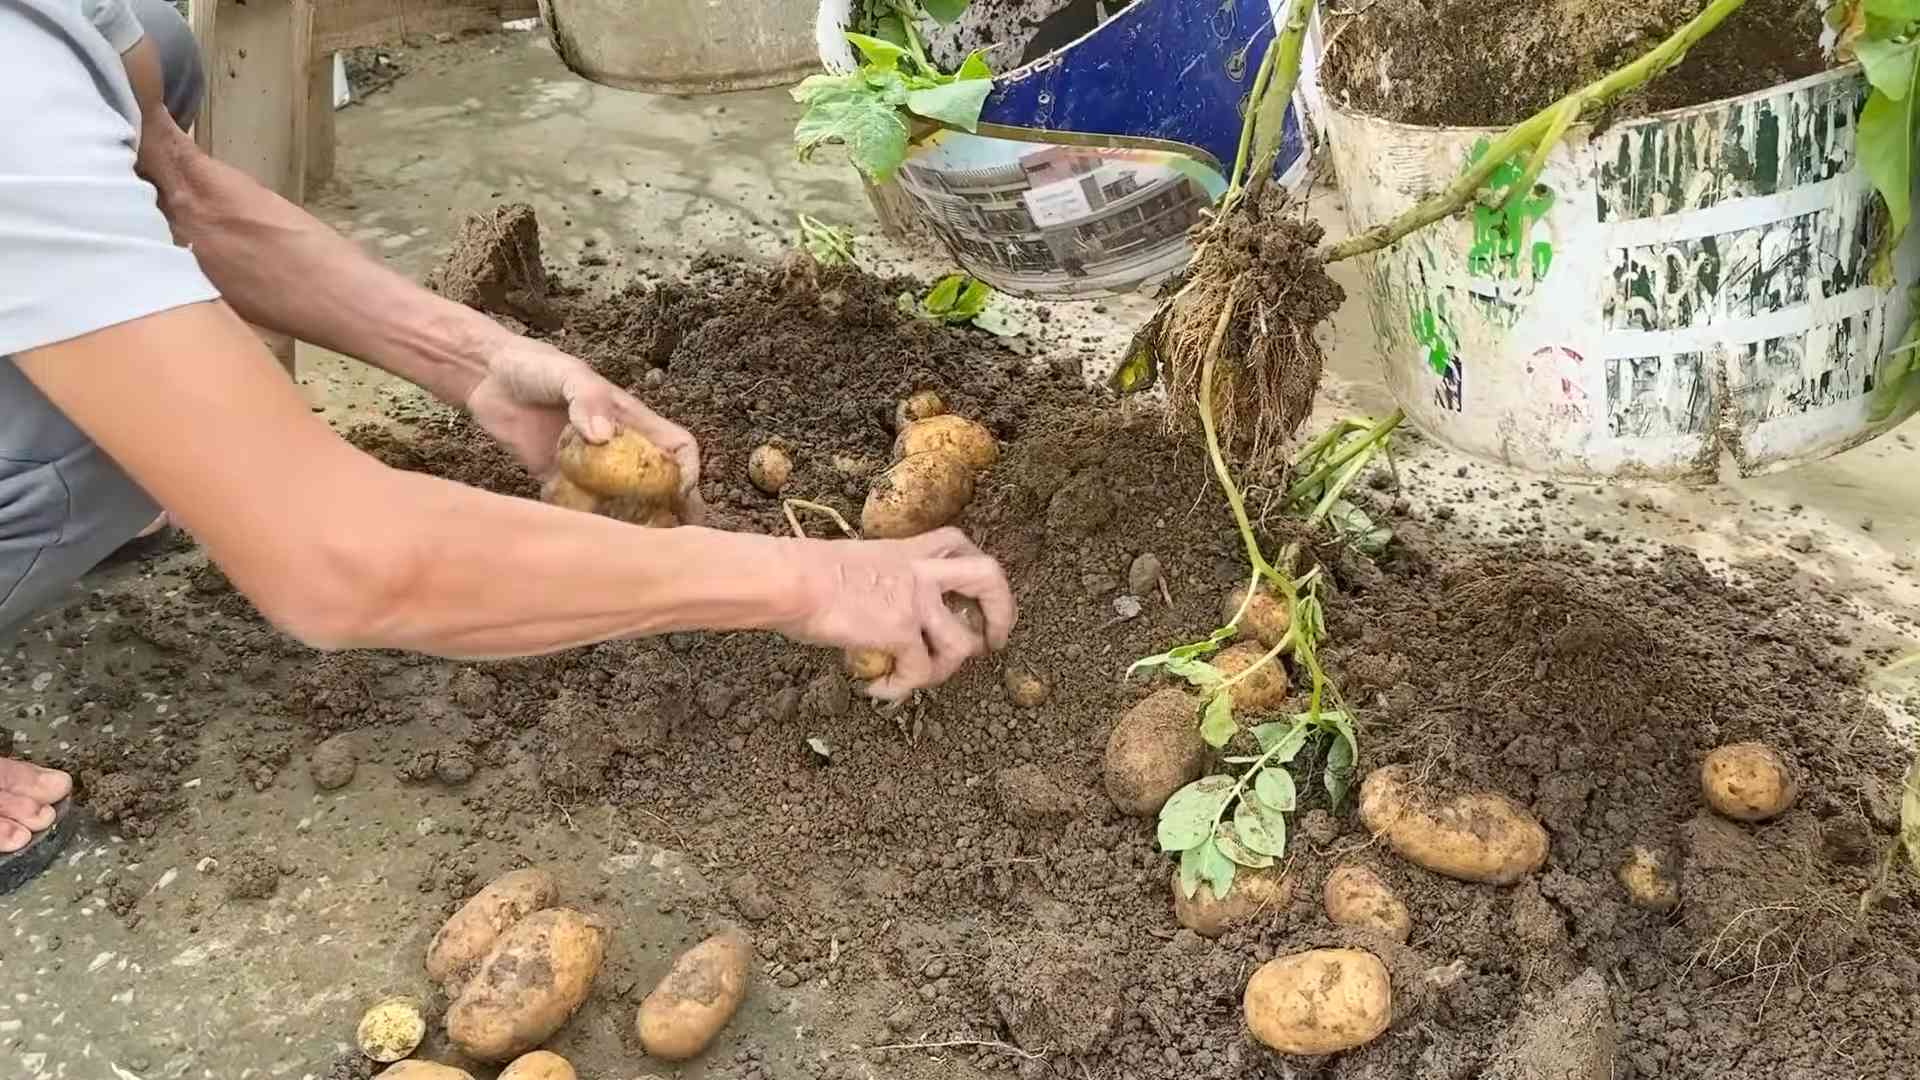
How do I harvest my indoor potatoes?
To harvest, carefully tip the container onto its side and gently remove the soil, being careful not to damage the potatoes. You can also use a garden fork to loosen the soil and lift the potatoes out. Once harvested, brush off any excess soil and store the potatoes in a cool, dark, and dry place.
Can I grow potatoes indoors in winter?
Yes, you can absolutely grow potatoes indoors in winter! In fact, it’s a great way to enjoy fresh potatoes year-round. Just make sure your plants receive adequate light, either from a sunny window or grow lights. You may also need to adjust your watering schedule, as the soil may dry out more slowly in cooler temperatures.
What are some common problems when growing potatoes indoors?
Some common problems include pests like aphids or spider mites, diseases like blight, and nutrient deficiencies. Regularly inspect your plants for signs of pests or diseases and take appropriate action. Ensure your plants are receiving adequate nutrients by fertilizing them with a balanced fertilizer every few weeks. Good air circulation can also help prevent fungal diseases.
Can I reuse the soil from my potato container?
It’s generally not recommended to reuse the soil from your potato container, especially if your plants experienced any diseases or pest infestations. The soil may contain pathogens or pests that could affect future crops. It’s best to discard the old soil and start with fresh potting mix for each new planting. You can compost the old soil if it’s disease-free.

Leave a Comment