
DIY Grape Growing System: Imagine plucking juicy, sun-ripened grapes straight from your own backyard! For centuries, cultivating grapes has been a cherished tradition, deeply woven into the fabric of cultures around the world, from ancient Roman vineyards to the sprawling landscapes of modern wine regions. But you don’t need a sprawling vineyard to enjoy the fruits (literally!) of your labor.
I know what you’re thinking: “Growing grapes seems complicated!” And traditionally, it might have been. But what if I told you that you could create your very own, easy-to-manage DIY Grape Growing System, even in a small space? That’s right, this article is all about simplifying the process and empowering you to grow delicious grapes at home, regardless of your experience level.
In today’s world, where we’re all looking for ways to connect with nature, reduce our reliance on store-bought produce, and enjoy fresh, healthy food, a DIY grape growing system is the perfect solution. Not only will you have access to incredibly flavorful grapes, but you’ll also experience the satisfaction of nurturing something from a tiny vine to a bountiful harvest. Plus, it’s a fantastic conversation starter and a beautiful addition to any garden or patio. So, let’s dive in and unlock the secrets to building your own thriving grape oasis!
DIY Grape Growing System: From Seedling to Sweet Harvest!
Hey there, fellow gardening enthusiasts! I’m so excited to share my tried-and-true method for creating a DIY grape growing system. Growing your own grapes can seem daunting, but trust me, with a little planning and elbow grease, you can enjoy delicious, homegrown grapes right in your backyard. This guide will walk you through every step, from choosing the right location to building a sturdy trellis and caring for your vines. Let’s get started!
Choosing the Right Location and Variety
Before you even think about digging, it’s crucial to pick the perfect spot and grape variety. This will significantly impact your success.
* Sunlight is Key: Grapes need at least 6-8 hours of direct sunlight per day. The more sun, the sweeter the grapes! Observe your yard throughout the day to identify the sunniest areas.
* Well-Drained Soil: Grapes hate soggy feet! Ensure your soil drains well. If you have heavy clay soil, you’ll need to amend it with compost, sand, and other organic matter to improve drainage.
* Air Circulation: Good air circulation helps prevent fungal diseases. Avoid planting grapes in low-lying areas or spots that are sheltered from the wind.
* Variety Selection: Consider your climate and personal preferences. Some grape varieties are better suited for cooler climates, while others thrive in warmer regions. Research disease resistance as well. Some popular and relatively easy-to-grow varieties include:
* Concord: A classic American grape, known for its distinct flavor and hardiness.
* Niagara: A white grape with a sweet, musky flavor, perfect for juice and jams.
* Reliance: A seedless red grape that’s very cold-hardy.
* Thompson Seedless: The most popular table grape, but it requires a warmer climate.
* Mars Seedless: A blue seedless grape that is disease resistant and cold hardy.
Building a Sturdy Trellis: The Backbone of Your Grapevine
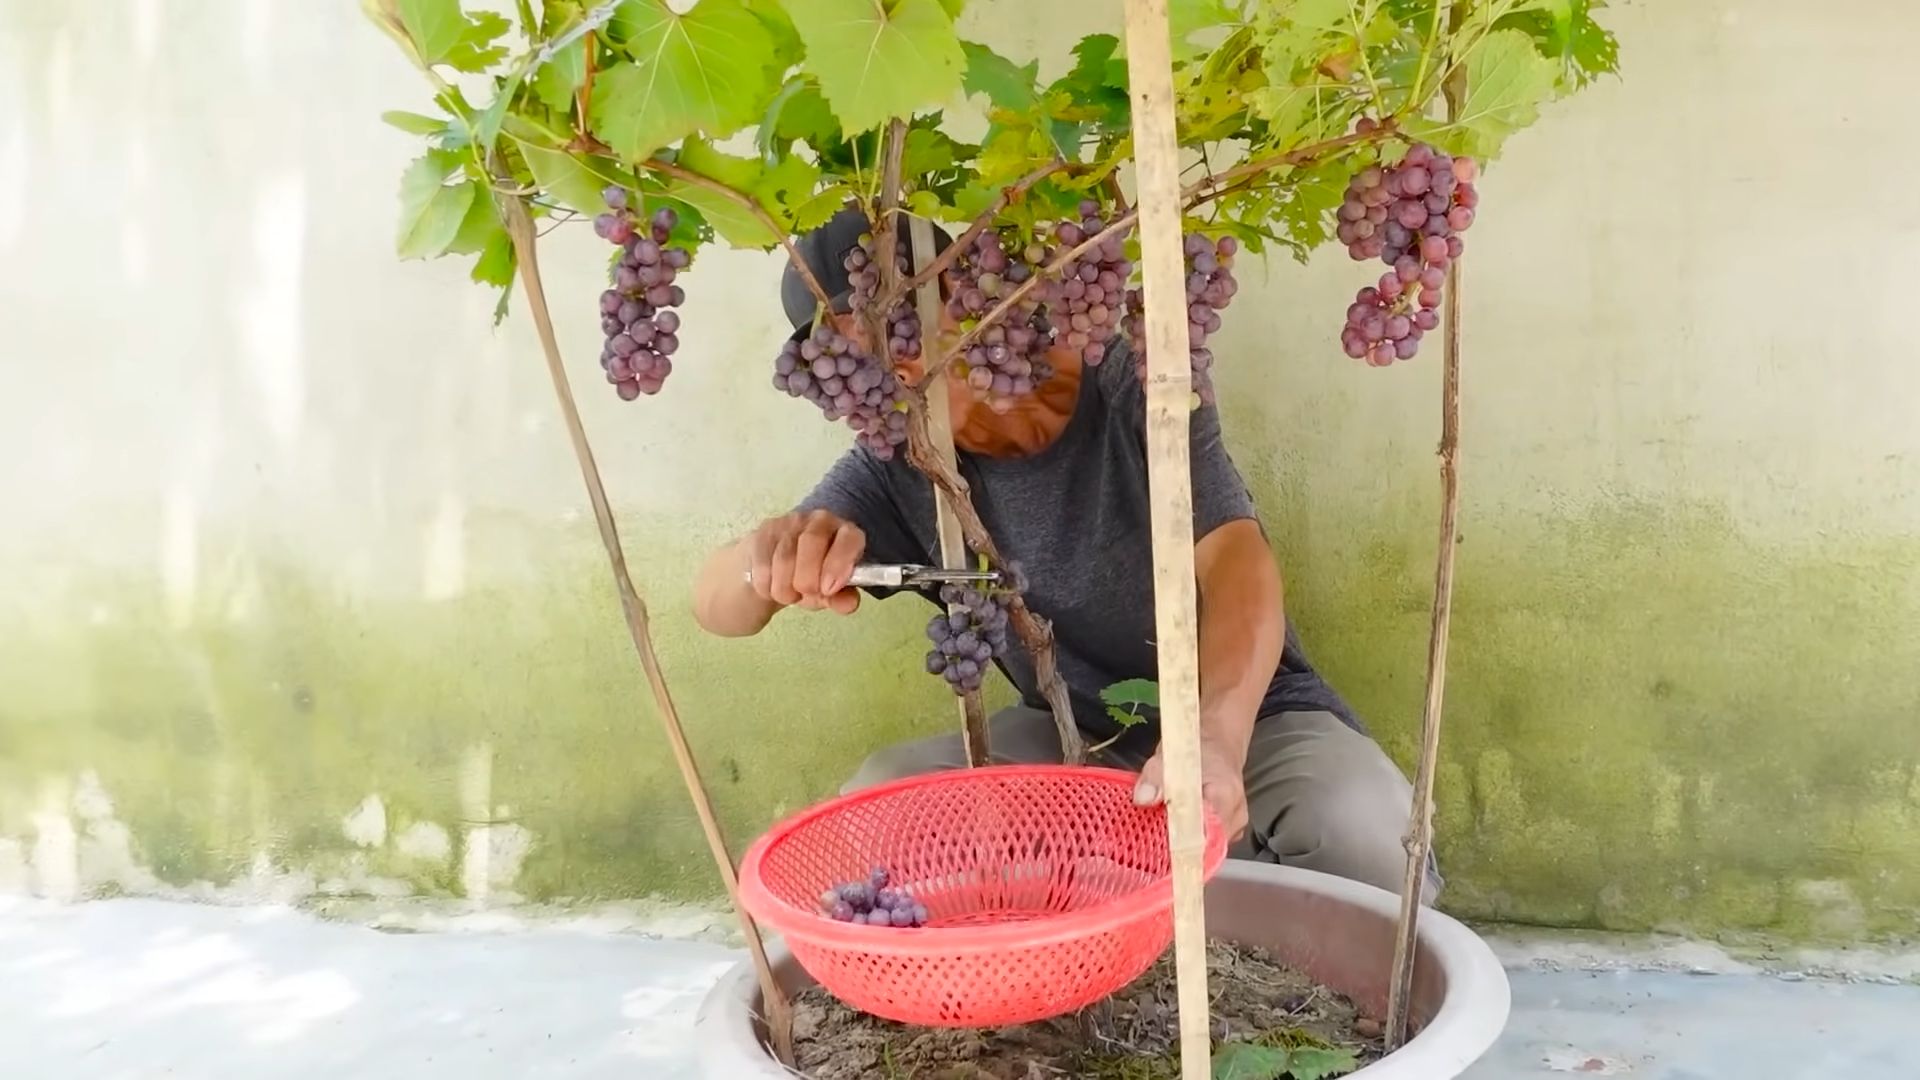
Grapes are vines, and they need a strong support system to climb and thrive. A well-built trellis is essential for proper growth, air circulation, and ease of harvesting. I’m going to show you how to build a simple, yet effective, two-wire trellis.
* Materials You’ll Need:
* Wooden Posts: Use pressure-treated 4×4 or 6×6 posts. The length will depend on the desired height of your trellis (usually 6-8 feet above ground), plus an additional 2-3 feet for burying in the ground.
* Wire: Use 12-gauge galvanized steel wire. This is strong and rust-resistant.
* Wire Tensioners (optional): These make it easier to tighten the wire and keep it taut.
* Concrete Mix: For setting the posts securely in the ground.
* Staples or Wire Clips: To attach the wire to the posts.
* Tools: Post hole digger, level, measuring tape, hammer, wire cutters, pliers, safety glasses, gloves.
Step-by-Step Trellis Construction:
1. Plan Your Layout: Decide how long you want your trellis to be. Space the posts 8-10 feet apart for optimal support. Mark the locations for your posts.
2. Dig the Post Holes: Use a post hole digger to dig holes that are 2-3 feet deep. The diameter of the holes should be wide enough to accommodate the posts and concrete.
3. Set the Posts: Place the posts in the holes. Use a level to ensure they are perfectly vertical.
4. Pour Concrete: Mix the concrete according to the manufacturer’s instructions. Pour the concrete into the holes around the posts, filling them to ground level. Use a trowel to smooth the surface of the concrete.
5. Let the Concrete Cure: Allow the concrete to cure for at least 48-72 hours before proceeding. This will ensure the posts are firmly anchored.
6. Attach the Wire: Once the concrete is cured, it’s time to attach the wire. The first wire should be about 3 feet above the ground, and the second wire should be about 5 feet above the ground.
7. Secure the Wire: Use staples or wire clips to attach the wire to the posts. Make sure the wire is taut. If you’re using wire tensioners, install them now and tighten the wire.
8. Check for Stability: Give the trellis a good shake to make sure it’s sturdy. If any posts are wobbly, you may need to add more concrete or reinforce them with additional supports.
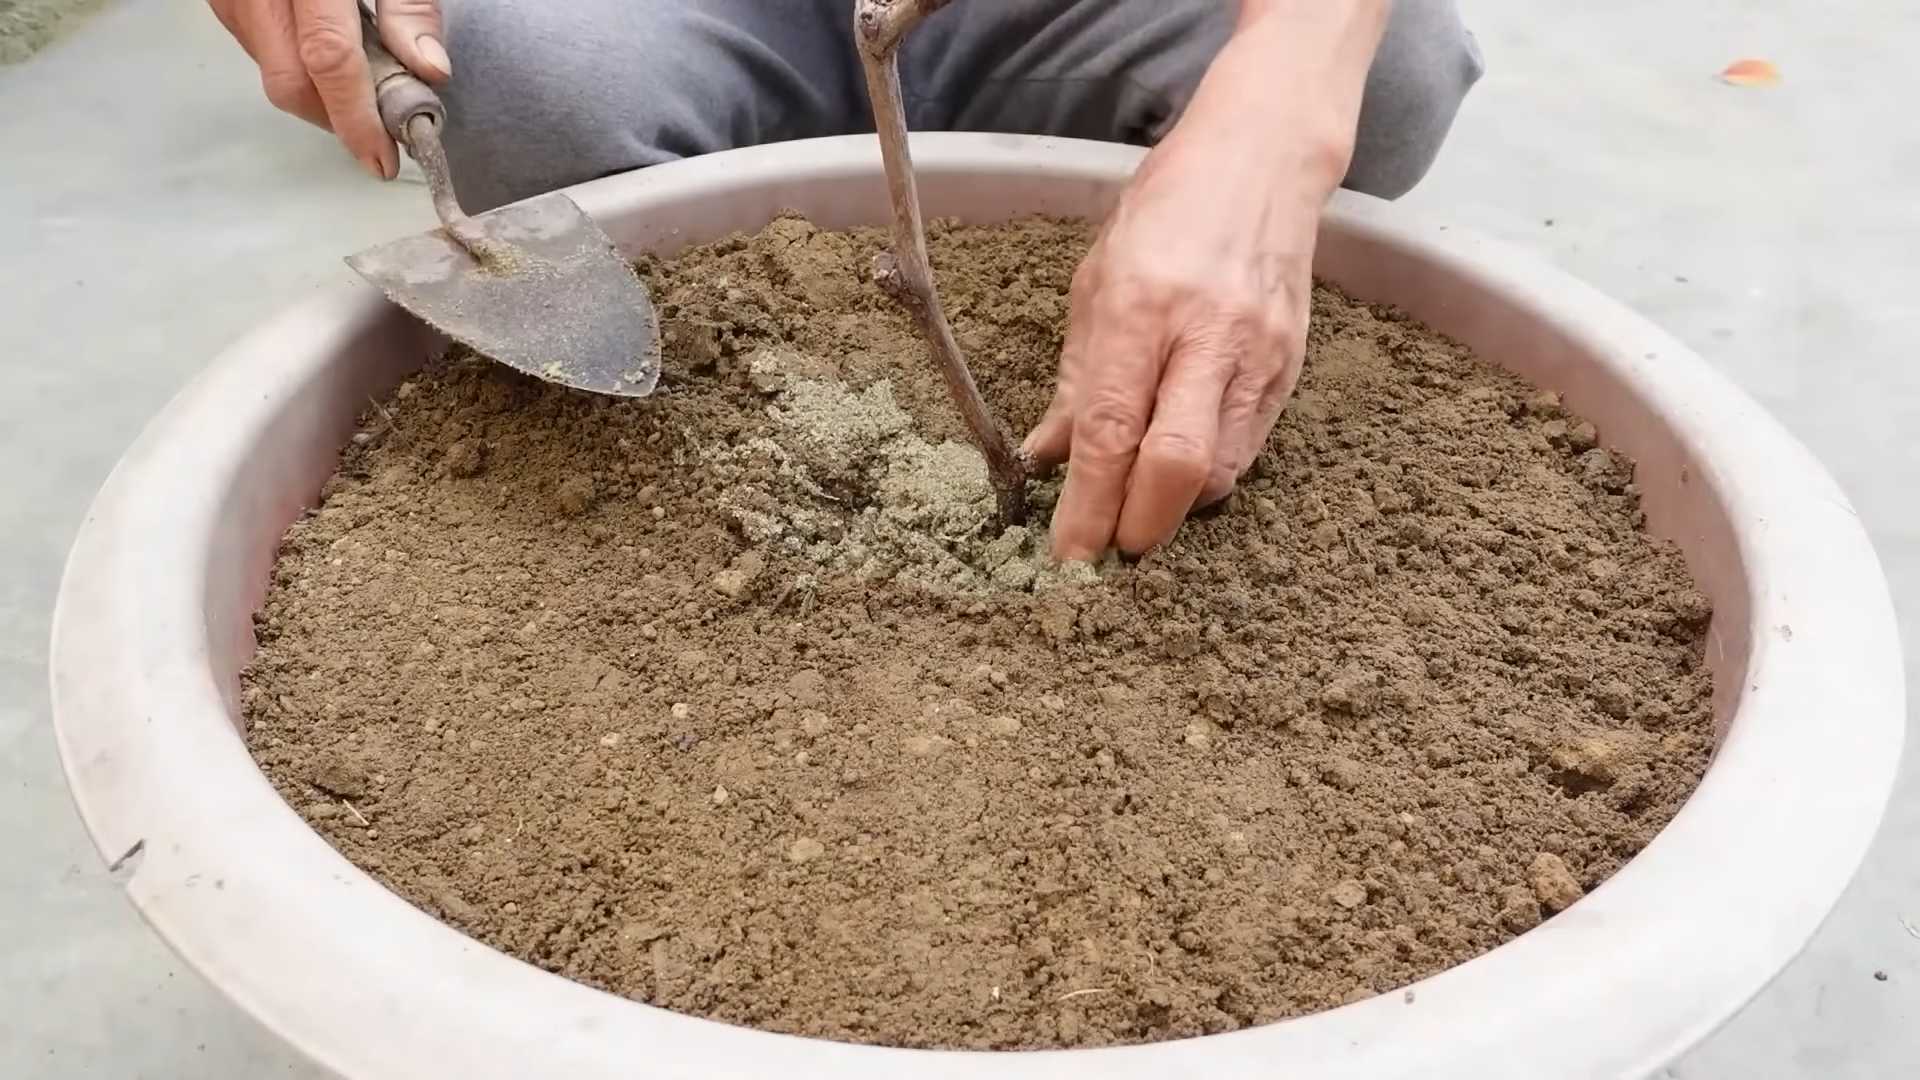
Planting Your Grapevines: Giving Them the Best Start
Now that your trellis is ready, it’s time to plant your grapevines! Proper planting is crucial for establishing healthy, productive vines.
* When to Plant: The best time to plant grapevines is in early spring, after the last frost, or in late fall, before the ground freezes.
* Preparing the Planting Hole: Dig a hole that is twice as wide and just as deep as the root ball of your grapevine.
* Amending the Soil: Mix the soil you removed from the hole with compost and other organic matter. This will improve drainage and provide nutrients for the grapevine.
* Planting the Grapevine: Gently remove the grapevine from its container. Loosen the roots slightly. Place the grapevine in the hole, making sure the top of the root ball is level with the ground.
* Backfilling the Hole: Fill the hole with the amended soil, gently tamping it down as you go.
* Watering: Water the grapevine thoroughly after planting.
* Mulching: Apply a layer of mulch around the base of the grapevine. This will help retain moisture, suppress weeds, and regulate soil temperature.
Step-by-Step Planting Guide:
1. Dig a Hole: Dig a hole that’s twice as wide as the pot your grapevine came in and just as deep.
2. Amend the Soil: Mix the soil you dug out with plenty of compost. Grapes love well-draining, nutrient-rich soil.
3. Remove the Grapevine: Gently take the grapevine out of its pot. Loosen the roots a bit with your fingers.
4. Plant the Grapevine: Place the grapevine in the hole, making sure the top of the root ball is level with the ground.
5. Backfill and Water: Fill the hole with the amended soil, gently patting it down. Water thoroughly.
6. Mulch: Add a layer of mulch around the base of the vine to help retain moisture and suppress weeds.
Training and Pruning: Shaping Your Grapevine for Success
Training and pruning are essential for shaping your grapevine and maximizing fruit production. It might seem intimidating, but with a little practice, you’ll get the hang of it.
* Training: Training refers to guiding the growth of the grapevine onto the trellis. The goal is to establish a strong trunk and cordon (horizontal arms) that will support the fruiting canes.
* Pruning: Pruning involves removing unwanted growth to improve air circulation, sunlight penetration, and fruit quality. It also helps to regulate the number of grapes the vine produces.
First Year Training:
1. Select a Shoot: Choose the strongest, most upright shoot on the grapevine. This will become the main trunk.
2. Tie to a Stake: Tie the selected shoot to a stake or bamboo cane that is placed next to the grapevine. This will help it grow straight and upright.
3. Remove Other Shoots: Remove any other shoots that are growing from the base of the grapevine.
4. Encourage Vertical Growth: As the shoot grows, continue to tie it to the stake, encouraging it to grow vertically.
5. Pinch Back: Once the shoot reaches the first wire of the trellis, pinch back the tip to encourage lateral growth.
Second Year Training:
1. Select Cordons: Choose two strong, healthy shoots that are growing horizontally from the main trunk. These will become the cordons.
2. Tie to the Wire: Tie the cordons to the first wire of the trellis, one on each side of the trunk.
3. Remove Other Shoots: Remove any other shoots that are growing from the trunk or cordons.
4. Encourage Cordon Growth: As the cordons grow, continue to tie them to the wire, encouraging them to grow horizontally.
5. Pinch Back: Once the cordons reach the desired length (usually about half the distance between the posts), pinch back the tips to encourage lateral growth.
Subsequent Years Pruning:
1. Dormant Pruning: Prune
Conclusion
So, there you have it – your very own DIY grape growing system! We’ve walked you through the steps, highlighting the simplicity and cost-effectiveness of creating a thriving vineyard, even in limited spaces. This isn’t just about growing grapes; it’s about connecting with nature, enjoying the fruits (literally!) of your labor, and experiencing the satisfaction of a truly homegrown harvest.
Why is this DIY trick a must-try? Because it democratizes grape growing. Forget the sprawling vineyards and specialized equipment. This system empowers you to cultivate delicious, juicy grapes right in your backyard, on your balcony, or even indoors with the right setup. It’s a sustainable, rewarding, and surprisingly easy way to add a touch of the Mediterranean to your life.
But the beauty of this system lies in its adaptability. Feel free to experiment with different grape varieties. Perhaps you’re a fan of the sweet, seedless table grapes like Thompson Seedless or the robust flavors of Concord grapes for making jams and jellies. Or maybe you’re feeling adventurous and want to try your hand at growing wine grapes like Cabernet Sauvignon or Chardonnay. The choice is yours!
Consider variations to the system itself. If you live in a colder climate, think about incorporating a greenhouse or cold frame to protect your vines during the winter months. You could also explore different trellis designs to optimize sunlight exposure and airflow. For those with limited vertical space, a horizontal espalier system might be the perfect solution.
Don’t be afraid to get creative with your container choices. While we’ve suggested specific sizes, you can adapt them based on the space you have available and the mature size of the grape variety you choose. Just remember to ensure adequate drainage to prevent root rot.
Ultimately, the success of your DIY grape growing system hinges on your dedication and attention to detail. Regular watering, proper fertilization, and diligent pruning are essential for healthy vines and abundant harvests. But trust us, the effort is well worth it when you’re biting into a sun-ripened grape that you grew yourself.
We are confident that this guide will help you embark on your grape-growing journey. We encourage you to try this DIY grape growing system and share your experiences with us! Post photos of your vines, share your tips and tricks, and let us know what grape varieties you’re growing. We’re eager to see your success stories and learn from your experiences. Happy growing!
Frequently Asked Questions (FAQ)
What type of grapes are best for a DIY growing system?
The best type of grapes for a DIY growing system depends on your climate, space, and personal preferences. For beginners, table grapes like Thompson Seedless, Reliance, or Canadice are excellent choices due to their hardiness and ease of cultivation. If you’re interested in winemaking, consider varieties like Pinot Noir (for cooler climates) or Cabernet Sauvignon (for warmer climates), but be aware that these may require more specialized care. Consider your local climate and choose varieties that are known to thrive in your region. Research disease resistance as well, as some varieties are more susceptible to common grape ailments.
How much sunlight do my grape vines need?
Grape vines require at least 6-8 hours of direct sunlight per day to thrive. Sunlight is crucial for photosynthesis, which fuels the growth of the vine and the development of sweet, flavorful grapes. If you’re growing your grapes indoors, supplement natural sunlight with grow lights to ensure they receive adequate illumination. Insufficient sunlight can lead to weak growth, poor fruit production, and increased susceptibility to diseases.
What kind of soil should I use for my grape vines?
Grape vines prefer well-draining soil with a slightly acidic to neutral pH (around 6.0-7.0). A good soil mix would consist of equal parts of garden soil, compost, and perlite or sand. This combination provides the necessary nutrients, drainage, and aeration for healthy root development. Avoid heavy clay soils, as they can retain too much moisture and lead to root rot. You can also purchase pre-mixed potting soil specifically formulated for fruit trees or grape vines.
How often should I water my grape vines?
Watering frequency depends on several factors, including the climate, soil type, and the age of the vine. Generally, young grape vines need more frequent watering than established vines. Water deeply and thoroughly when the top inch of soil feels dry to the touch. Avoid overwatering, as this can lead to root rot. During hot, dry periods, you may need to water more frequently. Mulching around the base of the vine can help retain moisture and reduce the need for frequent watering.
How do I prune my grape vines?
Pruning is essential for maintaining the health and productivity of your grape vines. The best time to prune is during the dormant season (late winter or early spring) before new growth begins. The specific pruning method will depend on the grape variety and the training system you’re using. Generally, you’ll want to remove dead, damaged, or diseased wood, as well as any suckers (shoots growing from the base of the vine). Pruning encourages new growth and helps to improve air circulation and sunlight penetration, which are crucial for fruit production. Research the specific pruning requirements for your grape variety to ensure you’re pruning correctly.
What kind of fertilizer should I use for my grape vines?
Grape vines benefit from regular fertilization, especially during the growing season. Use a balanced fertilizer with an NPK ratio of around 10-10-10 or 12-12-12. Apply fertilizer in early spring before new growth begins and again in early summer after fruit set. Avoid over-fertilizing, as this can lead to excessive vegetative growth at the expense of fruit production. You can also supplement with organic fertilizers like compost or aged manure. Soil testing can help you determine the specific nutrient needs of your soil and adjust your fertilization accordingly.
How do I protect my grape vines from pests and diseases?
Regularly inspect your grape vines for signs of pests or diseases. Common grape pests include aphids, spider mites, and Japanese beetles. Diseases like powdery mildew, downy mildew, and black rot can also affect grape vines. Treat infestations or diseases promptly with appropriate insecticides or fungicides. Choose disease-resistant grape varieties whenever possible. Good air circulation and sunlight penetration can also help prevent disease. Consider using organic pest control methods like neem oil or insecticidal soap.
How long does it take for grape vines to produce fruit?
Grape vines typically take 2-3 years to begin producing fruit. The first year is focused on establishing the root system and developing the vine structure. In the second year, you may see some flowers, but it’s best to remove them to encourage further vegetative growth. In the third year, you can expect to harvest your first crop of grapes. The yield will increase as the vine matures.
Can I grow grapes indoors?
Yes, you can grow grapes indoors, but it requires careful planning and attention to detail. Choose a grape variety that is well-suited for container growing and provide it with plenty of sunlight (or supplemental grow lights). Ensure adequate drainage and use a well-draining potting mix. Prune regularly to maintain the vine’s shape and size. Indoor grape vines may require hand-pollination to ensure fruit set.
What do I do if my grapes don’t taste sweet?
If your grapes aren’t as sweet as you’d like, there are several factors to consider. First, ensure that the grapes are fully ripe before harvesting. Grapes will not continue to ripen after they’re picked. Sunlight is crucial for sugar development, so make sure your vines are receiving adequate sunlight. Proper fertilization and watering can also affect the sweetness of the grapes. Soil testing can help you determine if your soil is lacking any essential nutrients. Finally, some grape varieties are naturally sweeter than others, so choose your variety carefully.
Leave a Comment