
Bay leaf cuttings propagation might sound intimidating, but trust me, it’s a surprisingly rewarding DIY project that can bring the fragrant allure of the Mediterranean right to your backyard! For centuries, bay leaves have been prized not only for their culinary contributions, adding depth and warmth to countless dishes, but also for their symbolic significance, representing victory and honor in ancient Greece and Rome. Imagine having a constant supply of fresh bay leaves, ready to elevate your cooking with their distinctive aroma, all thanks to your own green thumb.
But why bother with propagation when you can just buy bay leaves at the store? Well, for starters, the flavor of homegrown bay leaves is simply unmatched – richer, more vibrant, and undeniably fresher than anything you’ll find dried on a supermarket shelf. Plus, propagating your own bay leaf plant is a fantastic way to save money, expand your garden, and experience the sheer joy of nurturing a plant from a simple cutting. This DIY trick is especially useful if you already have a mature bay leaf plant and want to create more, or if you’ve admired a friend’s plant and want to bring a piece of it home. I’m going to guide you through the process of bay leaf cuttings propagation, making it easy and accessible, even if you’re a beginner gardener. Let’s get started and unlock the secrets to growing your own thriving bay leaf plants!
Propagating Bay Leaf Cuttings: A Gardener’s Guide
Hey there, fellow plant enthusiasts! Ever wanted to have more bay leaf plants without shelling out cash at the nursery? Well, you’re in luck! Propagating bay leaf cuttings is totally doable, and I’m here to walk you through the process step-by-step. It might seem a little intimidating at first, but trust me, with a little patience and the right techniques, you’ll be growing your own bay leaf forest in no time!
What You’ll Need
Before we dive in, let’s gather our supplies. Having everything ready beforehand will make the whole process smoother and more enjoyable. Here’s what you’ll need:
- Healthy Bay Leaf Plant: This is your “mother” plant. Choose one that’s vigorous and free from pests or diseases.
- Sharp, Clean Pruning Shears or Knife: Cleanliness is key to prevent infections. I always sterilize mine with rubbing alcohol.
- Rooting Hormone (Optional but Recommended): This will significantly increase your chances of success. I prefer a powdered rooting hormone.
- Small Pots or Containers: Choose pots with drainage holes. Size depends on the size of your cuttings, but something around 3-4 inches in diameter is usually good.
- Well-Draining Potting Mix: A mix specifically designed for seedlings or cuttings is ideal. You can also make your own by combining equal parts peat moss, perlite, and vermiculite.
- Clear Plastic Bags or a Humidity Dome: These will help create a humid environment, which is crucial for rooting.
- Spray Bottle with Water: For misting the cuttings.
- Warm, Bright Location (Indirect Sunlight): Avoid direct sunlight, which can scorch the cuttings.
Choosing the Right Cuttings
The success of your propagation efforts largely depends on the quality of the cuttings you take. Here’s what to look for:
- Time of Year: The best time to take bay leaf cuttings is typically in late spring or early summer, when the plant is actively growing.
- Type of Cutting: Semi-hardwood cuttings are ideal. These are stems that have started to mature but are not yet fully woody. They should be flexible but not too soft.
- Length of Cutting: Aim for cuttings that are about 4-6 inches long.
- Leaf Nodes: Make sure your cuttings have at least 2-3 leaf nodes (the points where leaves grow from the stem). These are where the roots will emerge.
- Healthy Appearance: Choose stems that are green, healthy, and free from any signs of pests or diseases.
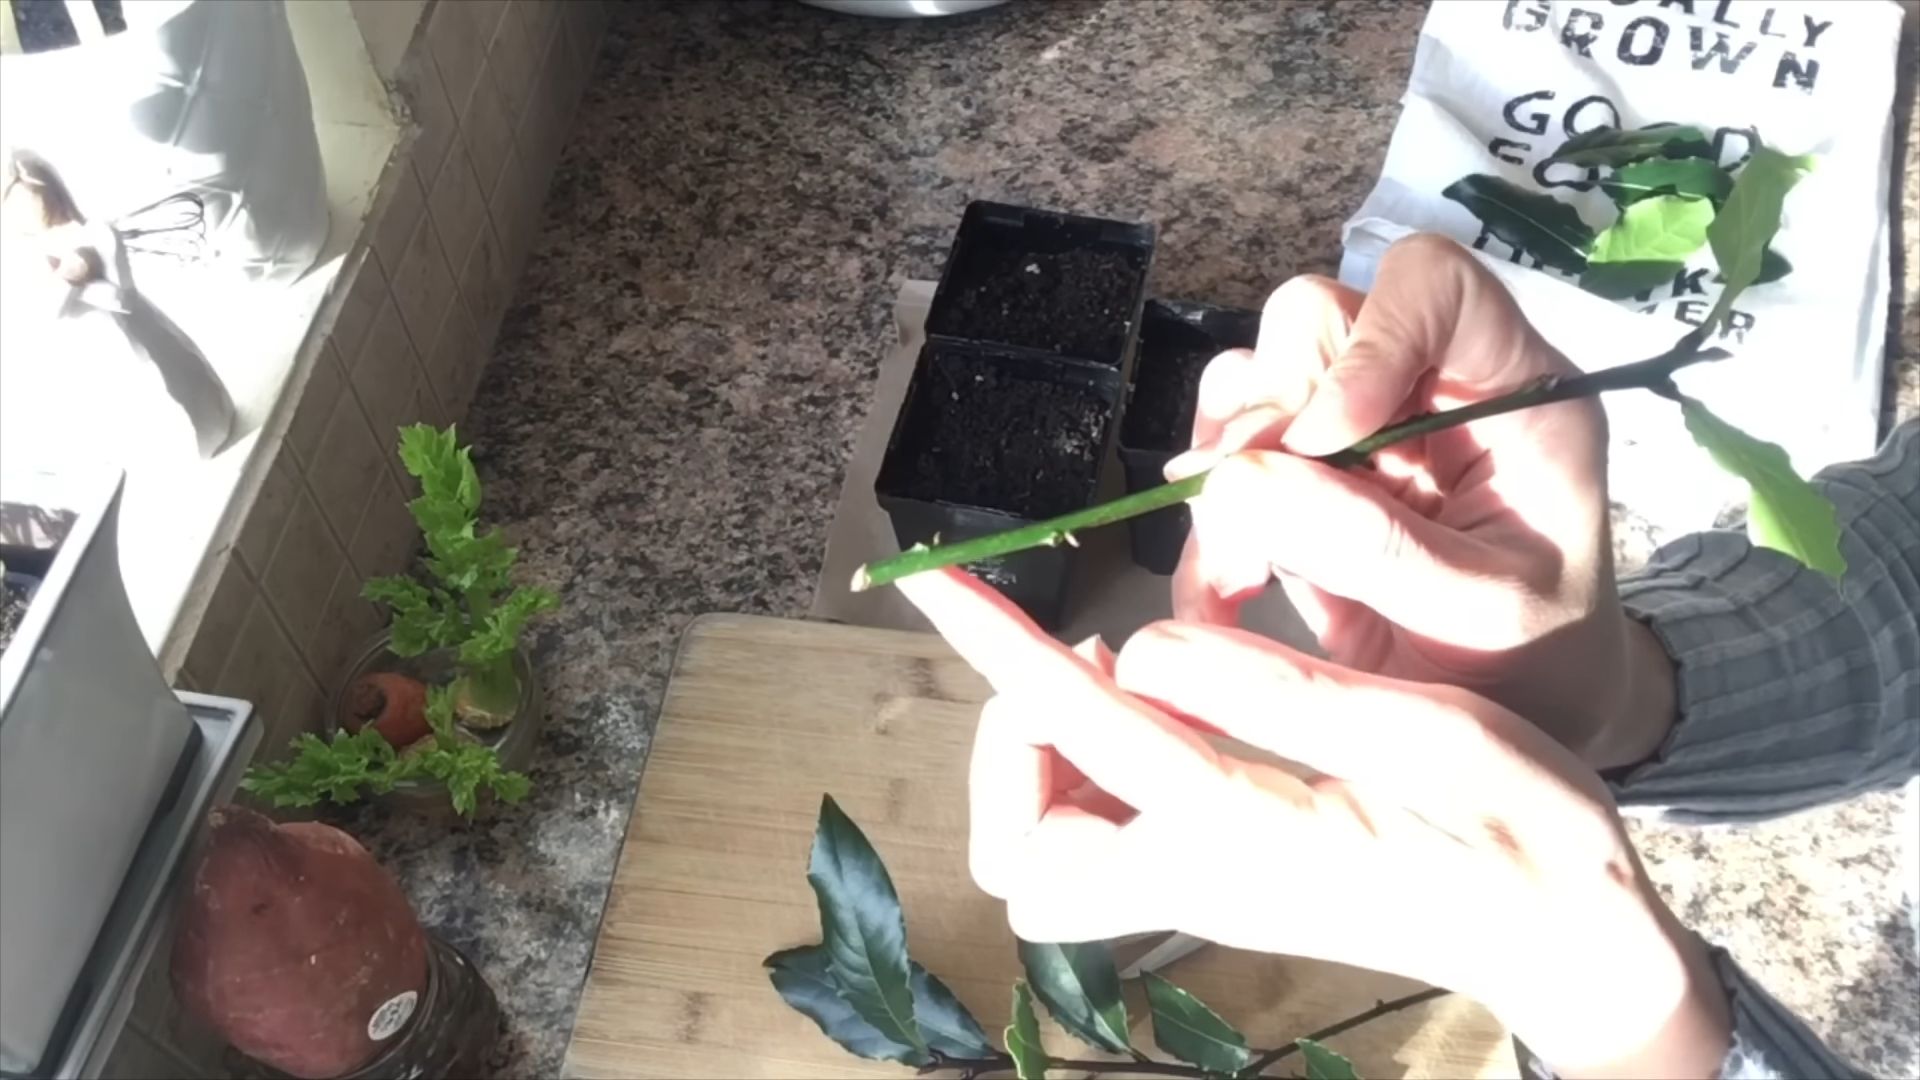
Taking the Cuttings: Step-by-Step
Alright, let’s get to the fun part! Here’s how to take your bay leaf cuttings:
- Prepare Your Tools: Sterilize your pruning shears or knife with rubbing alcohol. This will help prevent the spread of diseases.
- Select a Healthy Stem: Choose a semi-hardwood stem that meets the criteria mentioned above.
- Make the Cut: Using your sterilized shears or knife, make a clean cut at a 45-degree angle just below a leaf node. This angled cut will increase the surface area for root development.
- Remove Lower Leaves: Carefully remove the leaves from the bottom 1-2 inches of the cutting. This will prevent them from rotting in the soil and also encourage root growth.
- Prepare the Cutting (Optional): Some people like to gently scrape the bottom inch of the cutting with a knife to encourage root formation. This is optional, but it can sometimes help.
Rooting Hormone Application
This step is optional, but I highly recommend it. Rooting hormone contains auxins, which are plant hormones that stimulate root growth.
- Moisten the Base: Lightly moisten the bottom inch of the cutting with water. This will help the rooting hormone adhere.
- Dip in Rooting Hormone: Dip the moistened end of the cutting into the rooting hormone powder. Make sure to coat the entire bottom inch.
- Tap Off Excess: Gently tap the cutting to remove any excess rooting hormone. You don’t want to overdo it.
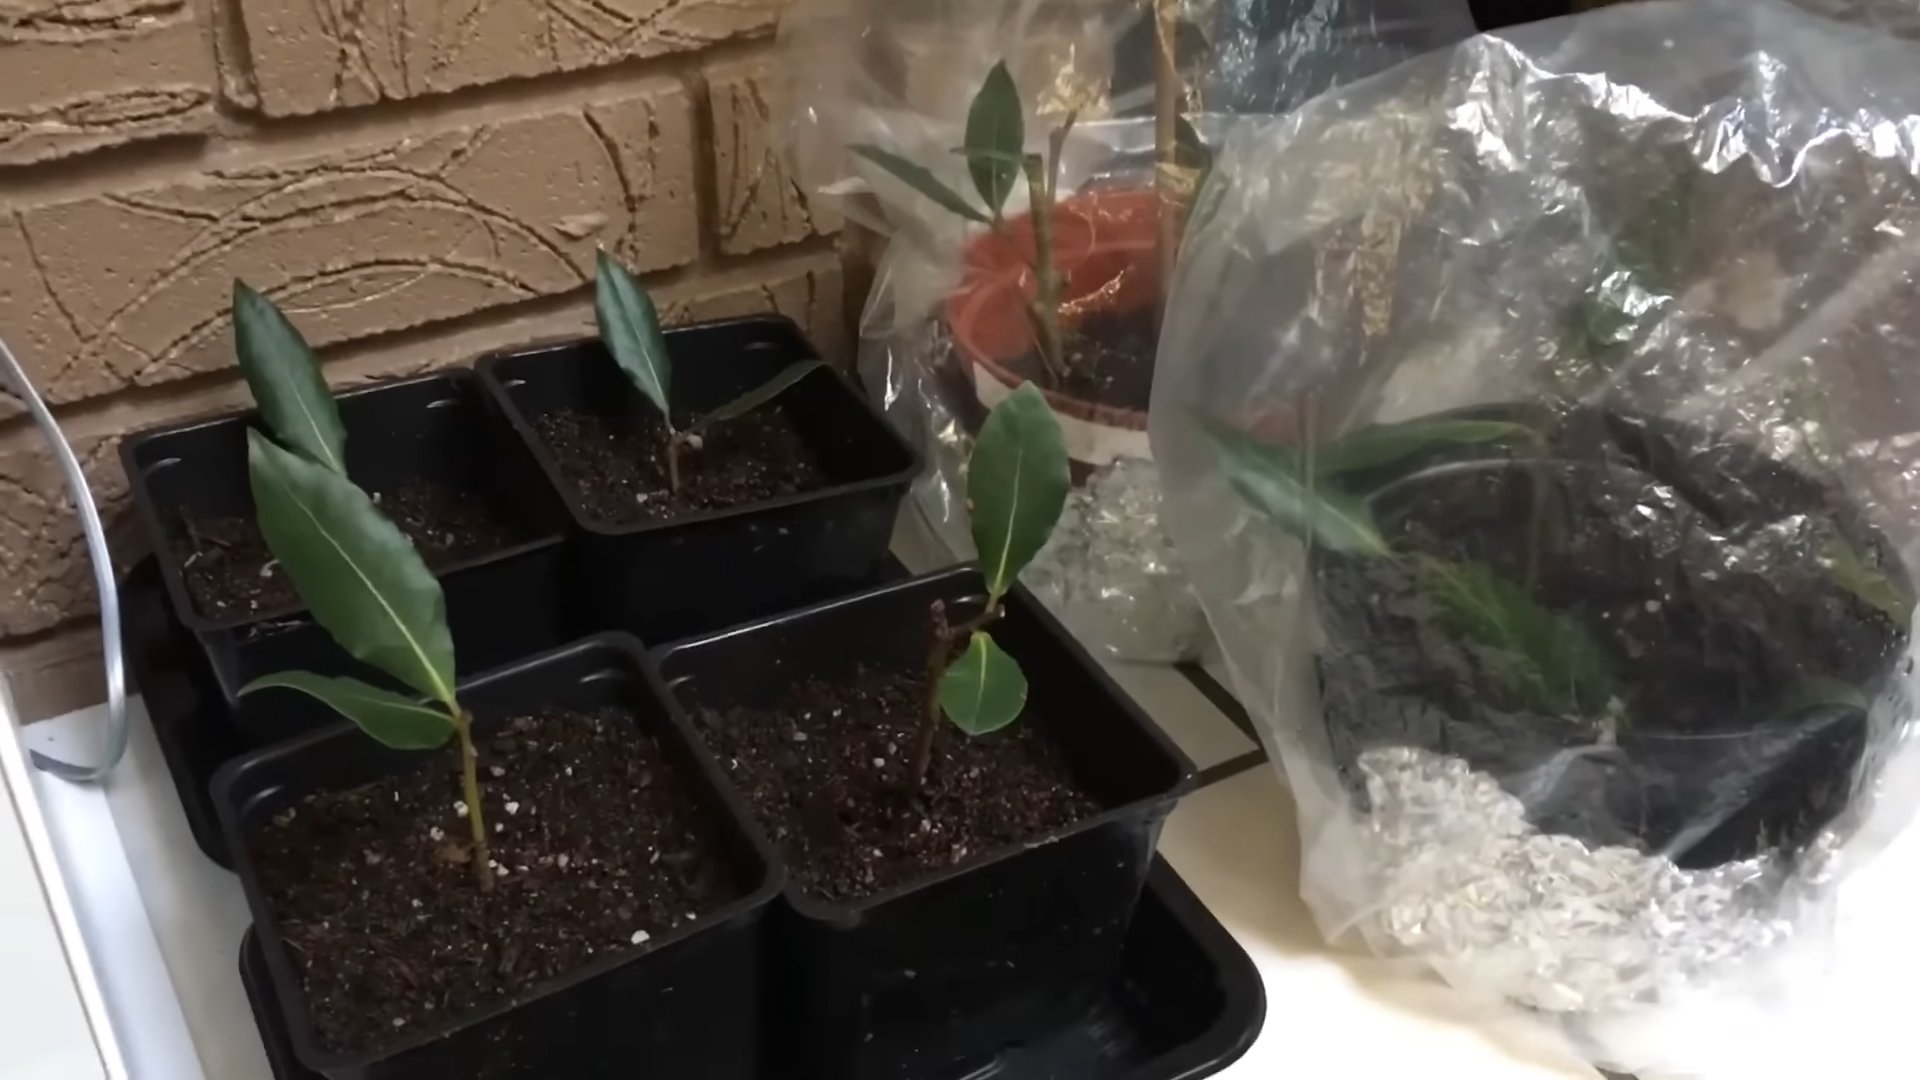
Planting the Cuttings
Now it’s time to get those cuttings into some soil!
- Prepare the Potting Mix: Moisten the potting mix with water until it’s evenly damp but not soggy.
- Fill the Pots: Fill your small pots or containers with the moistened potting mix.
- Make a Hole: Use a pencil or your finger to create a small hole in the center of the potting mix, deep enough to accommodate the bottom inch of the cutting.
- Insert the Cutting: Carefully insert the cutting into the hole, making sure not to rub off the rooting hormone (if you used it).
- Gently Firm the Soil: Gently firm the soil around the base of the cutting to provide support.
- Water Lightly: Water the cutting lightly to settle the soil.
Creating a Humid Environment
Bay leaf cuttings need a humid environment to prevent them from drying out before they can develop roots.
- Cover with Plastic Bag or Humidity Dome: Place a clear plastic bag over the pot, making sure the bag doesn’t touch the leaves. You can use skewers or chopsticks to prop up the bag if needed. Alternatively, you can use a humidity dome.
- Misting: Mist the inside of the bag or dome with water to increase humidity.
Caring for Your Cuttings
This is where patience comes in! Here’s how to care for your bay leaf cuttings while they’re rooting:
- Location: Place the pots in a warm, bright location that receives indirect sunlight. Avoid direct sunlight, which can scorch the cuttings.
- Humidity: Maintain high humidity by keeping the cuttings covered with a plastic bag or humidity dome. Mist the cuttings regularly to keep the humidity up.
- Watering: Keep the potting mix consistently moist but not soggy. Check the moisture level regularly and water when the top inch of soil feels dry.
- Ventilation: Open the plastic bag or humidity dome for a few minutes every day to provide ventilation and prevent the growth of mold or fungus.
- Patience: Rooting can take several weeks or even a few months. Be patient and don’t give up!
Checking for Root Development
After a few weeks, you can start checking for root development. Here’s how:
- Gently Tug: Gently tug on the cutting. If you feel resistance, it means roots have started to form.
- Observe New Growth: Look for new growth on the cutting. This is a good sign that roots have developed.
Transplanting Your Rooted Cuttings
Once your cuttings have developed a good root system, it’s time to transplant them into larger pots.
- Choose a Larger Pot: Select a pot that’s a few inches larger than the current pot.
- Prepare the Potting Mix: Use a well-draining potting mix.
- Gently Remove the Cutting: Carefully remove the rooted cutting from its current pot, being careful not to damage the roots.
- Plant in the New Pot: Place the cutting in the new pot and fill with potting mix.
- Water Thoroughly: Water the newly transplanted cutting thoroughly.
- Care for Your New Plant: Care for your new bay leaf plant as you would any other bay leaf plant. Provide it with plenty of sunlight, water regularly, and fertilize as needed.
Troubleshooting
Sometimes, things don’t go as planned. Here are some common problems you might encounter and how to fix them:
- Cuttings Rotting: This is usually caused by overwatering or poor ventilation. Make sure the potting mix is well-draining and provide adequate ventilation.
- Cuttings Drying Out: This is usually caused by low humidity. Make sure the cuttings are covered with a plastic bag or humidity dome and mist them regularly.
- No Root Development: This can be caused by a variety of factors, including poor cutting quality, lack of rooting hormone, or improper care. Try taking new cuttings from a different part of the plant, using rooting hormone, and providing better care.
And that’s it! You’ve successfully propagated bay leaf cuttings. With a little patience and care, you’ll have a thriving bay leaf garden in no time. Happy gardening
Conclusion
So, there you have it! Propagating bay leaf cuttings might seem daunting at first, but with a little patience and the right approach, you can successfully cultivate your own thriving bay leaf plant. This DIY trick isn’t just about saving money; it’s about connecting with nature, understanding the life cycle of plants, and enjoying the satisfaction of nurturing something from a simple cutting into a flourishing herb. Imagine the pride you’ll feel when you’re seasoning your favorite dishes with bay leaves harvested from a plant you propagated yourself!
This method is a must-try for several reasons. Firstly, it’s a sustainable way to expand your herb garden without relying on commercially grown plants, which often come with a hefty price tag and potentially harmful pesticides. Secondly, it allows you to clone a specific bay leaf plant that you particularly admire – perhaps one with exceptional flavor or resilience. Finally, it’s a fantastic learning experience that will deepen your appreciation for the natural world.
Don’t be afraid to experiment with variations! Some gardeners have found success using different rooting hormones or varying the humidity levels during the propagation process. You could also try propagating bay leaf cuttings in different types of growing mediums, such as perlite or vermiculite, to see which works best for you. Another interesting variation is to try propagating semi-hardwood cuttings taken in late summer, as these may root more readily than softwood cuttings taken in spring. Remember to keep detailed notes on your experiments so you can refine your technique over time.
We wholeheartedly encourage you to give this bay leaf cuttings propagation method a try. It’s a rewarding and cost-effective way to expand your herb garden and enjoy the fresh, aromatic flavor of homegrown bay leaves. Once you’ve successfully propagated your own bay leaf plant, we’d love to hear about your experience! Share your tips, tricks, and any challenges you encountered in the comments below. Your insights could help other aspiring gardeners embark on their own propagation journey. Happy gardening!
Frequently Asked Questions (FAQs)
Q: What is the best time of year to propagate bay leaf cuttings?
A: The ideal time to propagate bay leaf cuttings is typically in late spring or early summer. This is when the plant is actively growing and the cuttings are more likely to root successfully. However, you can also attempt propagation in late summer using semi-hardwood cuttings. Avoid taking cuttings during the dormant winter months.
Q: What type of bay leaf cutting should I use?
A: The best type of bay leaf cutting to use is a softwood cutting, which is a new growth that is still flexible and green. Look for stems that are about 4-6 inches long and have several leaves. Avoid using woody or overly mature stems, as they are less likely to root. Semi-hardwood cuttings, taken in late summer from partially matured growth, can also be used.
Q: Do I need to use rooting hormone?
A: While not strictly necessary, using rooting hormone can significantly increase the success rate of bay leaf cuttings propagation. Rooting hormone contains auxins, which are plant hormones that stimulate root development. Dip the cut end of the cutting in rooting hormone powder or liquid before planting it in the rooting medium.
Q: What is the best rooting medium for bay leaf cuttings?
A: A well-draining rooting medium is essential for successful bay leaf cuttings propagation. A mixture of perlite and vermiculite is a popular choice, as it provides good aeration and moisture retention. You can also use a mixture of peat moss and sand, or a commercially available seed starting mix. Avoid using garden soil, as it can be too heavy and may contain pathogens.
Q: How often should I water the cuttings?
A: Keep the rooting medium consistently moist, but not waterlogged. Water the cuttings whenever the top inch of the medium feels dry to the touch. Avoid overwatering, as this can lead to root rot. It’s also helpful to mist the cuttings regularly to maintain high humidity.
Q: How much light do the cuttings need?
A: Bay leaf cuttings need bright, indirect light to root successfully. Avoid placing them in direct sunlight, as this can scorch the leaves. A north- or east-facing window is a good option. You can also use a grow light to provide supplemental lighting.
Q: How long does it take for bay leaf cuttings to root?
A: It typically takes 4-8 weeks for bay leaf cuttings to root. Be patient and continue to provide consistent moisture and humidity. You can check for root development by gently tugging on the cutting. If it resists, it has likely rooted.
Q: How do I know if my bay leaf cutting has rooted?
A: The most reliable way to tell if a bay leaf cutting has rooted is to gently tug on it. If you feel resistance, it means that roots have formed and are anchoring the cutting in the rooting medium. You may also see new growth emerging from the cutting.
Q: What do I do after the cuttings have rooted?
A: Once the cuttings have rooted, you can transplant them into individual pots filled with a well-draining potting mix. Gradually acclimate the young plants to outdoor conditions before planting them in the garden. Choose a location that receives full sun to partial shade and has well-drained soil.
Q: Can I propagate bay leaf cuttings in water?
A: While it is possible to propagate bay leaf cuttings in water, it is generally less successful than using a rooting medium. Cuttings rooted in water tend to develop weaker roots that are more susceptible to transplant shock. If you choose to propagate in water, change the water every few days and add a rooting hormone to the water.
Q: What are some common problems when propagating bay leaf cuttings?
A: Some common problems when propagating bay leaf cuttings include root rot, fungal diseases, and pest infestations. To prevent these problems, use a sterile rooting medium, avoid overwatering, and provide good air circulation. Inspect the cuttings regularly for signs of pests or diseases and treat them promptly if necessary.
Q: My bay leaf cuttings are wilting. What should I do?
A: Wilting is a common problem when propagating bay leaf cuttings, especially in the early stages. It is usually caused by a lack of humidity. To prevent wilting, mist the cuttings regularly and cover them with a plastic bag or humidity dome to create a humid environment.
Q: Can I use bay leaves from a grocery store to propagate?
A: Unfortunately, no. The dried bay leaves you purchase from the grocery store are not viable for propagation. You need fresh cuttings from a living bay leaf plant.
Q: What size pot should I use when transplanting the rooted cutting?
A: Start with a small pot, around 4-6 inches in diameter. This will allow the roots to establish themselves without being overwhelmed by too much soil. As the plant grows, you can gradually transplant it into larger pots.
Q: How often should I fertilize my new bay leaf plant?
A: Fertilize your new bay leaf plant sparingly. Once the plant is established in its pot, you can fertilize it every 2-3 months with a balanced liquid fertilizer diluted to half strength. Avoid over-fertilizing, as this can damage the roots.
Q: Can I grow bay leaf in a container?
A: Yes, bay leaf plants are well-suited to container growing. Choose a large pot with good drainage and use a well-draining potting mix. Container-grown bay leaf plants will need to be watered more frequently than those grown in the ground.
Q: How do I protect my bay leaf plant from frost?
A: Bay leaf plants are relatively hardy, but they can be damaged by frost. If you live in an area with cold winters, it’s best to grow your bay leaf plant in a container so you can bring it indoors during the winter months. If you have a bay leaf plant growing in the ground, you can protect it from frost by covering it with a blanket or burlap sack.
Q: How do I harvest bay leaves from my plant?
A: You can harvest bay leaves from your plant at any time of year. Simply snip off the leaves with scissors or pruning shears. Fresh bay leaves have a stronger flavor than dried bay leaves.
Q: Are bay leaves poisonous?
A: Fresh bay leaves are not poisonous, but they are very tough and difficult to digest. It’s best to remove them from dishes before serving. Dried bay leaves are safe to eat, but they should also be removed from dishes before serving.

Leave a Comment