
Bitter Gourd Trellis DIY: Ready to ditch the sprawling vines and embrace a vertical garden bursting with healthy, homegrown bitter gourds? I know I was! For generations, cultivating bitter gourd has been a staple in many Asian and African cuisines, prized for its unique flavor and medicinal properties. But let’s be honest, those sprawling vines can quickly take over your garden, becoming a tangled mess. That’s where a well-constructed trellis comes in – and I’m here to show you how to build one yourself!
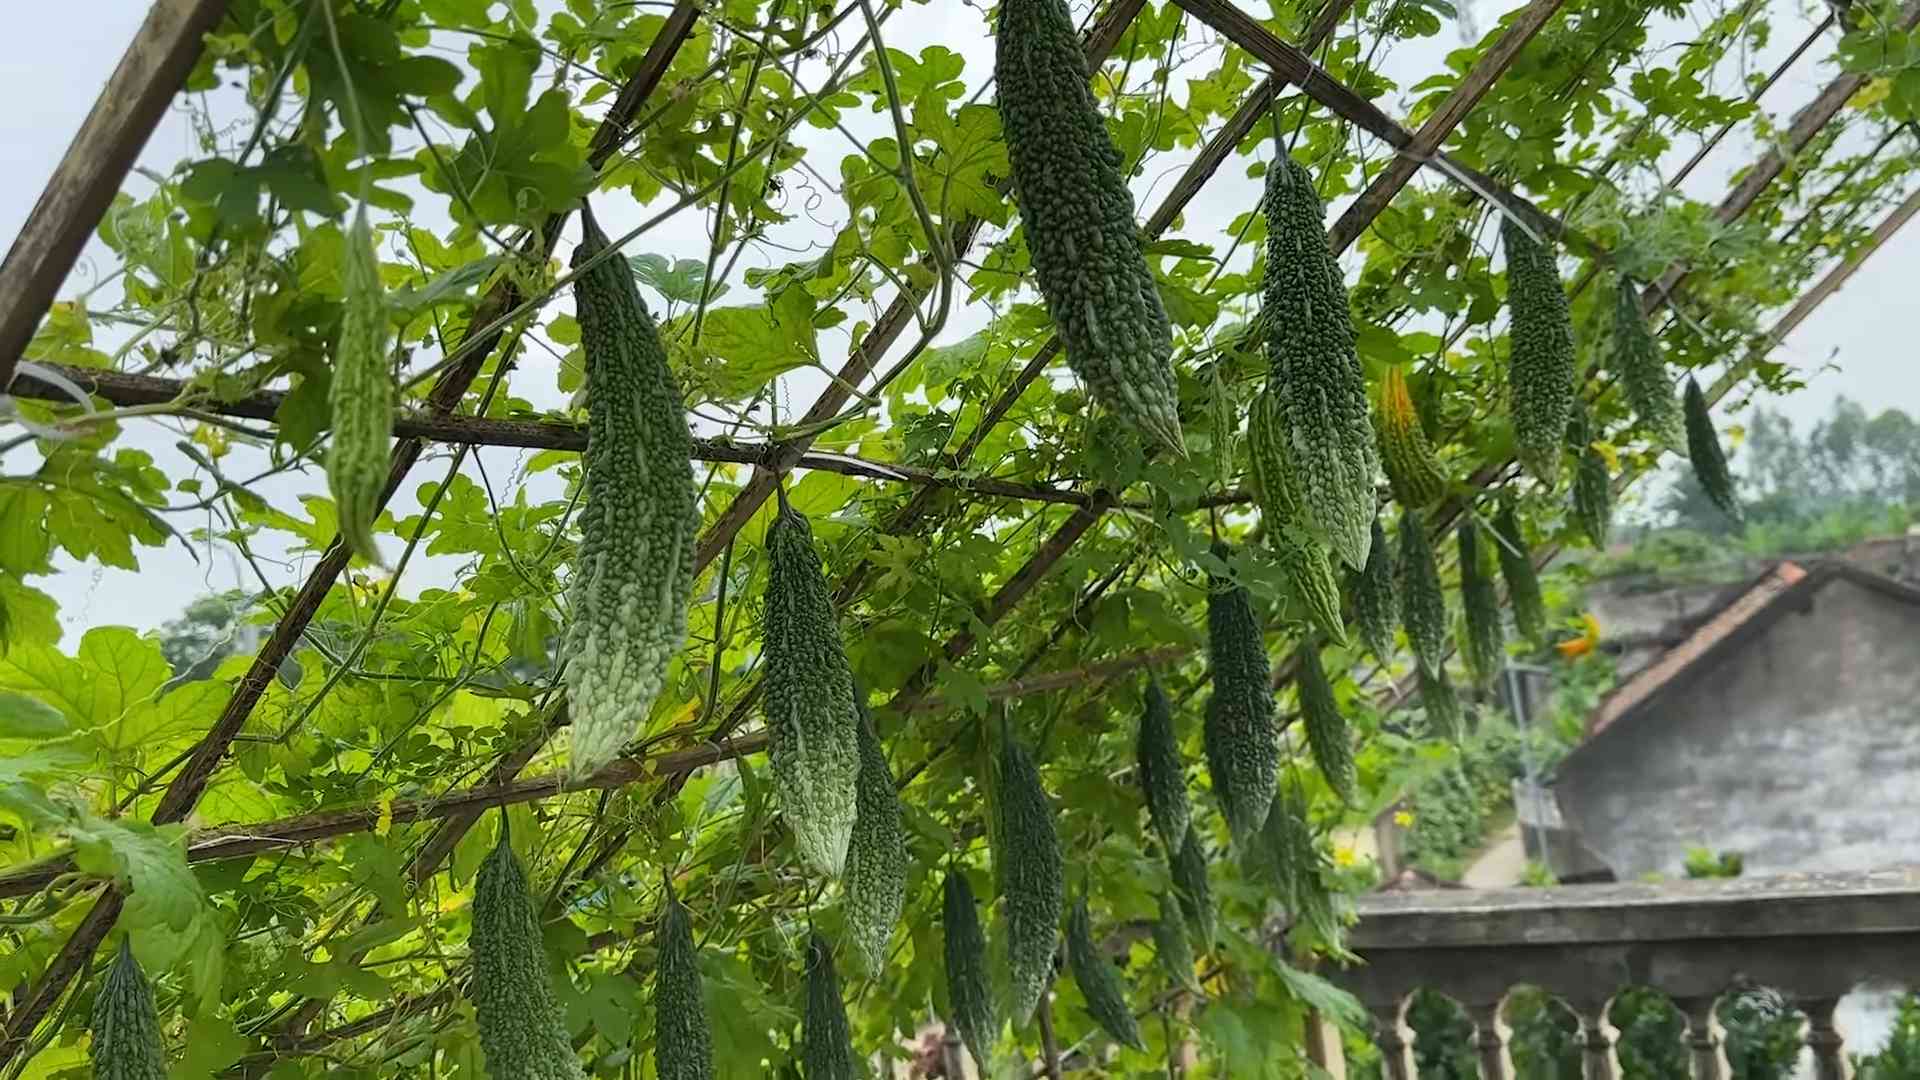
Building your own bitter gourd trellis isn’t just about aesthetics; it’s about maximizing your yield, improving air circulation to prevent diseases, and making harvesting a breeze. Imagine plucking perfectly formed bitter gourds, hanging gracefully from your DIY creation. No more searching through dense foliage or risking damage to the fruits. Plus, a vertical trellis adds a touch of elegance to your garden, transforming it into a productive and visually appealing space.
This article is your ultimate guide to creating a sturdy and effective bitter gourd trellis DIY project, even if you’re a complete beginner. We’ll cover everything from choosing the right materials to step-by-step instructions, ensuring you have all the knowledge you need to succeed. So, grab your tools, and let’s get started on this rewarding gardening adventure! I promise, you’ll be amazed at the difference a simple trellis can make.
DIY Bitter Gourd Trellis: A Bountiful Harvest Awaits!
Hey there, fellow gardeners! Are you ready to take your bitter gourd game to the next level? I’m talking about a vertical explosion of healthy, homegrown goodness! Forget those sprawling vines taking over your garden; we’re building a trellis! And trust me, it’s easier than you think. This DIY bitter gourd trellis will not only support your plants but also make harvesting a breeze and add a touch of rustic charm to your garden. Let’s get started!
Materials You’ll Need
Before we dive in, let’s gather our supplies. Don’t worry, you probably have some of this stuff lying around already!
* Bamboo Poles or Wooden Stakes: I recommend at least 6-8 feet long. The number you need depends on the size of your trellis. I’m using 6 for a roughly 4ft x 8ft trellis.
* Twine or Jute Rope: Natural fibers are best, as they’re biodegradable and won’t harm the environment. You’ll need a good amount – at least 50 feet.
* Wire (Optional): For extra stability, especially if you’re using thicker bamboo.
* Wire Cutters (If using wire): Safety first!
* Gloves: Protect those hands!
* Measuring Tape: Accuracy is key!
* Scissors or Knife: For cutting the twine.
* Hammer or Mallet (Optional): To help drive the stakes into the ground.
* Level (Optional): If you’re a perfectionist like me!
Planning Your Trellis Design
Okay, before we start hammering and tying, let’s think about the design. This is where you can get creative! Here are a few options:
* A-Frame Trellis: This is a classic and sturdy design, perfect for heavier crops.
* Arched Trellis: Adds a touch of elegance to your garden.
* Flat Trellis: Simple and effective, ideal for smaller spaces.
* Teepee Trellis: A fun and whimsical option, especially great for kids’ gardens.
For this guide, I’m going with a simple flat trellis. It’s easy to build and provides ample support for my bitter gourd vines. I’m aiming for a rectangular shape, roughly 4 feet wide and 8 feet tall.
Building the Trellis: Step-by-Step
Alright, let’s get our hands dirty!
1. Preparing the Ground
* Choose your location: Select a sunny spot in your garden where your bitter gourd plants will thrive. Make sure the soil is well-draining.
* Clear the area: Remove any weeds, rocks, or debris that might get in the way.
* Mark the corners: Use your measuring tape to mark the four corners of your trellis. This will help you visualize the final product.
2. Setting the Corner Posts
* Drive in the corner posts: Take your four longest bamboo poles or wooden stakes and drive them firmly into the ground at each corner. Aim for at least 1-2 feet deep for stability. Use a hammer or mallet if needed.
* Ensure they’re sturdy: Give each post a good wiggle to make sure it’s secure. If it feels loose, drive it in further or add some extra support.
* Check for level (Optional): Use a level to ensure the posts are straight. This is mostly for aesthetics, but it can also help with stability.
3. Adding the Horizontal Supports
* Measure and cut the horizontal supports: Measure the distance between the corner posts along the top and bottom of the trellis. Cut two bamboo poles or wooden stakes to these lengths.
* Attach the top support: Position one of the horizontal supports across the top of the corner posts. Use twine or wire to securely tie it in place. I like to use a figure-eight knot for extra strength.
* Attach the bottom support: Repeat the process for the bottom horizontal support. Make sure it’s parallel to the top support.
4. Creating the Vertical Grid
This is where the magic happens! We’re going to create a grid pattern that the bitter gourd vines can climb.
* Measure and cut the vertical supports: Measure the distance between the top and bottom horizontal supports. Cut several bamboo poles or wooden stakes to this length. The number you need will depend on how dense you want your grid to be. I’m using about 6 vertical supports for my trellis.
* Attach the vertical supports: Evenly space the vertical supports between the horizontal supports. Use twine or wire to securely tie them in place. Again, a figure-eight knot works great.
* Ensure even spacing: Take a step back and eyeball the grid. Make sure the vertical supports are evenly spaced and that the grid looks balanced.
5. Reinforcing the Trellis (Optional)
For extra stability, especially if you’re expecting heavy winds or a particularly bountiful harvest, you can add some diagonal supports.
* Measure and cut the diagonal supports: Measure the distance between opposite corners of the trellis. Cut two bamboo poles or wooden stakes to this length.
* Attach the diagonal supports: Position the diagonal supports across the corners of the trellis. Use twine or wire to securely tie them in place.
6. Adding the Climbing Twine
This is what the bitter gourd vines will actually climb on!
* Tie the twine to the bottom support: Securely tie one end of the twine to the bottom horizontal support.
* Weave the twine vertically: Weave the twine up and down between the vertical supports, creating a ladder-like structure.
* Tie the twine to the top support: Securely tie the other end of the twine to the top horizontal support.
* Repeat the process: Repeat this process, spacing the vertical twine lines about 6-8 inches apart. The closer the lines, the easier it will be for the vines to climb.
* Add horizontal twine (Optional): For even more support, you can also weave twine horizontally between the vertical lines.
Planting Your Bitter Gourd
Now that your trellis is built, it’s time to plant your bitter gourd!
* Prepare the soil: Make sure the soil around the base of the trellis is loose and well-draining. Add some compost or other organic matter to enrich the soil.
* Plant the seeds or seedlings: Follow the instructions on your seed packet or seedling label. Generally, you’ll want to plant the seeds or seedlings a few inches away from the base of the trellis.
* Water thoroughly: Water the plants thoroughly after planting.
* Guide the vines: As the bitter gourd vines grow, gently guide them towards the trellis. You can use small pieces of twine to tie them to the trellis if needed.
Maintenance and Care
* Water regularly: Bitter gourd needs consistent moisture, especially during hot weather.
* Fertilize as needed: Use a balanced fertilizer to promote healthy growth and fruit production.
* Prune the vines: Pruning can help to encourage branching and fruit production. Remove any dead or diseased leaves.
* Watch for pests and diseases: Keep an eye out for common garden pests and diseases. Treat them promptly to prevent them from spreading.
Harvesting Your Bitter Gourd
The moment you’ve been waiting for!
* Harvest when mature: Bitter gourd is typically ready to harvest about 2-3 months after planting. The fruits should be firm and green.
* Use a sharp knife: Cut the bitter gourd from the vine using a sharp knife.
* Enjoy your harvest! Bitter gourd can be used in a variety of dishes. It’s a popular ingredient in Asian cuisine.
Tips and Tricks for Success
* Choose the right variety: There are many different varieties of bitter gourd available. Choose one that is well-suited to your climate and growing conditions.
* Start seeds indoors: Starting seeds indoors can give your bitter gourd plants a head start.
* Provide support early: The sooner you provide support for the vines, the better. This will help them to climb more easily and prevent them from sprawling on the ground.
* Be patient: Bitter gourd can take some time to mature. Don’t get discouraged if you don’t see results right away.
* Enjoy the process! Gardening is a rewarding hobby. Take your time, enjoy the process, and don’t be afraid to experiment.
And there you have it! Your very own DIY bitter gourd trellis. I hope this guide has been helpful. Now go forth and grow some delicious bitter gourd! Happy gardening!

Conclusion
So, there you have it! Building your own bitter gourd trellis isn’t just a cost-effective solution; it’s an empowering way to take control of your garden’s design and maximize your yield. Forget those flimsy, store-bought supports that buckle under the weight of a thriving vine. This DIY approach allows you to create a sturdy, customized structure perfectly suited to your space and the vigorous growth of your bitter gourd.
Think about the satisfaction of harvesting plump, healthy bitter gourds from a trellis you built with your own two hands. Imagine the envy of your gardening neighbors as they admire your flourishing vine, gracefully climbing its custom-made support. This isn’t just about growing vegetables; it’s about creating a beautiful and productive garden ecosystem.
But the benefits extend beyond aesthetics and yield. A well-constructed trellis improves air circulation around the plant, reducing the risk of fungal diseases that can plague bitter gourd. It also makes harvesting easier, preventing the gourds from rotting on the ground and allowing them to ripen evenly in the sunlight.
Don’t be afraid to get creative with your design! Consider variations like using bamboo poles for a rustic look, repurposing old metal fencing for a sustainable option, or even building an A-frame trellis for a more dramatic effect. You could also incorporate companion planting around the base of the trellis, attracting beneficial insects and further enhancing your garden’s biodiversity. Marigolds, basil, and nasturtiums are excellent choices for deterring pests and adding a splash of color.
This DIY bitter gourd trellis project is more than just a weekend activity; it’s an investment in your garden’s future. It’s a chance to connect with nature, learn new skills, and enjoy the fruits (or rather, vegetables) of your labor. We are confident that this project will not only improve your bitter gourd harvest but also enhance your overall gardening experience.
We urge you to give this DIY bitter gourd trellis a try. It’s simpler than you might think, and the rewards are well worth the effort. Once you’ve built your trellis and your bitter gourd is thriving, we’d love to hear about your experience! Share your photos, tips, and any variations you’ve tried in the comments below. Let’s build a community of passionate gardeners, sharing our knowledge and inspiring each other to grow the best bitter gourds possible! Happy gardening!
Frequently Asked Questions (FAQ)
What is the best material to use for a bitter gourd trellis?
The “best” material really depends on your budget, aesthetic preferences, and the resources available to you. Wood, bamboo, and metal are all excellent choices. Wood is readily available and relatively inexpensive, but it will eventually rot and need replacing. Bamboo is a sustainable and attractive option, but it may not be as strong as wood or metal. Metal is the most durable option, but it can also be the most expensive. Consider using repurposed materials like old fencing or metal pipes to save money and reduce waste. The key is to choose a material that is strong enough to support the weight of the mature bitter gourd vine and its fruits, and that will withstand the elements in your climate.
How tall should my bitter gourd trellis be?
The ideal height for your bitter gourd trellis depends on the variety of bitter gourd you are growing. Some varieties are more compact, while others can grow quite long. As a general rule, aim for a trellis that is at least 6-8 feet tall. This will provide ample space for the vine to climb and spread out. If you are growing a particularly vigorous variety, you may need to build a taller trellis. It’s always better to err on the side of caution and provide more space than you think you’ll need.
How far apart should I space the supports for my bitter gourd trellis?
The spacing of the supports will depend on the material you are using and the overall design of your trellis. If you are using wood or bamboo poles, space them about 2-3 feet apart. If you are using wire or netting, you can space the supports further apart, but make sure the wire or netting is taut and securely attached to the supports. The goal is to create a sturdy and stable structure that can withstand the weight of the vine and the wind.
How do I train my bitter gourd vine to climb the trellis?
Bitter gourd vines have tendrils that will naturally cling to the trellis. However, you may need to help them get started, especially when they are young. Gently guide the tendrils towards the trellis and tie them loosely with twine or plant ties. As the vine grows, continue to guide it along the trellis, ensuring that it is evenly distributed. Avoid overcrowding the vine in one area, as this can restrict airflow and increase the risk of disease.
What if my bitter gourd isn’t climbing the trellis?
If your bitter gourd vine isn’t climbing the trellis on its own, there are a few things you can try. First, make sure the trellis is close enough to the vine so that the tendrils can easily reach it. Second, check that the tendrils are not being blocked by leaves or other obstacles. Third, try gently tying the tendrils to the trellis with twine or plant ties. Finally, ensure that the vine is getting enough sunlight and water. A healthy and vigorous vine is more likely to climb the trellis on its own.
Can I grow bitter gourd in a container with a trellis?
Yes, you can definitely grow bitter gourd in a container with a trellis. Choose a large container, at least 18-24 inches in diameter, to provide enough space for the roots to grow. Use a well-draining potting mix and provide regular watering and fertilization. A smaller, more manageable trellis can be constructed to fit the container. Container-grown bitter gourd may require more frequent watering and fertilization than those grown in the ground.
How do I protect my bitter gourd from pests and diseases?
Bitter gourd can be susceptible to various pests and diseases, including aphids, squash bugs, and powdery mildew. To protect your plants, practice good garden hygiene by removing any dead or diseased leaves. Encourage beneficial insects like ladybugs and lacewings, which prey on aphids and other pests. Use organic pesticides like neem oil or insecticidal soap to control infestations. Ensure good air circulation around the plants to prevent fungal diseases.
When is the best time to harvest bitter gourd?
Bitter gourd is typically harvested when it is still green and slightly immature. The exact timing will depend on the variety and your personal preference. Generally, you should harvest the gourds when they are about two-thirds of their mature size and still firm to the touch. Overripe bitter gourds will turn yellow or orange and become very bitter. Use a sharp knife or pruning shears to cut the gourds from the vine, leaving a short stem attached.
Can I save seeds from my bitter gourd for next year?
Yes, you can save seeds from your bitter gourd for next year, but be aware that the resulting plants may not be exactly the same as the parent plant, especially if you are growing hybrid varieties. To save seeds, allow a few gourds to fully ripen on the vine until they turn yellow or orange. Remove the seeds from the gourds and wash them thoroughly. Spread the seeds out on a paper towel to dry completely. Store the dried seeds in an airtight container in a cool, dark place.


Leave a Comment