
Clorox cleaning hacks – who knew tackling tough stains and grimy surfaces could be so surprisingly simple? I’m always on the lookout for ways to make my cleaning routine more efficient and less of a chore, and that’s exactly what these DIY tricks offer.
For generations, Clorox has been a household staple, synonymous with cleanliness and disinfection. Its roots trace back to 1913, born from a need for a safer and more effective bleach. Over the years, it has evolved from a simple disinfectant to a versatile cleaning agent, finding its way into countless homes and cleaning routines. But beyond its intended use, resourceful individuals have discovered a plethora of unconventional applications, transforming Clorox into a multi-purpose cleaning powerhouse.
Let’s face it, cleaning isn’t anyone’s favorite pastime. We all crave a sparkling home, but the time and effort involved can be daunting. That’s where these Clorox cleaning hacks come in! They’re designed to save you time, money, and elbow grease, offering clever solutions to everyday cleaning challenges. From reviving dingy whites to tackling stubborn mold, these DIY tricks will empower you to achieve a spotless home with minimal fuss. So, grab your Clorox and let’s dive into some game-changing cleaning secrets!
DIY Clorox Cleaning Hacks: Unleash the Power of Bleach!
Hey there, fellow cleaning enthusiasts! I’m excited to share some amazing DIY cleaning hacks using Clorox bleach. Now, I know what you might be thinking: “Bleach? Isn’t that harsh?” And you’re right, it can be. That’s why it’s crucial to use it safely and responsibly. But trust me, when used correctly, Clorox bleach can be a game-changer in your cleaning routine. It’s a powerful disinfectant, stain remover, and whitener that can tackle some of the toughest cleaning challenges around your home.
Important Safety First!
Before we dive in, let’s get the safety stuff out of the way. Bleach is a strong chemical, so always remember these crucial points:
* Ventilation is Key: Always work in a well-ventilated area. Open windows and doors to ensure good airflow.
* Protective Gear: Wear rubber gloves to protect your skin. Eye protection, like safety glasses, is also a good idea, especially when spraying.
* Dilution is Your Friend: Never use bleach undiluted unless specifically instructed. Follow the dilution ratios carefully.
* No Mixing!: Never, ever mix bleach with ammonia or other cleaning products. This can create toxic and deadly fumes. Seriously, don’t do it!
* Storage Matters: Store bleach in a cool, dry place, out of reach of children and pets. Keep it in its original container.
* Test First: Before applying any bleach solution to a surface, test it in an inconspicuous area to ensure it doesn’t damage or discolor the material.
Okay, now that we’ve covered the safety basics, let’s get to the fun part!
Cleaning Hack 1: Sparkling White Laundry
One of the most common uses for Clorox bleach is, of course, whitening laundry. But I’m going to share a few tips to get your whites looking their absolute best.
What You’ll Need:
* Clorox Bleach (Regular, not splash-less for best whitening)
* Laundry Detergent
* Measuring Cup
* Your Washing Machine
Step-by-Step Instructions:
1. Sort Your Laundry: Separate your whites from your colors. This is crucial to prevent color bleeding and ruining your clothes.
2. Load the Washing Machine: Load your washing machine with your white clothes, being careful not to overload it.
3. Add Detergent: Add your regular laundry detergent according to the manufacturer’s instructions.
4. Add Bleach: This is where the magic happens! For a standard top-loading washing machine, add about ¾ cup of Clorox bleach to the bleach dispenser. For a high-efficiency (HE) machine, follow the manufacturer’s instructions for bleach usage, usually around ¼ to ⅓ cup. Important: Never pour bleach directly onto your clothes, as this can cause discoloration.
5. Select Wash Cycle: Choose the appropriate wash cycle for your whites. A hot water cycle is generally best for whitening, but check the care labels on your clothes to ensure they can withstand hot water.
6. Start the Wash: Start the washing machine and let it do its thing!
7. Dry Your Clothes: Once the wash cycle is complete, dry your clothes as usual. Tumble drying on high heat can further enhance the whitening effect, but again, check the care labels first.
Pro Tip: For heavily soiled whites, you can pre-soak them in a bleach solution before washing. Fill a tub or sink with cold water and add ½ cup of Clorox bleach. Soak the clothes for about 30 minutes, then wash as usual.
Cleaning Hack 2: Disinfecting Kitchen Surfaces
The kitchen is a breeding ground for germs, so keeping it clean and disinfected is essential. Clorox bleach can be a powerful tool for disinfecting countertops, sinks, and cutting boards.
What You’ll Need:
* Clorox Bleach
* Water
* Spray Bottle
* Clean Cloths or Paper Towels
Step-by-Step Instructions:
1. Prepare the Bleach Solution: In a clean spray bottle, mix 1 tablespoon of Clorox bleach with 1 quart (4 cups) of water. This creates a 10% bleach solution, which is effective for disinfecting.
2. Clean the Surface: Before disinfecting, make sure to clean the surface with soap and water to remove any visible dirt or grime. Bleach works best on clean surfaces.
3. Spray the Surface: Spray the bleach solution onto the surface, making sure to cover it completely.
4. Let it Sit: Allow the bleach solution to sit on the surface for at least 10 minutes. This dwell time is crucial for killing germs and bacteria.
5. Rinse Thoroughly: After 10 minutes, rinse the surface thoroughly with clean water.
6. Dry the Surface: Dry the surface with a clean cloth or paper towel.
Important Note: This bleach solution is safe for most kitchen surfaces, but always test it in an inconspicuous area first. Avoid using bleach on porous surfaces like wood, as it can damage them.
Cleaning Hack 3: Mold and Mildew Removal in the Bathroom
Bathrooms are notorious for mold and mildew growth, especially in damp areas like showers and bathtubs. Clorox bleach can effectively kill mold and mildew and prevent it from returning.
What You’ll Need:
* Clorox Bleach
* Water
* Spray Bottle
* Scrub Brush or Sponge
* Rubber Gloves
* Eye Protection
Step-by-Step Instructions:
1. Prepare the Bleach Solution: In a clean spray bottle, mix 1 part Clorox bleach with 10 parts water. For example, you could mix ½ cup of bleach with 5 cups of water.
2. Spray the Affected Area: Spray the bleach solution onto the mold or mildew-affected area, making sure to saturate it completely.
3. Let it Sit: Allow the bleach solution to sit on the surface for at least 10-15 minutes. This will give it time to kill the mold and mildew.
4. Scrub the Surface: After 10-15 minutes, scrub the surface with a scrub brush or sponge to remove the dead mold and mildew.
5. Rinse Thoroughly: Rinse the surf
Hey there, fellow cleaning enthusiasts! I’m excited to share some amazing DIY cleaning hacks using Clorox bleach. Now, I know what you might be thinking: “Bleach? Isn’t that harsh?” And you’re right, it can be. That’s why it’s crucial to use it safely and responsibly. But trust me, when used correctly, Clorox bleach can be a game-changer in your cleaning routine. It’s a powerful disinfectant, stain remover, and whitener that can tackle some of the toughest cleaning challenges around your home.
Important Safety First!
Before we dive in, let’s get the safety stuff out of the way. Bleach is a strong chemical, so always remember these crucial points:
* Ventilation is Key: Always work in a well-ventilated area. Open windows and doors to ensure good airflow.
* Protective Gear: Wear rubber gloves to protect your skin. Eye protection, like safety glasses, is also a good idea, especially when spraying.
* Dilution is Your Friend: Never use bleach undiluted unless specifically instructed. Follow the dilution ratios carefully.
* No Mixing!: Never, ever mix bleach with ammonia or other cleaning products. This can create toxic and deadly fumes. Seriously, don’t do it!
* Storage Matters: Store bleach in a cool, dry place, out of reach of children and pets. Keep it in its original container.
* Test First: Before applying any bleach solution to a surface, test it in an inconspicuous area to ensure it doesn’t damage or discolor the material.
Okay, now that we’ve covered the safety basics, let’s get to the fun part!
Cleaning Hack 1: Sparkling White Laundry
One of the most common uses for Clorox bleach is, of course, whitening laundry. But I’m going to share a few tips to get your whites looking their absolute best.
What You’ll Need:
* Clorox Bleach (Regular, not splash-less for best whitening)
* Laundry Detergent
* Measuring Cup
* Your Washing Machine
Step-by-Step Instructions:
1. Sort Your Laundry: Separate your whites from your colors. This is crucial to prevent color bleeding and ruining your clothes.
2. Load the Washing Machine: Load your washing machine with your white clothes, being careful not to overload it.
3. Add Detergent: Add your regular laundry detergent according to the manufacturer’s instructions.
4. Add Bleach: This is where the magic happens! For a standard top-loading washing machine, add about ¾ cup of Clorox bleach to the bleach dispenser. For a high-efficiency (HE) machine, follow the manufacturer’s instructions for bleach usage, usually around ¼ to ⅓ cup. Important: Never pour bleach directly onto your clothes, as this can cause discoloration.
5. Select Wash Cycle: Choose the appropriate wash cycle for your whites. A hot water cycle is generally best for whitening, but check the care labels on your clothes to ensure they can withstand hot water.
6. Start the Wash: Start the washing machine and let it do its thing!
7. Dry Your Clothes: Once the wash cycle is complete, dry your clothes as usual. Tumble drying on high heat can further enhance the whitening effect, but again, check the care labels first.
Pro Tip: For heavily soiled whites, you can pre-soak them in a bleach solution before washing. Fill a tub or sink with cold water and add ½ cup of Clorox bleach. Soak the clothes for about 30 minutes, then wash as usual.
Cleaning Hack 2: Disinfecting Kitchen Surfaces
The kitchen is a breeding ground for germs, so keeping it clean and disinfected is essential. Clorox bleach can be a powerful tool for disinfecting countertops, sinks, and cutting boards.
What You’ll Need:
* Clorox Bleach
* Water
* Spray Bottle
* Clean Cloths or Paper Towels
Step-by-Step Instructions:
1. Prepare the Bleach Solution: In a clean spray bottle, mix 1 tablespoon of Clorox bleach with 1 quart (4 cups) of water. This creates a 10% bleach solution, which is effective for disinfecting.
2. Clean the Surface: Before disinfecting, make sure to clean the surface with soap and water to remove any visible dirt or grime. Bleach works best on clean surfaces.
3. Spray the Surface: Spray the bleach solution onto the surface, making sure to cover it completely.
4. Let it Sit: Allow the bleach solution to sit on the surface for at least 10 minutes. This dwell time is crucial for killing germs and bacteria.
5. Rinse Thoroughly: After 10 minutes, rinse the surface thoroughly with clean water.
6. Dry the Surface: Dry the surface with a clean cloth or paper towel.
Important Note: This bleach solution is safe for most kitchen surfaces, but always test it in an inconspicuous area first. Avoid using bleach on porous surfaces like wood, as it can damage them.
Cleaning Hack 3: Mold and Mildew Removal in the Bathroom
Bathrooms are notorious for mold and mildew growth, especially in damp areas like showers and bathtubs. Clorox bleach can effectively kill mold and mildew and prevent it from returning.
What You’ll Need:
* Clorox Bleach
* Water
* Spray Bottle
* Scrub Brush or Sponge
* Rubber Gloves
* Eye Protection
Step-by-Step Instructions:
1. Prepare the Bleach Solution: In a clean spray bottle, mix 1 part Clorox bleach with 10 parts water. For example, you could mix ½ cup of bleach with 5 cups of water.
2. Spray the Affected Area: Spray the bleach solution onto the mold or mildew-affected area, making sure to saturate it completely.
3. Let it Sit: Allow the bleach solution to sit on the surface for at least 10-15 minutes. This will give it time to kill the mold and mildew.
4. Scrub the Surface: After 10-15 minutes, scrub the surface with a scrub brush or sponge to remove the dead mold and mildew.
5. Rinse Thoroughly: Rinse the surface thoroughly with clean water.
6. Dry the Surface: Dry the surface with a clean cloth or towel.
7. Ventilate the Area: Open windows and doors to ventilate the bathroom and allow it to dry completely.
Pro Tip: For stubborn mold and mildew stains, you can create a paste of bleach and baking soda. Apply the paste to the affected area, let it sit for 30 minutes, then scrub and rinse.
Cleaning Hack 4: Cleaning and Disinfecting Cutting Boards
Cutting boards, especially wooden ones, can harbor bacteria and food particles. Clorox bleach can be used to clean and disinfect cutting boards effectively.
What You’ll Need:
* Clorox Bleach
* Water
* Dish Soap
* Scrub Brush
* Clean Cloth or Paper Towels
Step-by-Step Instructions:
1. Wash with Soap and Water: First, wash the cutting board thoroughly with dish soap and hot water to remove any food particles.
2. Prepare the Bleach Solution: In a sink or tub, mix 1 tablespoon of Clorox bleach with 1 gallon of water.
3. Soak the Cutting Board: Submerge the cutting board in the bleach solution for about 2 minutes.
4. Rinse Thoroughly: Remove the cutting board from the bleach solution and rinse it thoroughly with clean water.
5. Dry the Cutting Board: Dry the cutting board with a clean cloth or paper towel. Allow it to air dry completely before storing.
Important Note: This method is safe for both wooden and plastic cutting boards. However, avoid soaking wooden cutting boards for extended periods, as this can cause them to warp or crack.
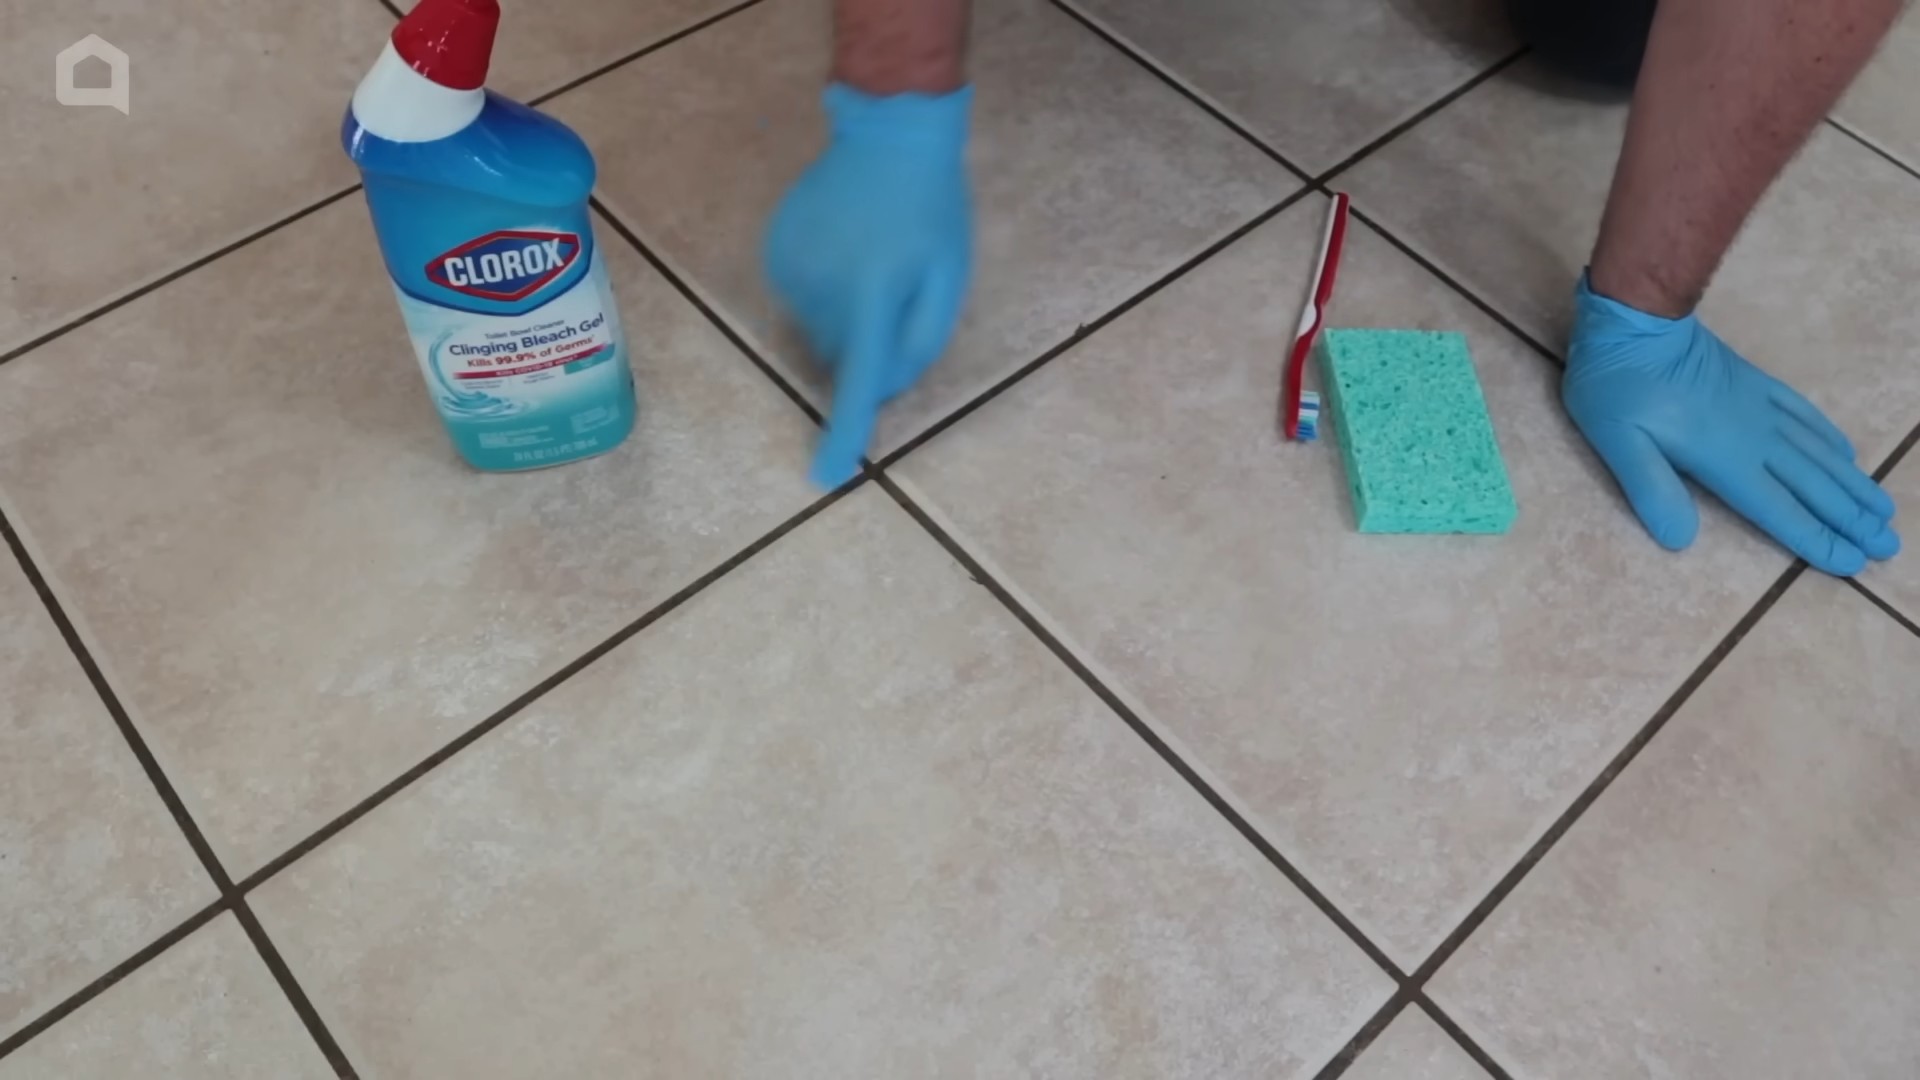
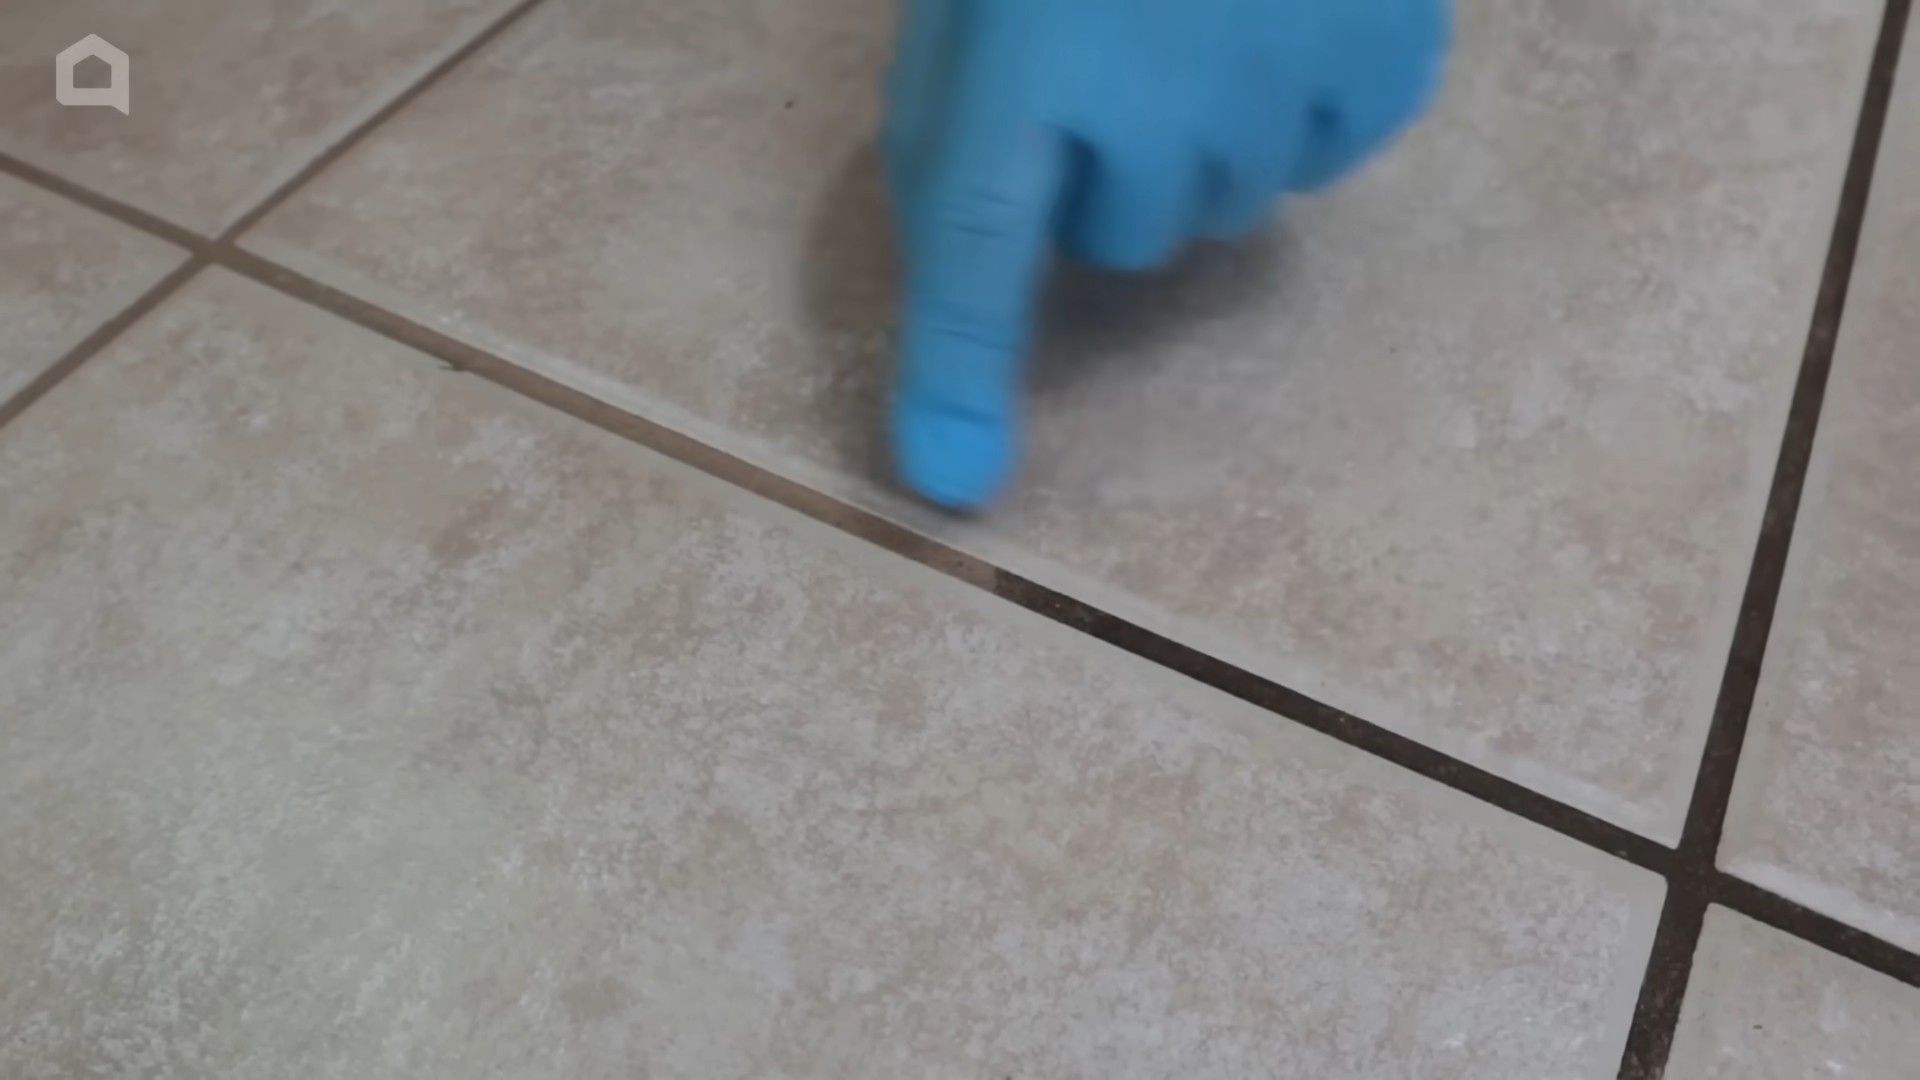
Cleaning Hack 5: Reviving Dingy Grout
Grout can easily become stained and discolored, making your tiles look old and dirty. Clorox bleach can help revive dingy grout and restore its original color.
What You’ll Need:
* Clorox Bleach
* Water
* Spray Bottle or Small Bowl
* Old Toothbrush or Grout Brush
* Rubber Gloves
* Eye Protection
Step-by-Step Instructions:
1. Prepare the Bleach Solution: In a spray bottle or small bowl, mix equal parts Clorox bleach and water.
2. Apply the Bleach Solution: Spray the bleach solution directly onto the grout lines or apply it
Conclusion
So, there you have it! This simple yet incredibly effective DIY Clorox cleaning hack is a game-changer for anyone looking to maintain a sparkling clean home without breaking the bank or relying on harsh chemicals alone. We’ve shown you how to harness the power of Clorox in a way that’s both efficient and surprisingly versatile.
Why is this a must-try? Because it simplifies your cleaning routine, tackles tough stains and grime with ease, and leaves your home feeling fresh and sanitized. Forget spending hours scrubbing or juggling multiple cleaning products. This single solution can handle a multitude of tasks, from disinfecting countertops to brightening dingy grout.
But the beauty of this DIY Clorox cleaning hack lies in its adaptability. Feel free to experiment with different ratios of Clorox to water depending on the severity of the cleaning task. For heavily soiled areas, you might opt for a slightly stronger solution. For more delicate surfaces, a diluted mixture is always best.
Consider adding a few drops of your favorite essential oil, like lemon or lavender, to the solution for an extra boost of freshness. Just be sure to test the mixture on an inconspicuous area first to ensure it doesn’t damage the surface. You can also infuse the solution with citrus peels for a natural, invigorating scent.
Another variation involves using this DIY Clorox cleaning hack in a spray bottle for easy application. This is particularly useful for cleaning bathroom fixtures, kitchen appliances, and other hard-to-reach areas. Remember to always label the bottle clearly to avoid any confusion.
We’re confident that once you try this DIY Clorox cleaning hack, you’ll wonder how you ever lived without it. It’s a cost-effective, time-saving, and highly effective way to keep your home clean and healthy.
Don’t just take our word for it – give it a try! We’re eager to hear about your experiences and any variations you discover. Share your tips, tricks, and before-and-after photos in the comments below. Let’s create a community of clean-home enthusiasts who are passionate about finding simple, effective solutions. Your feedback will not only help others but also inspire us to continue sharing valuable cleaning hacks.
This DIY Clorox cleaning hack is more than just a recipe; it’s a pathway to a cleaner, healthier, and happier home. So, grab your Clorox, mix up a batch, and prepare to be amazed by the results. Happy cleaning!
Frequently Asked Questions (FAQs)
Is this DIY Clorox cleaning hack safe to use on all surfaces?
No, it’s crucial to exercise caution and test the solution on an inconspicuous area before applying it to the entire surface. Clorox, even in diluted form, can damage certain materials, such as wood, painted surfaces, and some types of fabrics. Always read the manufacturer’s instructions for both the Clorox product and the surface you’re cleaning. For delicate surfaces, opt for a highly diluted solution or consider using alternative cleaning methods. When in doubt, err on the side of caution.
What is the recommended ratio of Clorox to water for this DIY cleaning solution?
The ideal ratio depends on the cleaning task. For general cleaning and disinfecting, a ratio of 1 part Clorox to 9 parts water is generally recommended. For tougher stains or heavily soiled areas, you can increase the concentration slightly, but never exceed a ratio of 1 part Clorox to 5 parts water. Always start with a diluted solution and gradually increase the concentration if necessary. Remember to wear gloves and eye protection when handling Clorox.
Can I use this DIY Clorox cleaning hack to clean my clothes?
While Clorox can be used to whiten and disinfect certain types of fabrics, it’s essential to follow the manufacturer’s instructions carefully. Always test the solution on a small, hidden area of the fabric first to ensure it doesn’t cause discoloration or damage. Avoid using Clorox on delicate fabrics like silk, wool, or linen. For colored clothes, use a color-safe bleach alternative instead. It’s also important to note that Clorox can weaken fabrics over time, so use it sparingly.
How long does the DIY Clorox cleaning solution last?
It’s best to prepare a fresh batch of the DIY Clorox cleaning solution each time you clean. Clorox degrades over time, especially when exposed to light and air, which reduces its effectiveness. Storing the solution for extended periods can also lead to the formation of harmful byproducts. For optimal results, mix only the amount you need for each cleaning session and discard any leftover solution properly.
Is it safe to mix Clorox with other cleaning products?
Absolutely not! Mixing Clorox with certain cleaning products, especially ammonia or acids, can create dangerous and potentially deadly gases. Always use Clorox by itself and avoid mixing it with any other chemicals. If you’ve used another cleaning product on a surface, rinse it thoroughly with water before applying the Clorox solution. Your safety is paramount.
What precautions should I take when using this DIY Clorox cleaning hack?
Always wear gloves and eye protection to prevent skin and eye irritation. Work in a well-ventilated area to avoid inhaling fumes. Keep the solution out of reach of children and pets. Never mix Clorox with other cleaning products. Test the solution on an inconspicuous area before applying it to the entire surface. Rinse surfaces thoroughly with water after cleaning. If you experience any adverse reactions, such as skin irritation or breathing difficulties, discontinue use and seek medical attention.
Can I use this DIY Clorox cleaning hack to remove mold?
Yes, Clorox can be effective in removing mold, but it’s important to address the underlying cause of the mold growth, such as moisture or humidity. Clean the affected area with the DIY Clorox cleaning solution, ensuring proper ventilation. Allow the solution to sit on the mold for a few minutes before scrubbing and rinsing thoroughly. If the mold infestation is extensive, it’s best to consult with a professional mold remediation service.
What are some alternative uses for this DIY Clorox cleaning hack?
Besides general cleaning and disinfecting, this solution can be used to brighten white laundry, clean outdoor furniture, sanitize garbage cans, and remove mildew from shower curtains. However, always exercise caution and test the solution on an inconspicuous area first to ensure it doesn’t damage the material. Remember to rinse surfaces thoroughly with water after cleaning.
How do I properly dispose of the DIY Clorox cleaning solution?
If you have leftover solution, dilute it further with water and pour it down the drain. Avoid pouring undiluted Clorox down the drain, as it can damage plumbing and harm the environment. You can also dispose of the solution at a hazardous waste disposal facility. Check with your local municipality for specific guidelines on proper disposal methods.

Leave a Comment