
Container Gardening Rutabaga: Sounds a little crazy, right? But trust me, it’s totally doable, and I’m here to show you how! Are you dreaming of fresh, homegrown veggies but lack the sprawling backyard to make it happen? Or perhaps you’re simply looking for a fun and rewarding gardening project? Well, you’ve come to the right place! This DIY guide is packed with simple tricks and hacks to help you successfully grow rutabaga – yes, that often-overlooked root vegetable – right in containers.
Rutabaga, a cross between a cabbage and a turnip, has a fascinating history. Originating in Bohemia sometime in the 17th century, it quickly spread across Europe and eventually made its way to North America. Historically, it was a staple crop, providing sustenance during harsh winters. While it might not be the most glamorous vegetable, its nutritional value and earthy flavor make it a fantastic addition to your diet. Plus, growing your own means you get the freshest, most flavorful rutabaga possible!
Why should you bother with container gardening rutabaga? Because it’s easier than you think! Many people are intimidated by root vegetables, assuming they need vast amounts of space. But with the right techniques, you can enjoy a bountiful harvest even in a small space. This guide will walk you through everything from choosing the right container and soil to providing the proper care and harvesting your delicious, homegrown rutabaga. Get ready to impress your friends and family with your gardening prowess!
Container Gardening: Grow Your Own Rutabagas!
Hey there, fellow gardening enthusiasts! Ever thought about growing rutabagas? These root vegetables, often overlooked, are surprisingly easy to cultivate, even if you don’t have a sprawling backyard. I’m going to walk you through how to grow rutabagas in containers, so you can enjoy fresh, homegrown goodness right on your patio or balcony. Let’s get started!
Choosing the Right Container and Soil
First things first, we need to set the stage for our rutabaga success. This means picking the perfect container and soil.
* Container Size: Rutabagas need room to grow downwards. A container that’s at least 12 inches deep and 12 inches in diameter is ideal. The bigger, the better, really! I’ve found that a 5-gallon bucket works great, but larger pots are even better if you have the space.
* Drainage: Excellent drainage is crucial. Rutabagas don’t like sitting in soggy soil. Make sure your container has plenty of drainage holes at the bottom. If not, you can drill some yourself.
* Soil Mix: Forget using garden soil straight from the ground. It’s often too heavy and doesn’t drain well in containers. Instead, opt for a high-quality potting mix. I like to use a mix of compost, peat moss (or coconut coir as a sustainable alternative), and perlite or vermiculite. This combination provides good drainage, aeration, and nutrients.
Planting Your Rutabaga Seeds
Now for the fun part – planting!
1. Prepare the Soil: Fill your container with the potting mix, leaving about an inch or two of space at the top. Gently pat down the soil to remove any large air pockets.
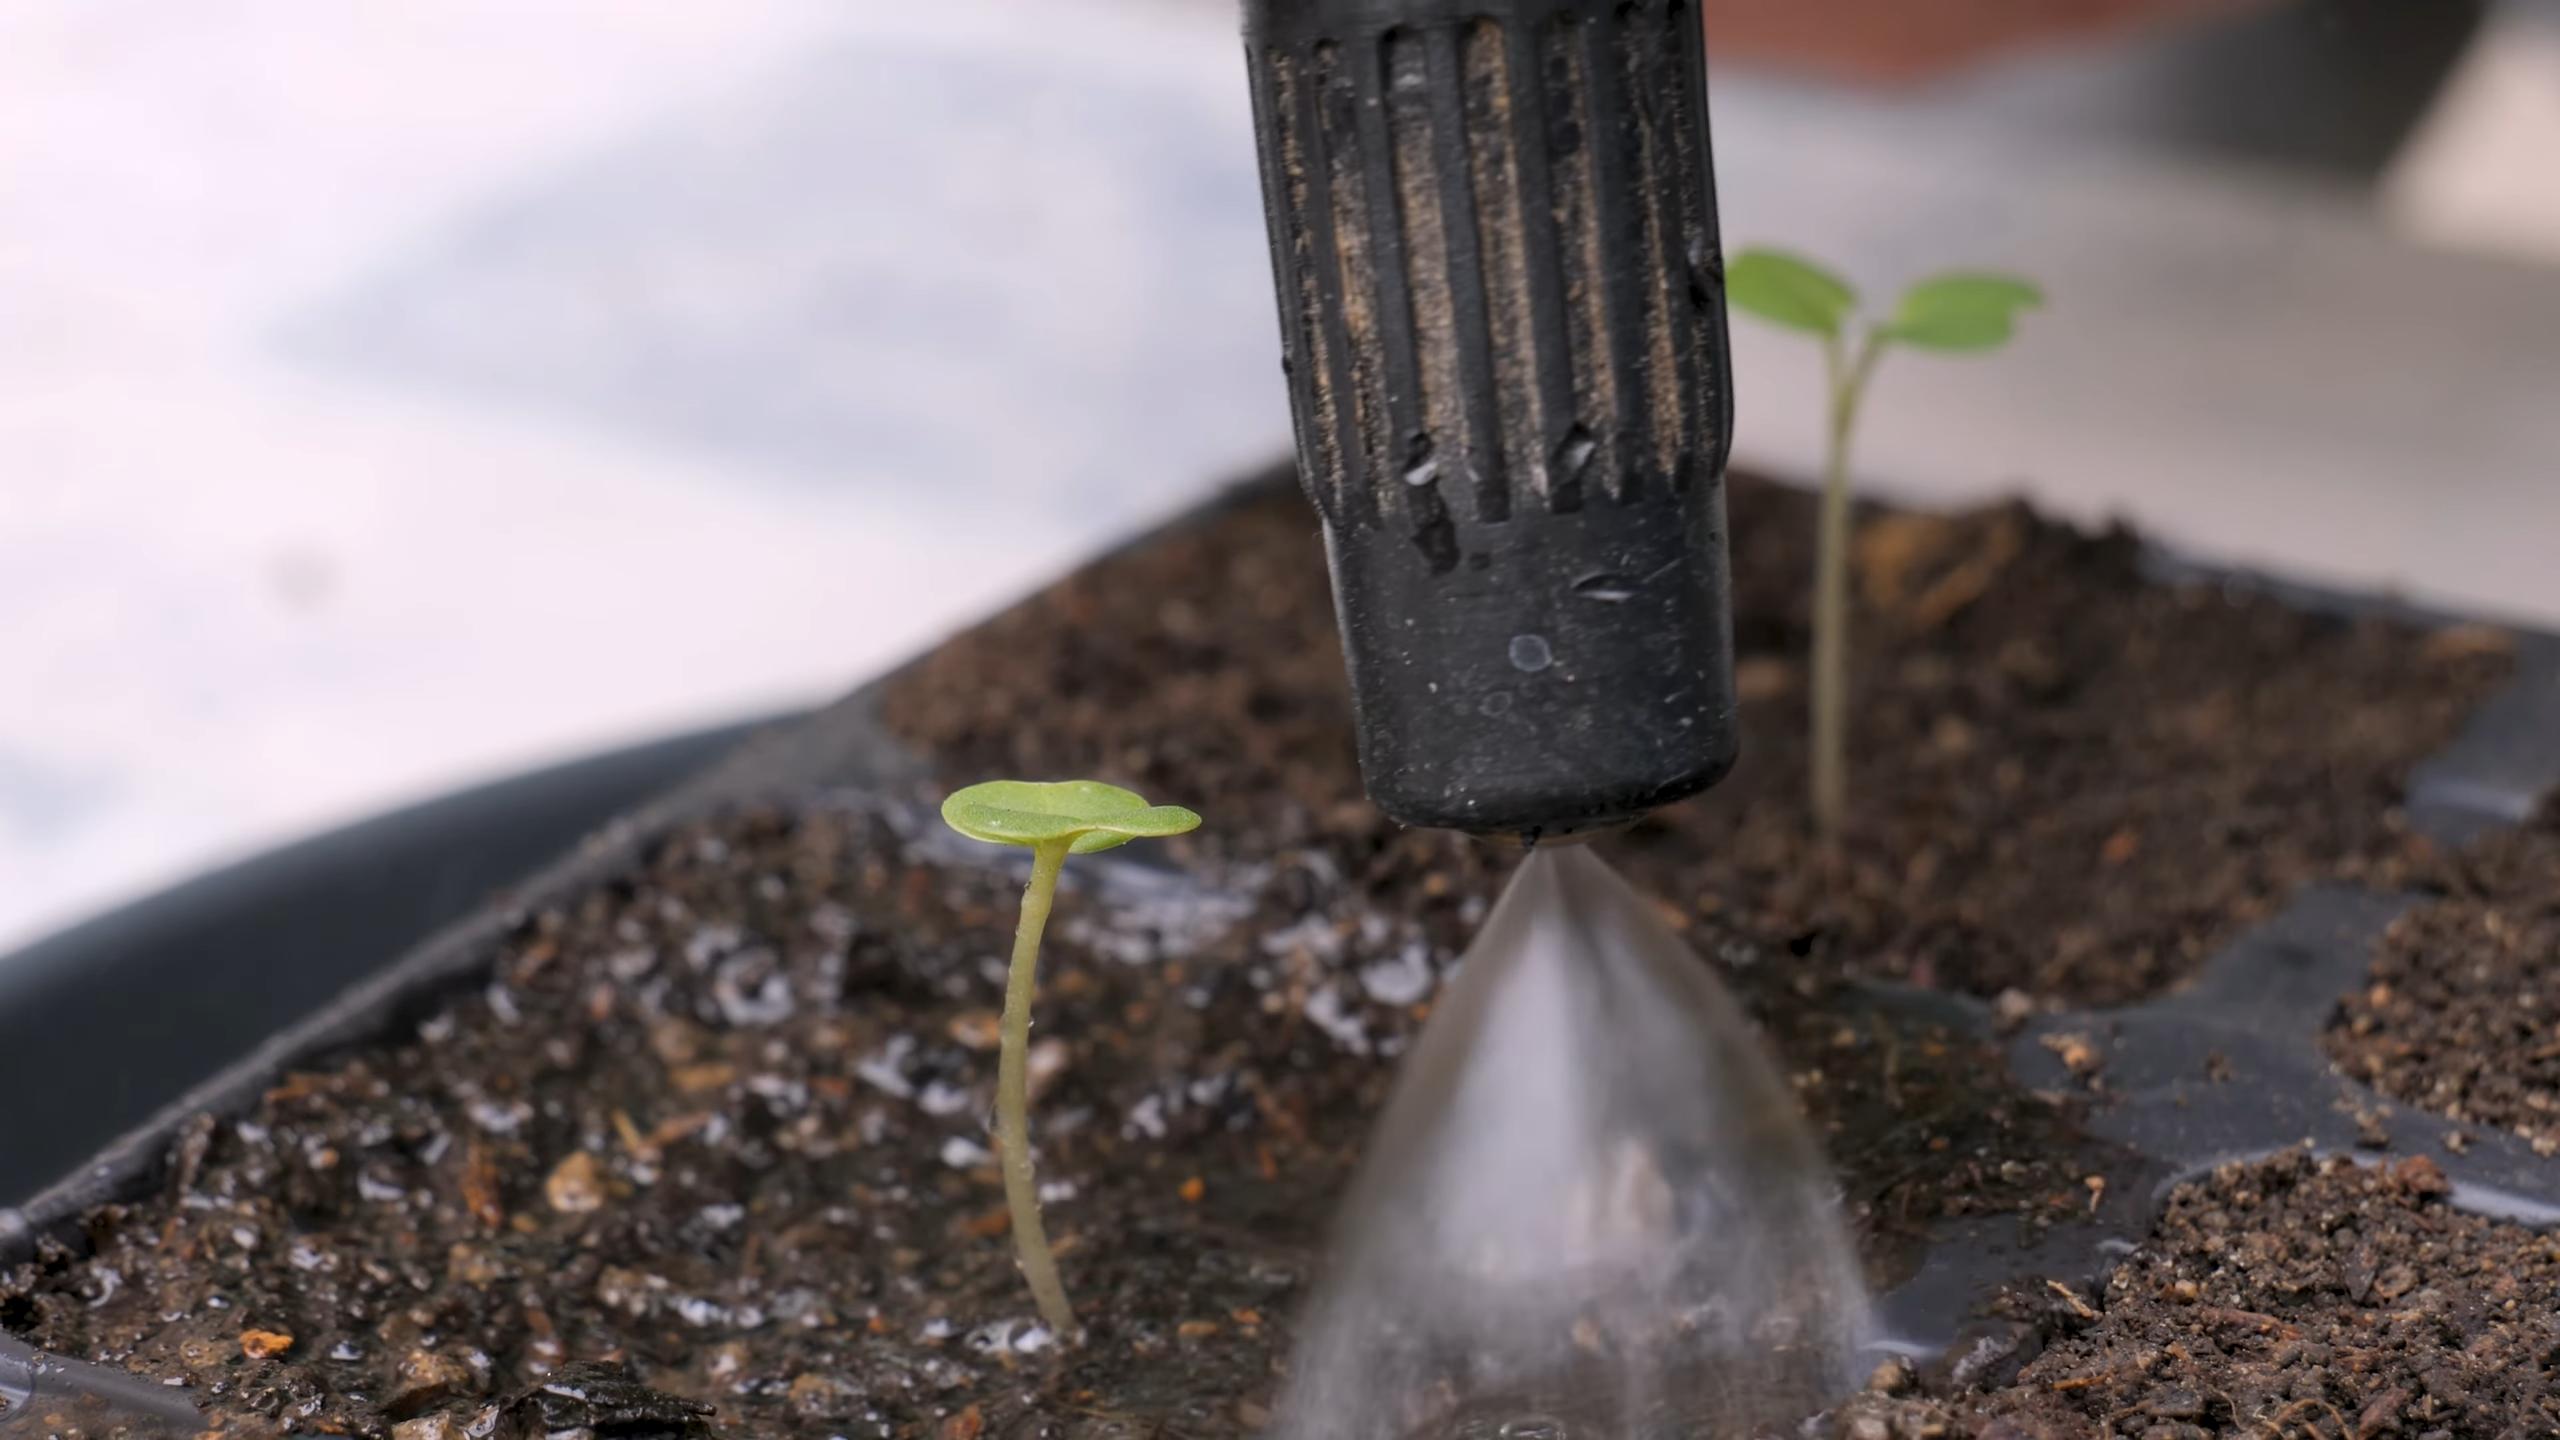
2. Sow the Seeds: Rutabagas are best grown from seed. Sow the seeds about ½ inch deep and 2-3 inches apart. You can always thin them out later if too many germinate. I usually plant a few extra seeds per spot just to be safe.
3. Water Gently: After planting, water the soil gently until it’s evenly moist. Avoid overwatering, which can cause the seeds to rot. A watering can with a rose head is perfect for this.
4. Location, Location, Location: Place your container in a spot that receives at least 6 hours of sunlight per day. Rutabagas thrive in full sun. If you don’t have a sunny spot, you might consider using grow lights.
Caring for Your Rutabaga Plants
Once your seeds have sprouted, it’s time to nurture your little rutabaga plants.
1. Watering: Keep the soil consistently moist, but not waterlogged. Water when the top inch of soil feels dry to the touch. During hot weather, you might need to water more frequently.
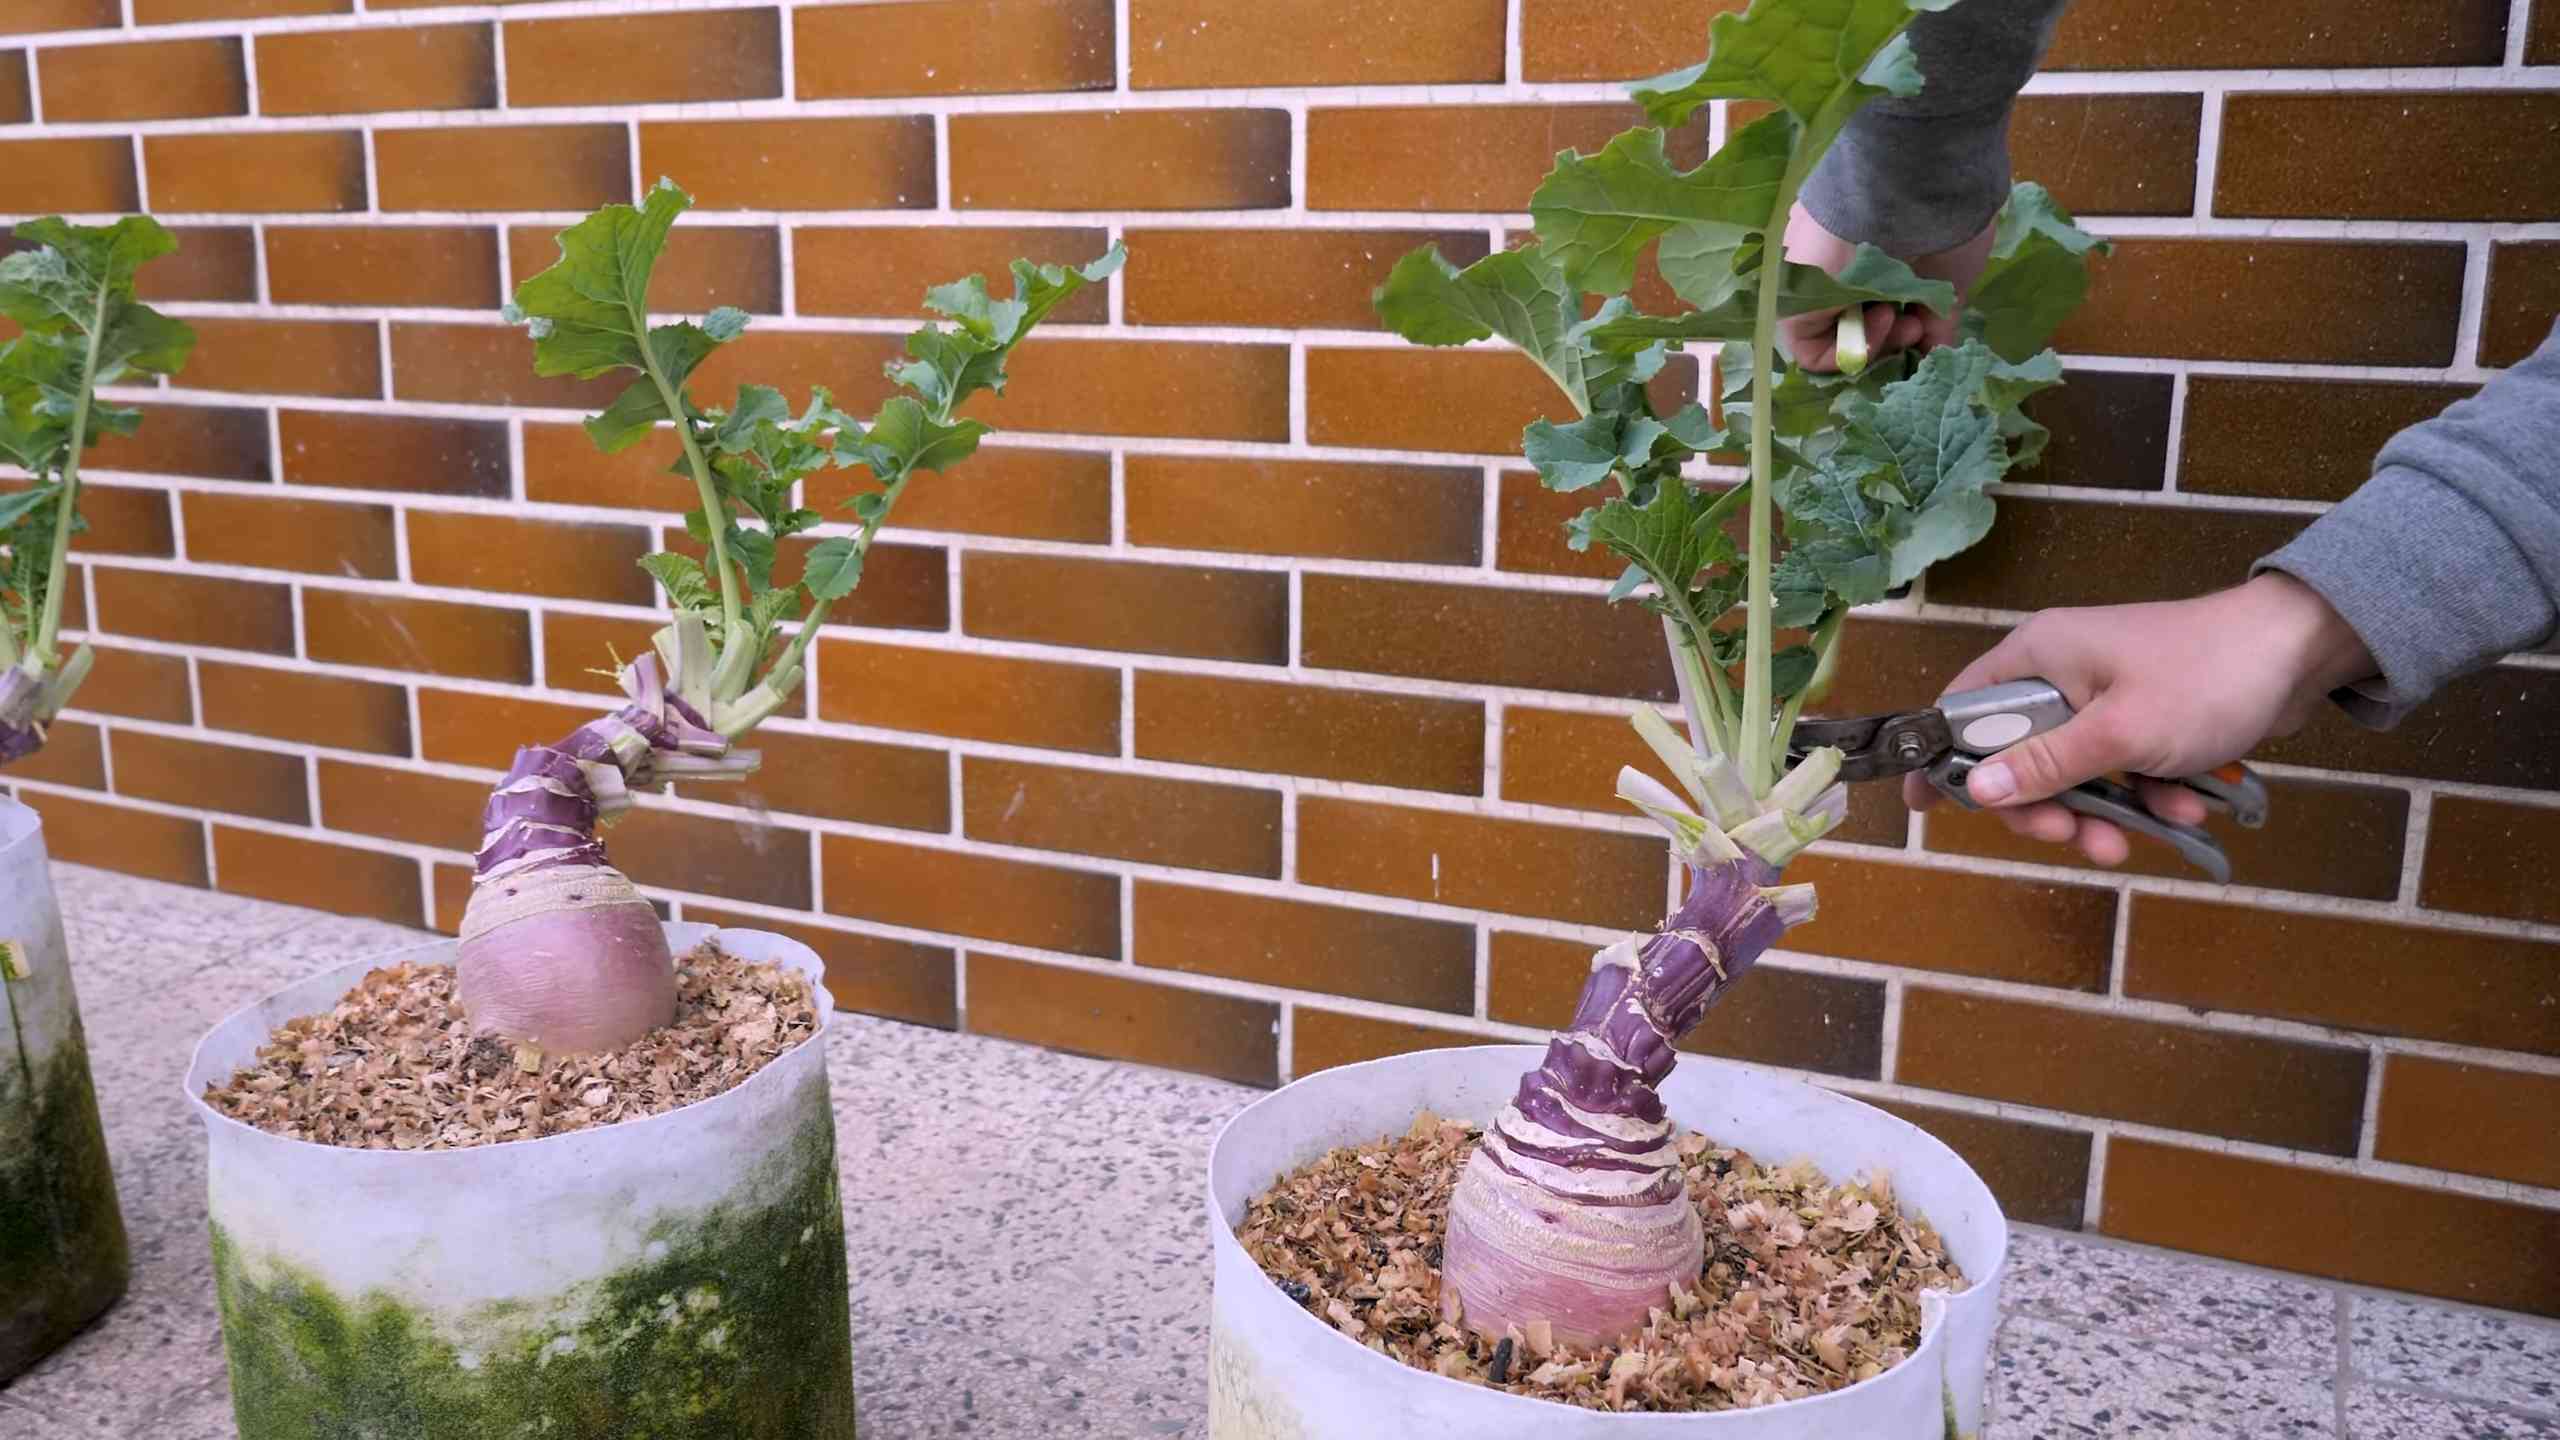
2. Thinning: Once the seedlings are a few inches tall, thin them out so that they are about 4-6 inches apart. This gives each plant enough room to grow. Don’t just yank them out! Gently snip the unwanted seedlings at the soil line with scissors.
3. Fertilizing: Rutabagas are heavy feeders. Fertilize them every 2-3 weeks with a balanced liquid fertilizer. Follow the instructions on the fertilizer package. I like to use a fertilizer that’s high in phosphorus and potassium to encourage root development.
4. Weed Control: Keep the container free of weeds. Weeds compete with your rutabagas for nutrients and water. Hand-pull any weeds that pop up.
5. Pest Control: Keep an eye out for pests like aphids, flea beetles, and cabbage worms. If you spot any pests, you can try spraying them with insecticidal soap or neem oil. I prefer organic pest control methods whenever possible.
Dealing with Common Problems
Even with the best care, you might encounter a few challenges along the way. Here are some common problems and how to deal with them:
* Bolting: Bolting is when the plant prematurely sends up a flower stalk. This can happen if the weather gets too hot or if the plants are stressed. To prevent bolting, keep the soil consistently moist and provide some shade during the hottest part of the day.
* Root Maggots: Root maggots are small, white larvae that feed on the roots of rutabagas. They can cause the roots to become stunted and deformed. To prevent root maggots, you can cover the soil with row covers or use diatomaceous earth.
* Clubroot: Clubroot is a fungal disease that causes the roots to become swollen and distorted. To prevent clubroot, make sure to use disease-free soil and avoid planting rutabagas in the same spot year after year.
Harvesting Your Rutabagas
The moment we’ve all been waiting for – harvest time!
1. When to Harvest: Rutabagas are typically ready to harvest in 90-100 days after planting. The roots should be about 3-5 inches in diameter. You can also harvest them when they are smaller if you prefer.
2. How to Harvest: To harvest your rutabagas, gently loosen the soil around the plant with a garden fork. Then, carefully pull the plant out of the container.
3. Storing Your Rutabagas: After harvesting, remove the tops and any excess soil. Store your rutabagas in a cool, dark, and humid place, such as a root cellar or refrigerator. They can last for several months if stored properly.
Extra Tips for Rutabaga Success
Here are a few extra tips to help you grow the best rutabagas possible:
* Succession Planting: To extend your harvest, try succession planting. Sow a new batch of seeds every few weeks.
* Companion Planting: Plant rutabagas with companion plants like rosemary, thyme, or marigolds. These plants can help to deter pests and improve the flavor of your rutabagas.
* Mulching: Mulch around your rutabaga plants with straw or wood chips to help retain moisture and suppress weeds.
* Rotate Your Crops: Avoid planting rutabagas in the same container year after year. Crop rotation helps to prevent soilborne diseases and pests.
Rutabaga Varieties to Consider
While ‘American Purple Top’ is a classic and reliable choice, don’t be afraid to experiment with different rutabaga varieties! Here are a few others you might want to try:
* ‘Laurentian’: This variety is known for its smooth, yellow flesh and sweet flavor. It’s a good choice for eating raw or cooked.
* ‘Joan’: A newer variety that is known for its disease resistance and high yields.
* ‘Purple Top Yellow’: Similar to ‘American Purple Top’ but with a slightly milder flavor.
Rutabaga Recipes to Enjoy
Now that you’ve harvested your homegrown rutabagas, it’s time to enjoy them! Rutabagas are incredibly versatile and can be used in a variety of dishes. Here are a few of my favorites:
* Mashed Rutabaga: A simple and delicious side dish. Just boil or steam the rutabagas until tender, then mash them with butter, milk, and seasonings.
* Roasted Rutabaga: Roasting brings out the natural sweetness of rutabagas. Toss them with olive oil, herbs, and spices, then roast them in the oven until tender and slightly caramelized.
* Rutabaga Fries: A healthier alternative to potato fries. Cut the rutabagas into fries, toss them with olive oil and seasonings, and bake them in the oven until crispy.
* Rutabaga Soup: A hearty and flavorful soup that’s perfect for a cold day. Combine rutabagas with other vegetables, broth, and seasonings, then simmer until tender.
* Rutabaga and Apple Salad: A refreshing and crunchy salad that’s perfect for a light lunch or side dish. Combine shredded rutabagas with apples, walnuts, and a vinaigrette dressing.
Growing rutabagas in containers is a rewarding experience that allows you to enjoy fresh, homegrown vegetables even if you have limited space. With a little bit of care and attention, you can harvest a bountiful crop of these delicious and nutritious root vegetables. Happy gardening!
Conclusion
So, there you have it! Growing rutabaga in containers might seem unconventional, but as we’ve explored, it’s entirely achievable and incredibly rewarding. This DIY container gardening rutabaga trick opens up a world of possibilities, especially for those with limited garden space or challenging soil conditions. No longer are you confined by the limitations of a traditional garden bed. You can cultivate these nutritious and delicious root vegetables right on your patio, balcony, or even a sunny windowsill.
Why is this a must-try? Because it empowers you to take control of your food source, ensuring you have access to fresh, homegrown produce regardless of your living situation. Imagine the satisfaction of harvesting your own rutabagas, knowing exactly where they came from and how they were grown. Plus, container gardening allows for greater control over soil quality, watering, and pest management, leading to healthier and more productive plants.
But the benefits don’t stop there. Container gardening rutabaga is also a fantastic way to experiment with different varieties. Consider trying ‘Laurentian’ for its smooth skin and sweet flavor, or ‘American Purple Top’ for its classic appearance and robust growth. You can even explore different soil mixes and fertilizer combinations to find what works best for your specific environment.
For a fun variation, try companion planting in your containers. Marigolds can help deter pests, while herbs like thyme or rosemary can add a delightful fragrance and potentially improve the flavor of your rutabagas. You could also interplant with fast-growing greens like spinach or lettuce to maximize space and yield.
Don’t be afraid to get creative and personalize your container gardening rutabaga experience. The beauty of DIY is that it allows you to tailor the process to your own preferences and needs.
We wholeheartedly encourage you to give this DIY trick a try. It’s a simple, effective, and incredibly satisfying way to grow your own rutabagas, even in the most limited of spaces. Once you’ve harvested your first crop, you’ll be hooked!
And most importantly, we want to hear about your experiences! Share your photos, tips, and challenges in the comments below. Let’s build a community of container gardening rutabaga enthusiasts and learn from each other. Your insights could inspire others to embark on their own gardening journey. So, grab your containers, soil, and seeds, and let’s get growing!
Frequently Asked Questions (FAQ)
What size container is best for growing rutabaga?
Rutabagas need ample space to develop their roots. A container that is at least 12 inches deep and 12 inches in diameter is recommended for a single plant. Larger containers, such as half-barrels or large grow bags, are even better, especially if you plan to grow multiple plants in the same container. The key is to provide enough room for the roots to expand without becoming root-bound. Remember, the bigger the container, the more moisture it will retain, reducing the frequency of watering.
What type of soil should I use for container gardening rutabaga?
Rutabagas thrive in well-draining, fertile soil. A good potting mix specifically formulated for vegetables is ideal. You can also create your own mix by combining equal parts of compost, peat moss (or coconut coir), and perlite or vermiculite. Compost provides essential nutrients, peat moss (or coconut coir) helps retain moisture, and perlite or vermiculite improves drainage. Avoid using garden soil in containers, as it can become compacted and hinder root growth. Adding a slow-release fertilizer to the soil mix at planting time will provide a steady supply of nutrients throughout the growing season.
How often should I water my container rutabagas?
Watering frequency depends on several factors, including the size of the container, the type of soil, the weather conditions, and the stage of plant growth. Generally, you should water your rutabagas when the top inch of soil feels dry to the touch. Water deeply until excess water drains out of the bottom of the container. Avoid overwatering, as this can lead to root rot. During hot, dry weather, you may need to water daily. Mulching the soil surface with straw or wood chips can help retain moisture and reduce the need for frequent watering.
How much sunlight do rutabagas need?
Rutabagas need at least 6 hours of direct sunlight per day to thrive. Choose a location for your containers that receives ample sunlight throughout the day. If you live in a particularly hot climate, providing some afternoon shade can help prevent the plants from overheating. If you don’t have access to a sunny location, you can supplement with grow lights.
How do I fertilize my container rutabagas?
Rutabagas are heavy feeders and benefit from regular fertilization. In addition to incorporating slow-release fertilizer into the soil mix at planting time, you should also feed your plants with a liquid fertilizer every 2-3 weeks. Choose a fertilizer that is high in phosphorus and potassium, as these nutrients are essential for root development. Follow the instructions on the fertilizer label carefully to avoid over-fertilizing, which can damage the plants.
What are some common pests and diseases that affect rutabagas, and how can I control them?
Common pests that can affect rutabagas include aphids, flea beetles, and cabbage worms. Aphids can be controlled with insecticidal soap or neem oil. Flea beetles can be deterred by covering the plants with row covers. Cabbage worms can be handpicked or controlled with Bacillus thuringiensis (Bt). Common diseases that can affect rutabagas include clubroot and downy mildew. Clubroot can be prevented by ensuring good soil drainage and avoiding planting rutabagas in the same location year after year. Downy mildew can be controlled with fungicides. Regularly inspect your plants for signs of pests and diseases and take action promptly to prevent them from spreading.
When and how do I harvest my container rutabagas?
Rutabagas are typically ready to harvest 90-100 days after planting. The roots should be about 4-6 inches in diameter. To harvest, gently loosen the soil around the plant and pull the rutabaga out of the container. You can also use a garden fork to lift the roots out of the soil. After harvesting, remove the leaves and store the rutabagas in a cool, dry place.
Can I grow rutabagas in containers during the winter?
In mild climates, you may be able to grow rutabagas in containers during the winter. However, in colder climates, you will need to protect the plants from frost. You can do this by moving the containers indoors or covering them with blankets or burlap. Rutabagas can tolerate light frost, but they will be damaged by prolonged exposure to freezing temperatures.
What are some creative ways to use my homegrown rutabagas?
Rutabagas are a versatile vegetable that can be used in a variety of dishes. They can be roasted, mashed, boiled, or added to soups and stews. They can also be grated and used in salads or slaws. Rutabagas have a slightly sweet and earthy flavor that pairs well with other root vegetables, such as carrots and potatoes. Try roasting them with olive oil, herbs, and garlic for a simple and delicious side dish. You can also use them to make rutabaga fries or rutabaga chips. Get creative and experiment with different recipes to find your favorite ways to enjoy your homegrown rutabagas.
Is container gardening rutabaga organic?
Yes, container gardening rutabaga can absolutely be organic! By using organic potting mix, organic fertilizers, and natural pest control methods, you can ensure that your rutabagas are grown without the use of synthetic chemicals. This is a great way to enjoy fresh, healthy produce while minimizing your impact on the environment.

Leave a Comment