
Growing Mint Indoors can seem like a daunting task, conjuring images of sprawling outdoor gardens, but I’m here to tell you it’s absolutely achievable, even if you only have a sunny windowsill! For centuries, mint has been cherished not just for its refreshing flavor, but also for its medicinal properties. From ancient Egyptians using it in religious ceremonies to Romans flavoring their sauces and wines, mint boasts a rich and vibrant history.
But let’s be honest, who has the time (or the space!) for a sprawling herb garden these days? That’s where these simple DIY tricks come in. Imagine having fresh, fragrant mint readily available for your morning tea, summer cocktails, or even as a natural air freshener. No more last-minute grocery store runs or settling for dried-out leaves!
This article is packed with easy-to-follow tips and hacks that will empower you to successfully start growing mint indoors, regardless of your gardening experience. We’ll cover everything from choosing the right container and soil to providing the perfect amount of light and water. Get ready to unleash your inner gardener and enjoy the delightful benefits of homegrown mint!
Growing Mint Indoors: A Beginner’s Guide to Fresh Flavor All Year Round
Okay, so you want fresh mint at your fingertips, no matter the season? I get it! There’s nothing quite like adding a sprig of homegrown mint to a refreshing mojito or a steaming cup of tea. Growing mint indoors is surprisingly easy, and I’m here to walk you through the whole process. Let’s get started!
Choosing Your Mint Variety
First things first, let’s talk mint varieties. There are tons of different types, each with its own unique flavor profile. Some popular choices include:
* Spearmint: This is your classic mint flavor, perfect for teas and desserts.
* Peppermint: A bolder, more intense flavor, great for candies and cocktails.
* Chocolate Mint: Yes, you read that right! It has a subtle chocolatey aroma and flavor.
* Apple Mint: A milder, fruitier mint with a hint of apple.
I recommend starting with spearmint or peppermint, as they’re generally the easiest to grow. You can find mint plants at most garden centers or even some grocery stores.
Gathering Your Supplies
Before we dive into the planting process, let’s make sure you have everything you need. Here’s a checklist:
* A Pot: Choose a pot that’s at least 6 inches in diameter. Mint likes to spread, so a larger pot is better. Make sure it has drainage holes!
* Potting Soil: Use a well-draining potting mix. Avoid using garden soil, as it can be too heavy and compact.
* Mint Plant: As mentioned earlier, you can find these at garden centers or grocery stores.
* Watering Can: For gentle watering.
* Grow Light (Optional): If you don’t have a sunny spot, a grow light can be a lifesaver.
* Scissors or Pruning Shears: For harvesting and trimming.
Planting Your Mint
Alright, let’s get our hands dirty! Here’s how to plant your mint:
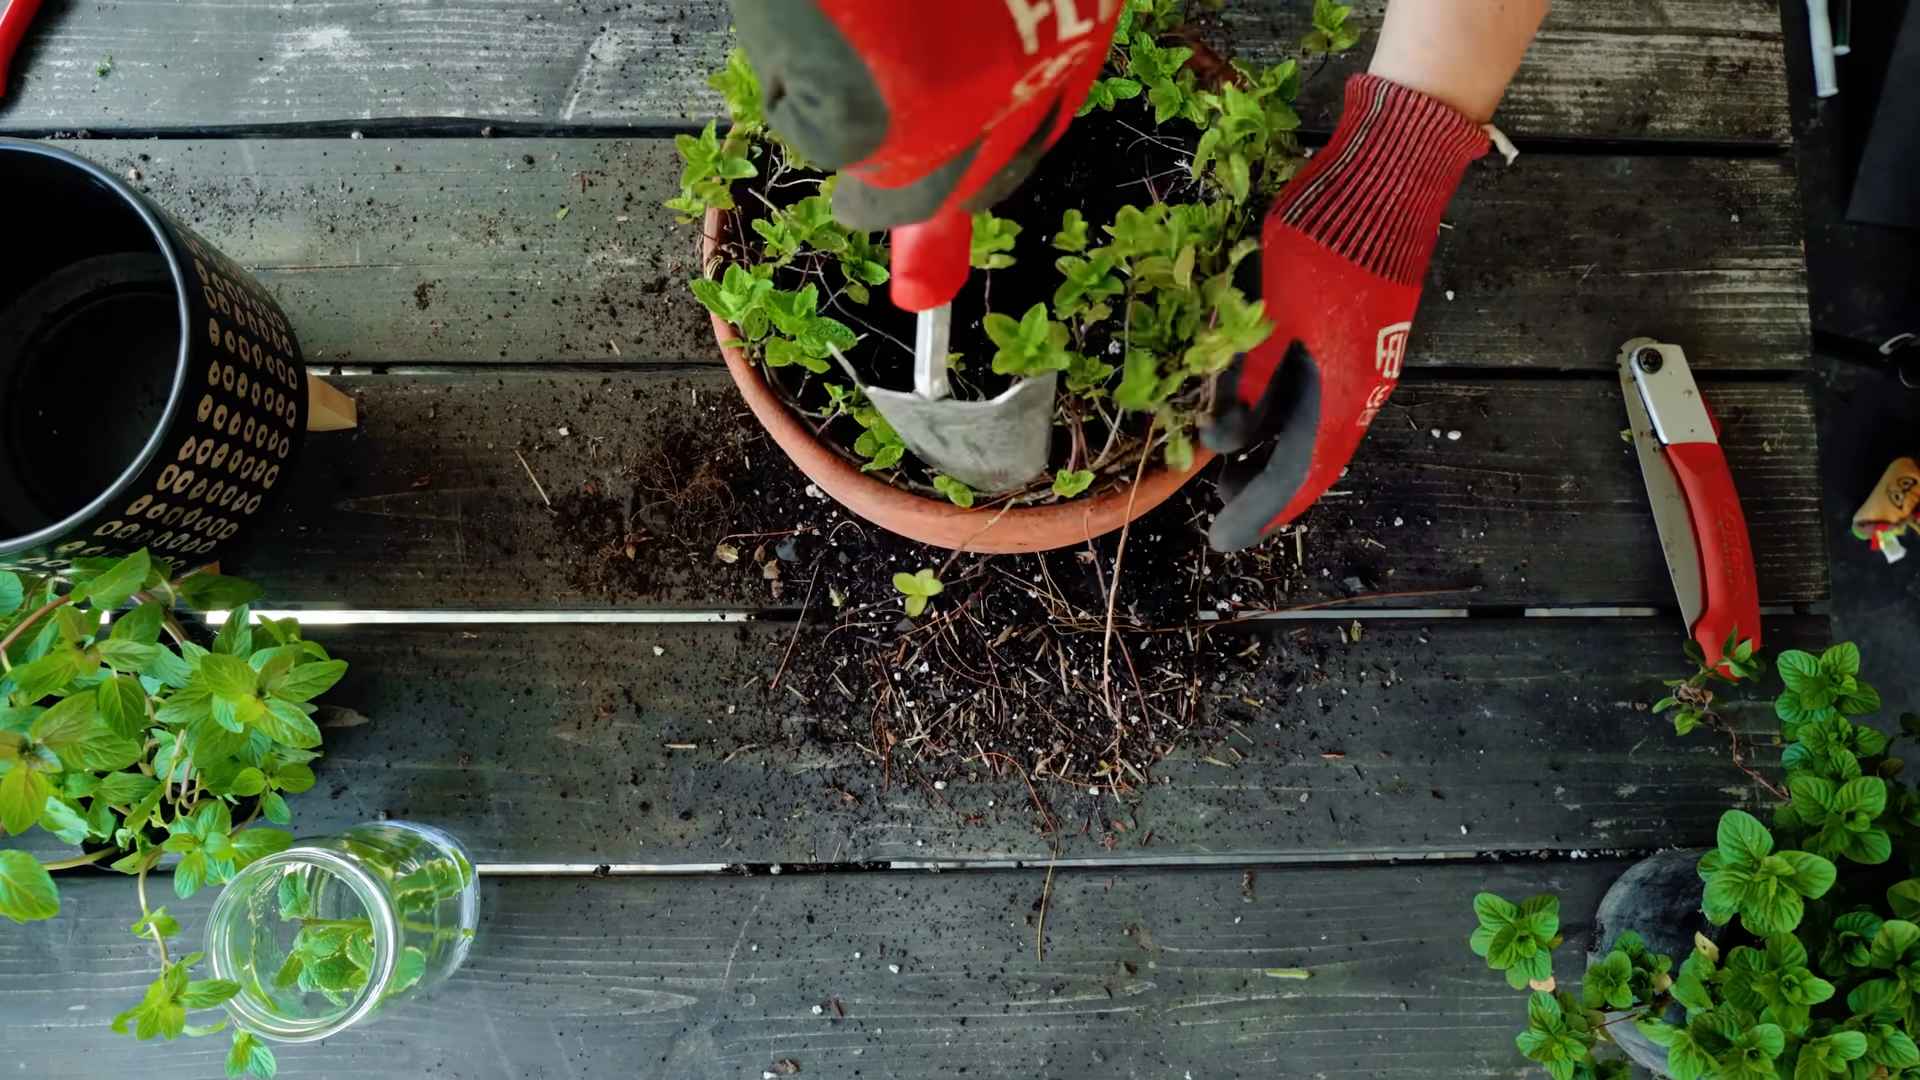
1. Prepare the Pot: Fill your pot with potting mix, leaving about an inch of space at the top.
2. Remove the Mint from its Container: Gently squeeze the sides of the container to loosen the plant. Carefully remove the mint plant, trying not to damage the roots.
3. Loosen the Roots: Gently tease the roots apart with your fingers. This will encourage them to spread out and establish themselves in the new pot.
4. Plant the Mint: Place the mint plant in the center of the pot. Make sure the top of the root ball is level with the soil surface.
5. Fill in with Soil: Add more potting mix around the plant, gently pressing it down to secure it.
6. Water Thoroughly: Water the plant until water drains out of the drainage holes. This will help settle the soil and hydrate the roots.
Finding the Perfect Spot
Mint loves sunlight, so finding the right spot is crucial. Here’s what to look for:
* Sunlight: Mint needs at least 6 hours of sunlight per day. A south-facing window is ideal.
* Temperature: Mint prefers temperatures between 65°F and 75°F (18°C and 24°C).
* Humidity: Mint likes humidity, but it can tolerate drier conditions.
If you don’t have a sunny spot, don’t worry! You can use a grow light to supplement the sunlight. Place the grow light about 6-12 inches above the plant.
Watering and Feeding Your Mint
Watering is key to keeping your mint happy. Here’s what you need to know:
* Watering Frequency: Water your mint when the top inch of soil feels dry to the touch.
* Watering Technique: Water thoroughly, until water drains out of the drainage holes. Avoid overwatering, as this can lead to root rot.
* Fertilizing: Feed your mint with a balanced liquid fertilizer every 2-4 weeks during the growing season (spring and summer).
Pruning and Harvesting Your Mint
Pruning and harvesting are essential for keeping your mint plant healthy and productive.
* Pruning: Pinch off the top leaves regularly to encourage bushier growth. This will also prevent the plant from getting leggy.
* Harvesting: You can harvest mint leaves at any time. Simply snip off the stems with scissors or pruning shears.
* Flowering: Once your mint plant starts to flower, the leaves may become bitter. Pinch off the flower buds to encourage leaf production.
Dealing with Common Problems
Even with the best care, you might encounter some problems. Here are a few common issues and how to deal with them:
* Pests: Mint can be susceptible to pests like aphids and spider mites. Inspect your plant regularly and treat any infestations with insecticidal soap.
* Root Rot: Overwatering can lead to root rot. Make sure your pot has drainage holes and avoid watering too frequently.
* Yellowing Leaves: Yellowing leaves can be a sign of overwatering, underwatering, or nutrient deficiency. Adjust your watering and fertilizing accordingly.
Propagating Your Mint
Mint is incredibly easy to propagate, which means you can create new plants from cuttings. Here’s how:
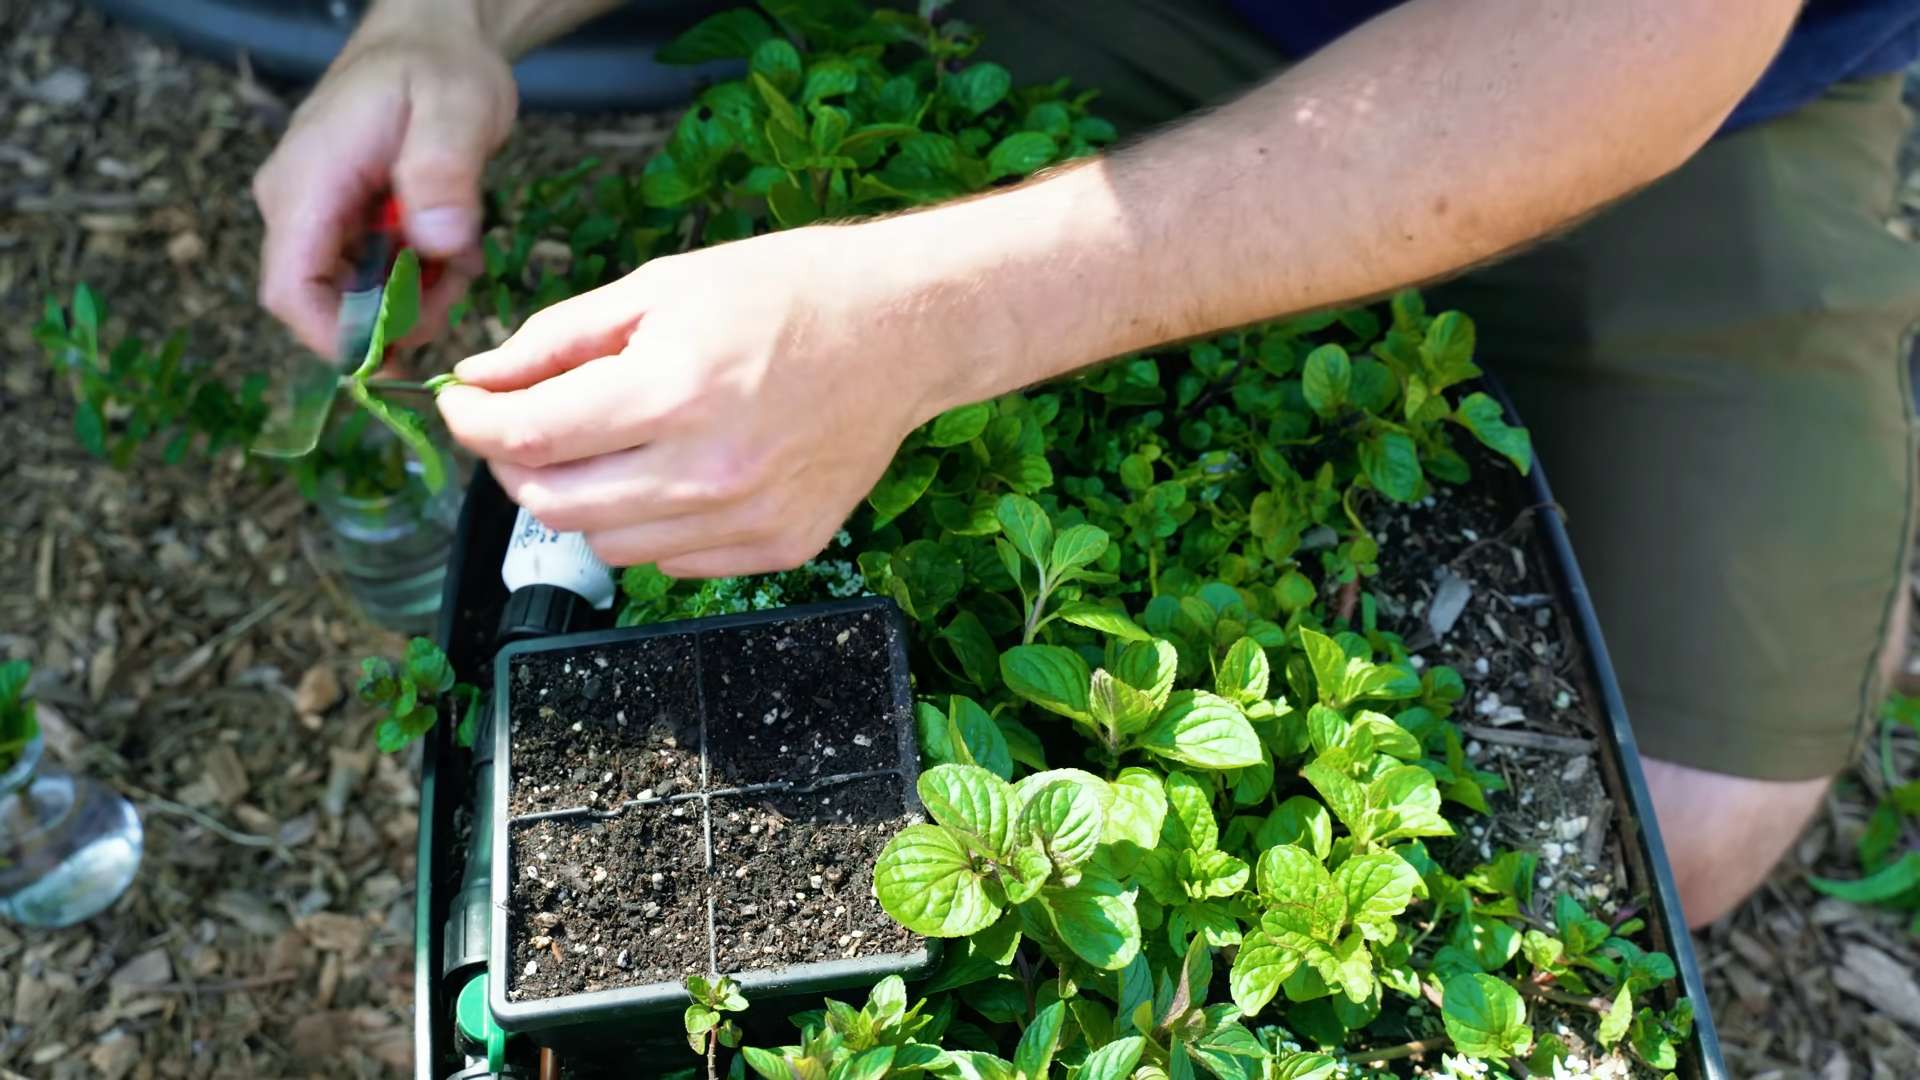
1. Take a Cutting: Cut a 4-6 inch stem from your mint plant, just below a leaf node (the point where a leaf grows from the stem).
2. Remove Lower Leaves: Remove the leaves from the bottom half of the stem.
3. Place in Water: Place the cutting in a glass of water, making sure the bottom nodes are submerged.
4. Wait for Roots: Place the glass in a bright, indirect light location. Change the water every few days. Roots should start to appear in a week or two.
5. Plant the Cutting: Once the roots are about an inch long, you can plant the cutting in a pot filled with potting mix.
Keeping Mint Contained
Mint is notorious for spreading, so it’s important to keep it contained, even indoors. Here are a few tips:
* Use a Pot: Always grow mint in a pot to prevent it from spreading.
* Monitor for Runners: Mint can send out runners (horizontal stems) that can root in other areas. Regularly check your plant for runners and remove them.
Troubleshooting Common Issues
Let’s dive a little deeper into some common problems you might encounter and how to fix them. I want to make sure you’re prepared for anything!
Yellowing Leaves
This is a super common issue, and thankfully, usually easy to fix.
* Overwatering: As I mentioned before, too much water can suffocate the roots. Let the soil dry out a bit between waterings. Make sure your pot has good drainage!
* Underwatering: On the flip side, not enough water can also cause yellowing. Check the soil moisture regularly and water when the top inch feels dry.
* Nutrient Deficiency: Mint needs nutrients to thrive. Try fertilizing with a balanced liquid fertilizer every 2-4 weeks.
* Sunlight: Not enough sunlight can also cause yellowing. Move your plant to a brighter location or use a grow light.
Brown Spots on Leaves
Brown spots can indicate a few different things.
* Fungal Infection: This is more common in humid environments. Improve air circulation around your plant and consider using a fungicide if the problem persists.
* Sunburn: If your plant is getting too much direct sunlight, the leaves can get sunburned. Move it to a spot with indirect light.
* Pest Damage: Check your plant for pests like spider mites or aphids. They can cause brown spots as they feed on the leaves.
Leggy Growth
Leggy growth means your mint plant is getting long and spindly, with few leaves.
* Not Enough Light: This is the most common cause of leggy growth. Mint needs plenty of sunlight to grow properly.
* Lack of Pruning: Regular pruning encourages bushier growth. Pinch off the top leaves regularly to keep your plant compact.
Pests
Pests can be a real nuisance, but don’t worry, you can get rid of them!
* Aphids: These tiny green bugs suck the sap from plants. You can wash them off with a strong stream of water or use insecticidal soap.
* Spider Mites: These tiny mites create webs on the leaves. Increase humidity around your plant and use insecticidal soap.
* Whiteflies: These small white flies fly up when you disturb the plant. Use sticky traps or insecticidal soap.
Harvesting for Maximum Flavor
Okay, so you’ve got a thriving mint plant. Now, let’
Conclusion
So, there you have it! Growing mint indoors isn’t just a whimsical dream for those with a green thumb; it’s an achievable reality for anyone, regardless of their gardening experience. We’ve walked through the simple steps, from selecting the right container and soil to providing adequate light and water. But why is this DIY trick a must-try?
First and foremost, imagine the sheer convenience of having fresh, fragrant mint readily available at your fingertips. No more last-minute dashes to the grocery store or settling for dried, lackluster substitutes. Whether you’re whipping up a refreshing mojito, garnishing a summer salad, or brewing a soothing cup of mint tea, the vibrant flavor of homegrown mint will elevate your culinary creations to a whole new level.
Beyond the culinary benefits, growing mint indoors offers a therapeutic escape. The simple act of nurturing a plant, watching it thrive, and inhaling its invigorating aroma can be incredibly calming and stress-relieving. It’s a small but significant way to connect with nature, even within the confines of your home.
But the advantages don’t stop there. By growing your own mint, you’re also contributing to a more sustainable lifestyle. You’re reducing your reliance on commercially grown herbs, which often involve pesticides and long-distance transportation. Plus, you’re minimizing plastic waste by avoiding those single-use herb containers.
Now, let’s talk about variations. While we’ve focused on the basic method, there are plenty of ways to personalize your indoor mint garden. Experiment with different varieties of mint, such as peppermint, spearmint, chocolate mint, or even orange mint. Each variety offers a unique flavor profile and aroma, allowing you to create a diverse and exciting herb collection.
Consider using different types of containers to add visual appeal to your indoor garden. Terracotta pots, hanging baskets, or even repurposed mason jars can all work beautifully. Just make sure the container has adequate drainage to prevent waterlogging.
You can also explore different lighting options. While a sunny windowsill is ideal, you can supplement with grow lights if needed, especially during the darker winter months. LED grow lights are energy-efficient and provide the perfect spectrum of light for healthy plant growth.
Finally, don’t be afraid to get creative with your mint. Use it to infuse water, make homemade beauty products, or even create natural insect repellents. The possibilities are endless!
We wholeheartedly encourage you to try this DIY trick and experience the joy of growing mint indoors for yourself. It’s a simple, rewarding, and sustainable way to enhance your life. And most importantly, share your experience with us! We’d love to hear about your successes, challenges, and creative uses for your homegrown mint. Post pictures of your indoor mint gardens, share your favorite recipes, and let us know what you’ve learned along the way. Together, we can create a community of indoor gardening enthusiasts and inspire others to embrace the magic of growing their own herbs. So, grab a pot, some soil, and a sprig of mint, and let the adventure begin! You’ll be amazed at how easy and rewarding it is to have fresh, fragrant mint at your fingertips, ready to elevate your culinary creations and brighten your day. This is truly a must-try for anyone looking to add a touch of green to their home and a burst of flavor to their life.
Frequently Asked Questions (FAQ)
What is the best type of mint to grow indoors?
The best type of mint to grow indoors depends on your personal preferences. Spearmint and peppermint are popular choices due to their versatility and refreshing flavors. Spearmint is milder and sweeter, making it ideal for teas and cocktails, while peppermint has a stronger, more intense flavor that’s great for desserts and candies. Chocolate mint offers a unique, slightly chocolatey flavor, while orange mint has a citrusy aroma. Experiment with different varieties to find your favorites! Consider starting with spearmint as it is generally considered the easiest to grow.
How much sunlight does indoor mint need?
Mint thrives in bright, indirect sunlight. Aim for at least 4-6 hours of sunlight per day. A sunny windowsill facing east or west is usually ideal. If you don’t have access to enough natural light, you can supplement with grow lights. Position the grow lights about 6-12 inches above the plants and keep them on for 12-14 hours per day.
What kind of soil should I use for growing mint indoors?
Use a well-draining potting mix that is rich in organic matter. A mixture of peat moss, perlite, and vermiculite works well. Avoid using garden soil, as it can be too heavy and may contain pests or diseases. You can also add some compost to the potting mix to provide extra nutrients.
How often should I water my indoor mint plant?
Water your mint plant when the top inch of soil feels dry to the touch. Avoid overwatering, as this can lead to root rot. Water thoroughly until water drains out of the bottom of the pot. During the warmer months, you may need to water more frequently. Check the soil moisture regularly and adjust your watering schedule accordingly.
How do I prevent my mint from becoming leggy?
Leggy growth occurs when the plant isn’t getting enough light. To prevent this, ensure your mint plant is receiving adequate sunlight or grow light exposure. You can also pinch back the stems regularly to encourage bushier growth. Pinching involves removing the tips of the stems, which stimulates the plant to produce more side shoots.
How do I harvest mint leaves?
Harvest mint leaves by snipping off the stems just above a leaf node (the point where a leaf grows from the stem). This will encourage the plant to produce new growth from that point. You can harvest leaves as needed throughout the growing season. For the best flavor, harvest mint leaves in the morning, after the dew has dried.
How do I propagate mint from cuttings?
Mint is very easy to propagate from cuttings. Simply take a 4-6 inch cutting from a healthy stem, remove the lower leaves, and place the cutting in a glass of water. Change the water every few days. Within a week or two, roots should start to develop. Once the roots are about an inch long, you can plant the cutting in a pot filled with well-draining potting mix.
Why are the leaves on my mint plant turning yellow?
Yellowing leaves can be caused by several factors, including overwatering, underwatering, nutrient deficiencies, or pests. Check the soil moisture to ensure you’re not overwatering or underwatering. If the soil is consistently wet, allow it to dry out before watering again. If the soil is dry, water thoroughly. You can also fertilize your mint plant with a balanced liquid fertilizer to address any nutrient deficiencies. Inspect the leaves for pests, such as aphids or spider mites, and treat accordingly.
How do I control pests on my indoor mint plant?
Regularly inspect your mint plant for pests. If you find any, you can try washing them off with a strong stream of water. You can also use insecticidal soap or neem oil to control pests. Be sure to follow the instructions on the product label carefully. Avoid using harsh chemicals, as they can harm your plant.
Can I grow mint in a container with other herbs?
While it’s technically possible to grow mint in a container with other herbs, it’s generally not recommended. Mint is a vigorous grower and can quickly take over the container, crowding out other plants. It’s best to grow mint in its own container to prevent it from becoming invasive.
How do I overwinter my indoor mint plant?
Mint is a perennial plant, meaning it can live for several years. To overwinter your indoor mint plant, reduce watering and fertilizing during the dormant season (fall and winter). Place the plant in a cool, bright location. You can also prune back the stems to encourage new growth in the spring.
My mint plant is flowering. Should I remove the flowers?
Yes, it’s generally recommended to remove the flowers from your mint plant. Flowering can cause the plant to become less productive and the leaves to lose some of their flavor. Simply pinch off the flower buds as soon as you see them.
How often should I fertilize my indoor mint plant?
Fertilize your indoor mint plant every 2-4 weeks during the growing season (spring and summer) with a balanced liquid fertilizer. Follow the instructions on the fertilizer label carefully. Avoid over-fertilizing, as this can burn the roots.
Is growing mint indoors a good way to have fresh mint year-round?
Absolutely! Growing mint indoors is an excellent way to ensure you have a constant supply of fresh mint, regardless of the season. With proper care, your indoor mint plant can thrive year-round, providing you with flavorful leaves for all your culinary and beverage needs.

Leave a Comment