
Grow Cauliflower Backyard – sounds intimidating, right? But trust me, with a few simple tricks and a little DIY spirit, you can be harvesting your own creamy, delicious cauliflower heads in no time! Forget those overpriced, sometimes-questionable veggies at the grocery store. Imagine the satisfaction of serving up a dish made with cauliflower you nurtured from seed to plate, right in your own backyard.
Cauliflower cultivation has a rich history, dating back to ancient times in the Mediterranean. It was considered a delicacy, enjoyed by emperors and the elite. While we might not be royalty, we can certainly enjoy the royal treatment of fresh, homegrown cauliflower! For centuries, gardeners have been perfecting the art of coaxing these temperamental brassicas to flourish, and now, I’m going to share some of their secrets with you.
Why bother with the effort? Well, besides the bragging rights, growing your own cauliflower allows you to control exactly what goes into your food – no harmful pesticides or mystery chemicals. Plus, freshly harvested cauliflower tastes infinitely better than anything you can buy. This DIY guide is packed with easy-to-follow tips and tricks that will help you grow cauliflower backyard like a pro, even if you’re a complete beginner. So, grab your gardening gloves, and let’s get started!
Growing Cauliflower in Your Backyard: A Comprehensive DIY Guide
Hey there, fellow gardening enthusiasts! I’m so excited to share my experience and knowledge on growing cauliflower right in your own backyard. It might seem intimidating at first, but trust me, with a little patience and the right guidance, you’ll be harvesting beautiful, creamy white heads in no time. Let’s dive in!
Choosing the Right Cauliflower Variety
Before we even think about planting, it’s crucial to pick the right cauliflower variety for your climate and growing season. Different varieties mature at different rates, so consider your local weather patterns.
* Early Varieties: These mature in about 50-60 days. Great for shorter growing seasons. Examples include ‘Snowball Y Improved’ and ‘Early White Hybrid’.
* Mid-Season Varieties: These take around 70-80 days to mature. ‘Snow Crown’ is a popular choice.
* Late Varieties: These need 80+ days to mature. ‘Giant of Naples’ is a good option if you have a long, cool growing season.
* Colored Caulifower: For a bit of fun, consider purple (‘Graffiti’), orange (‘Cheddar’), or green (‘Romanesco’) varieties. They taste similar to white cauliflower but add a vibrant touch to your garden and plate.
I personally love growing ‘Snow Crown’ because it’s reliable and produces consistently good heads. But experiment and see what works best for you!
Preparing the Soil
Cauliflower is a heavy feeder, meaning it needs nutrient-rich soil to thrive. Proper soil preparation is absolutely essential for a successful harvest.
* Soil Type: Cauliflower prefers well-drained, fertile soil with a pH between 6.0 and 7.0.
* Sunlight: Choose a location that receives at least 6 hours of direct sunlight per day.
* Testing the Soil: I highly recommend testing your soil before planting. You can buy a soil testing kit at most garden centers or send a sample to your local agricultural extension office. This will tell you the pH level and nutrient content of your soil.
* Amending the Soil: Based on your soil test results, amend the soil accordingly.
* Compost: Add plenty of compost to improve soil structure, drainage, and fertility. I usually add a few inches of compost to the planting area and work it in well.
* Manure: Well-rotted manure is another excellent soil amendment. Be sure it’s fully composted to avoid burning the plants.
* Fertilizer: Incorporate a balanced fertilizer (e.g., 10-10-10) into the soil according to the package directions. Alternatively, you can use an organic fertilizer like bone meal or blood meal.
* Lime: If your soil is too acidic (pH below 6.0), add lime to raise the pH.
* Sulfur: If your soil is too alkaline (pH above 7.0), add sulfur to lower the pH.
I usually start preparing my soil a few weeks before planting to give the amendments time to break down and integrate into the soil.
Starting Cauliflower Seeds Indoors (Optional)
While you can direct sow cauliflower seeds, I’ve found that starting them indoors gives them a head start, especially in areas with short growing seasons.
* When to Start: Start seeds indoors about 4-6 weeks before the last expected frost.
* Seed Starting Mix: Use a high-quality seed starting mix.
* Containers: Sow seeds in seed trays or individual pots. I prefer individual pots because it minimizes root disturbance when transplanting.
* Sowing Seeds: Sow seeds about 1/4 inch deep.
* Watering: Keep the soil consistently moist but not waterlogged.
* Light: Provide plenty of light. A sunny windowsill might not be enough, so consider using grow lights.
* Temperature: Maintain a temperature of around 65-70°F (18-21°C).
* Hardening Off: Before transplanting seedlings outdoors, you need to “harden them off.” This means gradually exposing them to outdoor conditions over a period of 7-10 days. Start by placing them in a sheltered location for a few hours each day, gradually increasing the amount of time they spend outdoors.
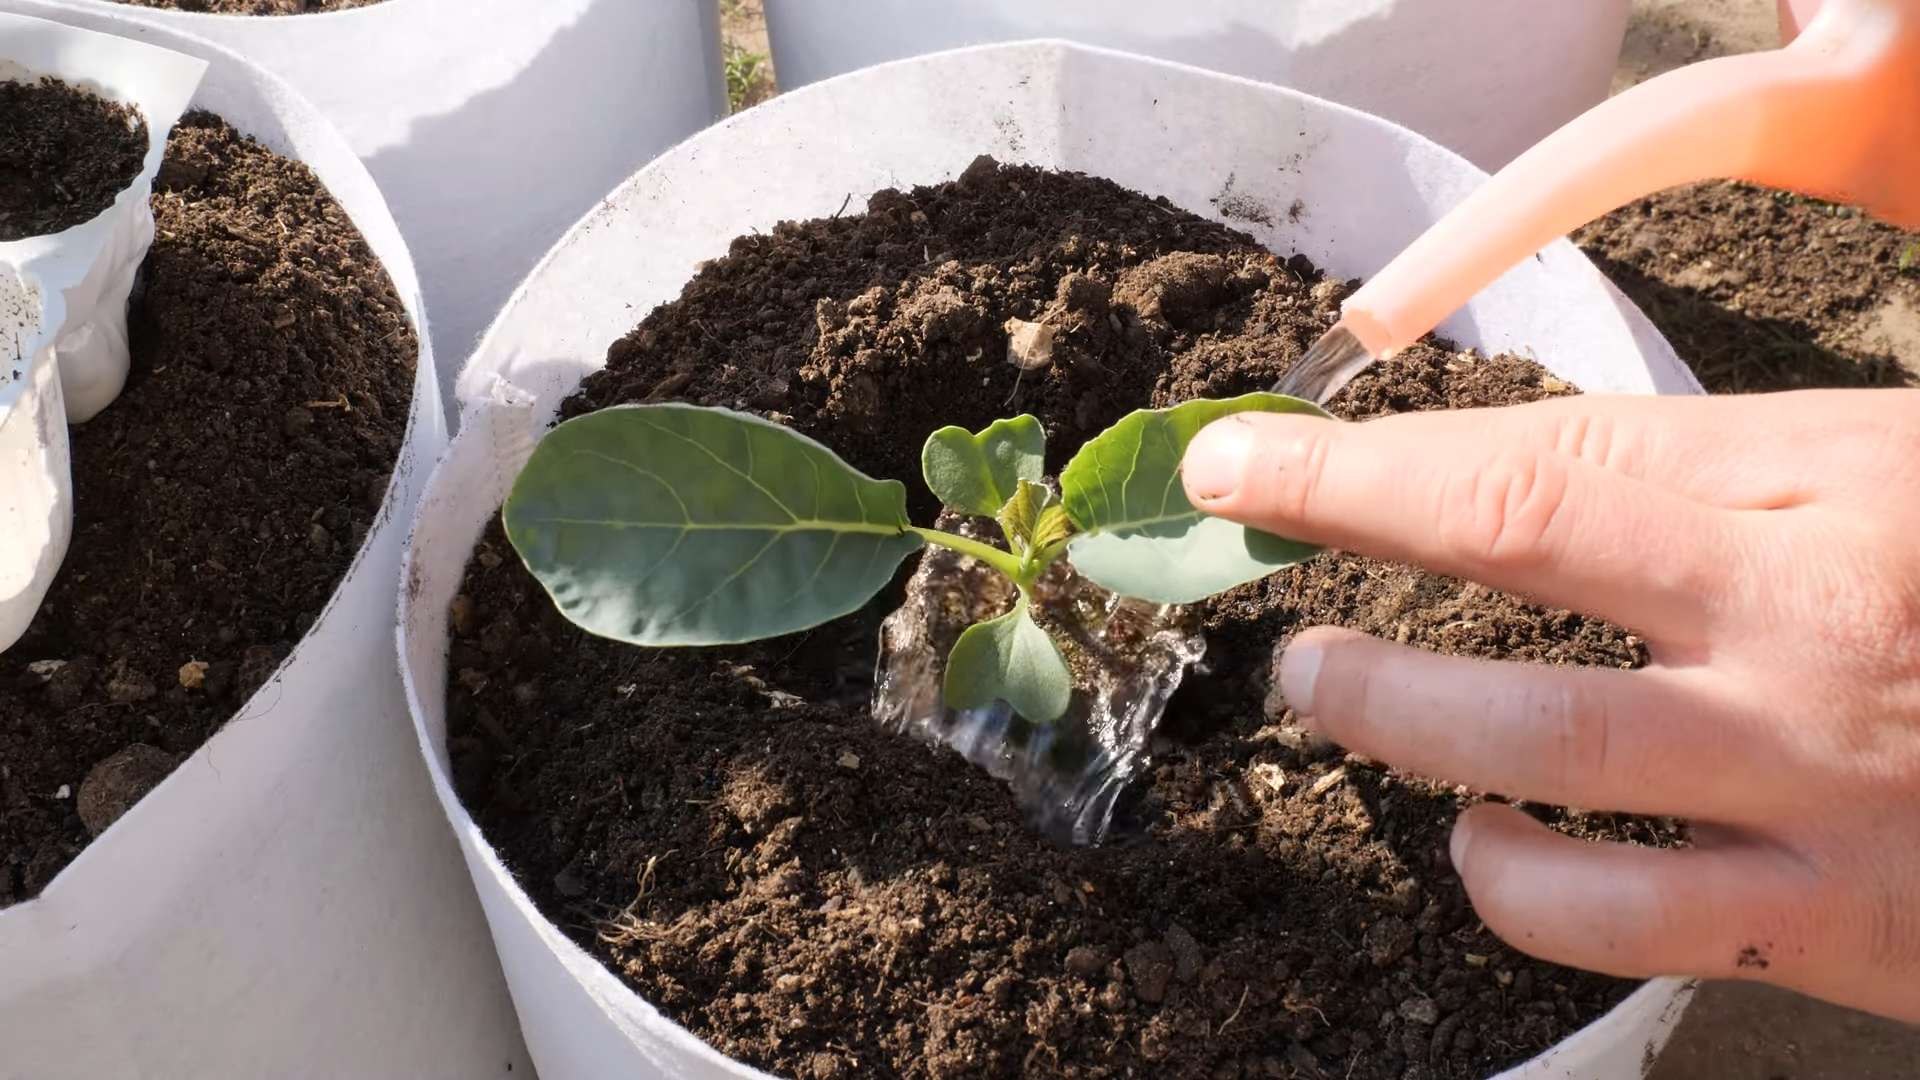
Transplanting Cauliflower Seedlings
Once your seedlings have developed a few sets of true leaves and the danger of frost has passed, it’s time to transplant them into the garden.
1. Choose a Cloudy Day: Transplanting on a cloudy day helps reduce stress on the seedlings.
2. Prepare the Planting Holes: Dig holes that are slightly larger than the root balls of the seedlings. Space the holes about 18-24 inches apart.
3. Carefully Remove Seedlings: Gently remove the seedlings from their containers, being careful not to damage the roots.
4. Plant Seedlings: Place the seedlings in the holes and backfill with soil. Make sure the top of the root ball is level with the soil surface.
5. Water Thoroughly: Water the seedlings thoroughly after planting.
6. Mulch: Apply a layer of mulch around the plants to help retain moisture, suppress weeds, and regulate soil temperature. I like to use straw or shredded leaves.
Direct Sowing Cauliflower Seeds
If you prefer to direct sow cauliflower seeds, follow these steps:
1. Wait Until the Soil Warms Up: Direct sow seeds after the last expected frost when the soil temperature is at least 60°F (15°C).
2. Prepare the Soil: Prepare the soil as described above.
3. Sow Seeds: Sow seeds about 1/2 inch deep and 2-3 inches apart.
4. Water Thoroughly: Water the seeds thoroughly after planting.
5. Thin Seedlings: Once the seedlings emerge, thin them to 18-24 inches apart.
Caring for Your Cauliflower Plants
Consistent care is essential for healthy cauliflower plants and a bountiful harvest.
* Watering: Cauliflower needs consistent moisture, especially during head formation. Water deeply and regularly, aiming for about 1-1.5 inches of water per week. Avoid overhead watering, as this can promote fungal diseases. Drip irrigation is ideal.
* Fertilizing: Side-dress the plants with a balanced fertilizer every 3-4 weeks. You can also use a liquid fertilizer, such as fish emulsion or seaweed extract.
* Weeding: Keep the area around the plants free of weeds. Weeds compete with cauliflower for nutrients and water.
* Pest Control: Cauliflower is susceptible to several pests, including cabbage worms, aphids, and flea beetles.
* Cabbage Worms: These green caterpillars can devour cauliflower leaves. Handpick them off the plants or use Bacillus thuringiensis (Bt), a biological insecticide.
* Aphids: These small, sap-sucking insects can weaken plants. Spray them with insecticidal soap or neem oil.
* Flea Beetles: These tiny beetles can create small holes in the leaves. Cover the plants with row covers or use insecticidal soap.
* Disease Control: Cauliflower can be affected by several diseases, including black rot, clubroot, and downy mildew.
* Black Rot: This bacterial disease causes dark lesions on the leaves. Plant disease-resistant varieties and practice crop rotation.
* Clubroot: This fungal disease causes swollen roots and stunted growth. Improve soil drainage and add lime to raise the soil pH.
* Downy Mildew: This fungal disease causes yellow spots on the leaves. Improve air circulation and avoid overhead watering.
* Blanching (Optional): Blanching is the process of covering the developing cauliflower head to prevent it from turning yellow or brown. This results in a whiter, more tender head.
* When to Blanch: Blanch when the head is about 2-3 inches in diameter.
* How to Blanch: Gently fold the outer leaves over the head and secure them with twine or rubber bands.
* Check Regularly: Check the head regularly to make sure it’s not rotting or attracting pests.
* Harvest Time: The head should be ready to harvest in about 7-12 days after blanching.
I usually skip the blanching process, especially with colored varieties, as I enjoy the natural color of the cauliflower.
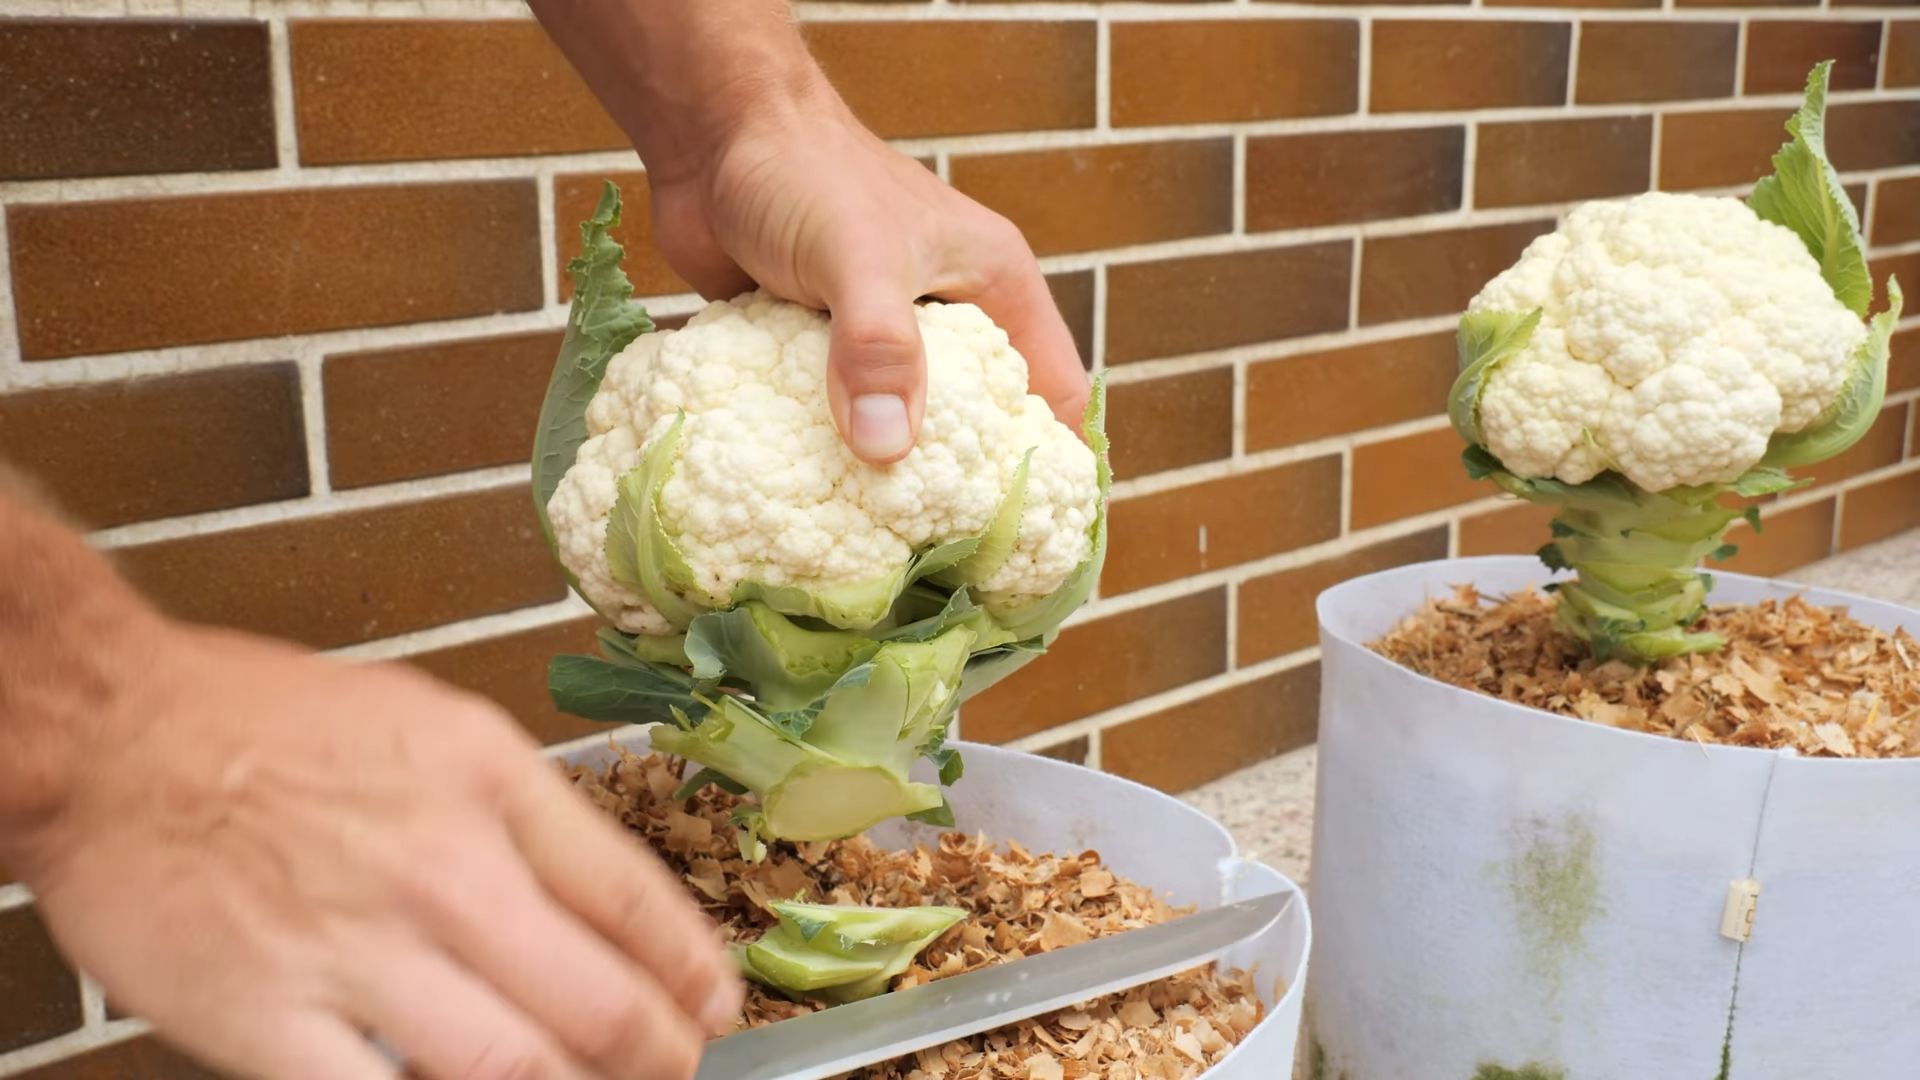
Harvesting Cauliflower
Knowing when to harvest cauliflower is key to getting the best flavor and texture.
* When to Harvest: Harvest cauliflower when the head is firm, compact, and about 6-8 inches in diameter. The florets should be tightly closed.
* How to Harvest: Cut the stem of the cauliflower head with a sharp knife, leaving a
Conclusion
So, there you have it! Growing cauliflower in your own backyard isn’t just a gardening project; it’s a gateway to fresher, healthier, and more flavorful meals. We’ve walked through the essential steps, from selecting the right variety to warding off common pests, and hopefully demystified the process along the way.
Why is this DIY trick a must-try? Because store-bought cauliflower simply can’t compare to the vibrant taste and satisfying crunch of a head you’ve nurtured yourself. You control the growing conditions, ensuring it’s free from unwanted chemicals and harvested at peak ripeness. Plus, there’s an undeniable sense of accomplishment that comes with bringing a vegetable from seed to table. It’s a rewarding experience that connects you to your food in a meaningful way.
But don’t stop there! Feel free to experiment with different cauliflower varieties. Consider purple cauliflower for a visually stunning addition to your dishes, or try Romanesco cauliflower for its unique fractal pattern and slightly nutty flavor. You can also adjust the planting schedule to extend your harvest season, ensuring a steady supply of fresh cauliflower throughout the year. Companion planting is another avenue to explore; marigolds, for example, can help deter pests naturally.
And speaking of variations, think beyond the standard steamed or roasted cauliflower. Try grilling it for a smoky char, pureeing it into a creamy soup, or even using it as a low-carb alternative to rice or mashed potatoes. The possibilities are truly endless!
We wholeheartedly encourage you to give this DIY trick a try. Even if you’re a novice gardener, the steps are straightforward, and the rewards are well worth the effort. Imagine serving a dish featuring your own homegrown cauliflower – the taste, the pride, and the satisfaction are unmatched.
Don’t be afraid to get your hands dirty and embrace the journey of growing cauliflower in your backyard. And most importantly, we want to hear about your experience! Share your tips, successes, and even your challenges in the comments below. Let’s build a community of backyard cauliflower growers and learn from each other. Your insights could be invaluable to someone just starting out. So, grab your seeds, prepare your soil, and get ready to enjoy the delicious fruits (or rather, vegetables) of your labor! Happy gardening!
Frequently Asked Questions (FAQ)
Q: What is the best time of year to start growing cauliflower?
A: The best time to start growing cauliflower depends on your climate. Cauliflower thrives in cool weather, so it’s generally best to plant it in the spring for a fall harvest or in late summer for a winter harvest in milder climates. For spring planting, start seeds indoors 6-8 weeks before the last expected frost. For fall planting, start seeds outdoors in mid-summer, ensuring they have enough time to mature before the first frost. Check your local frost dates for the most accurate timing.
Q: What kind of soil does cauliflower need?
A: Cauliflower needs well-drained, fertile soil that is rich in organic matter. The ideal soil pH is between 6.0 and 7.0. Before planting, amend your soil with compost or well-rotted manure to improve its fertility and drainage. You can also add a balanced fertilizer to provide essential nutrients. Avoid heavy clay soils, as they can retain too much moisture and lead to root rot. If you have clay soil, consider growing cauliflower in raised beds or containers.
Q: How much sunlight does cauliflower need?
A: Cauliflower requires at least 6 hours of direct sunlight per day to thrive. Choose a planting location that receives full sun for most of the day. If you live in a particularly hot climate, some afternoon shade can be beneficial to prevent the cauliflower from bolting (going to seed prematurely).
Q: How often should I water cauliflower?
A: Cauliflower needs consistent moisture to grow properly. Water deeply and regularly, especially during dry periods. Aim to keep the soil consistently moist but not waterlogged. A good rule of thumb is to water when the top inch of soil feels dry to the touch. Mulching around the plants can help retain moisture and suppress weeds.
Q: What are some common pests and diseases that affect cauliflower, and how can I prevent them?
A: Cauliflower is susceptible to several pests and diseases, including cabbage worms, aphids, flea beetles, clubroot, and black rot. To prevent these problems, practice good garden hygiene, such as removing plant debris and weeds. Use row covers to protect young plants from pests. Inspect your plants regularly for signs of infestation or disease and take action promptly. Organic pest control methods, such as insecticidal soap or neem oil, can be effective against many common pests. For diseases like clubroot, ensure proper soil drainage and consider crop rotation.
Q: How do I know when my cauliflower is ready to harvest?
A: Cauliflower is ready to harvest when the head is firm, compact, and reaches the desired size (usually 6-8 inches in diameter). The florets should be tightly closed and not starting to separate. Check the variety you are growing for specific size expectations. Use a sharp knife to cut the head from the plant, leaving a few leaves attached to protect the head.
Q: Can I grow cauliflower in containers?
A: Yes, you can grow cauliflower in containers, but you’ll need a large container (at least 12 inches in diameter) to accommodate the plant’s root system. Use a high-quality potting mix and ensure the container has good drainage. Water regularly and fertilize every few weeks. Choose a dwarf or compact cauliflower variety for best results in containers.
Q: My cauliflower head is starting to turn yellow. What should I do?
A: Yellowing of the cauliflower head can be caused by several factors, including overexposure to sunlight, lack of nutrients, or disease. If the head is exposed to direct sunlight, try tying the outer leaves together over the head to blanch it and protect it from the sun. Ensure the plant is receiving adequate nutrients by fertilizing with a balanced fertilizer. If you suspect disease, inspect the plant closely for other symptoms and take appropriate action.
Q: Can I eat the leaves of the cauliflower plant?
A: Yes, the leaves of the cauliflower plant are edible and can be cooked like other leafy greens, such as kale or collard greens. They have a slightly stronger flavor than the florets. Choose young, tender leaves for the best taste and texture.
Q: How can I store cauliflower after harvesting?
A: To store cauliflower after harvesting, wrap the head loosely in plastic wrap and store it in the refrigerator. It should keep for up to a week. You can also blanch and freeze cauliflower for longer storage.

Leave a Comment