
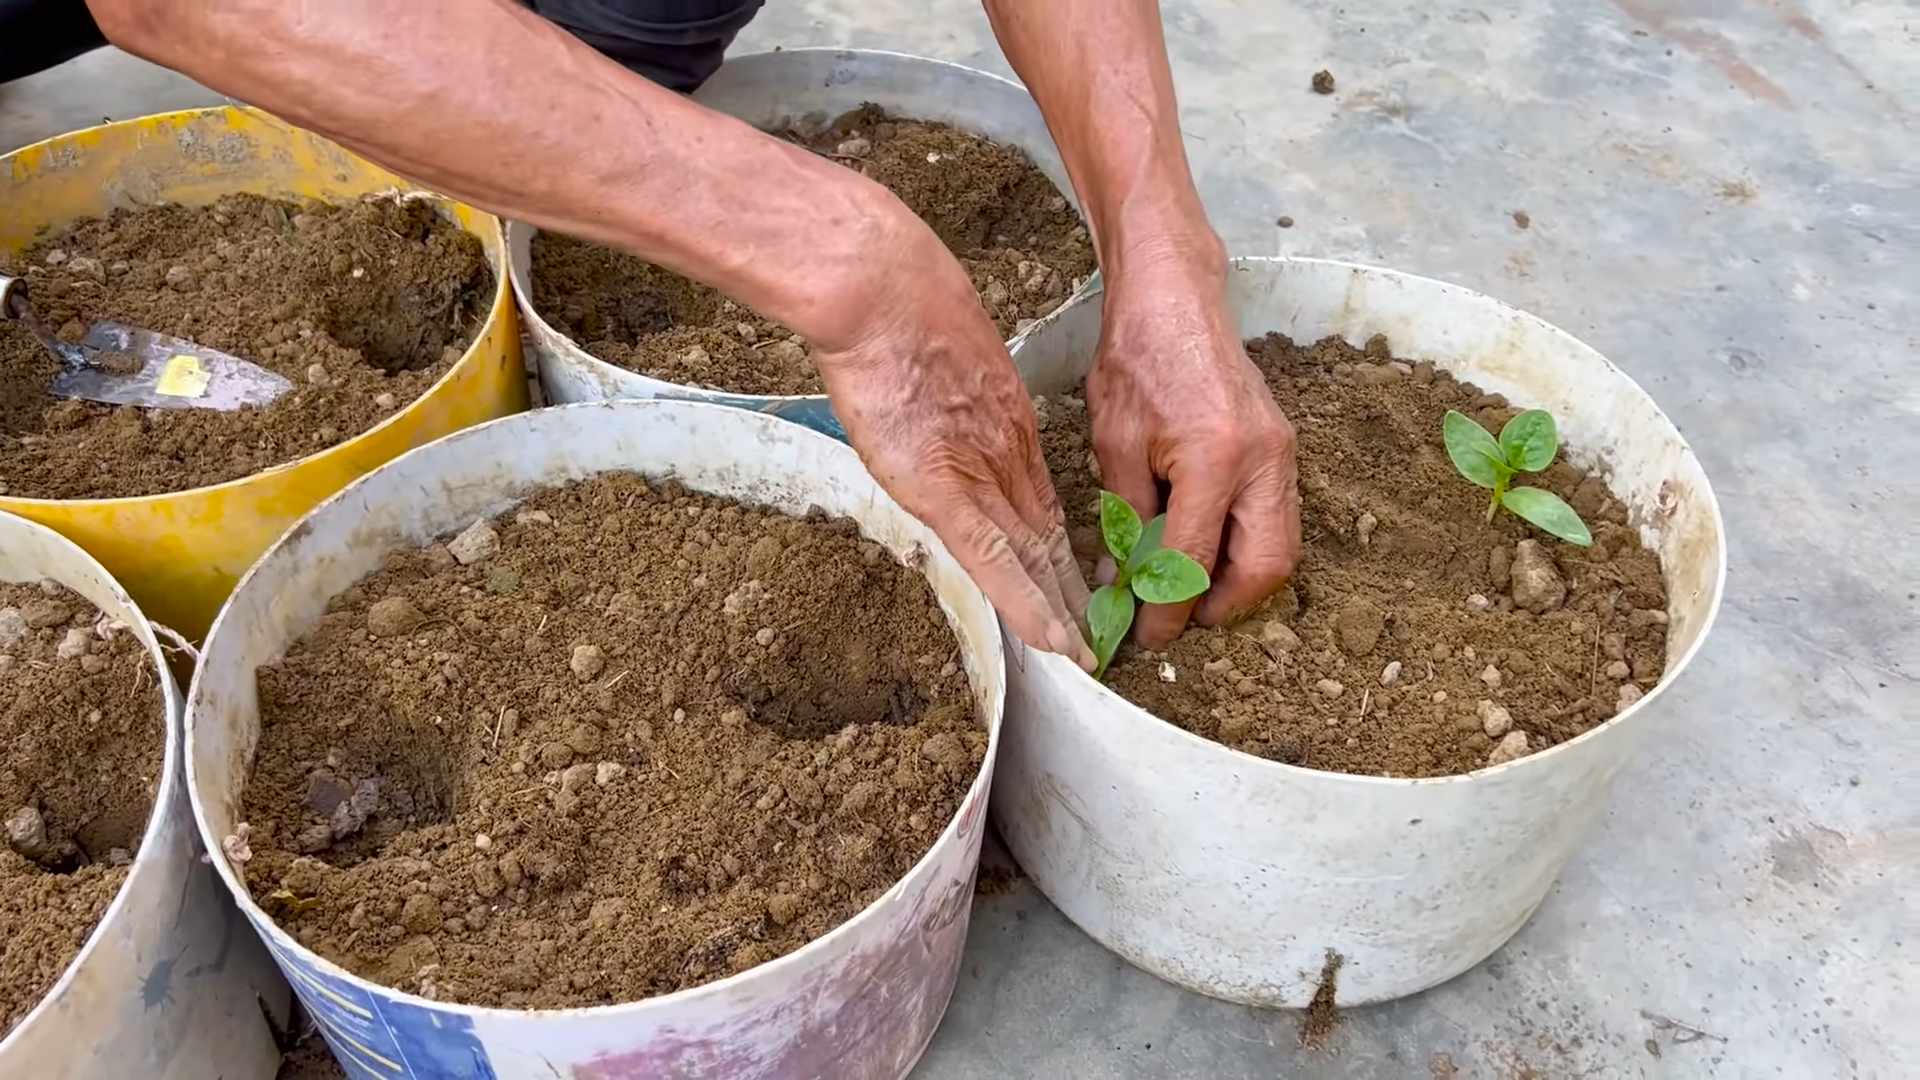
Grow Malabar Spinach Indoors? Absolutely! Imagine fresh, vibrant, and nutritious greens right at your fingertips, no matter the season. Forget those sad, wilted spinach bags from the grocery store. I’m going to show you how to cultivate your very own thriving Malabar spinach haven inside your home.
While not a true spinach, Malabar spinach, also known as Ceylon spinach, has been enjoyed for centuries in Asian and African cuisines. Its succulent leaves and tender stems offer a mild, earthy flavor that’s perfect for salads, stir-fries, and soups. Historically, it’s been valued not only for its culinary uses but also for its medicinal properties.
Why should you learn this DIY trick? Well, for starters, growing your own food is incredibly rewarding! Plus, it gives you complete control over what you’re eating – no pesticides or harmful chemicals. More importantly, grow Malabar Spinach Indoors allows you to enjoy this delicious and healthy green year-round, regardless of your climate. I know that you will love the satisfaction of harvesting your own fresh produce, and I’m here to guide you every step of the way. Let’s get started!

DIY Floating Shelves: A Simple Guide to Adding Style and Storage
Hey there, fellow DIY enthusiasts! I’m so excited to share this project with you. Floating shelves are a fantastic way to add a touch of modern elegance and extra storage to any room. They look sleek, are relatively easy to install, and can be customized to fit your exact needs. So, let’s dive in and learn how to build your own!
Materials You’ll Need
Before we get started, let’s gather all the necessary materials. This will save you time and frustration later on.
* **Wood for the Shelves:** Choose your wood wisely! I recommend using solid wood like pine, oak, or maple for a sturdy and beautiful shelf. The thickness will depend on the weight you plan to put on the shelves, but 1-inch thick wood is usually a good starting point. You can also use plywood, but make sure it’s a high-quality variety with a nice veneer.
* **Hidden Shelf Brackets:** These are the key to the “floating” effect. You can find these at most hardware stores or online. Make sure to choose brackets that are rated for the weight you plan to put on the shelves. Consider the length of the bracket rod – longer rods provide more stability.
* **Screws:** You’ll need screws to attach the brackets to the wall and to secure the shelves to the brackets. Choose screws that are appropriate for the type of wall you have (drywall, plaster, or concrete).
* **Wood Glue:** For added strength, I like to use wood glue when attaching the shelves to the brackets.
* **Wood Finish:** This is where you can get creative! Choose a stain, paint, or varnish that complements your décor.
* **Sandpaper:** You’ll need sandpaper to smooth the wood before finishing. I recommend starting with a coarser grit (around 80-120) and then moving to a finer grit (around 220).
* **Painter’s Tape:** This will help you create clean lines when painting or staining.
* **Wood Filler (Optional):** If your wood has any imperfections, you can use wood filler to fill them in.
Tools You’ll Need
Having the right tools makes all the difference. Here’s what I recommend:
* **Drill:** A drill is essential for creating pilot holes and driving screws.
* **Stud Finder:** Absolutely crucial for finding the wall studs! You need to anchor the brackets to the studs for maximum support.
* **Level:** A level is essential for ensuring that your shelves are straight.
* **Measuring Tape:** For accurate measurements, of course!
* **Pencil:** For marking your measurements.
* **Saw:** To cut the wood to the desired length. A circular saw, miter saw, or hand saw will work.
* **Sander (Optional):** A power sander will make the sanding process much faster and easier.
* **Clamps (Optional):** Clamps can be helpful for holding the shelves in place while the glue dries.
* **Safety Glasses:** Always protect your eyes!
* **Dust Mask:** To avoid inhaling sawdust.
Step-by-Step Instructions
Okay, let’s get to the fun part! Here’s how to build and install your floating shelves:
1. Prepare the Wood
1. **Cut the Wood:** Measure and cut the wood to the desired length for your shelves. Make sure your cuts are straight and clean. I always double-check my measurements before cutting!
2. **Sand the Wood:** Sand the wood thoroughly, starting with a coarser grit sandpaper and then moving to a finer grit. This will create a smooth surface for finishing. Pay special attention to the edges and corners.
3. **Fill Imperfections (Optional):** If your wood has any knots or imperfections, fill them in with wood filler. Let the filler dry completely and then sand it smooth.
4. **Clean the Wood:** Wipe the wood clean with a damp cloth to remove any sawdust.
2. Finish the Wood
1. **Apply Painter’s Tape (Optional):** If you’re painting or staining your shelves, use painter’s tape to protect any areas you don’t want to finish.
2. **Apply the Finish:** Apply your chosen finish according to the manufacturer’s instructions. I usually apply two or three coats for a durable and beautiful finish. Let each coat dry completely before applying the next.
3. **Lightly Sand Between Coats (Optional):** For an extra smooth finish, lightly sand the wood with fine-grit sandpaper between coats.
4. **Remove Painter’s Tape:** Once the finish is completely dry, carefully remove the painter’s tape.
3. Install the Hidden Shelf Brackets
This is the most crucial step, so pay close attention!
1. **Locate the Wall Studs:** Use a stud finder to locate the wall studs where you want to install the shelves. Mark the location of the studs with a pencil. This is essential for ensuring that your shelves are strong and stable.
2. **Mark Bracket Placement:** Decide where you want to position the brackets on the wall. Use a level to ensure that the brackets will be installed straight. Mark the screw holes for the brackets on the wall. I usually use a pencil and a small nail to make a small indentation for the drill bit.
3. **Drill Pilot Holes:** Drill pilot holes into the wall studs at the marked locations. The pilot holes should be slightly smaller than the screws you’ll be using.
4. **Attach the Brackets:** Attach the brackets to the wall studs using screws. Make sure the brackets are securely fastened and level. Double-check that the brackets are level before tightening the screws completely.
5. **Check for Level Again:** Use a level to double-check that the brackets are still level after they’re installed.
4. Attach the Shelves to the Brackets
1. **Mark Bracket Locations on the Shelf:** Place the shelf on a flat surface with the finished side facing down. Position the shelf so that the bracket rods will be centered within the shelf’s thickness. Mark the locations of the bracket rods on the underside of the shelf.
2. **Drill Holes for the Brackets:** Drill holes into the underside of the shelf at the marked locations. The holes should be slightly smaller than the diameter of the bracket rods.
3. **Apply Wood Glue (Optional):** Apply a small amount of wood glue to the bracket rods. This will help to secure the shelves to the brackets and prevent them from wobbling.
4. **Slide the Shelves onto the Brackets:** Carefully slide the shelves onto the bracket rods. Make sure the shelves are pushed all the way back against the wall.
5. **Secure the Shelves with Screws (Optional):** For added security, you can drive screws through the underside of the shelf and into the bracket rods. This is especially important if you plan to put heavy items on the shelves.
6. **Let the Glue Dry (If Applicable):** If you used wood glue, let it dry completely before putting anything on the shelves. I usually wait at least 24 hours.
Tips and Tricks
Here are a few extra tips to help you get the best results:
* Use a Laser Level: If you have a laser level, it can be incredibly helpful for ensuring that your shelves are perfectly level.
* Pre-Drill Everything: Always pre-drill pilot holes before driving screws. This will prevent the wood from splitting.
* Don’t Overload the Shelves: Be mindful of the weight capacity of your brackets. Don’t overload the shelves with heavy items.
* Consider the Spacing: Think about the height of the items you plan to put on the shelves when determining the spacing between them.
* Get Creative with the Finish: Don’t be afraid to experiment with different finishes. You can use paint, stain, varnish, or even a combination of finishes to create a unique look.
* Use Shims: If your walls aren’t perfectly straight, you can use shims to level the brackets.
* Ask for Help: If you’re not comfortable with any of these steps, don’t hesitate to ask a friend or family member for help.
Troubleshooting
* **Shelves are Wobbly:** Make sure the brackets are securely attached to the wall studs. You may also need to add screws to secure the shelves to the brackets.
* **Shelves are Not Level:** Use shims to level the brackets.
* **Wood is Splitting:** Pre-drill pilot holes before driving screws.
* **Finish is Uneven:** Sand the wood thoroughly before applying the finish. Apply multiple thin coats of finish instead of one thick coat.
Alternative Bracket Options
While hidden brackets offer a clean look, there are other options to consider:
* **Metal Brackets:** Visible metal brackets can add an industrial touch. Choose brackets that complement your décor.
* **Wooden Corbels:** Corbels provide a more traditional and decorative look.
* **Pipe
Conclusion
So, there you have it! Growing Malabar spinach indoors is not only achievable but also incredibly rewarding. Imagine having a constant supply of fresh, vibrant greens right at your fingertips, ready to elevate your salads, stir-fries, and soups. This DIY trick transforms your windowsill into a miniature edible garden, offering a sustainable and cost-effective alternative to constantly purchasing spinach from the store.
Why is this a must-try? Because it’s more than just growing a plant; it’s about connecting with nature, understanding the growth cycle, and enjoying the unparalleled flavor of homegrown produce. Store-bought spinach simply can’t compare to the crispness and subtle earthiness of freshly harvested Malabar spinach. Plus, you have complete control over the growing environment, ensuring your spinach is free from harmful pesticides and chemicals.
But the benefits don’t stop there. Growing Malabar spinach indoors is a fantastic way to add a touch of greenery to your living space, creating a calming and inviting atmosphere. It’s also a great conversation starter and a fun project to share with family and friends, especially children, teaching them about the importance of healthy eating and sustainable living.
Looking for variations? Consider experimenting with different potting mixes to see which one yields the best results. Some gardeners swear by a blend of compost, perlite, and vermiculite, while others prefer a more organic mix. You can also try growing Malabar spinach in different types of containers, from traditional pots to hanging baskets, to maximize space and add visual interest.
Another exciting variation is to explore different cultivars of Malabar spinach. While the green variety is the most common, you can also find red-stemmed varieties that add a pop of color to your garden and your plate. Each cultivar has its own unique flavor profile, so experimenting with different types is a great way to discover your favorite.
Don’t be afraid to get creative with your trellising system. Malabar spinach is a vining plant, so it needs something to climb on. You can use a simple bamboo stake, a decorative trellis, or even a repurposed tomato cage. The possibilities are endless!
We wholeheartedly encourage you to try this DIY trick and experience the joy of growing your own Malabar spinach indoors. It’s a simple, rewarding, and sustainable way to add fresh greens to your diet and a touch of nature to your home.
Once you’ve embarked on your indoor Malabar spinach growing journey, we’d love to hear about your experience! Share your tips, tricks, and photos with us in the comments below. Let’s create a community of indoor gardeners and inspire others to embrace the joys of homegrown produce. What are you waiting for? Get planting!
Frequently Asked Questions (FAQ)
What exactly is Malabar spinach, and how is it different from regular spinach?
Malabar spinach (Basella alba) isn’t actually a true spinach, although it shares a similar flavor profile. It’s a heat-loving, vining plant that thrives in warm climates, unlike traditional spinach which prefers cooler temperatures. Malabar spinach has thicker, more succulent leaves and a slightly peppery taste. It’s also more nutritious, packed with vitamins A and C, iron, and calcium. Because it tolerates heat well, it’s an excellent alternative to spinach in summer gardens or indoor environments where temperatures are consistently warm.
How much sunlight does Malabar spinach need when grown indoors?
Malabar spinach thrives in bright, indirect sunlight. Aim for at least 6 hours of sunlight per day. A south-facing window is ideal, but an east- or west-facing window can also work. If you don’t have access to enough natural light, consider supplementing with a grow light. Position the grow light about 6-12 inches above the plant and keep it on for 12-14 hours per day. Insufficient light will result in leggy growth and reduced leaf production.
What type of soil is best for growing Malabar spinach indoors?
A well-draining potting mix is crucial for growing Malabar spinach indoors. Avoid heavy, clay-based soils that retain too much moisture, as this can lead to root rot. A good mix consists of equal parts potting soil, perlite, and compost. The potting soil provides nutrients, the perlite improves drainage, and the compost adds organic matter. You can also add a slow-release fertilizer to the mix to provide a steady supply of nutrients.
How often should I water my indoor Malabar spinach plant?
Water your Malabar spinach plant regularly, keeping the soil consistently moist but not waterlogged. Check the soil moisture level by sticking your finger about an inch into the soil. If it feels dry, it’s time to water. Water deeply, allowing the excess water to drain out of the bottom of the pot. Avoid overwatering, as this can lead to root rot. During the warmer months, you may need to water more frequently.
Does Malabar spinach need a trellis or support system when grown indoors?
Yes, Malabar spinach is a vining plant and needs a trellis or support system to climb on. Without support, the vines will sprawl and become tangled. You can use a simple bamboo stake, a decorative trellis, or even a repurposed tomato cage. Train the vines to climb the support system by gently wrapping them around it. As the plant grows, you may need to add more support.
How do I harvest Malabar spinach leaves?
You can start harvesting Malabar spinach leaves about 6-8 weeks after planting. Harvest the leaves by snipping them off with scissors or pruning shears. Focus on harvesting the larger, more mature leaves, leaving the smaller leaves to continue growing. Regular harvesting encourages the plant to produce more leaves. You can also harvest the tender stems, which are also edible.
What are some common pests and diseases that affect Malabar spinach, and how can I prevent them?
Malabar spinach is generally resistant to pests and diseases, but it can be susceptible to aphids, spider mites, and fungal diseases. To prevent pests, inspect your plants regularly and remove any pests you find by hand or with a strong spray of water. You can also use insecticidal soap or neem oil to control pests. To prevent fungal diseases, ensure good air circulation around your plants and avoid overwatering. If you notice any signs of disease, remove the affected leaves immediately.
Can I grow Malabar spinach from seed indoors?
Yes, you can grow Malabar spinach from seed indoors. Start the seeds indoors 6-8 weeks before the last expected frost. Soak the seeds in water for 24 hours before planting to improve germination. Sow the seeds about 1/2 inch deep in a seed-starting mix. Keep the soil moist and warm (around 70-75°F). The seeds should germinate in 7-14 days. Once the seedlings have developed a few sets of true leaves, you can transplant them into larger pots.
Is Malabar spinach safe to eat?
Yes, Malabar spinach is safe to eat and is a nutritious addition to your diet. It’s a good source of vitamins A and C, iron, and calcium. However, like all leafy greens, it’s important to wash the leaves thoroughly before eating to remove any dirt or debris. Some people may experience a slightly slimy texture when eating Malabar spinach, but this can be reduced by cooking it briefly.
How can I encourage my Malabar spinach plant to produce more leaves?
To encourage your Malabar spinach plant to produce more leaves, provide it with plenty of sunlight, water, and nutrients. Fertilize the plant regularly with a balanced fertilizer. Prune the plant regularly by pinching back the tips of the vines. This will encourage branching and more leaf production. Regular harvesting also encourages the plant to produce more leaves.
Leave a Comment