
Bean Sprouts Home Growing: Ever dreamt of having a fresh, crunchy salad ingredient readily available right in your kitchen? Imagine bypassing the grocery store and harvesting your own vibrant bean sprouts whenever you crave them. Well, dream no more! This DIY guide unlocks the secrets to effortlessly growing bean sprouts at home, transforming your kitchen into a mini-farm.
Sprouting beans isn’t just a modern trend; it’s a practice with deep roots. For centuries, cultures across Asia have cherished bean sprouts for their nutritional value and ease of cultivation. From adding a delightful crunch to stir-fries to enriching salads with vital nutrients, bean sprouts have been a staple ingredient. I’ve always been fascinated by how something so simple can pack such a powerful punch of flavor and health benefits.
In today’s fast-paced world, convenience is key. But often, convenience comes at the cost of freshness and quality. That’s where bean sprouts home growing comes in! This DIY trick empowers you to take control of your food source, ensuring you have access to the freshest, most nutritious bean sprouts possible. Plus, it’s incredibly rewarding to watch those tiny seeds transform into a vibrant, edible crop right before your eyes. So, ditch the store-bought sprouts and let’s embark on this exciting journey of growing your own!
Growing Celery Indoors: A Beginner’s Guide to a Crispy Harvest
Hey there, fellow plant enthusiasts! Ever thought about growing your own celery indoors? It’s totally doable, and honestly, there’s something incredibly satisfying about snipping off a stalk you nurtured yourself. Plus, fresh celery just tastes better, right? I’m going to walk you through the whole process, from rescuing a celery base to enjoying a homegrown harvest. Let’s get started!
What You’ll Need
Before we dive in, let’s gather our supplies. This is a pretty low-key project, so you probably have most of this stuff already.
* **Celery Stalk with Root End:** This is the star of the show! Buy a fresh bunch of celery from the grocery store, making sure the base (the part where the stalks are connected) is intact and looks healthy.
* **Shallow Dish or Bowl:** Something to hold water and the celery base. A pie plate, a small Tupperware container, or even a saucer will work.
* **Water:** Tap water is fine, but filtered water is even better.
* **Potting Soil:** A good quality potting mix is essential for healthy growth.
* **Pot with Drainage Holes:** Choose a pot that’s at least 6-8 inches in diameter to give your celery room to grow.
* **Sunny Location:** Celery needs plenty of light, so a sunny windowsill or a spot under a grow light is ideal.
* **Spray Bottle (Optional):** For misting the leaves.
* **Liquid Fertilizer (Optional):** A balanced liquid fertilizer can help boost growth.
Rescuing Your Celery: Regrowing from the Base
This is where the magic begins! We’re going to coax that celery base into sprouting new growth.
1. **Prepare the Celery Base:** Once you’ve enjoyed the stalks of your celery, don’t toss the base! Carefully cut off the stalks about 2 inches from the bottom, leaving the root end intact. Try to make a clean, even cut.
2. **Place in Water:** Put the celery base in your shallow dish or bowl. Add enough water to cover the bottom inch or so of the base. You don’t want the entire base submerged, just the bottom part where the roots will eventually emerge.
3. **Find a Sunny Spot:** Place the dish with the celery base on a sunny windowsill or under a grow light. Celery needs at least 6 hours of sunlight per day to thrive.
4. **Change the Water Regularly:** This is important! Change the water every 1-2 days to prevent bacteria growth and keep the water fresh.
5. **Watch for Growth:** Within a few days to a week, you should start to see small roots emerging from the bottom of the celery base. You’ll also notice new green shoots sprouting from the top. This is a sign that your celery is happy and ready to be planted!
Planting Your Celery: From Water to Soil
Now that your celery base has sprouted roots and new growth, it’s time to move it to a pot with soil.
1. **Prepare the Pot:** Fill your pot with potting soil, leaving about an inch of space at the top. Gently pat down the soil to remove any air pockets.
2. **Create a Hole:** Use your finger or a small trowel to create a hole in the center of the pot that’s large enough to accommodate the celery base and its roots.
3. **Carefully Transplant:** Gently remove the celery base from the water. Be careful not to damage the delicate roots. Place the celery base in the hole, making sure the top of the base is level with the soil surface.
4. **Fill in with Soil:** Gently fill in the hole around the celery base with potting soil. Lightly pat down the soil to secure the plant.
5. **Water Thoroughly:** Water the newly planted celery thoroughly until the water drains out of the bottom of the pot. This will help settle the soil and encourage root growth.
Caring for Your Indoor Celery
Now that your celery is planted, it’s time to provide it with the care it needs to grow into a healthy, thriving plant.
1. **Sunlight:** Celery needs plenty of sunlight, so keep it in a sunny location. If you don’t have a sunny windowsill, you can use a grow light to supplement the natural light.
2. **Watering:** Celery needs consistent moisture, but it doesn’t like to be waterlogged. Water your celery when the top inch of soil feels dry to the touch. Make sure the pot has good drainage to prevent root rot.
3. **Humidity:** Celery prefers a humid environment. If your home is dry, you can increase the humidity around your celery by misting the leaves with water regularly or placing the pot on a tray filled with pebbles and water.
4. **Fertilizing (Optional):** To give your celery a boost, you can fertilize it every 2-3 weeks with a balanced liquid fertilizer. Follow the instructions on the fertilizer label.
5. **Pest Control:** Keep an eye out for pests like aphids or spider mites. If you notice any pests, you can treat them with insecticidal soap or neem oil.
Harvesting Your Homegrown Celery
The best part! After a few months of care, your celery should be ready to harvest.
1. **Harvesting Individual Stalks:** You can harvest individual stalks of celery as needed. Simply cut off the outer stalks near the base of the plant. This will encourage the plant to produce more stalks.
2. **Harvesting the Entire Plant:** If you want to harvest the entire plant, you can cut it off at the base.
3. **Enjoy Your Harvest:** Wash your harvested celery thoroughly and enjoy it in salads, soups, stews, or as a healthy snack.
Troubleshooting
Even with the best care, you might encounter a few challenges along the way. Here are some common problems and how to fix them:
* **Yellowing Leaves:** This could be a sign of overwatering, underwatering, or nutrient deficiency. Check the soil moisture and adjust your watering schedule accordingly. If the soil is dry, water more frequently. If the soil is soggy, water less frequently. You can also try fertilizing your celery with a balanced liquid fertilizer.
* **Leggy Growth:** This is usually caused by insufficient light. Move your celery to a sunnier location or supplement with a grow light.
* **Slow Growth:** This could be due to a variety of factors, including insufficient light, poor soil, or lack of nutrients. Make sure your celery is getting enough sunlight, is planted in good quality potting soil, and is being fertilized regularly.
* **Pests:** Keep an eye out for pests like aphids or spider mites. Treat them with insecticidal soap or neem oil.
Tips for Success
Here are a few extra tips to help you grow the best celery possible:
* Choose a good quality potting mix. This will provide your celery with the nutrients it needs to grow.
* Don’t overwater your celery. Celery needs consistent moisture, but it doesn’t like to be waterlogged.
* Provide your celery with plenty of sunlight. Celery needs at least 6 hours of sunlight per day to thrive.
* Fertilize your celery regularly. This will help boost growth and produce a healthier plant.
* Be patient! It takes time for celery to grow, so don’t get discouraged if you don’t see results immediately.
Growing celery indoors is a rewarding experience. With a little patience and care, you can enjoy fresh, homegrown celery all year round. Happy gardening!

Conclusion
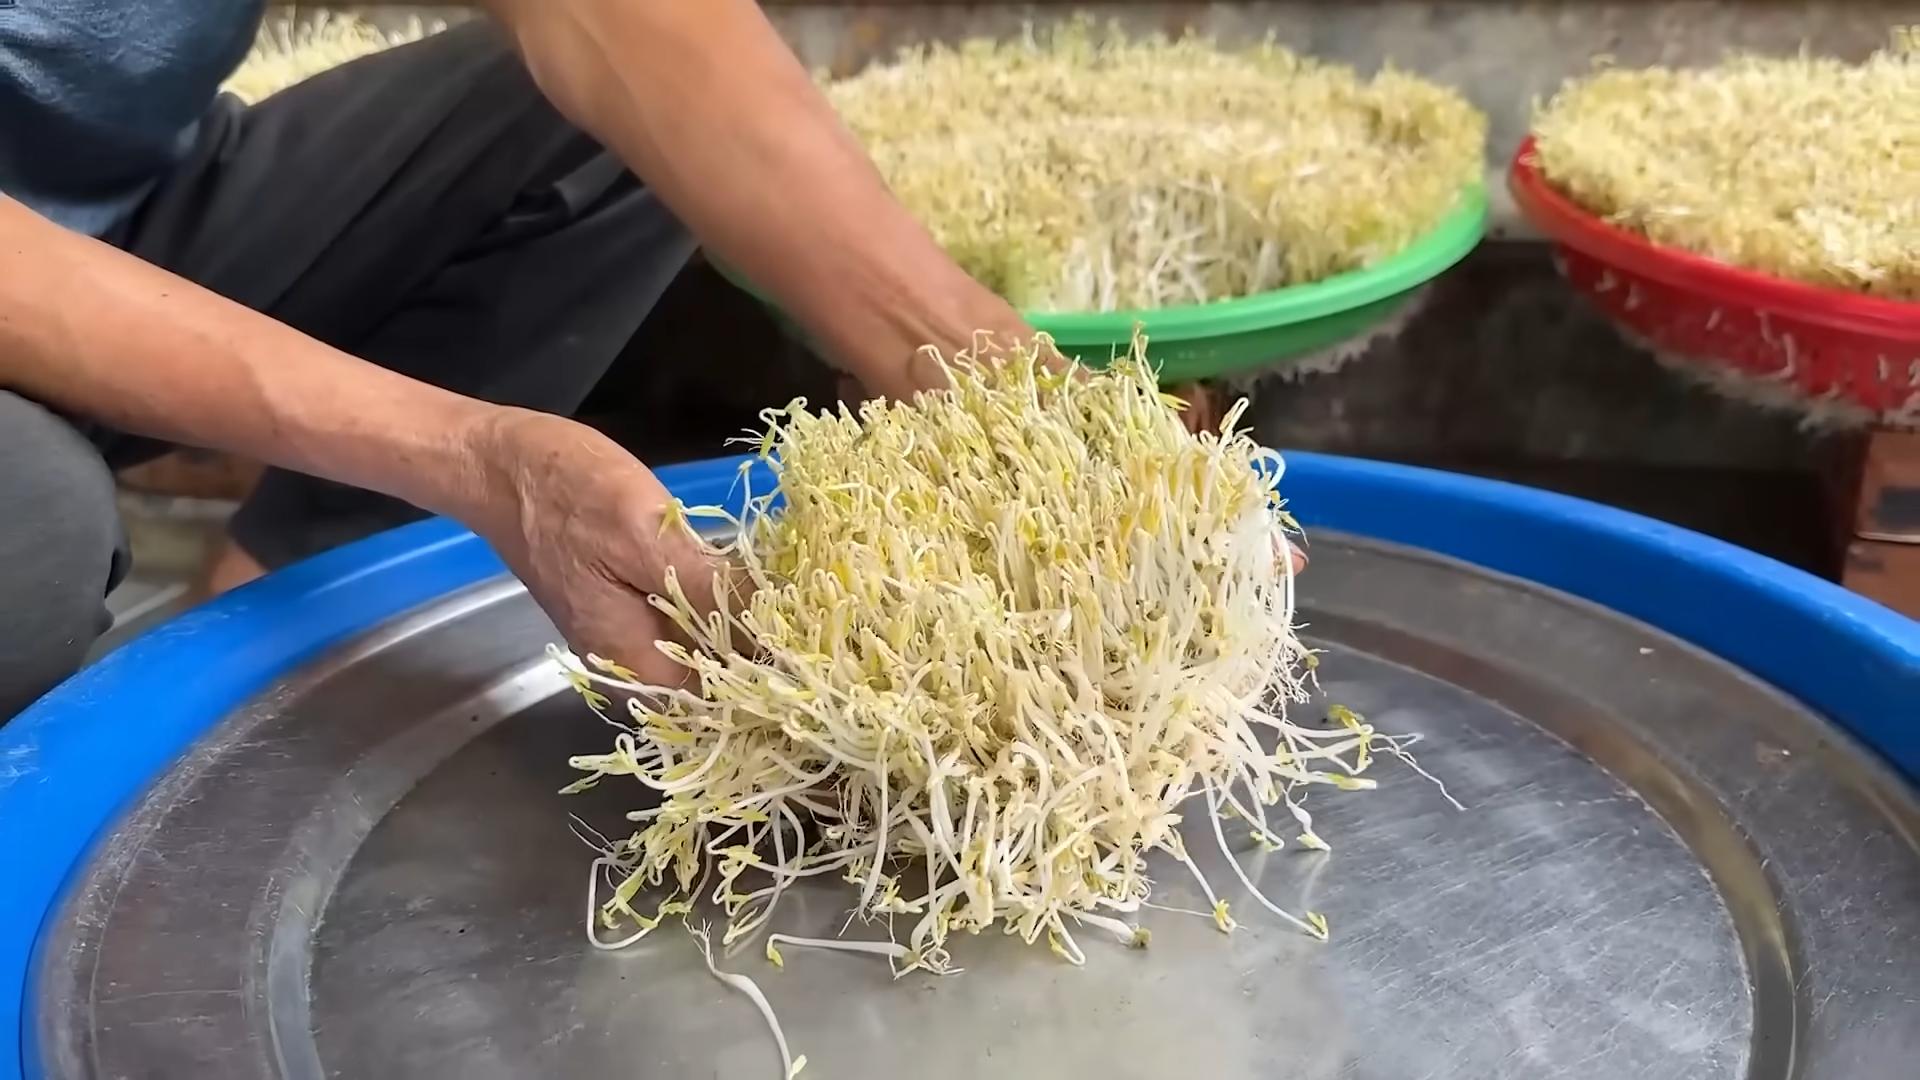
So, there you have it! Growing your own bean sprouts at home is not only incredibly easy and cost-effective, but it also provides you with a constant supply of fresh, nutritious sprouts right at your fingertips. Forget those limp, often questionable sprouts from the grocery store. With this simple DIY method, you’re in complete control of the process, ensuring the highest quality and freshest flavor.
Why is this a must-try? Because it’s a game-changer for anyone who loves adding a healthy crunch to their meals. Imagine tossing vibrant, homegrown bean sprouts into your salads, stir-fries, sandwiches, or even using them as a garnish for soups. The possibilities are endless! Plus, you’ll be amazed at how quickly they grow – a week is all it takes to go from tiny seeds to a bountiful harvest.
Don’t be afraid to experiment with different types of beans! While mung beans are the most common choice for bean sprouts, you can also try adzuki beans, lentils, or even chickpeas. Each variety will offer a slightly different flavor and texture, allowing you to customize your sprouts to suit your preferences. You can also experiment with the sprouting container itself. While a mason jar works perfectly, you could also use a sprouting bag or a multi-tiered sprouting system for larger yields.
Ready to embark on your bean sprouting adventure? We highly encourage you to give this DIY trick a try. It’s a fun, rewarding, and incredibly satisfying experience. Once you taste the difference between store-bought and homegrown bean sprouts, you’ll never go back!
And most importantly, we want to hear about your experience! Share your photos, tips, and variations in the comments below. Let’s build a community of bean sprout enthusiasts and inspire others to discover the joys of homegrown goodness. Mastering the art of bean sprouts home growing is easier than you think, and the rewards are well worth the effort. Happy sprouting!
Frequently Asked Questions (FAQs)
What kind of beans are best for sprouting?
Mung beans are the most popular and readily available choice for sprouting, and they produce the classic bean sprouts you find in most grocery stores. However, you can also successfully sprout other types of beans and legumes, including adzuki beans, lentils, chickpeas, and even some types of peas. Keep in mind that different beans will have different sprouting times and may require slightly different care. Always ensure you are using beans specifically intended for sprouting or culinary use, as some beans can be toxic if eaten raw or improperly prepared. Avoid using garden beans or beans treated with pesticides or fungicides.
How long does it take for bean sprouts to grow?
Generally, bean sprouts will be ready to harvest in about 3 to 7 days, depending on the type of bean, the temperature, and the humidity. Mung beans tend to sprout relatively quickly, often being ready in as little as 3 days. Keep an eye on your sprouts and harvest them when they reach your desired length and thickness. Overgrown sprouts can become bitter.
What if my bean sprouts start to smell bad?
A foul odor is a sign of bacterial contamination. This can happen if the sprouts are not rinsed frequently enough or if the sprouting environment is too warm and humid. Discard any sprouts that smell bad, as they are not safe to eat. To prevent this, ensure you rinse your sprouts thoroughly at least twice a day with cool, clean water. Good ventilation is also important.
How do I store bean sprouts?
Once your bean sprouts are ready, rinse them thoroughly and drain them well. Store them in an airtight container lined with a paper towel in the refrigerator. The paper towel will help absorb excess moisture and keep the sprouts fresh for longer. Properly stored bean sprouts should last for up to a week in the refrigerator.
Can I eat the bean sprout roots?
Yes, the roots of bean sprouts are perfectly edible and are often consumed along with the rest of the sprout. They have a slightly nutty flavor and add a nice texture to dishes.
Do I need special equipment to grow bean sprouts?
No, you don’t need any special equipment to grow bean sprouts at home. A wide-mouth mason jar, a sprouting lid or cheesecloth, and a dark place are all you need to get started. You can also purchase specialized sprouting kits or trays if you plan on sprouting beans regularly.
How much light do bean sprouts need?
Bean sprouts don’t need direct sunlight. In fact, exposing them to direct sunlight can cause them to turn bitter. Keep them in a dark or dimly lit place during the sprouting process. Some people prefer to expose the sprouts to indirect light for the last day or two to encourage chlorophyll production, which gives them a greener color.
Can I grow bean sprouts in soil?
While you can technically grow bean sprouts in soil, it’s not the traditional or most efficient method. Sprouting in a jar or container with just water is much easier and faster. Growing in soil requires more maintenance and increases the risk of mold or bacterial contamination.
Are bean sprouts safe to eat raw?
While homegrown bean sprouts are generally safe to eat raw, it’s important to take precautions to minimize the risk of foodborne illness. Always use clean water and equipment, rinse the sprouts thoroughly, and store them properly. If you are pregnant, elderly, or have a weakened immune system, it’s best to cook bean sprouts before eating them.
How do I prevent mold from growing on my bean sprouts?
The key to preventing mold growth is good hygiene and proper ventilation. Use clean equipment, rinse the sprouts thoroughly at least twice a day, and ensure there is adequate airflow around the sprouting container. Avoid overcrowding the container with too many beans. If you notice any signs of mold, discard the entire batch of sprouts.
What are the nutritional benefits of bean sprouts?
Bean sprouts are a good source of vitamins, minerals, and enzymes. They are low in calories and fat and contain fiber, protein, and antioxidants. They are particularly rich in vitamin C, vitamin K, and folate.
Can I use tap water for sprouting?
It’s best to use filtered or purified water for sprouting, as tap water may contain chlorine or other chemicals that can inhibit germination or affect the flavor of the sprouts. If you must use tap water, let it sit out for 24 hours to allow the chlorine to dissipate.
What do I do if my bean sprouts are not sprouting?
If your bean sprouts are not sprouting, there could be several reasons. First, make sure the beans are viable and intended for sprouting. Old or damaged beans may not germinate. Second, ensure the beans are being soaked and rinsed properly. They need adequate moisture to sprout. Third, check the temperature. Bean sprouts prefer a temperature between 70-80°F (21-27°C). If the temperature is too cold or too hot, they may not sprout. Finally, be patient! Some beans may take longer to sprout than others.
Leave a Comment