
Grow Spinach at Home Fast – imagine harvesting fresh, vibrant spinach right from your backyard, ready to be tossed into a salad or whirled into a smoothie. No more trips to the grocery store for wilted greens! This isn’t just a dream; it’s an achievable reality with a few simple DIY tricks. For centuries, spinach has been a staple in diets around the world, prized for its nutritional value and versatility. From ancient Persia, where it originated, to Popeye’s iconic endorsement, spinach has a rich history.
But let’s be honest, sometimes growing your own food can feel intimidating. That’s where these DIY hacks come in. I’m here to share some of my favorite, tried-and-true methods to help you grow spinach at home fast, even if you don’t have a green thumb. We’ll cover everything from seed selection and soil preparation to pest control and harvesting techniques.
Why do you need these tricks? Because store-bought spinach can be expensive and often lacks the freshness and flavor of homegrown varieties. Plus, knowing exactly where your food comes from gives you peace of mind. So, get ready to roll up your sleeves and discover how easy and rewarding it can be to cultivate your own thriving spinach patch. Let’s get started!
Grow Spinach at Home Fast: A DIY Guide
Hey there, fellow gardening enthusiasts! I’m so excited to share my tried-and-true method for growing spinach at home, and trust me, it’s faster than you think! Forget those flimsy, pre-packaged greens from the store. With a little know-how, you can have a constant supply of fresh, vibrant spinach right at your fingertips. Let’s dive in!
What You’ll Need: The Essential Spinach Starter Kit
Before we get our hands dirty, let’s gather everything we need. Having all your supplies ready will make the whole process smooth and enjoyable.
* Spinach Seeds: Choose a variety that suits your climate. ‘Bloomsdale Long Standing’ and ‘Giant Nobel’ are popular and reliable choices. I personally love ‘Bloomsdale’ for its crinkly leaves and bolt resistance.
* Potting Mix: A well-draining potting mix is crucial. Avoid using garden soil directly, as it can compact and hinder drainage. Look for a mix specifically formulated for vegetables or seedlings.
* Containers (Optional): If you’re starting indoors or don’t have a garden plot, you’ll need containers. Choose pots that are at least 6 inches deep and wide to give the spinach roots enough room to grow.
* Garden Trowel: This handy tool will help you with planting and transplanting.
* Watering Can or Hose with a Gentle Spray Nozzle: Spinach needs consistent moisture, but avoid overwatering.
* Fertilizer (Optional): A balanced, water-soluble fertilizer can give your spinach a boost, but it’s not strictly necessary. I like to use a diluted fish emulsion.
* Sunlight: Spinach thrives in partial shade, especially during the hotter months. Aim for at least 4-6 hours of sunlight per day.
* Mulch (Optional): Mulch helps retain moisture, suppress weeds, and regulate soil temperature. Straw or shredded leaves work well.
Phase 1: Sowing the Seeds of Success
This is where the magic begins! Whether you’re starting indoors or directly sowing into your garden, the initial planting is key.
1. Choose Your Location: Spinach prefers cool weather, so the best time to plant is in early spring or fall. If you live in a warmer climate, you can grow spinach during the winter months. Select a spot that receives partial shade, especially during the hottest part of the day.
2. Prepare the Soil: Whether you’re using containers or a garden bed, make sure the soil is loose and well-draining. Remove any rocks, weeds, or debris. If you’re using containers, fill them with your chosen potting mix. If you’re planting directly in the garden, amend the soil with compost or other organic matter to improve its fertility and drainage.
3. Sow the Seeds: Spinach seeds are small, so don’t plant them too deep. Sow the seeds about ½ inch deep and 1 inch apart. If you’re planting in rows, space the rows about 12 inches apart.
4. Water Gently: After sowing the seeds, water the soil gently to moisten it. Avoid overwatering, as this can cause the seeds to rot.
5. Keep the Soil Moist: Spinach needs consistent moisture to germinate and grow. Check the soil regularly and water it whenever it feels dry to the touch.
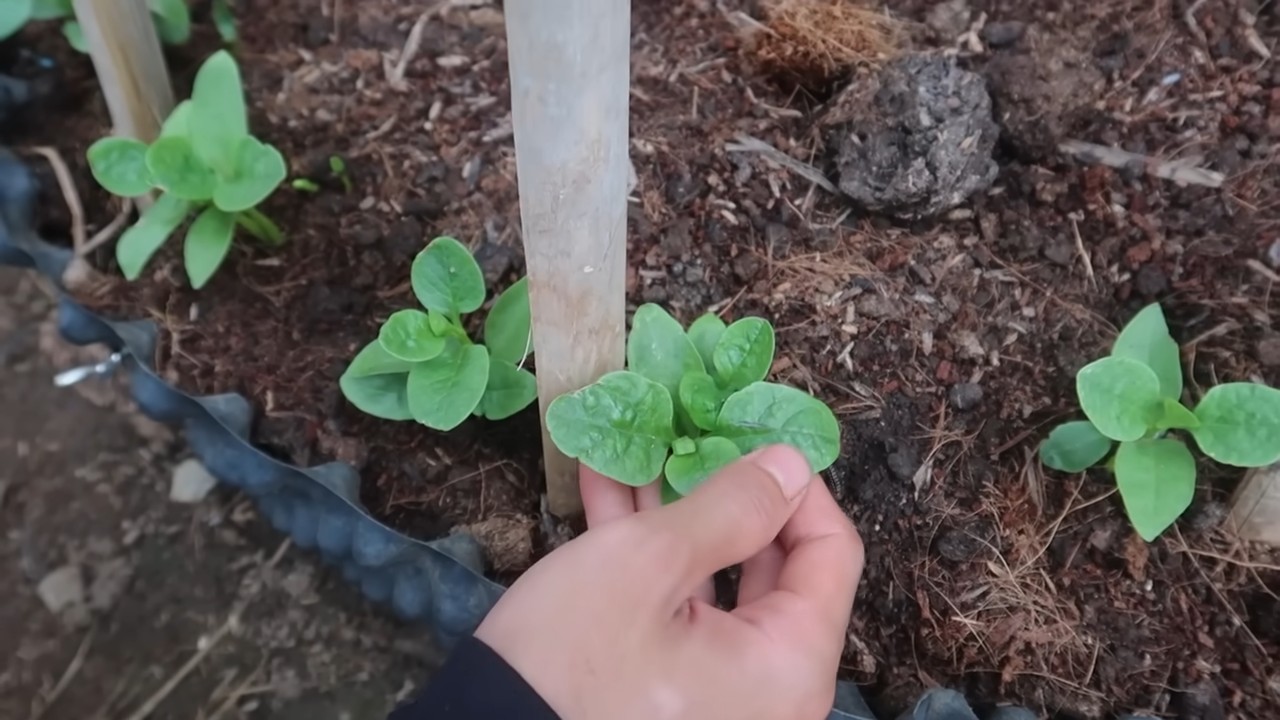
6. Germination Time: Spinach seeds typically germinate in 5-10 days, depending on the temperature and moisture levels. Be patient, and you’ll soon see tiny seedlings emerging from the soil.
Phase 2: Nurturing Your Spinach Patch
Once your spinach seedlings have emerged, it’s time to provide them with the care they need to thrive.
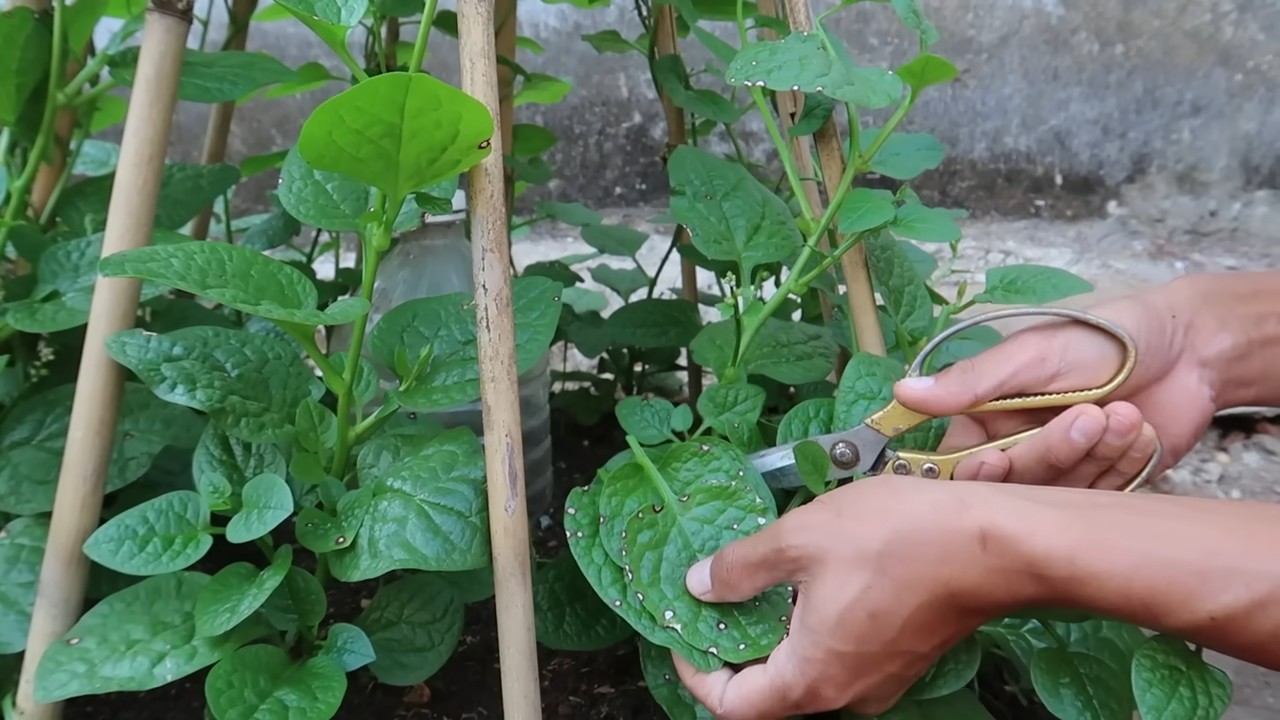
1. Thin the Seedlings: Once the seedlings have developed a few true leaves, thin them out so that they are about 3-6 inches apart. This will give them enough room to grow and prevent overcrowding. Don’t just pull them out! Gently snip the unwanted seedlings at the soil line with scissors to avoid disturbing the roots of the remaining plants.
2. Water Regularly: Spinach needs consistent moisture, especially during hot weather. Water deeply whenever the soil feels dry to the touch. Avoid overhead watering, as this can promote fungal diseases. Instead, water at the base of the plants.
3. Fertilize (Optional): If you want to give your spinach a boost, you can fertilize it with a balanced, water-soluble fertilizer every 2-3 weeks. Dilute the fertilizer according to the package instructions. I find that a diluted fish emulsion works wonders!
4. Weed Control: Keep your spinach patch free of weeds, as they can compete with the spinach for nutrients and water. Gently pull out any weeds that you see. Mulching around the plants can also help suppress weeds.
5. Pest Control: Spinach is relatively pest-resistant, but it can be susceptible to aphids, slugs, and snails. Inspect your plants regularly for any signs of pests. If you find any, you can try spraying them with insecticidal soap or hand-picking them off the plants. I’ve had good luck with diatomaceous earth for slugs and snails.
6. Sunlight Management: While spinach needs sunlight, too much direct sun can cause the leaves to wilt and burn, especially in warmer climates. If you live in a hot area, provide your spinach with some shade during the hottest part of the day. You can use shade cloth or plant your spinach near taller plants that will provide some afternoon shade.
Phase 3: Harvesting Your Bounty
The most rewarding part! Harvesting your own spinach is a truly satisfying experience.
1. When to Harvest: You can start harvesting spinach leaves as soon as they are large enough to eat, typically when they are about 4-6 inches long. The younger leaves are more tender and have a milder flavor.
2. How to Harvest: There are two main ways to harvest spinach:
* Cut-and-Come-Again: This method involves harvesting only the outer leaves, leaving the inner leaves to continue growing. This allows you to harvest spinach multiple times from the same plant. Use scissors or a sharp knife to cut the leaves about 1 inch above the soil line.
* Whole Plant Harvest: This method involves harvesting the entire plant at once. This is a good option if you want to harvest a large amount of spinach at once or if the plant is starting to bolt (go to seed). To harvest the whole plant, simply cut it off at the base.
3. Harvesting Tips:
* Harvest spinach in the morning, when the leaves are crisp and cool.
* Avoid harvesting spinach during the hottest part of the day, as the leaves will be more likely to wilt.
* Wash the spinach leaves thoroughly after harvesting to remove any dirt or debris.
4. Bolting: Spinach is a cool-season crop, and it will eventually bolt (go to seed) when the weather gets too warm. Bolting causes the leaves to become bitter and less palatable. To prevent bolting, plant your spinach in early spring or fall, and provide it with some shade during the hottest part of the day. If your spinach starts to bolt, you can still harvest the leaves, but they will be more bitter. You can also let the plant go to seed and collect the seeds for planting next year.
Troubleshooting: Common Spinach Growing Problems
Even with the best care, you might encounter a few challenges along the way. Here’s how to tackle some common spinach problems:
* Yellowing Leaves: This can be caused by a variety of factors, including nutrient deficiencies, overwatering, or underwatering. Check the soil moisture and nutrient levels, and adjust your watering and fertilizing accordingly.
* Stunted Growth: This can be caused by poor soil, lack of sunlight, or pests. Make sure your spinach is planted in well-draining soil, receives enough sunlight, and is free of pests.
* Leaf Spots: This can be caused by fungal diseases. Avoid overhead watering and provide good air circulation to prevent fungal diseases. If you see leaf spots, remove the affected leaves and spray the plants with a fungicide.
* Bolting: As mentioned earlier, bolting is a natural process that occurs when the weather gets too warm. To prevent bolting, plant your spinach in early spring or fall, and provide it with some shade during the hottest part of the day.
Beyond the Basics: Advanced Spinach Growing Techniques
Want to take your spinach growing to the next level? Here are a few advanced techniques to try:
* Succession Planting: Plant spinach seeds every 2-3 weeks to ensure a continuous harvest throughout the growing season.
* Companion Planting: Plant spinach alongside other vegetables that can benefit from its presence. Good companion plants for spinach include radishes, lettuce, and strawberries.
* Winter Growing: If you live in a mild climate, you can grow spinach throughout the winter. Protect your plants from frost with row covers or a cold frame.
Growing
Conclusion
So, there you have it! Growing spinach at home fast isn’t just a pipe dream; it’s an achievable reality with a little know-how and the right approach. We’ve walked you through the essential steps, from selecting the perfect spinach variety to optimizing your growing environment and providing the necessary care. But why should you bother with this DIY project when you can simply buy spinach at the grocery store? The answer lies in the unparalleled freshness, flavor, and control you gain over your food source. Store-bought spinach often travels long distances, losing its nutritional value and crispness along the way. By growing your own, you’re guaranteed a vibrant, nutrient-packed harvest that’s ready to be enjoyed within minutes of picking.
Beyond the superior quality, growing your own spinach is incredibly rewarding. There’s a unique satisfaction in nurturing a plant from seed to table, witnessing its growth, and reaping the benefits of your labor. It’s also a fantastic way to connect with nature, reduce your carbon footprint, and save money on your grocery bill. Plus, you’ll have the bragging rights of serving up the freshest, most delicious spinach dishes imaginable.
But the benefits don’t stop there. Growing spinach at home fast allows for endless experimentation and customization. Want to add a spicy kick to your salads? Try growing a variety like ‘Red Carnival’ for its vibrant color and slightly peppery flavor. Prefer a milder taste? ‘Bloomsdale Long Standing’ is a classic choice known for its smooth leaves and excellent heat tolerance. You can also experiment with different growing methods, such as container gardening, raised beds, or even hydroponics, to find what works best for your space and preferences.
Consider companion planting to further enhance your spinach crop. Planting spinach alongside radishes, lettuce, or strawberries can help deter pests and improve overall growth. You can also use spinach as a ground cover in your vegetable garden, suppressing weeds and conserving moisture.
Don’t be afraid to get creative with your spinach harvest. Beyond salads, spinach can be used in smoothies, soups, omelets, pasta dishes, and countless other recipes. It’s a versatile and nutritious ingredient that can add a boost of flavor and health to any meal.
We understand that gardening can sometimes seem daunting, especially for beginners. But growing spinach is surprisingly easy, and with the tips and tricks we’ve shared, you’ll be well on your way to a bountiful harvest in no time. Remember to start small, be patient, and don’t be afraid to experiment. The most important thing is to have fun and enjoy the process.
So, what are you waiting for? Grab some spinach seeds, prepare your soil, and get ready to experience the joy of growing your own fresh, delicious spinach at home fast. We’re confident that you’ll be amazed by the results.
We encourage you to share your experiences with us! Post photos of your spinach garden on social media using #HomeGrownSpinach and tell us about your favorite spinach recipes. We can’t wait to see what you create! Let’s build a community of home gardeners who are passionate about growing their own food and enjoying the many benefits of fresh, homegrown spinach. Happy gardening!
Frequently Asked Questions (FAQ)
What is the best time of year to grow spinach?
Spinach thrives in cool weather, making spring and fall the ideal seasons for planting. In most regions, you can plant spinach seeds in early spring, as soon as the soil can be worked. For a fall harvest, sow seeds in late summer or early fall. Avoid planting spinach during the hottest months of summer, as high temperatures can cause it to bolt (go to seed) and become bitter. If you live in a region with mild winters, you may even be able to grow spinach throughout the winter months.
How much sunlight does spinach need?
Spinach needs at least 3-6 hours of sunlight per day to grow well. However, it can tolerate partial shade, especially during the hottest part of the day. If you live in a region with intense sunlight, consider providing some afternoon shade to prevent the leaves from scorching. When growing spinach indoors, use grow lights to supplement natural sunlight and ensure adequate growth.
What kind of soil is best for growing spinach?
Spinach prefers well-drained soil that is rich in organic matter. The ideal soil pH is between 6.5 and 7.0. Before planting, amend your soil with compost, aged manure, or other organic materials to improve its fertility and drainage. Avoid planting spinach in heavy clay soil, as this can lead to waterlogging and root rot. If you have clay soil, consider growing spinach in raised beds or containers filled with a well-draining potting mix.
How often should I water spinach?
Spinach needs consistent moisture to grow well, but it doesn’t like to be waterlogged. Water your spinach plants deeply whenever the top inch of soil feels dry to the touch. Avoid overhead watering, as this can promote fungal diseases. Instead, water at the base of the plants using a watering can or soaker hose. During hot, dry weather, you may need to water your spinach plants more frequently.
How do I prevent spinach from bolting?
Bolting is a common problem with spinach, especially during hot weather. To prevent bolting, choose heat-tolerant spinach varieties, provide afternoon shade, and water your plants regularly. You can also mulch around your spinach plants to help keep the soil cool and moist. If your spinach plants do start to bolt, harvest the leaves immediately to prevent them from becoming bitter.
What are some common pests and diseases that affect spinach?
Spinach is susceptible to a variety of pests and diseases, including aphids, leaf miners, flea beetles, downy mildew, and white rust. To prevent pest and disease problems, practice good garden hygiene, such as removing weeds and debris from around your plants. You can also use insecticidal soap or neem oil to control aphids, leaf miners, and flea beetles. To prevent fungal diseases, avoid overhead watering and ensure good air circulation around your plants. If you notice signs of disease, remove the affected leaves immediately and treat your plants with a fungicide.
How do I harvest spinach?
You can harvest spinach leaves as soon as they are large enough to eat, typically when they are about 4-6 inches long. To harvest, simply cut the leaves off at the base of the plant using a sharp knife or scissors. You can harvest the entire plant at once, or you can harvest individual leaves as needed. Regular harvesting will encourage the plant to produce more leaves.
Can I grow spinach in containers?
Yes, spinach grows well in containers, making it a great option for gardeners with limited space. Choose a container that is at least 6 inches deep and has drainage holes. Fill the container with a well-draining potting mix and plant your spinach seeds or seedlings. Water regularly and fertilize every few weeks with a balanced fertilizer. Place the container in a sunny location that receives at least 3-6 hours of sunlight per day.
How do I store spinach after harvesting?
To store spinach after harvesting, wash the leaves thoroughly and pat them dry with a paper towel. Place the spinach in a plastic bag or container lined with a paper towel and store it in the refrigerator. Spinach will typically last for about 5-7 days in the refrigerator. You can also freeze spinach for longer storage. To freeze spinach, blanch the leaves in boiling water for 2 minutes, then plunge them into ice water. Drain the spinach well and squeeze out any excess water. Place the spinach in freezer bags or containers and freeze for up to 8 months.
Can I grow spinach indoors?
Yes, you can grow spinach indoors, especially during the winter months. Choose a sunny location near a window or use grow lights to provide adequate light. Plant your spinach seeds or seedlings in a container filled with a well-draining potting mix. Water regularly and fertilize every few weeks with a balanced fertilizer. Keep the temperature between 60-70°F (15-21°C) for optimal growth.


Leave a Comment