
Grow wheatgrass water only? Absolutely! Imagine having a vibrant, nutrient-packed superfood readily available right in your kitchen, without the fuss of soil or complicated setups. For centuries, civilizations have recognized the potent health benefits of wheatgrass, from ancient Egyptians who revered it to modern-day health enthusiasts who juice it for its detoxifying properties. But let’s be honest, the traditional method can be messy and time-consuming.
That’s where this DIY guide comes in! I’m going to show you a simple, clean, and incredibly effective way to grow wheatgrass water only. Forget about dealing with soil, pests, or complicated watering schedules. This method is perfect for busy individuals, apartment dwellers, or anyone who wants to enjoy the benefits of fresh wheatgrass without the hassle.
Why do you need this trick? Because access to fresh, healthy food shouldn’t be a luxury. By learning this easy method, you’ll be able to cultivate your own supply of wheatgrass, packed with vitamins, minerals, and antioxidants, all with minimal effort and maximum reward. Get ready to unlock the secrets to growing your own green goodness, one water-soaked seed at a time!
Growing Wheatgrass with Just Water: A Simple DIY Guide
Hey there, fellow green thumb enthusiasts! Ever wanted to bring a vibrant, healthy touch to your home without the fuss of soil? Well, you’re in the right place! I’m going to walk you through the super easy process of growing wheatgrass using just water. It’s a fantastic way to get fresh wheatgrass for juicing, smoothies, or even just as a decorative element. Trust me, it’s simpler than you think!
What You’ll Need
Before we dive in, let’s gather our supplies. The beauty of this method is that you don’t need much!
* Wheatgrass Seeds: Make sure you get seeds specifically for growing wheatgrass, not for planting in a field. You can find these at most health food stores or online. I usually buy organic for peace of mind.
* Shallow Trays: These can be plastic trays, repurposed takeout containers (cleaned thoroughly, of course!), or even baking dishes. Just make sure they have drainage holes or you’re prepared to manage the water carefully.
* Water: Filtered water is best, but tap water that’s been sitting out for a while to let the chlorine dissipate will also work.
* Spray Bottle: For misting the seeds and seedlings.
* Dark Towel or Cloth: To cover the seeds during the initial germination phase.
* Optional: Hydrogen Peroxide (3%): This can help prevent mold growth, but it’s not essential.
Phase 1: Soaking and Sprouting the Seeds
This is where the magic begins! Getting the seeds properly soaked and sprouted is crucial for a successful wheatgrass crop.
1. Rinse the Seeds: Place your wheatgrass seeds in a bowl and rinse them thoroughly with cool water. This removes any debris and helps to wake them up.
2. Soak the Seeds: Cover the seeds with plenty of fresh, cool water. I usually use about 2-3 times the volume of water to seeds. Let them soak for 8-12 hours. This allows the seeds to absorb the water they need to germinate. I usually do this overnight.
3. Drain and Rinse Again: After soaking, drain the water completely and rinse the seeds again. This helps prevent mold and keeps them fresh.
4. Sprouting (Optional, but Recommended): This step isn’t strictly necessary, but I find it significantly improves germination rates. Place the drained seeds in a jar or container with a mesh lid (or cheesecloth secured with a rubber band). Rinse and drain the seeds 2-3 times a day for 1-2 days. You’ll start to see tiny sprouts emerging. This is a good sign!
Phase 2: Planting and Germinating in the Tray
Now that our seeds are prepped, it’s time to get them into the tray.
1. Prepare the Tray: If your tray doesn’t have drainage holes, be extra careful with watering. You don’t want the seeds sitting in standing water, which can lead to mold.
2. Spread the Seeds: Distribute the soaked or sprouted seeds evenly across the bottom of the tray. You want a fairly dense layer, but not so thick that the seeds are piled on top of each other. Aim for about 1/4 inch thick.
3. Mist with Water: Gently mist the seeds with water using your spray bottle. You want them to be moist, but not soaking wet.
4. Cover with a Dark Towel: This is important! Covering the seeds with a dark towel or cloth creates a humid, dark environment that encourages germination. Make sure the towel is damp, but not dripping.
5. Maintain Moisture: Check the seeds at least once a day (preferably twice) and mist them with water as needed to keep them moist. The towel should also remain damp.
6. Wait for Germination: This usually takes 2-3 days. You’ll know the seeds are germinating when you see tiny white roots emerging and the seeds starting to sprout.
Phase 3: Growing the Wheatgrass
Once the seeds have germinated, it’s time to let them grow!
1. Remove the Towel: Once you see a good amount of sprouting, remove the dark towel.
2. Introduce Light: Place the tray in a location with indirect sunlight. Direct sunlight can scorch the delicate seedlings. A bright windowsill or a spot near a grow light works well.
3. Water Regularly: Continue to mist the wheatgrass with water 1-2 times a day, keeping the roots moist. You can also gently pour water into the tray, making sure not to overwater. If your tray has drainage holes, let the excess water drain out. If not, carefully pour off any standing water.
4. Optional: Hydrogen Peroxide Solution: If you’re concerned about mold, you can mix a small amount of 3% hydrogen peroxide with water (about 1 tablespoon per cup of water) and use this solution to mist the wheatgrass. This can help inhibit mold growth without harming the plants.
5. Rotate the Tray: To ensure even growth, rotate the tray every day or two. This will prevent the wheatgrass from leaning towards the light source.
6. Observe and Adjust: Keep an eye on your wheatgrass. If it looks dry, water it more often. If it looks yellow or droopy, it might be getting too much sunlight or not enough water. Adjust accordingly.
Phase 4: Harvesting and Enjoying Your Wheatgrass
The best part! Harvesting your own homegrown wheatgrass.
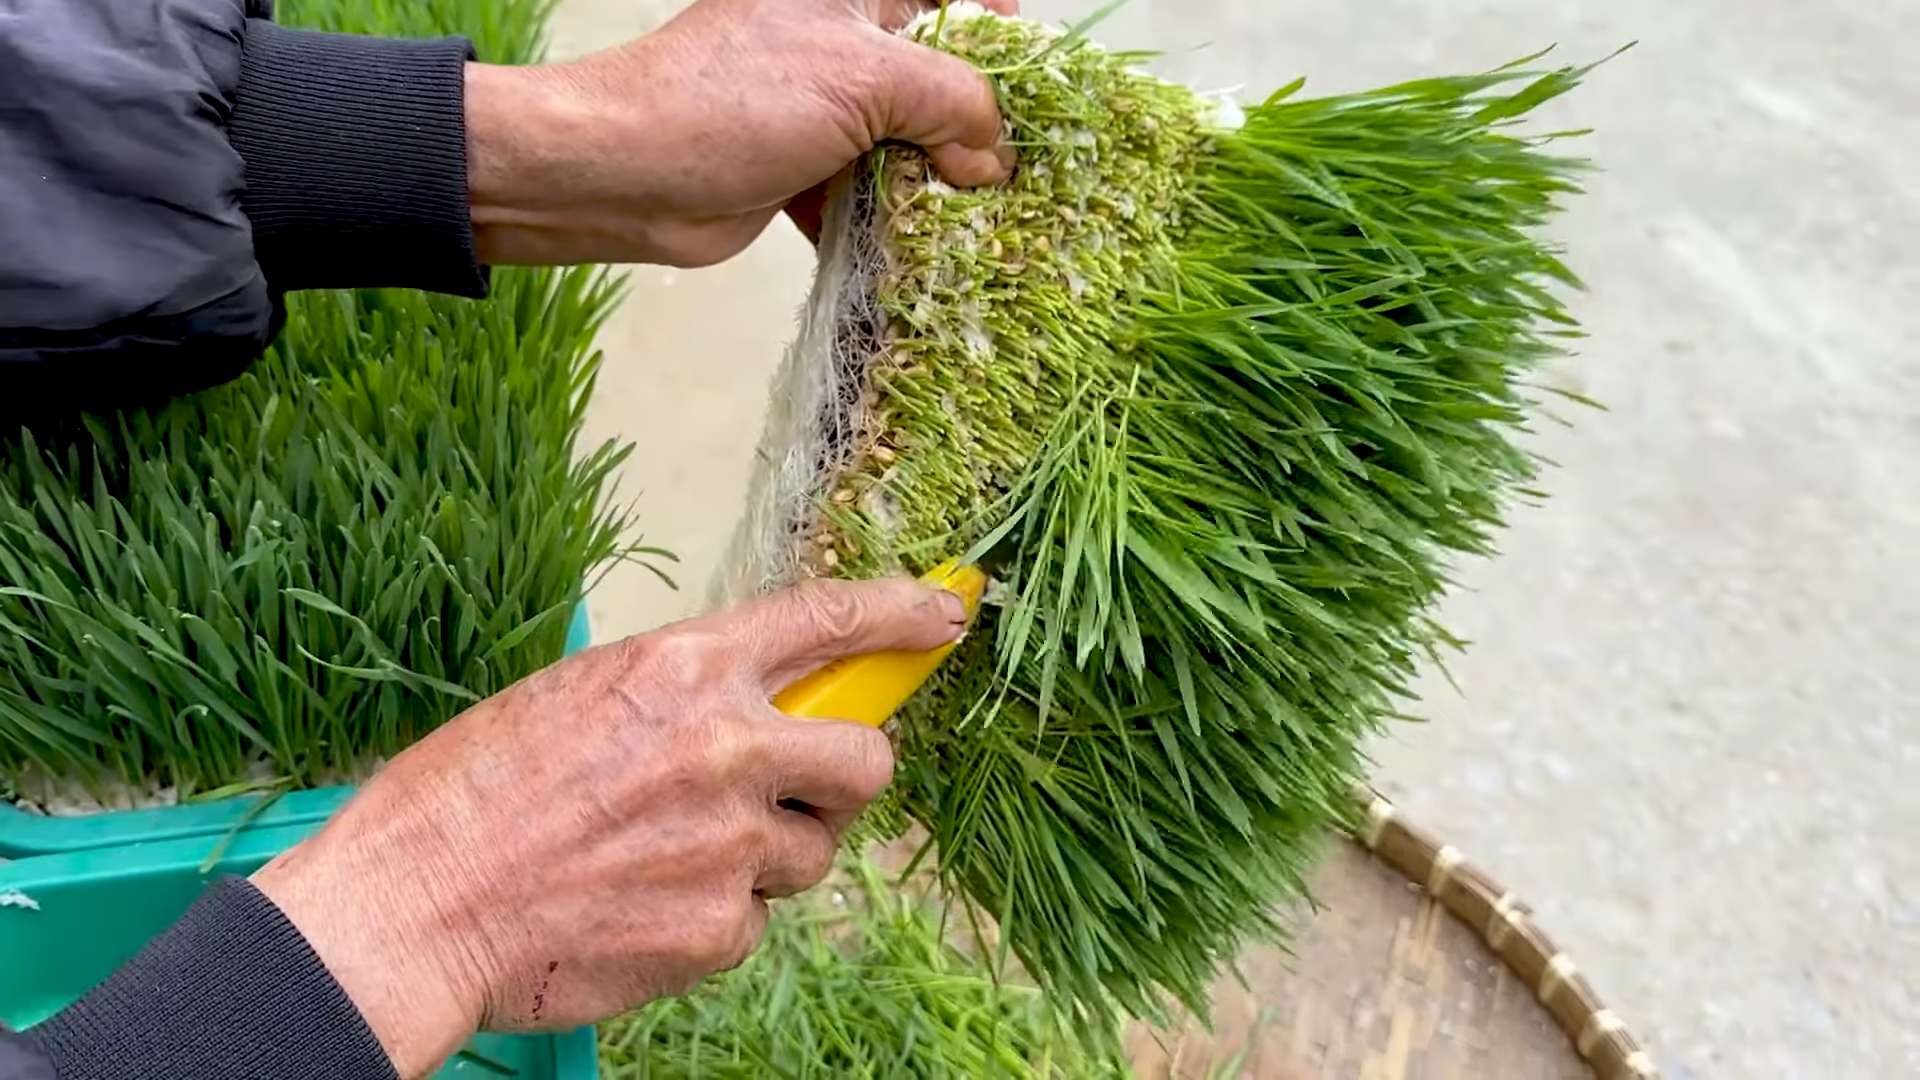
1. Harvest Time: Your wheatgrass is ready to harvest when it’s about 4-7 inches tall. This usually takes about 7-10 days after removing the towel.
2. Cut the Wheatgrass: Using clean scissors or a sharp knife, cut the wheatgrass just above the seed level.
3. Rinse and Use: Rinse the harvested wheatgrass thoroughly with water before using it.
4. Juicing: The most common use for wheatgrass is juicing. You can use a dedicated wheatgrass juicer or a masticating juicer.
5. Smoothies: You can also add wheatgrass to smoothies for a nutritional boost. Start with a small amount (about 1/2 ounce) and increase as tolerated.
6. Storage: Store harvested wheatgrass in the refrigerator in a sealed container. It will stay fresh for about a week.
7. Second Harvest (Optional): Sometimes, you can get a second, smaller harvest from the same tray. After the first harvest, continue to water the roots and see if new shoots emerge. However, the second harvest is usually less vigorous than the first.
Troubleshooting
Even with the best intentions, things can sometimes go wrong. Here are a few common issues and how to address them:
* Mold: Mold is a common problem when growing wheatgrass, especially in humid environments. To prevent mold, make sure to rinse the seeds thoroughly, provide good air circulation, and avoid overwatering. If you see mold, you can try spraying the affected area with a hydrogen peroxide solution. In severe cases, you may need to discard the affected area or the entire tray.
* Slow Germination: If your seeds are taking a long time to germinate, it could be due to several factors: old seeds, insufficient moisture, or too low temperature. Make sure your seeds are fresh, keep them consistently moist, and maintain a temperature of around 65-75°F (18-24°C).
* Yellowing Wheatgrass: Yellowing wheatgrass can be a sign of overwatering, underwatering, or too much sunlight. Adjust your watering schedule and move the tray to a location with indirect sunlight.
* Uneven Growth: Uneven growth can be caused by uneven light exposure. Rotate the tray regularly to ensure that all parts of the wheatgrass receive adequate light.
Tips for Success
Here are a few extra tips to help you grow the best wheatgrass possible:
* Use High-Quality Seeds: Investing in high-quality wheatgrass seeds will make a big difference in your success.
* Maintain Consistent Moisture: Keeping the seeds and roots consistently moist is crucial for germination and growth.
* Provide Good Air Circulation: Good air circulation helps prevent mold growth.
* Experiment with Different Trays: Try different types of trays to see what works best for you.
* Don’t Give Up! Growing wheatgrass can be a bit of a learning curve. Don’t be discouraged if you don’t succeed the first time. Just keep experimenting and you’ll eventually get the hang of it.
Growing wheatgrass with just water is a rewarding and easy way to bring a touch of green into your life. With a little patience and attention, you’ll be enjoying fresh, homegrown wheatgrass in no time! Happy growing!

Conclusion
So, there you have it! Growing your own wheatgrass using just water is not only incredibly simple, but it’s also a rewarding experience that brings a touch of vibrant green into your home and a boost of fresh nutrients into your diet. We’ve walked you through the straightforward process, highlighting how accessible and cost-effective it is to cultivate this nutritional powerhouse. Forget expensive store-bought wheatgrass shots – with a little patience and our easy-to-follow guide, you can have a continuous supply of fresh, potent wheatgrass right at your fingertips.
But why is this DIY trick a must-try? Beyond the cost savings, growing your own wheatgrass allows you to control every aspect of the process. You know exactly what’s going into your wheatgrass – no hidden chemicals, no questionable growing practices, just pure, unadulterated goodness. This is especially important for those who are health-conscious and prioritize organic, natural foods. Plus, there’s a certain satisfaction that comes from nurturing something from seed to harvest, a connection to nature that can be incredibly grounding and therapeutic.
Looking for variations? Experiment with different types of wheatgrass seeds to find your favorite flavor profile. Some varieties are sweeter, while others have a more intense, grassy taste. You can also try adding a small amount of organic fertilizer to the water after the initial sprouting phase to boost growth, but remember to keep it minimal to maintain the purity of your wheatgrass. Another fun variation is to use different containers for growing. While we recommended trays, you could also try using glass jars for a more aesthetically pleasing display, or even repurpose plastic containers to reduce waste. Just ensure proper drainage in whatever container you choose.
Don’t be intimidated by the process! It’s far simpler than you might think. The key is to maintain consistent moisture and provide adequate light. Even if you don’t have a green thumb, you can successfully grow wheatgrass using just water. It’s a forgiving plant that thrives with minimal intervention.
We wholeheartedly encourage you to give this DIY wheatgrass growing method a try. It’s a fantastic way to incorporate more greens into your diet, save money, and connect with nature. Once you’ve harvested your first batch of homegrown wheatgrass, experiment with different ways to use it. Add it to smoothies, juice it for a concentrated shot of nutrients, or even use it as a garnish for salads and other dishes. The possibilities are endless!
Most importantly, we want to hear about your experience! Share your photos, tips, and challenges in the comments below. Did you try a different variation? Did you encounter any unexpected hurdles? Your feedback will not only help other readers but also contribute to a community of wheatgrass enthusiasts who are passionate about growing their own food. Let’s learn from each other and make this DIY wheatgrass growing journey even more rewarding! So, grab some wheatgrass seeds, some water, and get ready to experience the joy of growing your own superfood! This simple method for growing wheatgrass water only is a game changer.
Frequently Asked Questions (FAQ)
What exactly is wheatgrass and why should I grow it?
Wheatgrass is the young grass of the common wheat plant (Triticum aestivum). It’s considered a superfood due to its high concentration of vitamins, minerals, antioxidants, and enzymes. Growing your own wheatgrass allows you to access these nutrients in their freshest and most potent form. It’s a great way to boost your immune system, detoxify your body, and increase your energy levels. Plus, it’s a sustainable and cost-effective way to incorporate more greens into your diet.
How long does it take to grow wheatgrass using just water?
The entire process, from soaking the seeds to harvesting the wheatgrass, typically takes about 7-10 days. The initial soaking and sprouting phase takes 1-2 days, followed by 5-7 days of growth in a tray with water. The exact timeframe may vary depending on the temperature and humidity of your environment.
What kind of water should I use for growing wheatgrass?
It’s best to use filtered or purified water for growing wheatgrass. Tap water may contain chlorine and other chemicals that can inhibit growth. If you only have access to tap water, let it sit out for 24 hours to allow the chlorine to evaporate before using it.
How much light does wheatgrass need?
Wheatgrass needs indirect sunlight to thrive. Avoid placing it in direct sunlight, as this can scorch the leaves. A bright windowsill or a spot near a grow light is ideal. If you don’t have access to natural light, you can use a fluorescent grow light to provide the necessary illumination.
How often should I water the wheatgrass?
Keep the wheatgrass seeds and roots consistently moist, but not waterlogged. Water the tray once or twice a day, depending on the humidity of your environment. The goal is to keep the roots hydrated without allowing them to sit in standing water, which can lead to mold growth.
How do I know when the wheatgrass is ready to harvest?
Wheatgrass is typically ready to harvest when it reaches a height of 4-7 inches. The blades should be a vibrant green color and feel firm to the touch. You can harvest the wheatgrass by cutting it close to the base with scissors or a sharp knife.
How do I store harvested wheatgrass?
Harvested wheatgrass is best used immediately for optimal nutrient content. However, you can store it in the refrigerator for up to a week. Wrap the wheatgrass in a damp paper towel and place it in a sealed plastic bag or container.
Can I regrow wheatgrass after harvesting it?
Wheatgrass can be harvested multiple times, but the subsequent harvests will be less nutrient-dense than the first. After the first harvest, continue to water the tray and provide adequate light. You may get one or two more harvests, but the yield will decrease with each subsequent cutting.
What if I see mold growing on my wheatgrass?
Mold growth is a common issue when growing wheatgrass, especially in humid environments. To prevent mold, ensure proper ventilation and avoid overwatering. If you see mold, remove the affected areas immediately. You can also try spraying the wheatgrass with a diluted solution of hydrogen peroxide and water (1 part hydrogen peroxide to 10 parts water).
Is it safe to eat wheatgrass if it has mold?
It’s generally not recommended to consume wheatgrass that has mold, as some molds can produce toxins that are harmful to humans. If you’re unsure whether the mold is safe, it’s best to discard the affected wheatgrass.
Can I use any type of wheat seeds to grow wheatgrass?
Yes, you can use any type of wheat seeds to grow wheatgrass, but it’s best to use organic, untreated wheat seeds specifically intended for sprouting. These seeds are typically free from chemicals and contaminants that could harm your health.
What are some creative ways to use wheatgrass?
Beyond juicing and smoothies, wheatgrass can be used in a variety of creative ways. You can add it to salads, soups, and other dishes as a garnish. You can also use it to make wheatgrass tea or infuse it into water for a refreshing and nutritious beverage. Some people even use wheatgrass topically to treat skin conditions.
Can I grow wheatgrass outdoors?
Yes, you can grow wheatgrass outdoors, but it’s important to protect it from direct sunlight and extreme temperatures. A shaded patio or balcony is an ideal location. Make sure to provide adequate drainage to prevent waterlogging.
What are the benefits of growing wheatgrass water only compared to using soil?
Growing wheatgrass water only is cleaner, simpler, and requires less maintenance than growing it in soil. It eliminates the need for soil preparation, fertilization, and pest control. It also reduces the risk of mold and other soilborne diseases. Plus, it’s a more sustainable and environmentally friendly method.
Leave a Comment