
Growing Bell Peppers Guide: Your Path to a Bountiful Harvest!
Have you ever dreamed of strolling into your backyard and plucking a perfectly ripe, vibrant bell pepper straight from the vine? Imagine the satisfaction of adding that homegrown goodness to your favorite dishes! Well, dream no more! This comprehensive growing bell peppers guide is your key to unlocking a season of delicious, colorful peppers, even if you’re a complete beginner.
Bell peppers, originating from Central and South America, have been cultivated for thousands of years. They’ve journeyed across continents, becoming a staple in cuisines worldwide. From the fiery flavors of Mexican cuisine to the sweet crunch in a fresh salad, bell peppers add a burst of flavor and nutrition to our lives. But why settle for store-bought when you can experience the unparalleled taste of homegrown?
Let’s face it, store-bought bell peppers can be expensive and sometimes lack that vibrant flavor we crave. Plus, there’s nothing quite like knowing exactly where your food comes from and how it was grown. This growing bell peppers guide will empower you to cultivate your own thriving pepper plants, saving you money and providing you with the freshest, most flavorful peppers imaginable. We’ll cover everything from choosing the right varieties and starting seeds to transplanting, watering, and pest control. Get ready to transform your garden into a pepper paradise!
DIY: From Seed to Supper – My Guide to Growing Bell Peppers Like a Pro!
Hey there, fellow gardening enthusiasts! I’m so excited to share my tried-and-true method for growing plump, juicy bell peppers right in your own backyard (or even on your balcony!). Forget those bland, overpriced peppers from the grocery store – with a little patience and know-how, you can harvest a rainbow of vibrant peppers bursting with flavor. I’ve learned a lot over the years, and I’m here to guide you through every step, from starting seeds indoors to enjoying your delicious harvest. Let’s get started!
Getting Started: Seed Starting Basics
Before we even think about planting outdoors, we need to get our pepper seedlings off to a strong start. Starting seeds indoors gives them a head start, especially in regions with shorter growing seasons.
* Timing is Key: Start your bell pepper seeds indoors about 6-8 weeks before the last expected frost in your area. I usually aim for late February or early March, but check your local frost dates to be sure.
* Choosing the Right Seeds: Select high-quality bell pepper seeds from a reputable source. Consider the variety you want to grow – green, red, yellow, orange, or even purple! I personally love growing a mix for a colorful harvest.
* Seed Starting Mix: Use a seed starting mix, not regular potting soil. Seed starting mix is lighter and provides better drainage, which is crucial for delicate seedlings.
* Containers: You can use seed starting trays, peat pots, or even recycled yogurt containers with drainage holes. I prefer seed starting trays with a humidity dome to help retain moisture.
* Warmth is Essential: Bell pepper seeds need warmth to germinate. Aim for a soil temperature of 75-85°F (24-29°C). A heat mat is a fantastic investment for consistent warmth.
* Light it Up: Once the seeds germinate, they need plenty of light to prevent them from becoming leggy. A grow light is ideal, but a sunny windowsill can work if you supplement with artificial light.
Step-by-Step Seed Starting Instructions:
1. Prepare Your Containers: Fill your chosen containers with seed starting mix, leaving about half an inch of space at the top. Gently tap the containers to settle the mix.
2. Sow the Seeds: Sow 2-3 seeds per cell or container, about ¼ inch deep.
3. Water Gently: Water the soil gently using a spray bottle or watering can with a fine rose. Avoid overwatering, which can lead to damping off (a fungal disease that kills seedlings).
4. Cover and Warm: Cover the containers with a humidity dome or plastic wrap to retain moisture. Place them on a heat mat in a warm location.
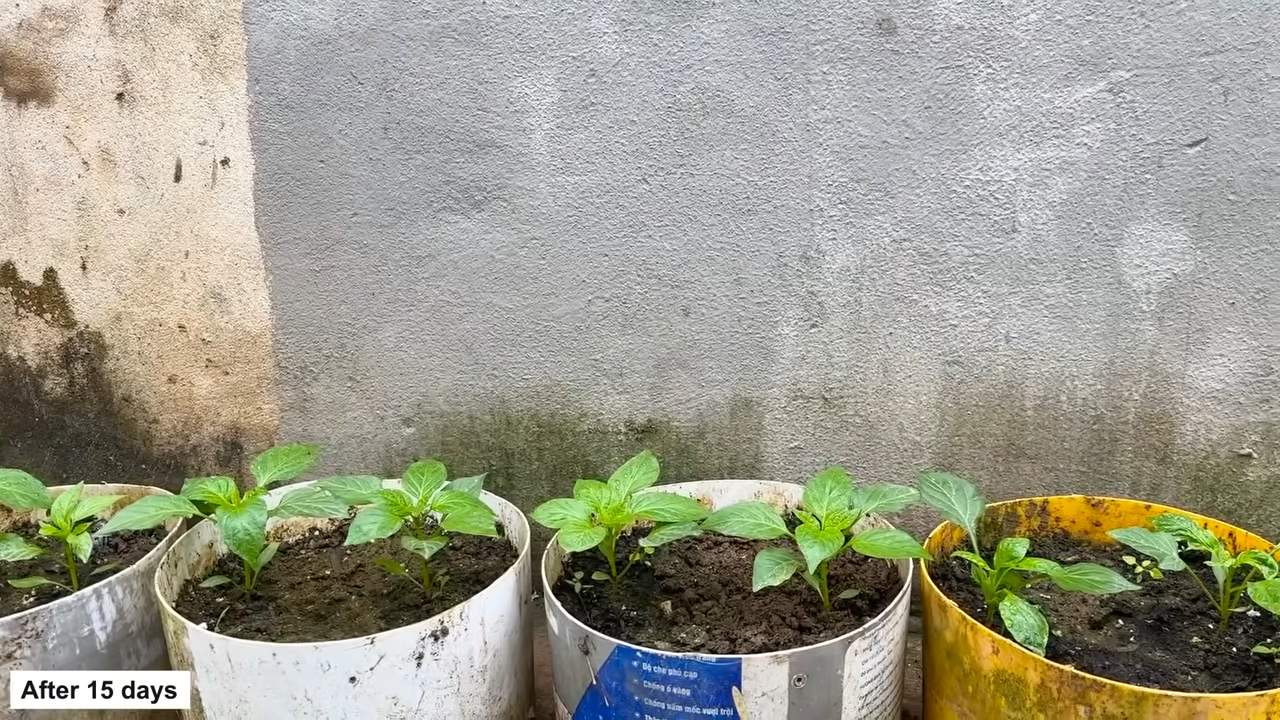
5. Monitor Germination: Check the containers daily for germination. Bell pepper seeds can take 7-21 days to germinate, depending on the temperature.
6. Provide Light: Once the seeds germinate, remove the humidity dome and place the seedlings under a grow light or in a sunny windowsill.
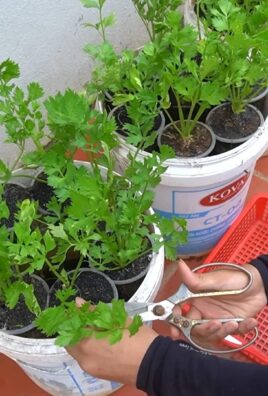
7. Thin the Seedlings: Once the seedlings have their first true leaves (the second set of leaves), thin them to one seedling per cell or container. Choose the strongest seedling and snip off the others at the soil line. Don’t pull them out, as this can disturb the roots of the remaining seedling.
8. Water Regularly: Water the seedlings regularly, keeping the soil moist but not soggy.
9. Fertilize Lightly: Start fertilizing the seedlings with a diluted liquid fertilizer (half strength) about once a week.
Transplanting Your Seedlings Outdoors
After nurturing your seedlings indoors, it’s time to prepare them for their new home in the garden. This is a crucial step, so let’s do it right!
* Hardening Off: Before transplanting, you need to harden off your seedlings. This process gradually acclimates them to outdoor conditions, preventing transplant shock. Over a period of 7-10 days, gradually expose the seedlings to increasing amounts of sunlight and wind. Start with an hour or two of shade and gradually increase the exposure each day.
* Choosing the Right Location: Bell peppers need at least 6-8 hours of sunlight per day. Choose a location with well-drained soil.
* Soil Preparation: Amend the soil with compost or well-rotted manure to improve drainage and fertility. Bell peppers are heavy feeders, so rich soil is essential.
* Spacing: Space the pepper plants 18-24 inches apart in rows that are 24-36 inches apart. This allows for adequate air circulation and sunlight penetration.
* Timing: Transplant your bell pepper seedlings outdoors after the last expected frost and when the soil temperature has warmed to at least 60°F (16°C).
Step-by-Step Transplanting Instructions:
1. Prepare the Planting Holes: Dig holes that are slightly larger than the root ball of the seedlings.
2. Add Compost: Add a handful of compost to each planting hole.
3. Gently Remove Seedlings: Gently remove the seedlings from their containers, being careful not to damage the roots. If using peat pots, you can plant the entire pot, but make sure to tear off the top edge to prevent it from wicking moisture away from the roots.
4. Plant the Seedlings: Place the seedlings in the planting holes, ensuring that the top of the root ball is level with the surrounding soil.
5. Backfill and Water: Backfill the holes with soil and gently firm the soil around the base of the plants. Water thoroughly.
6. Mulch: Apply a layer of mulch around the plants to help retain moisture, suppress weeds, and regulate soil temperature. I like to use straw or shredded bark.
7. Provide Support: Bell pepper plants can become top-heavy as they produce fruit. Provide support with stakes or cages to prevent them from falling over. I prefer using tomato cages, as they provide ample support.
Caring for Your Bell Pepper Plants
Now that your bell pepper plants are in the ground, it’s time to provide them with the care they need to thrive.
* Watering: Water regularly, especially during dry spells. Bell peppers need consistent moisture to produce plump, juicy fruits. Aim for about 1 inch of water per week. Water deeply and less frequently, rather than shallowly and often.
* Fertilizing: Fertilize every 2-3 weeks with a balanced fertilizer or a fertilizer specifically formulated for peppers and tomatoes. Follow the instructions on the fertilizer package.
* Weeding: Keep the area around the plants free of weeds. Weeds compete with the pepper plants for nutrients and water.
* Pest Control: Monitor the plants regularly for pests, such as aphids, flea beetles, and tomato hornworms. Handpick pests or use organic pest control methods, such as insecticidal soap or neem oil.
* Pruning: Pruning bell pepper plants can improve air circulation and encourage fruit production. Remove any suckers (shoots that grow from the base of the plant) and any yellowing or diseased leaves.
* Blossom End Rot Prevention: Blossom end rot is a common problem in bell peppers, caused by a calcium deficiency. To prevent blossom end rot, ensure consistent watering and amend the soil with calcium-rich amendments, such as bone meal or crushed eggshells.
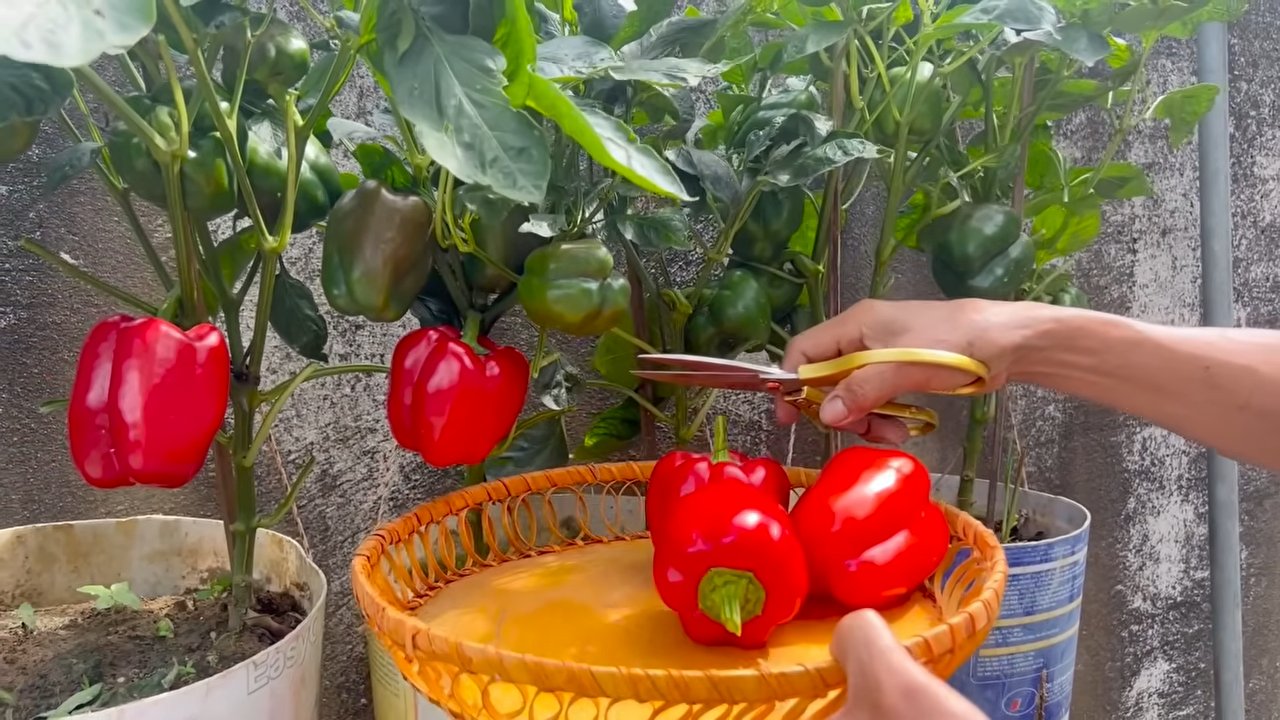
Harvesting Your Bountiful Crop
The moment you’ve been waiting for! Harvesting your own homegrown bell peppers is incredibly rewarding.
* Timing: Bell peppers can be harvested at any stage of maturity, depending on your preference. Green bell peppers are harvested when they are firm and fully sized, but before they start to turn color. Colored bell peppers are harvested when they have reached their full color and are firm to the touch.
* Harvesting Technique: Use pruning shears or a sharp knife to cut the peppers from the plant, leaving about an inch of stem attached.
* Storage: Store harvested bell peppers in the refrigerator for up to 1-2 weeks.
Troubleshooting Common Problems
Even with the best care, you might encounter some challenges along the way. Here are some common problems and how to address them:
* Blossom End Rot: As mentioned earlier, this is caused by a calcium deficiency. Ensure consistent watering and amend the soil with calcium-rich amendments.
* Sunscald: This occurs when the peppers are exposed to too much direct sunlight, causing them to develop white or tan patches. Provide shade during the hottest part of the day.
* Pests: Monitor the plants regularly for pests and take action promptly.
* Diseases: Prevent diseases by providing good air circulation, avoiding overwatering, and using disease-resistant varieties.
My Favorite Bell Pepper Varieties
Over the years, I’ve experimented with many different bell pepper varieties. Here are a few of my favorites:
* California Wonder: A classic green bell
Conclusion
So, there you have it! Mastering the art of growing bell peppers doesn’t require a green thumb blessed by the gardening gods. It’s about understanding their needs, providing the right environment, and a little bit of patience. This guide has armed you with the knowledge to cultivate vibrant, healthy bell pepper plants right in your own backyard or even on your balcony.
Why is this DIY approach a must-try? Because store-bought bell peppers, while convenient, often lack the robust flavor and satisfying crunch of homegrown varieties. Plus, you have complete control over the growing process, ensuring your peppers are free from unwanted pesticides and chemicals. Imagine biting into a juicy, sun-ripened bell pepper, knowing you nurtured it from seed to table – that’s a reward worth striving for!
But the journey doesn’t end here. Feel free to experiment with different bell pepper varieties. Try growing sweet bell peppers like the classic California Wonder or venture into the realm of colorful options like purple, yellow, or even chocolate bell peppers. Each variety offers a unique flavor profile and visual appeal, adding excitement to your garden and your plate.
Consider companion planting to further enhance your bell pepper yield and deter pests naturally. Basil, marigolds, and carrots are excellent companions for bell peppers, offering mutual benefits that contribute to a thriving garden ecosystem.
Don’t be afraid to tweak the techniques outlined in this guide to suit your specific climate and growing conditions. If you live in a particularly hot region, provide extra shade during the peak of the day. If you’re dealing with limited space, explore container gardening options and choose compact bell pepper varieties.
Ultimately, the key to successful bell pepper cultivation lies in observation and adaptation. Pay close attention to your plants, monitor their growth, and adjust your care routine as needed. Remember, gardening is a learning process, and every season brings new opportunities to refine your skills and deepen your connection with nature.
We wholeheartedly encourage you to embark on this rewarding gardening adventure. Start small, be patient, and most importantly, have fun! And once you’ve harvested your first batch of homegrown bell peppers, we’d love to hear about your experience. Share your tips, successes, and even your challenges in the comments below. Let’s build a community of passionate bell pepper growers and inspire others to discover the joys of homegrown produce. Happy gardening, and may your bell pepper plants flourish! Remember, with a little effort, you can enjoy the delicious taste of homegrown bell peppers all season long.
Frequently Asked Questions (FAQs)
What are the most common problems when growing bell peppers, and how can I fix them?
Bell peppers, while relatively easy to grow, can sometimes encounter a few common issues. One frequent problem is blossom-end rot, characterized by a dark, sunken spot on the bottom of the pepper. This is usually caused by calcium deficiency due to inconsistent watering. To prevent blossom-end rot, ensure consistent watering, especially during fruit development. You can also amend the soil with calcium-rich supplements like bone meal or crushed eggshells before planting.
Another common issue is pest infestations, such as aphids, whiteflies, and pepper weevils. Regularly inspect your plants for signs of infestation, such as distorted leaves, sticky residue, or visible pests. For minor infestations, try spraying the plants with a strong stream of water or using insecticidal soap. For more severe infestations, consider using organic pesticides like neem oil or pyrethrin.
Fungal diseases like powdery mildew and leaf spot can also affect bell peppers. To prevent these diseases, ensure good air circulation around the plants, avoid overhead watering, and remove any infected leaves promptly. You can also apply a fungicide if necessary.
How often should I water my bell pepper plants?
Watering frequency depends on several factors, including the climate, soil type, and stage of plant growth. Generally, bell pepper plants need about 1 inch of water per week. However, during hot, dry weather, you may need to water them more frequently.
Check the soil moisture regularly by sticking your finger about an inch into the soil. If the soil feels dry, it’s time to water. Water deeply and thoroughly, ensuring the water reaches the roots. Avoid overhead watering, as this can promote fungal diseases.
Container-grown bell peppers tend to dry out more quickly than those grown in the ground, so you may need to water them more frequently.
What kind of fertilizer should I use for bell peppers?
Bell peppers benefit from regular fertilization, especially during the early stages of growth and fruit development. Choose a fertilizer that is specifically formulated for vegetables or tomatoes, as these fertilizers typically contain the right balance of nutrients for bell peppers.
A balanced fertilizer with an NPK ratio of 5-10-10 or 10-10-10 is a good choice for bell peppers. Apply the fertilizer according to the package instructions, usually every 2-3 weeks.
You can also supplement with organic fertilizers like compost tea or fish emulsion. These fertilizers provide a slow-release source of nutrients and help improve soil health.
Avoid over-fertilizing, as this can lead to excessive foliage growth and reduced fruit production.
How long does it take for bell peppers to mature?
The time it takes for bell peppers to mature depends on the variety and growing conditions. Generally, bell peppers take about 60-90 days from transplanting to harvest.
Sweet bell peppers typically mature faster than hot peppers. Green bell peppers can be harvested when they are fully sized but still green. Colored bell peppers, such as red, yellow, and orange, need to ripen fully on the plant to develop their characteristic color and sweetness.
To determine if a bell pepper is ripe, check its color and firmness. Ripe bell peppers should be firm to the touch and have a vibrant, uniform color.
Can I grow bell peppers in containers?
Yes, bell peppers can be successfully grown in containers, making them a great option for gardeners with limited space. Choose a container that is at least 12 inches in diameter and 12 inches deep to provide enough room for the roots to grow.
Use a well-draining potting mix and ensure the container has drainage holes to prevent waterlogging. Place the container in a sunny location that receives at least 6-8 hours of sunlight per day.
Water container-grown bell peppers regularly, as they tend to dry out more quickly than those grown in the ground. Fertilize regularly with a balanced fertilizer.
Consider using a stake or cage to support the plants as they grow, especially if you are growing taller varieties.
How do I protect my bell pepper plants from pests and diseases organically?
Protecting your bell pepper plants from pests and diseases organically is crucial for a healthy and bountiful harvest. Here are some effective strategies:
* **Companion Planting:** Plant basil, marigolds, or nasturtiums near your bell peppers. These plants deter common pests like aphids and whiteflies.
* **Neem Oil:** Apply neem oil as a foliar spray to control aphids, whiteflies, and other pests. Neem oil also has antifungal properties.
* **Insecticidal Soap:** Use insecticidal soap to control soft-bodied insects like aphids and whiteflies.
* **Diatomaceous Earth (DE):** Sprinkle DE around the base of your plants to deter slugs, snails, and other crawling pests.
* **Row Covers:** Use row covers to protect your plants from pests early in the season.
* **Good Air Circulation:** Ensure good air circulation around your plants to prevent fungal diseases.
* **Remove Infected Leaves:** Promptly remove any infected leaves to prevent the spread of disease.
* **Water Properly:** Avoid overhead watering and water deeply at the base of the plants to prevent fungal diseases.
* **Healthy Soil:** Maintain healthy soil by amending it with compost and other organic matter. Healthy plants are more resistant to pests and diseases.
What are some creative ways to use my homegrown bell peppers?
Beyond the usual salads and stir-fries, homegrown bell peppers offer a world of culinary possibilities. Here are a few creative ideas:
* **Stuffed Bell Peppers:** A classic for a reason! Experiment with different fillings like quinoa, rice, ground meat, or vegetables.
* **Roasted Bell Pepper Soup:** Roasting the peppers before blending them into soup intensifies their flavor.
* **Bell Pepper Relish:** A tangy and flavorful relish made with diced bell peppers, onions, vinegar, and spices.
* **Bell Pepper Pizza Topping:** Add sliced bell peppers to your homemade pizza for a burst of color and flavor.
* **Bell Pepper Hummus:** Blend roasted bell peppers into your hummus for a smoky and sweet twist.
* **Bell Pepper Salsa:** A refreshing and vibrant salsa made with diced bell peppers, tomatoes, onions, cilantro, and lime juice.
* **Pickled Bell Peppers:** Preserve your bell pepper harvest by pickling them in vinegar, sugar, and spices.
* **Bell Pepper Frittata or Omelet:** Add diced bell peppers to your frittata or omelet for a nutritious and flavorful breakfast.
* **Grilled Bell Peppers:** Grilling bell peppers brings out their sweetness and adds a smoky char.
Remember to share your own creative uses for homegrown bell peppers with the community!
Leave a Comment