
Growing Peanuts in Foam Box: Ever dreamt of harvesting your own crunchy, homegrown peanuts, even without a sprawling garden? I know I have! Forget the image of vast fields – you can actually cultivate these delicious legumes right on your patio or balcony using a simple foam box. This DIY project opens up a world of possibilities for urban gardeners and anyone with limited space.
Peanuts, originally from South America, have a rich history as a staple food and a symbol of prosperity in many cultures. From ancient Incan tombs to modern-day ballparks, the humble peanut has certainly made its mark. But did you know you don’t need acres of land to enjoy the fruits (or rather, nuts!) of your labor?
Many people are intimidated by the idea of growing their own food, thinking it requires extensive knowledge and resources. That’s where this DIY trick comes in! Growing peanuts in a foam box is a surprisingly easy and rewarding experience. It’s a fantastic way to connect with nature, learn about the growing process, and enjoy fresh, organic peanuts without breaking the bank. Plus, it’s a fun project for the whole family! So, ditch the store-bought peanuts and let’s get our hands dirty!

Growing Peanuts in a Foam Box: A DIY Guide
Hey there, fellow gardening enthusiasts! Ever thought about growing your own peanuts? It’s surprisingly easy and rewarding, and you don’t even need a huge garden. I’m going to walk you through how to grow peanuts in a foam box – a fantastic option if you’re short on space or want to control the growing environment. Let’s get started!
Materials You’ll Need
Before we dive in, let’s gather everything we need. This will make the whole process smoother and more enjoyable.
* Foam Box: Choose a sturdy foam box that’s at least 12 inches deep. The bigger, the better, as peanut plants need room to spread their roots. I usually repurpose old shipping containers, but you can find them at craft stores or even ask local businesses if they have any they’re discarding.
* Peanut Seeds: You can’t just use roasted peanuts from the store! You need raw, unsalted peanuts in their shells. I usually get mine from a garden center or online seed supplier. Look for varieties specifically suited to your climate.
* Potting Mix: Use a high-quality potting mix that drains well. Avoid using garden soil, as it can become compacted in a container and hinder root growth. I like to mix in some compost for added nutrients.
* Drill or Screwdriver: For creating drainage holes in the foam box.
* Watering Can or Hose: For watering your peanut plants.
* Optional:
* Fertilizer: A balanced fertilizer (like 10-10-10) can help boost growth.
* Mulch: Straw or wood chips to help retain moisture and suppress weeds.
* Small Shovel or Trowel: For planting the seeds.
Preparing the Foam Box
This step is crucial for ensuring proper drainage and preventing waterlogging, which can be detrimental to peanut plants.
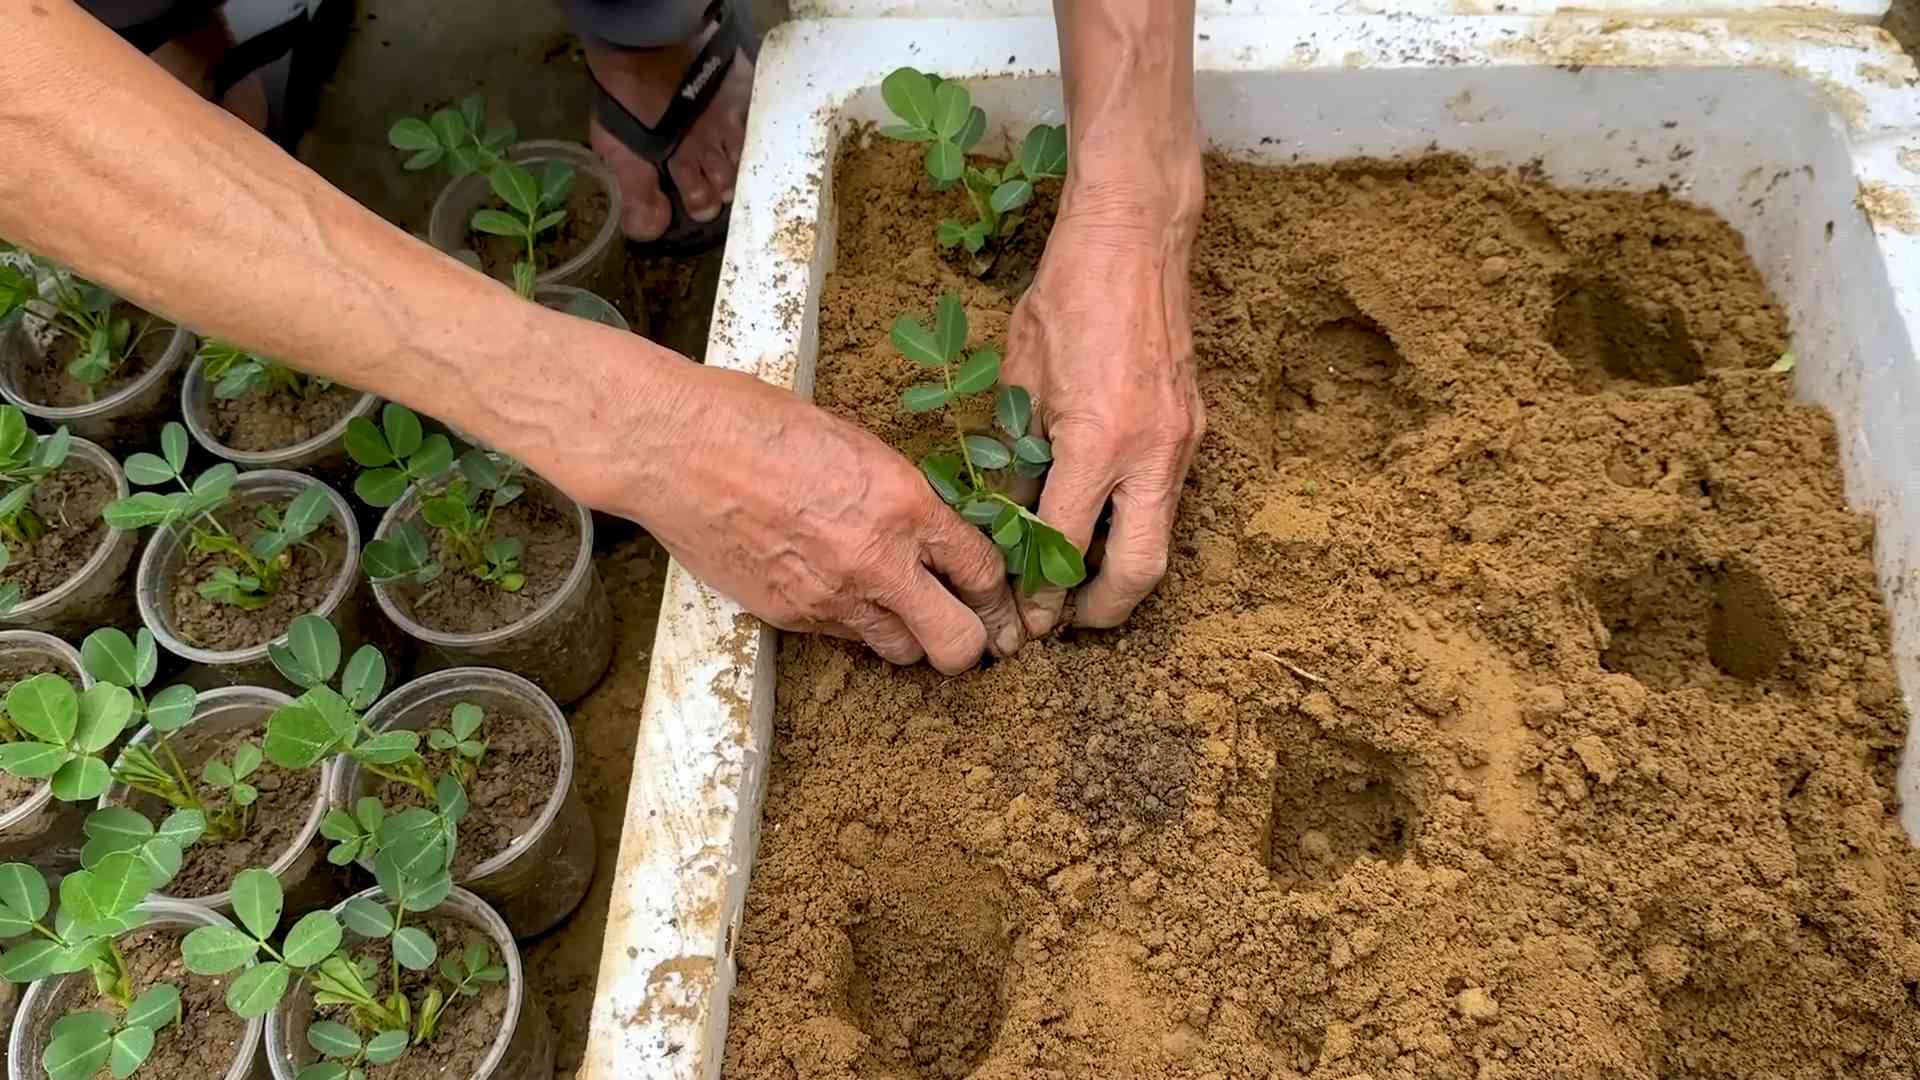
1. Drill Drainage Holes: Using your drill or screwdriver, create several drainage holes in the bottom of the foam box. I usually aim for about 6-8 holes, evenly spaced. Make sure the holes are large enough to allow water to drain freely.
2. Line the Bottom (Optional): While not strictly necessary, lining the bottom of the box with landscape fabric can help prevent soil from washing out through the drainage holes. Just cut a piece of fabric slightly larger than the bottom of the box and place it inside.
3. Fill with Potting Mix: Now, fill the foam box with your potting mix, leaving about 2-3 inches of space at the top. Gently pat down the soil to remove any air pockets.
Planting the Peanut Seeds
This is where the magic happens! Let’s get those peanut seeds in the ground.
1. Soak the Seeds (Optional): Soaking the peanut seeds in water for 24 hours before planting can help speed up germination. I usually skip this step, but it can be beneficial if you’re in a cooler climate or have had trouble with germination in the past.
2. Planting Depth: Dig small holes about 1-2 inches deep and 6-8 inches apart. This spacing allows the plants enough room to grow and spread.
3. Place the Seeds: Place one peanut seed in each hole. Make sure the “eye” of the peanut (the small indentation) is facing downwards.
4. Cover with Soil: Gently cover the seeds with soil and lightly pat it down.
5. Water Thoroughly: Water the soil thoroughly until water drains out of the drainage holes. This will help settle the soil and provide the seeds with the moisture they need to germinate.
Caring for Your Peanut Plants
Now that your peanut seeds are planted, it’s time to provide them with the care they need to thrive.
1. Sunlight: Peanut plants need at least 6-8 hours of direct sunlight per day. Place your foam box in a sunny location, such as a patio, balcony, or garden.
2. Watering: Water your peanut plants regularly, especially during hot, dry weather. The soil should be consistently moist, but not waterlogged. I usually water deeply every 2-3 days, depending on the weather. Check the soil moisture by sticking your finger into the soil – if it feels dry an inch or two down, it’s time to water.
3. Fertilizing: Fertilize your peanut plants every 4-6 weeks with a balanced fertilizer. Follow the instructions on the fertilizer package. I like to use a liquid fertilizer diluted in water for easy application.
4. Weeding: Keep the foam box free of weeds, as they can compete with your peanut plants for nutrients and water. Hand-pull any weeds that appear.
5. Hilling: As your peanut plants grow, they will produce “pegs” – small stems that grow downwards from the plant and into the soil. These pegs are where the peanuts will develop. To encourage peanut production, you can “hill” the soil around the base of the plants, covering the pegs with soil. I usually do this a few times during the growing season.
6. Pest Control: Peanut plants are generally resistant to pests, but keep an eye out for aphids, spider mites, and other common garden pests. If you notice any pests, you can treat them with insecticidal soap or neem oil.
Harvesting Your Peanuts
This is the most exciting part! After about 120-150 days, your peanut plants will be ready to harvest.
1. Signs of Maturity: The leaves of the peanut plants will start to turn yellow and brown, and the plants will begin to die back. This is a sign that the peanuts are mature.
2. Digging Up the Plants: Carefully dig up the entire peanut plant, being careful not to damage the peanuts. I usually use a garden fork to loosen the soil around the plant before pulling it up.
3. Cleaning the Peanuts: Gently shake off any excess soil from the peanuts.
4. Curing the Peanuts: Cure the peanuts by drying them in a warm, dry place for 2-3 weeks. I usually spread them out on a screen or tray in a well-ventilated area.
5. Storing the Peanuts: Once the peanuts are cured, you can store them in a cool, dry place in their shells. They will keep for several months.
Troubleshooting
Even with the best care, you might encounter some challenges along the way. Here are a few common problems and how to address them:
* Poor Germination: If your peanut seeds don’t germinate, make sure the soil is warm enough (at least 65°F). You can also try soaking the seeds before planting.
* Yellowing Leaves: Yellowing leaves can be a sign of nutrient deficiency. Try fertilizing your plants with a balanced fertilizer.
* Lack of Peanuts: If your plants are growing well but not producing peanuts, make sure they are getting enough sunlight and that you are hilling the soil around the base of the plants.
* Pest Infestation: If you notice pests on your plants, treat them with insecticidal soap or neem oil.
Extra Tips for Success
Here are a few extra tips to help you grow the best peanuts possible:
* Choose the Right Variety: Select a peanut variety that is well-suited to your climate.
* Improve Drainage: If you live in an area with heavy rainfall, consider adding some perlite or vermiculite to your potting mix to improve drainage.
* Protect from Frost: Peanut plants are sensitive to frost. If you live in an area with late frosts, protect your plants with a frost blanket.
* Enjoy the Process: Growing peanuts is a fun and rewarding experience. Don’t be afraid to experiment and learn along the way!
Enjoying Your Homegrown Peanuts
Once you’ve harvested and cured your peanuts, the possibilities are endless! You can roast them, boil them, or use them in your favorite recipes. There’s nothing quite like the taste of homegrown peanuts! I love roasting mine with a little salt and pepper for a simple and delicious snack. You can also use them to make peanut butter, peanut brittle, or add them to salads and stir-fries.
Growing peanuts in a foam box is a fantastic way to enjoy fresh, homegrown peanuts, even if you don’t have a lot of space. With a little care and attention, you can harvest a bountiful crop of delicious peanuts. Happy gardening!
Conclusion
So, there you have it! Growing peanuts in a foam box isn’t just a quirky gardening experiment; it’s a surprisingly effective and rewarding way to cultivate your own delicious, homegrown snacks. We’ve walked you through the entire process, from selecting the right foam box and preparing the soil to planting, nurturing, and finally, harvesting your very own peanut bounty.
Why is this DIY trick a must-try? Because it offers a multitude of benefits, especially for those with limited space or challenging soil conditions. Foam boxes provide excellent drainage and insulation, protecting your peanut plants from extreme temperatures and ensuring healthy root development. Plus, the portability of a foam box allows you to move your peanut crop to the sunniest spot in your yard or even indoors during unexpected frosts. Imagine the satisfaction of cracking open a freshly harvested peanut, knowing you nurtured it from seed to snack, all within the confines of a simple foam box!
But the fun doesn’t stop there! Feel free to experiment with different peanut varieties. Virginia peanuts, known for their large size, thrive exceptionally well in containers. Or, try Spanish peanuts for a sweeter, more compact yield. You can also enhance your soil mix with organic amendments like compost or worm castings to boost nutrient levels and promote even more vigorous growth. Consider adding companion plants like marigolds or basil around the perimeter of your foam box to deter pests naturally. Another variation is to use different sizes of foam boxes, depending on the space you have available and the number of peanut plants you want to grow. A larger box will allow for more plants and potentially a larger harvest.
Don’t be intimidated by the prospect of growing your own peanuts. This DIY project is incredibly accessible, even for beginner gardeners. The steps are straightforward, the materials are readily available, and the rewards are undeniably delicious. The key is to provide consistent moisture, adequate sunlight, and a little bit of patience. Remember to monitor your plants regularly for any signs of pests or diseases and address them promptly.
We are confident that you’ll find growing peanuts in a foam box to be a fulfilling and enjoyable experience. It’s a fantastic way to connect with nature, learn about the life cycle of plants, and enjoy the fruits (or rather, nuts!) of your labor.
So, what are you waiting for? Grab a foam box, some peanut seeds, and get ready to embark on your own peanut-growing adventure! We encourage you to try this DIY trick and share your experiences with us. Post photos of your peanut plants, share your tips and tricks, and let us know how your harvest turns out. We can’t wait to see your peanut-growing success stories! Let’s all become foam box peanut farmers together! Remember, successful **peanut cultivation** starts with a little bit of ingenuity and a whole lot of enthusiasm. Happy growing!
Frequently Asked Questions (FAQ)
What kind of foam box should I use?
Ideally, you should use a clean, food-grade foam box. These are often available from grocery stores or restaurants that receive shipments of produce or other perishable items. Make sure the box is sturdy and has drainage holes. If it doesn’t have drainage holes, you’ll need to drill some yourself to prevent waterlogging. The size of the box will depend on how many peanut plants you want to grow. A box that is at least 12 inches deep and 18 inches wide is a good starting point for a few plants. Avoid using foam boxes that have been used to store chemicals or other potentially harmful substances.
How often should I water my peanut plants in a foam box?
Watering frequency depends on several factors, including the weather, the size of the foam box, and the type of soil you’re using. Generally, you should water your peanut plants when the top inch of soil feels dry to the touch. During hot, dry weather, you may need to water them daily. Be careful not to overwater, as this can lead to root rot. Ensure the foam box has adequate drainage to prevent water from pooling at the bottom. A good way to check if your plants need water is to stick your finger into the soil. If the soil feels dry an inch or two down, it’s time to water.
What kind of soil is best for growing peanuts in a foam box?
Peanuts prefer well-draining, sandy loam soil. You can create your own potting mix by combining equal parts of potting soil, sand, and compost. The sand will help with drainage, while the compost will provide essential nutrients. Avoid using heavy clay soil, as it can become waterlogged and prevent the peanuts from developing properly. You can also purchase a pre-made potting mix specifically designed for vegetables or legumes. Make sure the soil is loose and airy to allow the peanut pegs (the stems that develop into peanuts) to easily penetrate the soil.
How much sunlight do peanut plants need?
Peanut plants need at least 6-8 hours of direct sunlight per day to thrive. Choose a sunny location for your foam box where the plants will receive plenty of light. If you live in a climate with very hot summers, you may need to provide some afternoon shade to prevent the plants from scorching. If you’re growing peanuts indoors, you’ll need to supplement with grow lights to provide adequate light. Rotate the foam box regularly to ensure that all sides of the plants receive equal sunlight.
When is the best time to plant peanuts in a foam box?
The best time to plant peanuts is after the last frost, when the soil has warmed up to at least 65 degrees Fahrenheit. In most regions, this is typically in late spring or early summer. You can start peanut seeds indoors a few weeks before the last frost to get a head start on the growing season. However, peanuts don’t transplant well, so it’s best to sow them directly into the foam box if possible. If you live in a warm climate with a long growing season, you may be able to plant peanuts multiple times throughout the year.
How long does it take for peanuts to mature in a foam box?
Peanuts typically take 120-150 days to mature, depending on the variety and growing conditions. You’ll know the peanuts are ready to harvest when the leaves start to turn yellow and the plants begin to die back. You can also dig up a few plants to check the peanuts. The peanut shells should be fully formed and the kernels should be plump and well-developed.
Are there any common pests or diseases that affect peanut plants in foam boxes?
Yes, peanut plants can be susceptible to several pests and diseases, including aphids, spider mites, leaf spot, and root rot. Monitor your plants regularly for any signs of infestation or disease. You can control aphids and spider mites with insecticidal soap or neem oil. Leaf spot can be prevented by ensuring good air circulation and avoiding overhead watering. Root rot is caused by overwatering, so make sure your foam box has adequate drainage and avoid letting the soil stay soggy.
Can I grow peanuts in a foam box indoors?
Yes, you can grow peanuts in a foam box indoors, but you’ll need to provide adequate light and ventilation. Place the foam box near a sunny window or use grow lights to supplement the natural light. Ensure the room is well-ventilated to prevent fungal diseases. You may also need to hand-pollinate the flowers to ensure a good peanut yield. Growing peanuts indoors can be a fun and rewarding experience, especially if you live in a climate with a short growing season.
How do I harvest peanuts from a foam box?
To harvest peanuts, carefully dig up the entire plant, being careful not to damage the peanut shells. Gently shake off any excess soil and hang the plants upside down in a dry, well-ventilated place for several weeks to cure. Once the peanuts are cured, you can remove them from the plants and store them in a cool, dry place. You can roast the peanuts in the oven or eat them raw.
Can I reuse the soil from my foam box after harvesting peanuts?
Yes, you can reuse the soil from your foam box after harvesting peanuts, but it’s a good idea to amend it with fresh compost or other organic matter to replenish the nutrients. Peanuts are nitrogen-fixing plants, so they actually add nitrogen to the soil. However, they also deplete other nutrients, so it’s important to replenish them before planting another crop. You can also rotate your crops to prevent nutrient depletion and reduce the risk of pests and diseases.
Leave a Comment