
Growing peanuts indoors might sound like a quirky challenge, but trust me, it’s a surprisingly rewarding DIY project that can bring a touch of the South right into your home! Forget those store-bought snacks – imagine harvesting your very own homegrown peanuts, roasted to perfection and enjoyed fresh from your indoor garden.
Peanuts, though often called nuts, are actually legumes, and their history stretches back thousands of years to South America. Cultivated by ancient civilizations, they eventually spread across the globe, becoming a staple in cuisines worldwide. While traditionally grown outdoors in warm climates, the desire for fresh, homegrown produce year-round has fueled the rise of indoor gardening, making growing peanuts indoors a viable and exciting option for urban gardeners and hobbyists alike.
Why should you try this DIY trick? Well, for starters, it’s incredibly satisfying to nurture a plant from seed to harvest. Plus, you have complete control over the growing environment, ensuring your peanuts are free from harmful pesticides and chemicals. More importantly, it’s a fantastic way to connect with nature, even when you’re stuck indoors. I’m excited to share some simple, effective DIY tricks and hacks that will guide you through every step of the process, from planting to harvesting, ensuring you enjoy a bountiful peanut crop right in your living room!
Growing Peanuts Indoors: A Nutty Adventure!
Hey there, fellow plant enthusiasts! Ever thought about growing your own peanuts? It might sound a bit unusual, especially if you don’t have a sprawling garden, but guess what? You can absolutely grow peanuts indoors! It’s a fun, rewarding, and surprisingly easy project. I’ve done it myself, and let me tell you, there’s nothing quite like harvesting your own homegrown peanuts. So, grab your gardening gloves, and let’s get started!
What You’ll Need: The Peanut Growing Arsenal
Before we dive into the nitty-gritty, let’s gather our supplies. Here’s a list of everything you’ll need to successfully grow peanuts indoors:
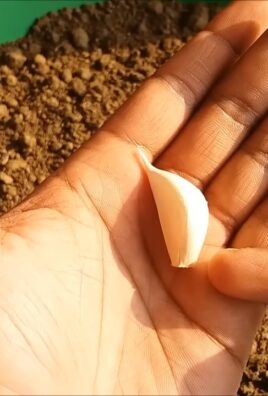
* Peanut Seeds (Raw, Unshelled): This is the most crucial ingredient! Make sure you get raw, unshelled peanuts. Roasted or salted peanuts won’t sprout. You can usually find these at health food stores or online.
* Large Container (12-18 inches deep): Peanuts need room to grow downwards, as the pods develop underground. A large pot or container is essential.
* Well-Draining Potting Mix: Peanuts thrive in well-draining soil. A mix of potting soil, perlite, and vermiculite works wonders.
* Grow Lights (Optional, but Recommended): If you don’t have a sunny spot, grow lights will be your best friend. Peanuts need plenty of light.
* Watering Can or Spray Bottle: For gentle watering.
* Small Shovel or Trowel: For planting and transplanting.
* Fertilizer (Optional): A balanced fertilizer can help boost growth, but it’s not strictly necessary.
* Patience: Peanut growing takes time, so be prepared to wait!
Phase 1: Germinating Your Peanut Seeds
The first step is to get those peanuts sprouting! This is a crucial phase, so let’s do it right.
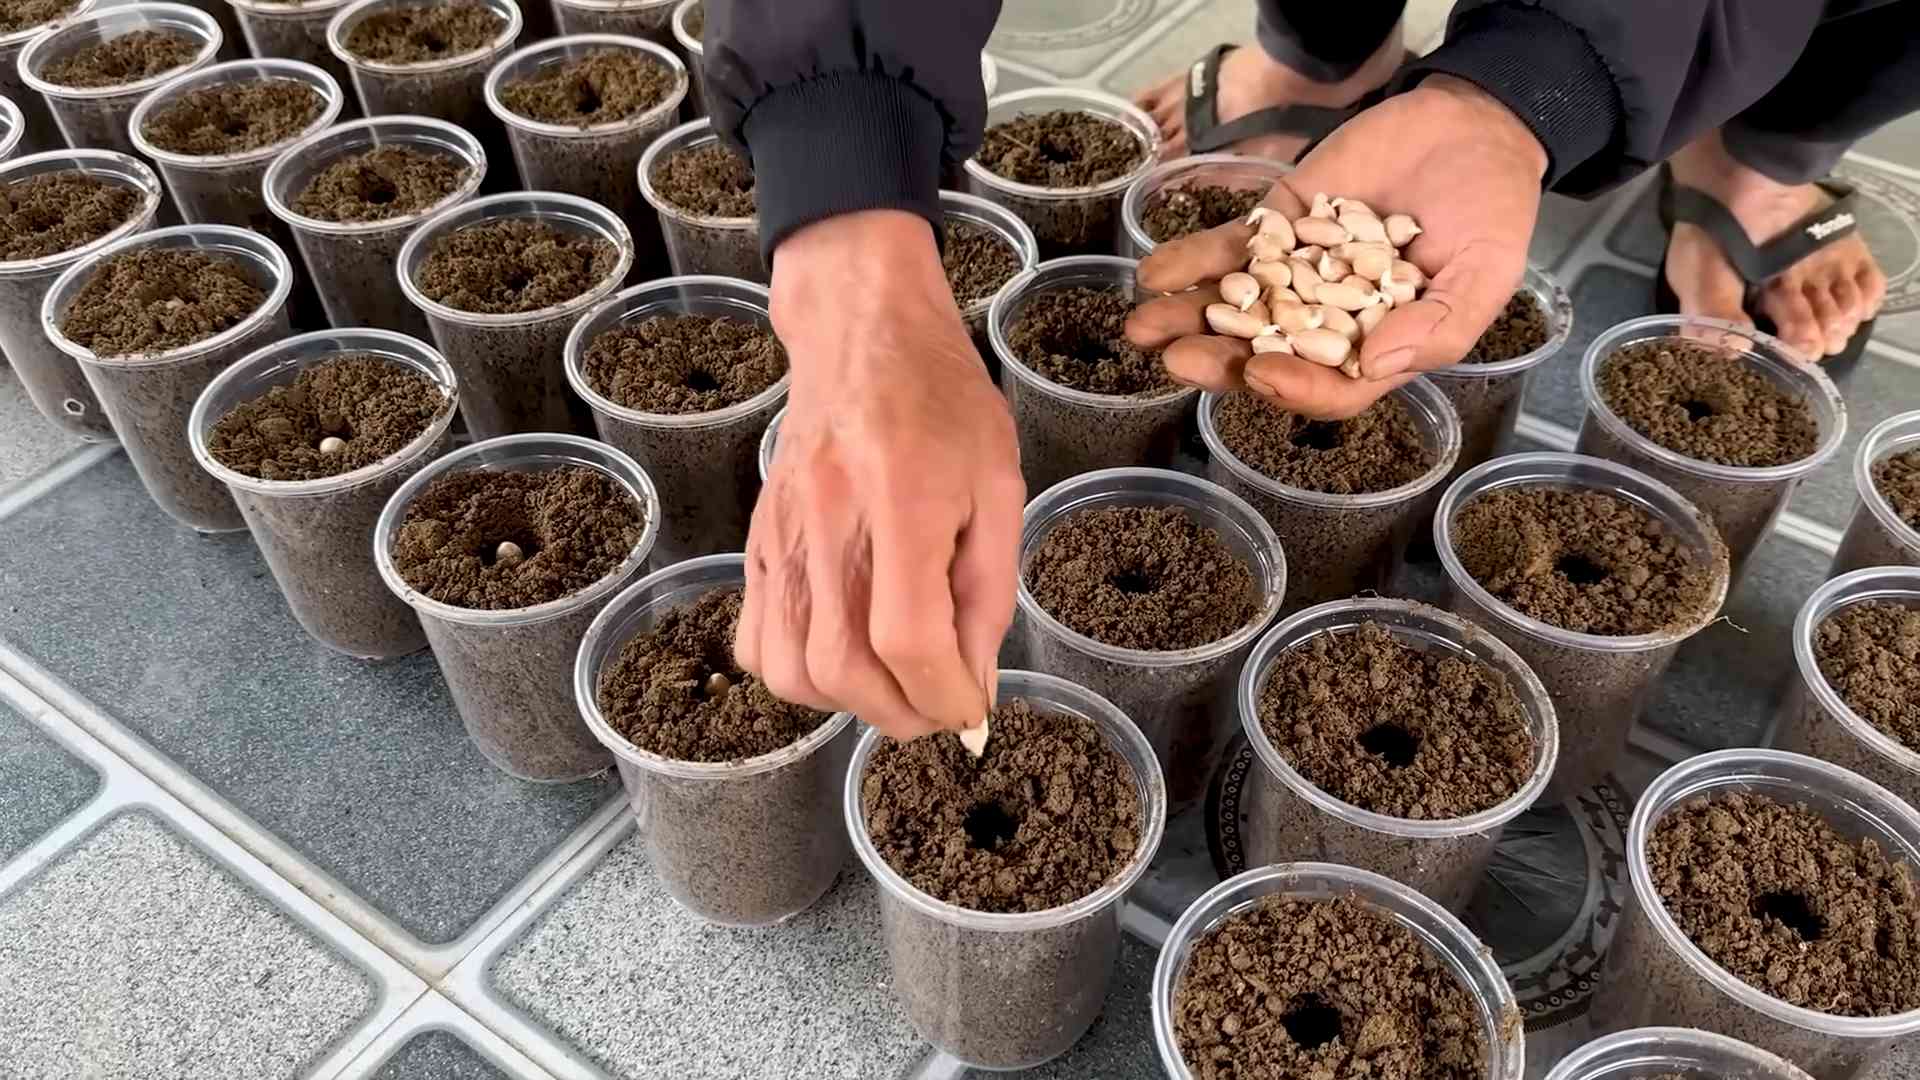
1. Soaking the Peanuts: Take your raw, unshelled peanuts and soak them in lukewarm water for about 24 hours. This helps soften the shells and encourages germination. I like to use a small bowl or container for this.
2. Preparing the Germination Setup: You have a couple of options here. You can either plant the peanuts directly into your large container, or you can start them in smaller pots or paper towels. I prefer the paper towel method because it allows me to see which peanuts are actually sprouting.
* Paper Towel Method: Dampen a few paper towels and lay them flat. Place the soaked peanuts on the paper towels, leaving some space between them. Cover the peanuts with another layer of damp paper towels. Place the paper towels in a plastic bag or container to keep them moist.
* Small Pot Method: Fill small pots (like seedling starter pots) with your well-draining potting mix. Moisten the soil and plant the peanuts about an inch deep.
3. Waiting for Sprouts: Place your germination setup in a warm location. Check the paper towels daily to ensure they stay moist. If you’re using the small pot method, keep the soil consistently moist but not waterlogged. You should start to see sprouts within 5-10 days.
Phase 2: Planting and Initial Care
Once your peanuts have sprouted, it’s time to move them to their permanent home!
1. Preparing the Large Container: Fill your large container with the well-draining potting mix. Leave a few inches of space at the top.
2. Transplanting the Seedlings: Gently remove the sprouted peanuts from the paper towels or small pots. Be careful not to damage the delicate roots. Plant the seedlings about 2-3 inches deep in the large container, spacing them about 6-8 inches apart.
3. Watering: Water the soil thoroughly after planting. Make sure the water drains well.
4. Light: Place the container in a location that receives at least 6-8 hours of sunlight per day. If you don’t have enough natural light, use grow lights. I’ve found that grow lights make a huge difference, especially during the winter months.
5. Temperature: Peanuts thrive in warm temperatures (around 70-80°F). Keep the container in a warm room.
Phase 3: Ongoing Care and Maintenance
Now that your peanuts are planted, it’s time to provide them with the care they need to flourish.
1. Watering: Water your peanut plants regularly, keeping the soil consistently moist but not waterlogged. Check the soil moisture by sticking your finger into the soil. If the top inch feels dry, it’s time to water.
2. Fertilizing (Optional): If you want to give your peanut plants a boost, you can fertilize them every few weeks with a balanced fertilizer. Follow the instructions on the fertilizer package. I usually use a liquid fertilizer diluted to half strength.
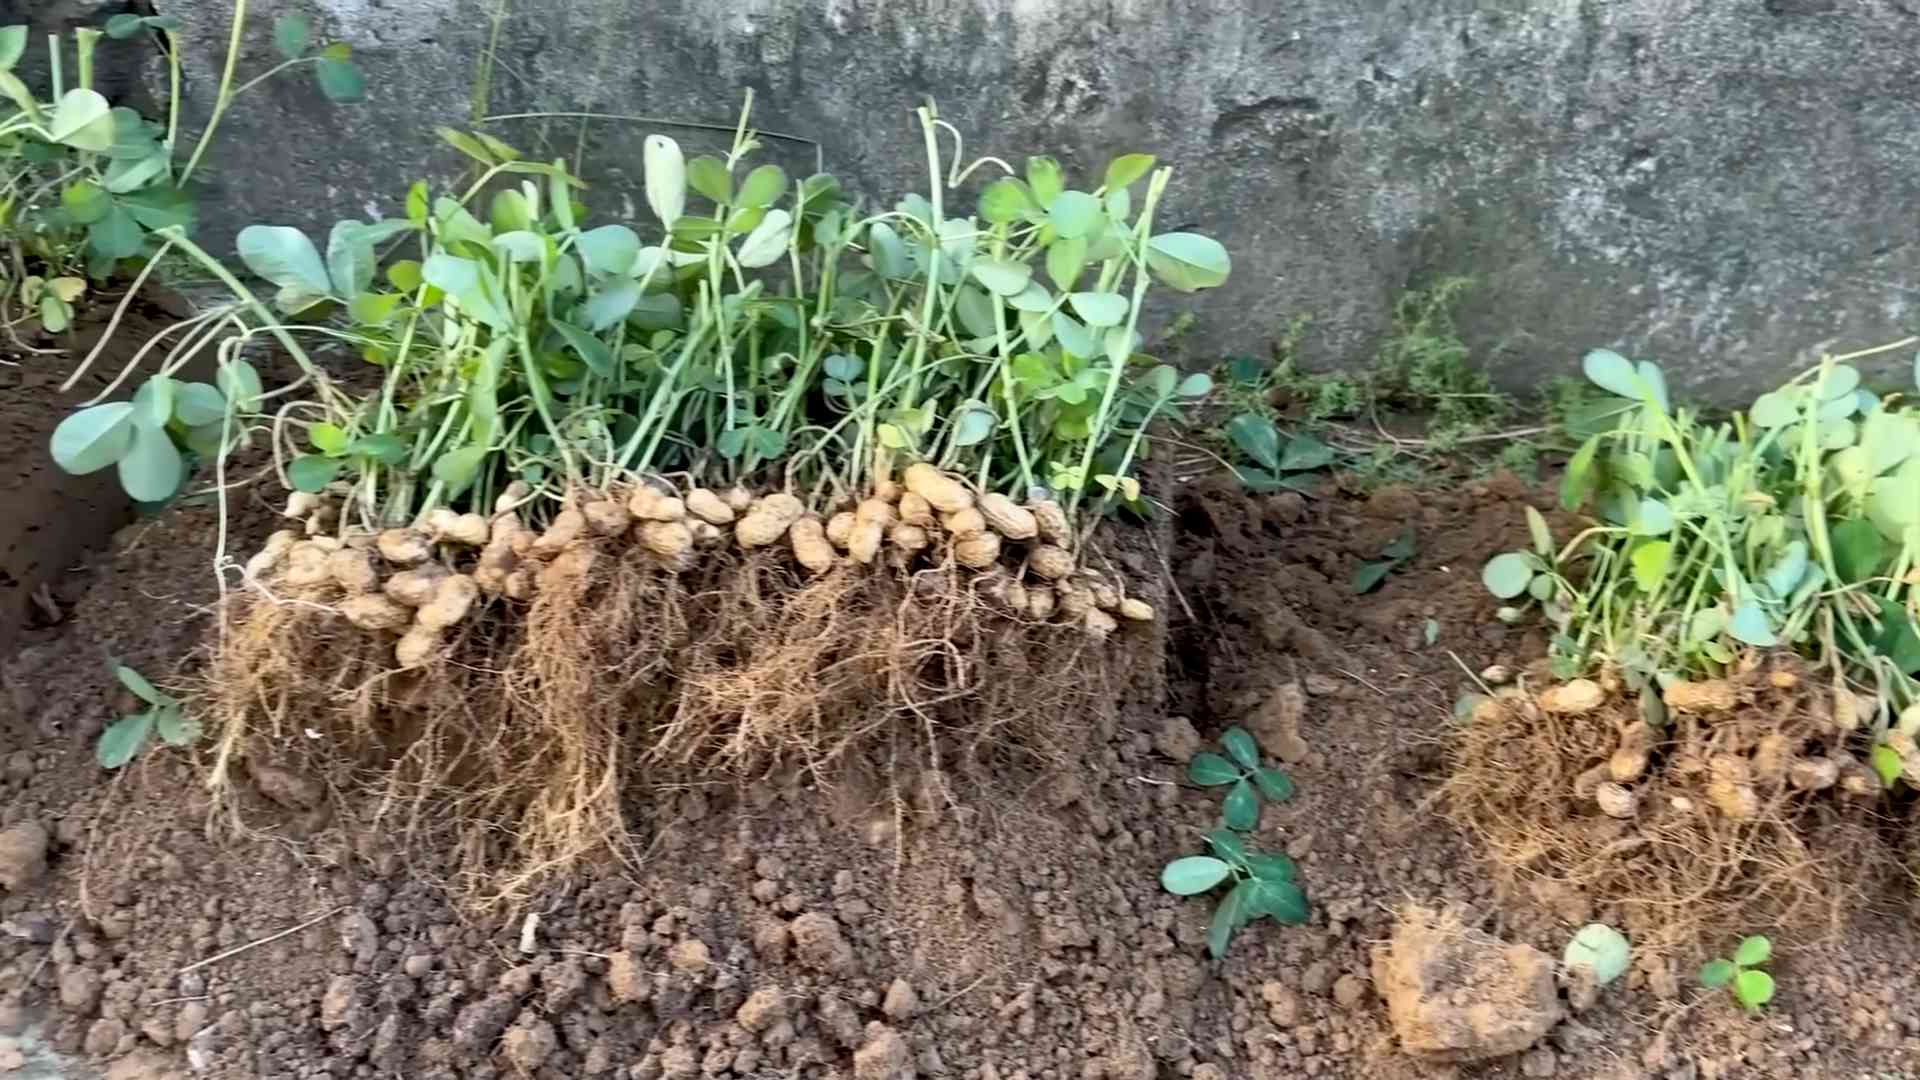
3. Hilling: As your peanut plants grow, they will produce small yellow flowers. After the flowers pollinate, they will form “pegs” that grow downwards into the soil. These pegs are where the peanuts will develop. To encourage peanut production, you can “hill” the soil around the base of the plants, covering the pegs with soil. This helps protect the developing peanuts and keeps them moist.
4. Pest Control: Keep an eye out for pests like aphids or spider mites. If you notice any pests, you can try spraying the plants with insecticidal soap or neem oil. I prefer to use natural pest control methods whenever possible.
5. Support (Optional): As the plants grow, they may become a bit leggy. You can provide them with some support by using small stakes or trellises.
Phase 4: Harvesting Your Peanuts
This is the most exciting part! After about 120-150 days, your peanut plants should be ready for harvest.
1. Signs of Maturity: The leaves of the peanut plants will start to turn yellow and brown. This is a sign that the peanuts are maturing.
2. Harvesting: Carefully dig up the entire plant, being careful not to damage the peanuts. Gently shake off the excess soil.
3. Curing: Hang the entire plant upside down in a warm, dry, well-ventilated area for about 2-3 weeks. This allows the peanuts to dry and cure.
4. Separating the Peanuts: Once the plants are cured, you can separate the peanuts from the roots.
5. Roasting (Optional): If you want to roast your peanuts, you can spread them out on a baking sheet and roast them in the oven at 350°F for about 20-30 minutes, or until they are golden brown.
6. Enjoy! Now you can enjoy your homegrown peanuts! They’re delicious roasted, boiled, or eaten raw.
Troubleshooting: Common Peanut Growing Problems
Even with the best care, you might encounter some problems along the way. Here are a few common issues and how to addre
Hey there, fellow plant enthusiasts! Ever thought about growing your own peanuts? It might sound a bit unusual, especially if you don’t have a sprawling garden, but guess what? You can absolutely grow peanuts indoors! It’s a fun, rewarding, and surprisingly easy project. I’ve done it myself, and let me tell you, there’s nothing quite like harvesting your own homegrown peanuts. So, grab your gardening gloves, and let’s get started!
What You’ll Need: The Peanut Growing Arsenal
Before we dive into the nitty-gritty, let’s gather our supplies. Here’s a list of everything you’ll need to successfully grow peanuts indoors:
* Peanut Seeds (Raw, Unshelled): This is the most crucial ingredient! Make sure you get raw, unshelled peanuts. Roasted or salted peanuts won’t sprout. You can usually find these at health food stores or online.
* Large Container (12-18 inches deep): Peanuts need room to grow downwards, as the pods develop underground. A large pot or container is essential.
* Well-Draining Potting Mix: Peanuts thrive in well-draining soil. A mix of potting soil, perlite, and vermiculite works wonders.
* Grow Lights (Optional, but Recommended): If you don’t have a sunny spot, grow lights will be your best friend. Peanuts need plenty of light.
* Watering Can or Spray Bottle: For gentle watering.
* Small Shovel or Trowel: For planting and transplanting.
* Fertilizer (Optional): A balanced fertilizer can help boost growth, but it’s not strictly necessary.
* Patience: Peanut growing takes time, so be prepared to wait!
Phase 1: Germinating Your Peanut Seeds
The first step is to get those peanuts sprouting! This is a crucial phase, so let’s do it right.
1. Soaking the Peanuts: Take your raw, unshelled peanuts and soak them in lukewarm water for about 24 hours. This helps soften the shells and encourages germination. I like to use a small bowl or container for this.
2. Preparing the Germination Setup: You have a couple of options here. You can either plant the peanuts directly into your large container, or you can start them in smaller pots or paper towels. I prefer the paper towel method because it allows me to see which peanuts are actually sprouting.
* Paper Towel Method: Dampen a few paper towels and lay them flat. Place the soaked peanuts on the paper towels, leaving some space between them. Cover the peanuts with another layer of damp paper towels. Place the paper towels in a plastic bag or container to keep them moist.
* Small Pot Method: Fill small pots (like seedling starter pots) with your well-draining potting mix. Moisten the soil and plant the peanuts about an inch deep.
3. Waiting for Sprouts: Place your germination setup in a warm location. Check the paper towels daily to ensure they stay moist. If you’re using the small pot method, keep the soil consistently moist but not waterlogged. You should start to see sprouts within 5-10 days.
Phase 2: Planting and Initial Care
Once your peanuts have sprouted, it’s time to move them to their permanent home!
1. Preparing the Large Container: Fill your large container with the well-draining potting mix. Leave a few inches of space at the top.
2. Transplanting the Seedlings: Gently remove the sprouted peanuts from the paper towels or small pots. Be careful not to damage the delicate roots. Plant the seedlings about 2-3 inches deep in the large container, spacing them about 6-8 inches apart.
3. Watering: Water the soil thoroughly after planting. Make sure the water drains well.
4. Light: Place the container in a location that receives at least 6-8 hours of sunlight per day. If you don’t have enough natural light, use grow lights. I’ve found that grow lights make a huge difference, especially during the winter months.
5. Temperature: Peanuts thrive in warm temperatures (around 70-80°F). Keep the container in a warm room.
Phase 3: Ongoing Care and Maintenance
Now that your peanuts are planted, it’s time to provide them with the care they need to flourish.
1. Watering: Water your peanut plants regularly, keeping the soil consistently moist but not waterlogged. Check the soil moisture by sticking your finger into the soil. If the top inch feels dry, it’s time to water.
2. Fertilizing (Optional): If you want to give your peanut plants a boost, you can fertilize them every few weeks with a balanced fertilizer. Follow the instructions on the fertilizer package. I usually use a liquid fertilizer diluted to half strength.
3. Hilling: As your peanut plants grow, they will produce small yellow flowers. After the flowers pollinate, they will form “pegs” that grow downwards into the soil. These pegs are where the peanuts will develop. To encourage peanut production, you can “hill” the soil around the base of the plants, covering the pegs with soil. This helps protect the developing peanuts and keeps them moist.
4. Pest Control: Keep an eye out for pests like aphids or spider mites. If you notice any pests, you can try spraying the plants with insecticidal soap or neem oil. I prefer to use natural pest control methods whenever possible.
5. Support (Optional): As the plants grow, they may become a bit leggy. You can provide them with some support by using small stakes or trellises.
Phase 4: Harvesting Your Peanuts
This is the most exciting part! After about 120-150 days, your peanut plants should be ready for harvest.
1. Signs of Maturity: The leaves of the peanut plants will start to turn yellow and brown. This is a sign that the peanuts are maturing.
2. Harvesting: Carefully dig up the entire plant, being careful not to damage the peanuts. Gently shake off the excess soil.
3. Curing: Hang the entire plant upside down in a warm, dry, well-ventilated area for about 2-3 weeks. This allows the peanuts to dry and cure.
4. Separating the Peanuts: Once the plants are cured, you can separate the peanuts from the roots.
5. Roasting (Optional): If you want to roast your peanuts, you can spread them out on a baking sheet and roast them in the oven at 350°F for about 20-30 minutes, or until they are golden brown.
6. Enjoy! Now you can enjoy your homegrown peanuts! They’re delicious roasted, boiled, or eaten raw.
Troubleshooting: Common Peanut Growing Problems
Even with the best care, you might encounter some problems along the way. Here are a few common issues and how to address them:
* Poor Germination: If your peanuts aren’t sprouting, make sure they are raw and unshelled. Also, ensure they are kept moist and warm during the germination process.
* Yellowing Leaves: Yellowing leaves can be a sign of overwatering, underwatering, or nutrient deficiency. Adjust your watering schedule and consider fertilizing the plants.
* Lack of Peanut Production: If your plants are growing but not producing peanuts, make sure they are getting enough sunlight and that you are hilling the soil around the base of the plants.
* Pests: Keep an eye out for pests and take action promptly to prevent them from damaging your plants.
Tips for Success: Peanut Growing Wisdom
Here are a few extra tips to help you succeed in your peanut-growing adventure:
* Choose the Right Variety: Some peanut varieties are better suited for indoor growing than others. Look for varieties that are compact and early-maturing.
* Provide Adequate Drainage: Peanuts need well-draining soil to prevent root rot. Make sure your container has drainage holes.
* Don’t Overwater: Overwatering can lead to root rot and other problems. Water only when the top inch of soil feels dry.
* Be Patient: Peanut growing takes time, so don’t get discouraged if you don’t see results immediately.
* Have Fun! Growing peanuts indoors is a fun and rewarding experience. Enjoy the process!
Growing peanuts indoors is a fantastic project that brings a little bit of the farm to your home. With a little patience and care, you’ll be enjoying your own homegrown peanuts in no time. Happy gardening!
Conclusion
So, there you have it! Growing peanuts indoors is not only possible, but it’s also a surprisingly rewarding experience. Forget the store-bought, often bland, peanuts – imagine the satisfaction of harvesting your own fresh, flavorful crop right from your living room. This DIY project is a must-try for several reasons. First, it’s a fantastic way to connect with nature, especially during colder months when outdoor gardening is limited. Second, it’s an educational opportunity for both adults and children, offering a hands-on lesson in plant life cycles and sustainable food production. Third, and perhaps most importantly, the taste of homegrown peanuts is simply unparalleled.
But the benefits don’t stop there. Growing peanuts indoors allows you to control the growing environment, minimizing the risk of pests and diseases that can plague outdoor crops. You can tailor the soil, light, and humidity to create the perfect conditions for optimal peanut production. Plus, it’s a conversation starter! Imagine the looks of surprise and admiration when you tell your friends and family that you’re growing your own peanuts indoors.
Don’t be afraid to experiment with different varieties of peanuts. Virginia peanuts, known for their large size, are a popular choice, but Spanish peanuts, with their smaller kernels and reddish skins, are also a great option. You can even try growing ornamental peanut plants, which produce beautiful flowers in addition to edible peanuts. Consider adding companion plants like marigolds or basil to your peanut containers to deter pests and enhance the overall health of your plants.
For a fun variation, try roasting your freshly harvested peanuts with different spices. A sprinkle of sea salt and smoked paprika adds a savory kick, while a touch of cinnamon and sugar creates a sweet and irresistible treat. You can also use your homegrown peanuts to make homemade peanut butter, peanut brittle, or even peanut sauce for Asian-inspired dishes. The possibilities are endless!
We understand that the idea of growing peanuts indoors might seem daunting at first, but we assure you that it’s a manageable project for gardeners of all skill levels. With a little patience, attention, and the right resources, you can enjoy a bountiful harvest of delicious, homegrown peanuts.
So, what are you waiting for? Gather your supplies, follow our simple steps, and embark on your indoor peanut-growing adventure today! We’re confident that you’ll be amazed by the results. And most importantly, we want to hear about your experience! Share your photos, tips, and stories with us in the comments below. Let’s create a community of indoor peanut growers and inspire others to try this fun and rewarding DIY project. Let us know what challenges you faced and what worked best for you. Your insights will help other aspiring peanut farmers succeed. Happy growing!
Frequently Asked Questions (FAQ)
What kind of container should I use for growing peanuts indoors?
The ideal container for growing peanuts indoors should be at least 12 inches deep and 12 inches wide. This allows ample space for the roots to develop and for the peanuts to form underground. Choose a container made of plastic, terracotta, or any other durable material. Make sure the container has drainage holes to prevent waterlogging, which can lead to root rot. Fabric pots are also a good option as they allow for better aeration and drainage. Remember that peanuts spread out, so a wider container is generally better than a taller, narrower one.
What type of soil is best for growing peanuts indoors?
Peanuts thrive in well-draining, sandy loam soil. Avoid heavy clay soils, as they can become compacted and hinder peanut development. You can create your own peanut-friendly soil mix by combining equal parts of potting soil, sand, and compost. The potting soil provides essential nutrients, the sand improves drainage, and the compost adds organic matter. Ensure the soil pH is between 6.0 and 6.5 for optimal growth. You can test the soil pH using a soil testing kit available at most garden centers.
How much sunlight do peanuts need when grown indoors?
Peanuts require at least 6-8 hours of direct sunlight per day to thrive. If you don’t have a sunny window, you can supplement with artificial grow lights. LED grow lights are a great option as they are energy-efficient and provide the
So, there you have it! Growing peanuts indoors is not only possible, but it’s also a surprisingly rewarding experience. Forget the store-bought, often bland, peanuts – imagine the satisfaction of harvesting your own fresh, flavorful crop right from your living room. This DIY project is a must-try for several reasons. First, it’s a fantastic way to connect with nature, especially during colder months when outdoor gardening is limited. Second, it’s an educational opportunity for both adults and children, offering a hands-on lesson in plant life cycles and sustainable food production. Third, and perhaps most importantly, the taste of homegrown peanuts is simply unparalleled.
But the benefits don’t stop there. Growing peanuts indoors allows you to control the growing environment, minimizing the risk of pests and diseases that can plague outdoor crops. You can tailor the soil, light, and humidity to create the perfect conditions for optimal peanut production. Plus, it’s a conversation starter! Imagine the looks of surprise and admiration when you tell your friends and family that you’re growing your own peanuts indoors.
Don’t be afraid to experiment with different varieties of peanuts. Virginia peanuts, known for their large size, are a popular choice, but Spanish peanuts, with their smaller kernels and reddish skins, are also a great option. You can even try growing ornamental peanut plants, which produce beautiful flowers in addition to edible peanuts. Consider adding companion plants like marigolds or basil to your peanut containers to deter pests and enhance the overall health of your plants.
For a fun variation, try roasting your freshly harvested peanuts with different spices. A sprinkle of sea salt and smoked paprika adds a savory kick, while a touch of cinnamon and sugar creates a sweet and irresistible treat. You can also use your homegrown peanuts to make homemade peanut butter, peanut brittle, or even peanut sauce for Asian-inspired dishes. The possibilities are endless!
We understand that the idea of growing peanuts indoors might seem daunting at first, but we assure you that it’s a manageable project for gardeners of all skill levels. With a little patience, attention, and the right resources, you can enjoy a bountiful harvest of delicious, homegrown peanuts.
So, what are you waiting for? Gather your supplies, follow our simple steps, and embark on your indoor peanut-growing adventure today! We’re confident that you’ll be amazed by the results. And most importantly, we want to hear about your experience! Share your photos, tips, and stories with us in the comments below. Let’s create a community of indoor peanut growers and inspire others to try this fun and rewarding DIY project. Let us know what challenges you faced and what worked best for you. Your insights will help other aspiring peanut farmers succeed. Happy growing!
Frequently Asked Questions (FAQ)
What kind of container should I use for growing peanuts indoors?
The ideal container for growing peanuts indoors should be at least 12 inches deep and 12 inches wide. This allows ample space for the roots to develop and for the peanuts to form underground. Choose a container made of plastic, terracotta, or any other durable material. Make sure the container has drainage holes to prevent waterlogging, which can lead to root rot. Fabric pots are also a good option as they allow for better aeration and drainage. Remember that peanuts spread out, so a wider container is generally better than a taller, narrower one.
What type of soil is best for growing peanuts indoors?
Peanuts thrive in well-draining, sandy loam soil. Avoid heavy clay soils, as they can become compacted and hinder peanut development. You can create your own peanut-friendly soil mix by combining equal parts of potting soil, sand, and compost. The potting soil provides essential nutrients, the sand improves drainage, and the compost adds organic matter. Ensure the soil pH is between 6.0 and 6.5 for optimal growth. You can test the soil pH using a soil testing kit available at most garden centers.
How much sunlight do peanuts need when grown indoors?
Peanuts require at least 6-8 hours of direct sunlight per day to thrive. If you don’t have a sunny window, you can supplement with artificial grow lights. LED grow lights are a great option as they are energy-efficient and provide the full spectrum of light that plants need. Position the grow lights about 6-12 inches above the peanut plants and adjust as they grow. Rotate the plants regularly to ensure even light exposure on all sides.
How often should I water my indoor peanut plants?
Water your peanut plants regularly, keeping the soil consistently moist but not waterlogged. Water deeply when the top inch of soil feels dry to the touch. Avoid overhead watering, as this can increase the risk of fungal diseases. Instead, water at the base of the plant. Reduce watering frequency during the winter months when plant growth slows down. Monitor the soil moisture levels closely and adjust watering accordingly.
How long does it take to grow peanuts indoors?
It typically takes about 120-150 days from planting to harvest when growing peanuts indoors. The exact time will depend on the variety of peanut, the growing conditions, and your climate. You’ll know the peanuts are ready to harvest when the leaves start to turn yellow and the plant begins to die back. You can also dig up a few peanuts to check their maturity. The peanut shells should be fully formed and the kernels should be plump and well-developed.
What are some common problems when growing peanuts indoors and how can I fix them?
Some common problems when growing peanuts indoors include pests, diseases, and nutrient deficiencies. Aphids, spider mites, and whiteflies can infest peanut plants. You can control these pests by spraying the plants with insecticidal soap or neem oil. Fungal diseases, such as leaf spot and powdery mildew, can also affect peanut plants. Prevent these diseases by providing good air circulation and avoiding overhead watering. Nutrient deficiencies can cause yellowing leaves or stunted growth. Fertilize your peanut plants regularly with a balanced fertilizer to provide the necessary nutrients.
Can I grow peanuts indoors from store-bought peanuts?
While it’s possible to grow peanuts from raw, unsalted, and unroasted store-bought peanuts, the success rate is lower compared to using seeds specifically intended for planting. Many commercially available peanuts are treated to prevent sprouting. Look for peanuts labeled as “raw” or “for planting” at your local garden center or online seed supplier for the best results.
How do I harvest peanuts grown indoors?
Once the peanut plants are ready for harvest, carefully dig them up from the container. Gently shake off the excess soil and allow the peanuts to dry in a well-ventilated area for several days. After drying, you can remove the peanuts from the vines and store them in a cool, dry place. You can also roast the peanuts for a more intense flavor.
Do I need to pollinate my peanut plants indoors?
Peanuts are self-pollinating, meaning they don’t require insects or wind to transfer pollen. However, you can gently shake the plants or use a small brush to transfer pollen from one flower to another to improve pollination and increase peanut production. This is especially helpful when growing peanuts indoors where there is limited air movement.
Can I grow peanuts indoors year-round?
Yes, you can grow peanuts indoors year-round as long as you provide the necessary growing conditions, including adequate light, water, and nutrients. You may need to adjust your watering and fertilizing schedule depending on the season and the growth rate of your plants. With proper care, you can enjoy a continuous harvest of fresh, homegrown peanuts throughout the year.
Leave a Comment