
Growing peas indoors might sound like a whimsical dream, especially if you’re picturing sprawling vines taking over your living room! But trust me, it’s a surprisingly achievable and rewarding project, even if you don’t have a sprawling garden. For centuries, humans have cultivated peas, with evidence suggesting their cultivation dates back to the Neolithic era. From humble beginnings as a foraged food source, peas have become a staple in cuisines worldwide, symbolizing spring and abundance.
But why bother growing peas indoors? Well, imagine enjoying fresh, sweet pea shoots in the dead of winter, adding a vibrant touch to your salads and stir-fries. Or perhaps you live in an apartment with limited outdoor space and crave the satisfaction of nurturing your own food. Maybe you just want to get a head start on the growing season and transplant healthy seedlings outdoors when the weather warms up. Whatever your reason, this DIY guide will equip you with the knowledge and simple tricks to successfully cultivate these delightful legumes within the comfort of your home.
I’m going to share some easy-to-follow steps and insider tips that will transform your windowsill into a mini pea patch. Get ready to experience the joy of harvesting your own homegrown goodness, no matter the season!
Growing Peas Indoors: A Complete DIY Guide
Hey there, fellow gardening enthusiasts! Are you craving the sweet taste of fresh peas but don’t have the outdoor space or the right climate? Don’t worry! I’m here to show you how to grow peas indoors, bringing a little bit of spring into your home, no matter the season. It’s easier than you might think, and the satisfaction of harvesting your own homegrown peas is truly rewarding.
What You’ll Need
Before we dive in, let’s gather all the necessary supplies. This will make the process smoother and more enjoyable.
* **Pea Seeds:** Choose a variety specifically suited for indoor growing. Bush or dwarf varieties like ‘Little Marvel,’ ‘Tom Thumb,’ or ‘Sugar Ann’ are excellent choices because they don’t require as much vertical space.
* **Containers:** You’ll need containers that are at least 6-8 inches deep and wide. Peas have relatively shallow roots, but they still need room to grow. I prefer using plastic pots with drainage holes, but you can also use fabric pots or even repurposed containers like buckets or large yogurt tubs.
* **Potting Mix:** Use a high-quality, well-draining potting mix. Avoid using garden soil, as it can compact and not provide adequate drainage. A mix of peat moss, perlite, and vermiculite works well.
* **Grow Lights (Optional but Recommended):** While peas can technically grow indoors with natural light, they’ll thrive with supplemental grow lights. This is especially important if you don’t have a south-facing window that receives at least 6 hours of direct sunlight per day. LED grow lights are energy-efficient and provide the full spectrum of light that plants need.
* **Trellis or Support System:** Even bush varieties can benefit from some support. A small trellis, bamboo stakes, or even twigs stuck into the soil can help keep the plants upright and prevent them from sprawling.
* **Watering Can or Spray Bottle:** For gentle and even watering.
* **Seed Starting Tray (Optional):** If you prefer to start your seeds indoors before transplanting them to larger containers.
* **Spray Bottle with Water:** For misting seedlings.
Step-by-Step Instructions: From Seed to Harvest
Now that we have everything we need, let’s get started!
1. Soaking the Seeds (Optional but Recommended)
Soaking your pea seeds before planting can significantly improve germination rates.
1. Place the pea seeds in a bowl.
2. Cover them with lukewarm water.
3. Let them soak for 12-24 hours. This will help soften the seed coat and speed up the germination process.
4. Drain the water and proceed to the next step.
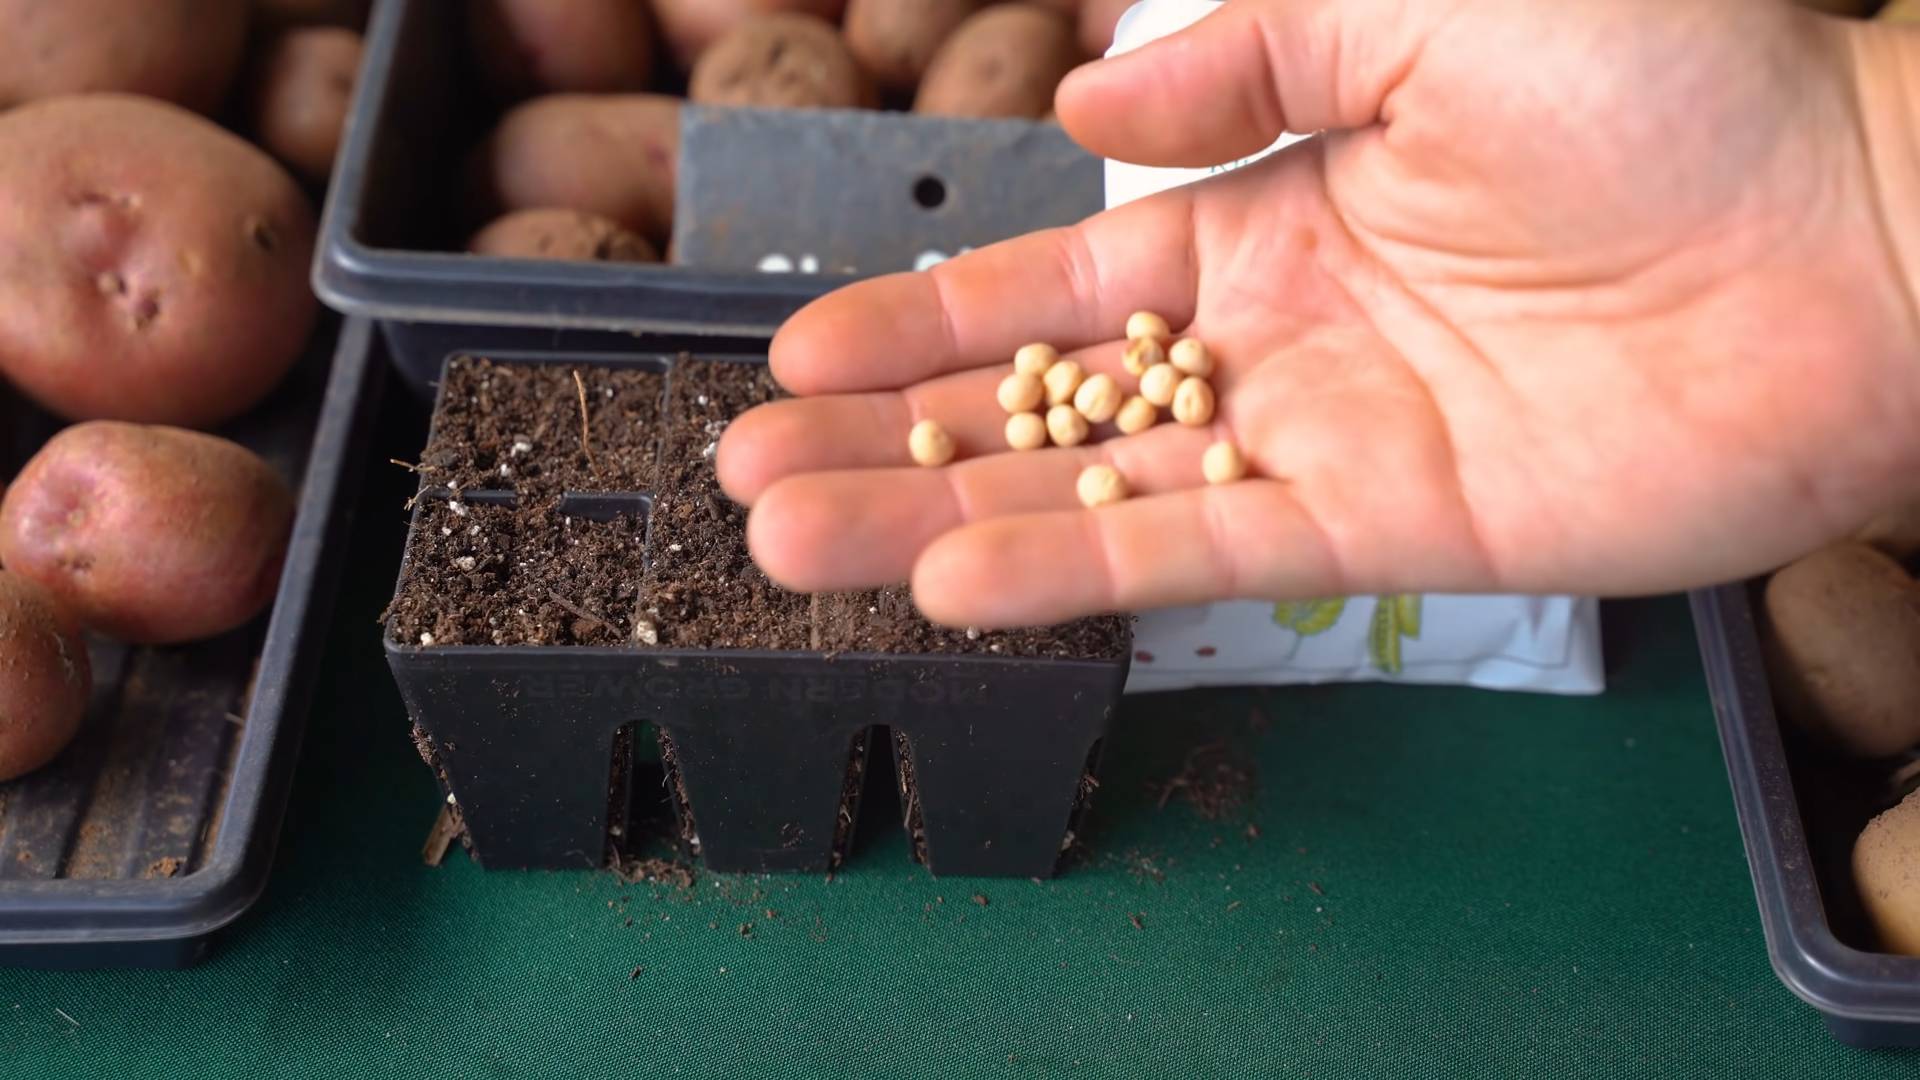
2. Planting the Seeds
1. **Prepare the Containers:** Fill your chosen containers with the potting mix, leaving about an inch of space at the top.
2. **Sow the Seeds:** Make small holes about 1 inch deep and 2 inches apart. You can plant 3-4 seeds per container, depending on the size of the container.
3. **Cover the Seeds:** Gently cover the seeds with potting mix.
4. **Water Thoroughly:** Water the soil gently but thoroughly until it’s evenly moist. Be careful not to overwater, as this can lead to seed rot.
3. Germination and Early Growth
1. **Provide Warmth:** Place the containers in a warm location, ideally around 65-70°F (18-21°C). You can use a heat mat to speed up germination, but it’s not essential.
2. **Maintain Moisture:** Keep the soil consistently moist but not soggy. Check the soil moisture daily and water as needed. A spray bottle is great for gently misting the seedlings.
3. **Provide Light:** Once the seedlings emerge (usually within 7-14 days), move them to a location with bright, indirect sunlight or under grow lights. If using grow lights, position them a few inches above the seedlings and keep them on for 14-16 hours per day.
4. **Thinning (If Necessary):** If multiple seedlings emerge from the same hole, thin them out by snipping off the weaker ones at the soil level. This will give the remaining seedlings more room to grow.
4. Providing Support
As your pea plants grow, they’ll need some support to climb.
1. **Install Trellis or Support:** Insert a small trellis, bamboo stakes, or twigs into the soil near the plants.
2. **Train the Vines:** Gently guide the pea vines towards the support system. They’ll naturally start to climb on their own. You can use plant ties or twine to secure them if needed.
5. Watering and Fertilizing
1. **Watering:** Water your pea plants regularly, keeping the soil consistently moist but not waterlogged. Check the soil moisture daily and water when the top inch of soil feels dry.
2. **Fertilizing:** Peas are relatively light feeders, but they’ll benefit from occasional fertilization. Use a balanced liquid fertilizer diluted to half strength every 2-3 weeks. Avoid over-fertilizing, as this can lead to excessive foliage growth at the expense of pea production.
6. Pollination
Peas are self-pollinating, meaning they don’t require insects or wind to transfer pollen. However, you can help the process along by gently shaking the plants or using a small paintbrush to transfer pollen from one flower to another. This is especially helpful if you’re growing your peas in a completely enclosed space.
7. Pest and Disease Control
While growing peas indoors minimizes the risk of pests and diseases, it’s still important to be vigilant.
1. **Inspect Regularly:** Check your plants regularly for signs of pests like aphids, spider mites, or whiteflies.
2. **Treat Infestations:** If you find any pests, treat them with insecticidal soap or neem oil.
3. **Prevent Diseases:** Ensure good air circulation around your plants to prevent fungal diseases. Avoid overwatering and remove any dead or yellowing leaves.
8. Harvesting
The most exciting part! Harvesting your homegrown peas.
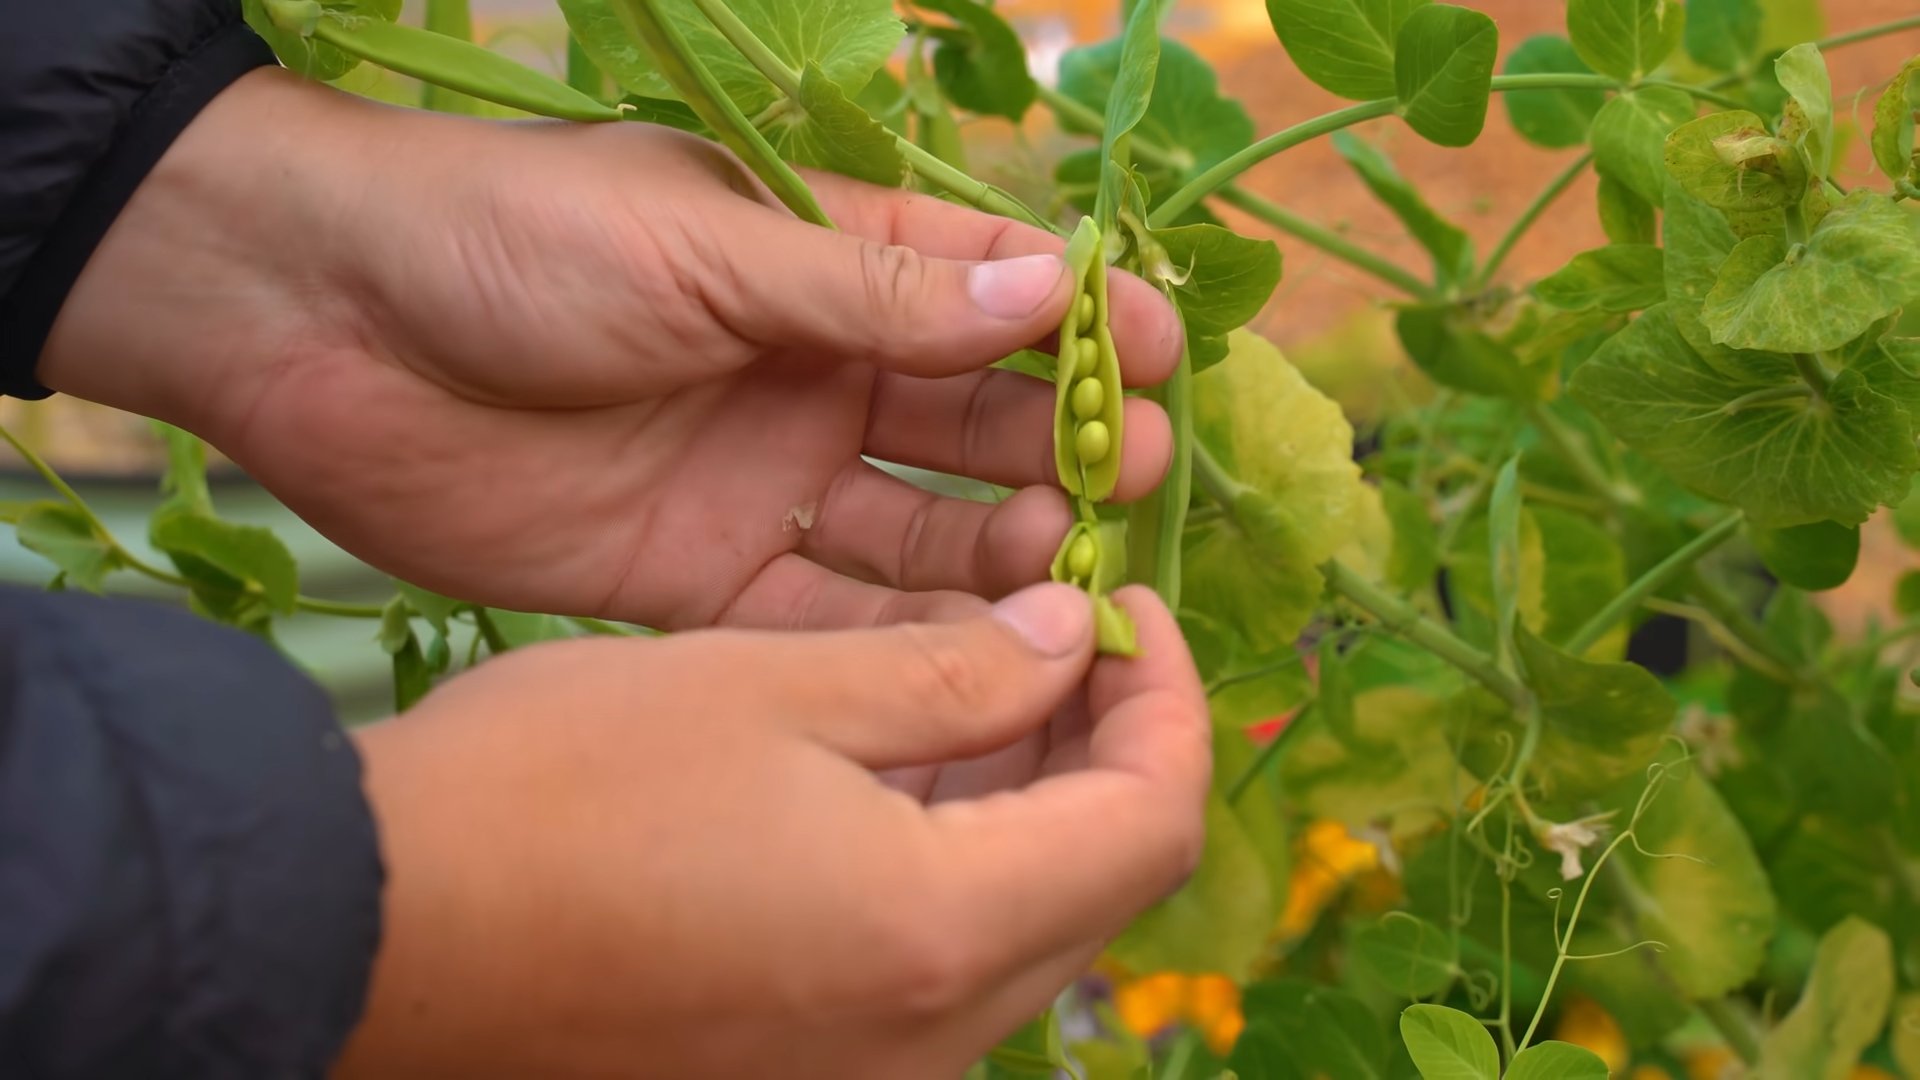
1. **Harvest Time:** Peas are typically ready to harvest about 60-70 days after planting. The pods should be plump and filled with peas.
2. **Harvesting Technique:** Gently pick the pea pods from the plant, being careful not to damage the vines.
3. **Harvest Regularly:** Harvest your peas regularly to encourage continued production. The more you harvest, the more peas your plants will produce.
Troubleshooting Tips
Even with the best care, you might encounter some challenges along the way. Here are some common problems and how to fix them:
* **Poor Germination:** If your pea seeds aren’t germinating, make sure the soil is warm enough and consistently moist. You can also try scarifying the seeds by gently nicking the seed coat with a knife or sandpaper before soaking them.
* **Yellowing Leaves:** Yellowing leaves can be a sign of overwatering, underwatering, or nutrient deficiency. Check the soil moisture and adjust your watering accordingly. If the problem persists, try fertilizing with a balanced liquid fertilizer.
* **Leggy Growth:** Leggy growth (tall, spindly plants) is usually caused by insufficient light. Move your plants to a brighter location or supplement with grow lights.
* **Lack of Pea Production:** If your plants are growing well but not producing peas, it could be due to insufficient pollination or nutrient deficiency. Try hand-pollinating the flowers and fertilizing with a fertilizer that’s high in phosphorus.
Choosing the Right Pea Variety
As I mentioned earlier, selecting the right pea variety is crucial for successful indoor growing. Here’s a closer look at some of my favorite varieties:
* **’Little Marvel’:** A classic bush variety that produces sweet, flavorful peas. It’s compact and doesn’t require a lot of space.
* **’Tom Thumb’:** An ultra-compact dwarf variety that’s perfect for small containers. It produces small but delicious peas.
* **’Sugar Ann’:** A snap pea variety that produces edible pods. It’s early-maturing and very productive.
* **’Oregon Sugar Pod II’:** Another excellent snap pea variety that’s known for its disease resistance.
When choosing a variety, consider the size of your growing space, your personal preferences, and the climate in your area.
Optimizing Your Indoor Pea Garden
To maximize your pea harvest, here are some additional tips:
* **Rotate Your Crops:** If you’re growing peas in the same containers year after year, consider rotating your crops to prevent soilborne diseases.
* **Amend the Soil:** Before planting, amend the soil with compost or other organic matter to improve its fertility and drainage.
* **Provide Adequate Ventilation:** Good air circulation is essential for preventing fungal diseases. Open a window or use a fan to circulate the air around your plants.
* **Monitor Soil pH:** Peas prefer a slightly acidic soil pH of around 6.0-6.8. You can test your soil pH
Conclusion
So, there you have it! Growing peas indoors is not only achievable but also incredibly rewarding. Imagine fresh, crisp pea shoots brightening up your winter salads or adding a burst of sweetness to your spring stir-fries, all cultivated right in your own home. This DIY trick transforms a small space into a miniature edible garden, offering a continuous supply of fresh greens even when the weather outside is less than ideal.
The beauty of growing peas indoors lies in its simplicity and adaptability. It’s a project that’s perfect for beginners, requiring minimal equipment and effort. Plus, it’s a fantastic way to introduce children to the wonders of gardening and the satisfaction of growing their own food.
Beyond the basic method, there are numerous variations you can explore. Experiment with different pea varieties to discover your favorite flavor profiles. Snow peas, sugar snap peas, and shelling peas all thrive indoors, each offering a unique texture and sweetness. You can also adjust the growing medium to suit your preferences. While soil works perfectly well, you can also try hydroponics or even just sprouting the peas in water for a quick and easy harvest of pea shoots.
Consider using vertical growing systems to maximize space, especially if you’re limited on countertop area. A simple trellis or even just some twine strung from the ceiling can provide support for the pea vines as they climb, creating a visually appealing and productive indoor garden.
Don’t be afraid to get creative with your containers. While standard pots work fine, you can also repurpose old containers like yogurt tubs, milk cartons, or even plastic storage bins. Just make sure they have adequate drainage to prevent waterlogging.
The benefits extend beyond just fresh produce. Growing peas indoors is a sustainable practice that reduces your reliance on store-bought vegetables, minimizing your carbon footprint and supporting a more eco-friendly lifestyle. It’s also a therapeutic activity that can help reduce stress and improve your overall well-being. The simple act of nurturing a plant and watching it grow can be incredibly calming and rewarding.
This DIY trick for growing peas indoors is a must-try for anyone looking to add a touch of freshness and sustainability to their lives. It’s a simple, affordable, and incredibly rewarding project that will provide you with a continuous supply of delicious and nutritious greens.
We encourage you to give it a try and share your experience with us! Let us know what varieties you’ve grown, what challenges you’ve faced, and what successes you’ve celebrated. Your insights and tips can help other aspiring indoor gardeners embark on their own pea-growing adventures. Share your photos and stories on our social media channels using #IndoorPeaGarden or leave a comment below. We can’t wait to see what you create!
Frequently Asked Questions (FAQ)
What are the best pea varieties to grow indoors?
The best pea varieties for indoor growing are typically bush or dwarf varieties, as they require less space and support than vining types. Some excellent choices include:
* **’Little Marvel’:** A classic dwarf variety that produces sweet, flavorful peas in abundance.
* **’Sugar Ann’:** An early-maturing snap pea variety that’s perfect for snacking straight from the vine.
* **’Snowbird’:** A compact snow pea variety that produces tender, edible pods.
* **’Tom Thumb’:** An ultra-dwarf variety that’s ideal for growing in small containers or even window boxes.
* **’Oregon Sugar Pod II’:** A disease-resistant snow pea variety that’s known for its high yields.
Experimenting with different varieties is part of the fun! Consider trying a few different types to see which ones thrive best in your indoor environment and which ones you prefer in terms of taste and texture.
How much light do indoor peas need?
Peas need at least 6-8 hours of direct sunlight per day to thrive. If you don’t have a sunny window, you’ll need to supplement with artificial lighting. Grow lights are an excellent option, providing the necessary spectrum of light for healthy growth. Position the grow lights a few inches above the plants and adjust the height as they grow.
If you’re using natural light, rotate the plants regularly to ensure that all sides receive equal exposure. This will prevent them from leaning towards the light source and becoming leggy.
What kind of soil should I use for growing peas indoors?
A well-draining potting mix is essential for growing peas indoors. Avoid using garden soil, as it can be too heavy and compact, leading to poor drainage and root rot. A good potting mix will contain a blend of peat moss, perlite, and vermiculite, which provides the necessary aeration and drainage.
You can also amend your potting mix with compost or other organic matter to provide additional nutrients. However, be careful not to over-fertilize, as this can lead to excessive foliage growth at the expense of pea production.
How often should I water my indoor pea plants?
Water your pea plants regularly, keeping the soil consistently moist but not waterlogged. Check the soil moisture level daily by sticking your finger into the soil. If the top inch feels dry, it’s time to water.
Avoid overwatering, as this can lead to root rot. Make sure your containers have adequate drainage holes to allow excess water to escape.
Do I need to provide support for my indoor pea plants?
Yes, most pea varieties will need some form of support to climb. Even dwarf varieties can benefit from a small trellis or stake to keep them upright. You can use a variety of materials for support, including bamboo stakes, twine, netting, or even repurposed household items like coat hangers.
Train the pea vines to climb the support structure by gently wrapping them around the stakes or twine. As they grow, they will naturally cling to the support.
How long does it take for peas to mature indoors?
The time it takes for peas to mature indoors depends on the variety and growing conditions. Generally, you can expect to harvest pea shoots in about 2-3 weeks and mature peas in about 60-70 days.
Keep an eye on the pods as they develop. Harvest snow peas when the pods are flat and tender, snap peas when the pods are plump and crisp, and shelling peas when the pods are full and the peas are round and firm.
Are there any common pests or diseases that affect indoor pea plants?
Indoor pea plants are generally less susceptible to pests and diseases than outdoor plants. However, they can still be affected by common problems like aphids, spider mites, and powdery mildew.
Inspect your plants regularly for signs of pests or diseases. If you notice any problems, take action immediately to prevent them from spreading. You can use insecticidal soap or neem oil to control pests and fungicides to treat diseases.
Good air circulation and proper watering practices can also help prevent pest and disease problems.
Can I grow peas indoors year-round?
Yes, you can grow peas indoors year-round, provided you have adequate light and temperature control. Peas prefer cooler temperatures, so avoid placing them near heat sources.
Successive planting is a great way to ensure a continuous harvest. Sow new seeds every few weeks to keep a steady supply of fresh peas coming.
What do I do with the pea plants after they’ve finished producing?
Once your pea plants have finished producing, you can compost them or use them as green manure in your garden. Pea plants are nitrogen-fixing, meaning they add nitrogen to the soil, which is beneficial for other plants.
You can also save the seeds from your pea plants to grow next year’s crop. Allow the pods to dry completely on the vine, then shell the peas and store them in a cool, dry place.
Leave a Comment