
Growing Potatoes in Water might sound like something out of a science fiction movie, but trust me, it’s a real, and surprisingly easy, way to cultivate these versatile vegetables right in your own home! Forget sprawling gardens and back-breaking digging; we’re talking about a clean, compact, and fascinating method that even the most novice gardener can master.
For centuries, humans have relied on potatoes as a staple food source. From the Inca civilization in the Andes Mountains, where potatoes were first cultivated, to the Irish potato famine that shaped history, this humble tuber has played a significant role in our lives. Now, we’re taking potato cultivation to a whole new level, bringing it indoors and simplifying the process.
Why should you try growing potatoes in water? Well, imagine having a fresh supply of baby potatoes readily available for your salads, stews, or roasted side dishes, all without ever stepping foot in a muddy garden. This DIY trick is perfect for apartment dwellers, urban gardeners, or anyone who wants to experience the joy of growing their own food in a unique and space-saving way. Plus, it’s a fantastic educational project for kids, teaching them about plant growth and sustainability. So, let’s dive in and discover the secrets to successfully growing potatoes in water!
Growing Potatoes in Water: A Fun and Easy DIY Project!
Hey there, fellow plant enthusiasts! Ever thought about growing potatoes without soil? It sounds a bit crazy, right? But trust me, it’s totally doable and a super fun project, especially if you’re short on space or just looking for a unique gardening experience. I’m going to walk you through the whole process, step-by-step, so you can enjoy your own little potato water garden.
What You’ll Need
Before we dive in, let’s gather our supplies. This is a pretty low-cost project, which is always a win in my book!
* Potatoes: You’ll need seed potatoes or regular potatoes that have started to sprout “eyes.” Organic potatoes are best, as they’re less likely to be treated with sprout inhibitors.
* A Clear Container: A glass jar, vase, or even a clear plastic container will work. The bigger, the better, as it gives the roots more room to grow. I personally love using large mason jars – they look so cute!
* Water: Tap water is fine, but letting it sit out for 24 hours to dechlorinate is even better.
* Toothpicks or Skewers: These will help suspend the potato in the water.
* Optional: Liquid fertilizer (balanced formula), rooting hormone (optional, but can speed things up).
Preparing Your Potatoes
Okay, let’s get those potatoes ready for their watery adventure!
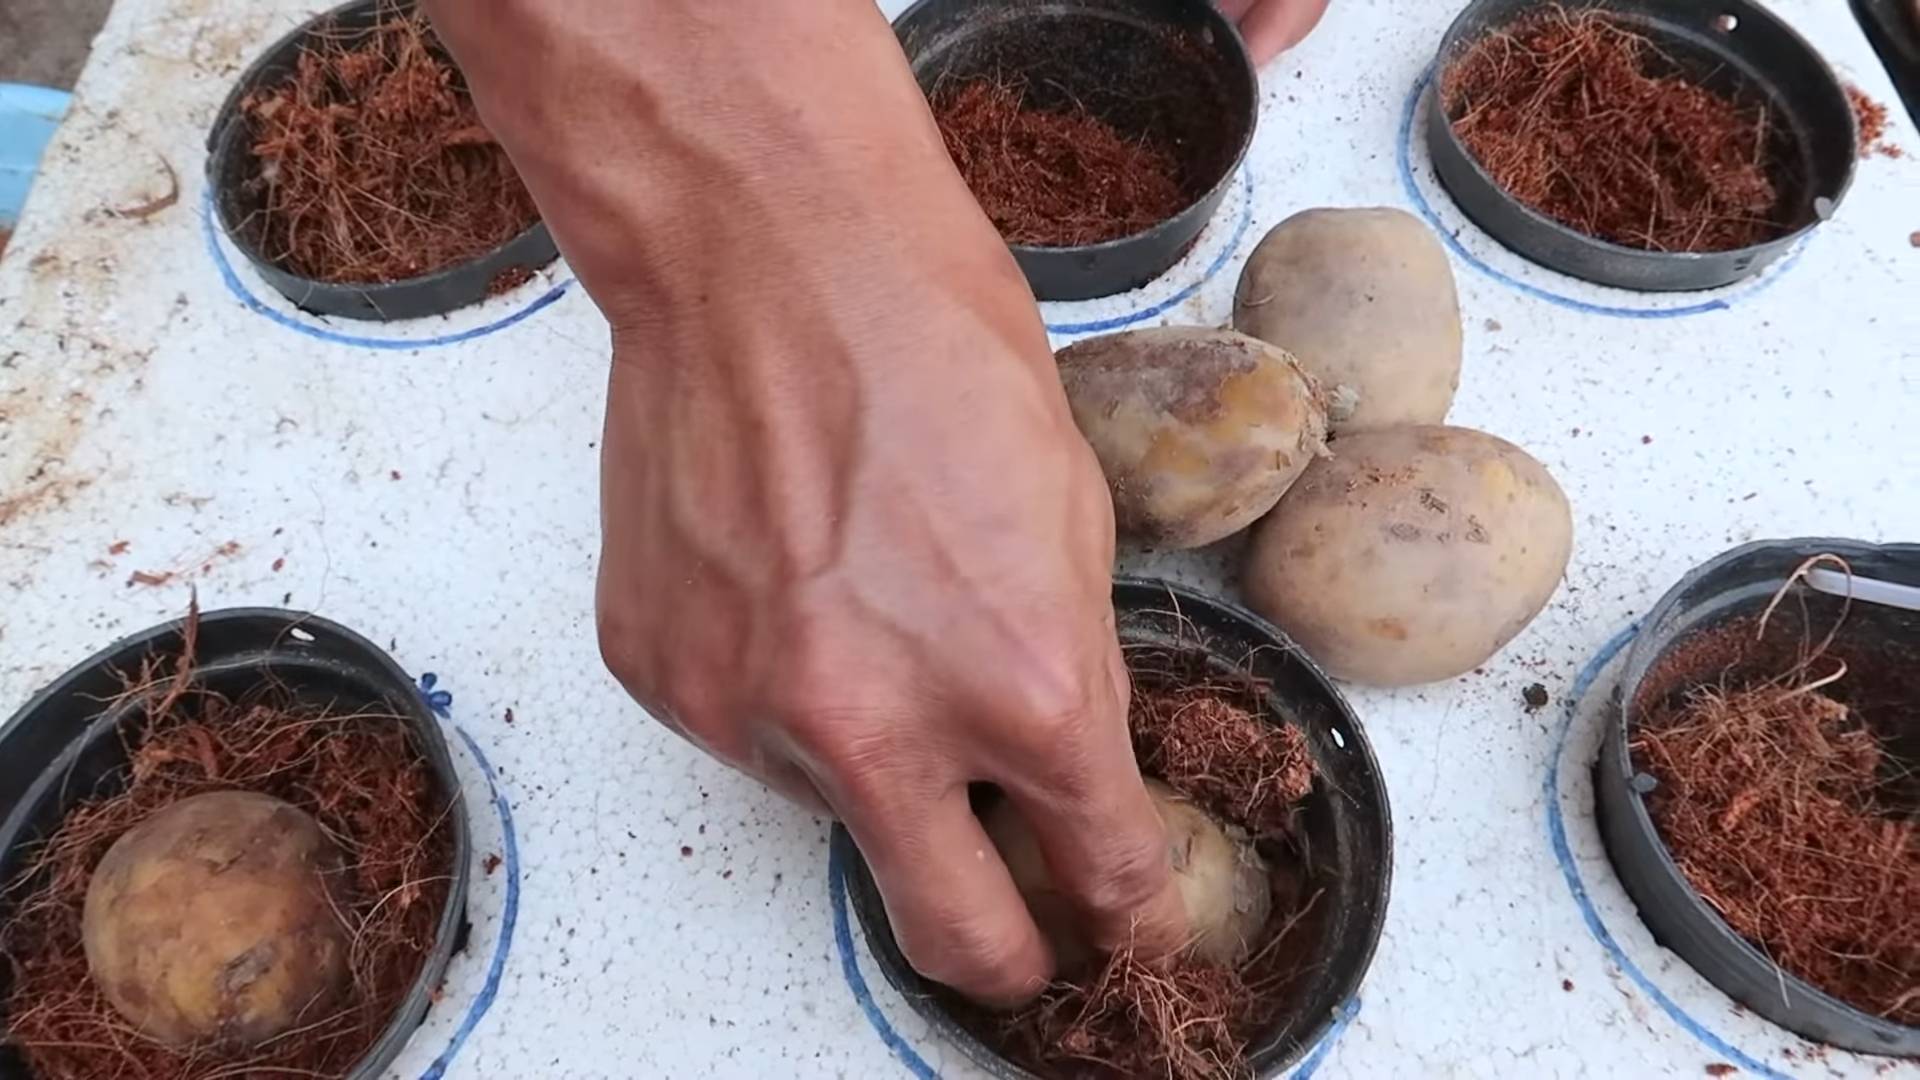
1. Choose Your Potatoes: Look for potatoes with several healthy “eyes” (those little bumps where sprouts will emerge). If your potatoes are large, you can cut them into pieces, ensuring each piece has at least two eyes. I usually aim for pieces about 2-3 inches in size.
2. Let the Cut Sides Heal (If Cutting): If you cut your potatoes, let the cut sides dry and callous over for a day or two. This helps prevent rot when they’re submerged in water. Just leave them out in a cool, dry place.
3. Encourage Sprouting (Optional): If your potatoes don’t have many sprouts, you can encourage them by placing the potatoes in a bright, warm spot for a few days. You can even put them in a paper bag with an apple – the ethylene gas from the apple helps stimulate sprouting!
Setting Up Your Water Garden
Now for the fun part – creating the perfect environment for your potato to thrive!
1. Clean Your Container: Make sure your jar or container is clean to prevent any unwanted bacteria or algae growth. A little soap and water will do the trick.
2. Insert Toothpicks/Skewers: This is how we’ll suspend the potato. Insert toothpicks or skewers around the middle of the potato, evenly spaced. The goal is to create a “platform” that will rest on the rim of the container. Make sure they’re inserted firmly so the potato doesn’t fall in!
3. Add Water: Fill your container with water, leaving about an inch or two of space at the top.
4. Position the Potato: Carefully place the potato on top of the container, using the toothpicks/skewers to hold it in place. The bottom half of the potato should be submerged in the water, while the top half remains exposed to air.
5. Optional: Add Rooting Hormone: If you’re using rooting hormone, you can dip the bottom of the potato (the part that will be submerged) in the powder before placing it in the water. This can help encourage root development.
Caring for Your Water Potato
Alright, your potato is all set up! Now it’s time to provide the right care to help it grow.
1. Location, Location, Location: Place your potato water garden in a bright location, but avoid direct sunlight, especially during the hottest part of the day. A spot near a window that receives indirect sunlight is ideal.
2. Water Changes: Change the water every few days, or at least once a week. This helps prevent the water from becoming stagnant and keeps the potato healthy. When you change the water, gently rinse the potato to remove any algae or debris.
3. Fertilizing (Optional): If you want to give your potato an extra boost, you can add a diluted liquid fertilizer to the water every couple of weeks. Use a balanced formula (like 20-20-20) and dilute it to half strength. Be careful not to over-fertilize, as this can harm the potato.
4. Monitor Growth: Keep an eye on your potato! You should start to see roots developing within a week or two. Sprouts will also start to emerge from the eyes.
5. Dealing with Algae: Algae growth is a common problem in water gardens. If you notice algae forming on the potato or in the water, gently clean it off with a soft brush or cloth. You can also add a small amount of hydrogen peroxide to the water (about a teaspoon per gallon) to help control algae growth.
Transplanting to Soil (Optional)
While you can technically grow potatoes entirely in water, you’ll get a much better yield if you eventually transplant them to soil. Here’s how:
1. Wait for Root Development: Wait until the roots are well-developed, at least a few inches long. The sprouts should also be several inches tall.
2. Prepare Your Pot: Choose a large pot (at least 10 gallons) with good drainage. Fill it with a well-draining potting mix.
3. Carefully Remove the Potato: Gently remove the potato from the water, being careful not to damage the roots.
4. Plant the Potato: Dig a hole in the potting mix and plant the potato, covering it with soil so that only the top few inches of the sprouts are exposed.
5. Water Thoroughly: Water the pot thoroughly after planting.
6. Care for Your Plant: Place the pot in a sunny location and water regularly, keeping the soil moist but not soggy. Fertilize every few weeks with a balanced fertilizer.
Troubleshooting
Even with the best care, you might encounter a few challenges. Here are some common issues and how to address them:
* Rotting Potato: If your potato starts to rot, it’s usually due to bacteria or fungus. Remove the potato immediately and start with a fresh one. Make sure to use a clean container and change the water frequently.
* Slow Growth: Slow growth can be caused by a lack of light, nutrients, or water. Make sure your potato is getting enough light, fertilize regularly, and change the water frequently.
* Yellowing Leaves: Yellowing leaves can be a sign of overwatering or nutrient deficiency. Adjust your watering schedule and fertilize as needed.
* Algae Growth: As mentioned earlier, algae growth is common. Clean the potato and container regularly and add a small amount of hydrogen peroxide to the water.
Harvesting Your Potatoes (If Transplanted)
If you transplanted your potato to soil, you can expect to harvest potatoes in about 80-100 days. Here’s how:
1. Watch for Signs of Maturity: The leaves will start to turn yellow and die back. This is a sign that the potatoes are ready to harvest.
2. Gently Dig Around the Plant: Carefully dig around the base of the plant, being careful not to damage the potatoes.
3. Harvest Your Potatoes: Gently lift the potatoes from the soil.
4. Cure Your Potatoes: Cure your potatoes by letting them dry in a cool, dark place for a week or two. This will help them store longer.
Final Thoughts
Growing potatoes in water is a fun and rewarding project that anyone can do. It’s a great way to learn about plant growth and enjoy fresh, homegrown potatoes. So, give it a try and see what you can grow! Happy gardening!
Conclusion
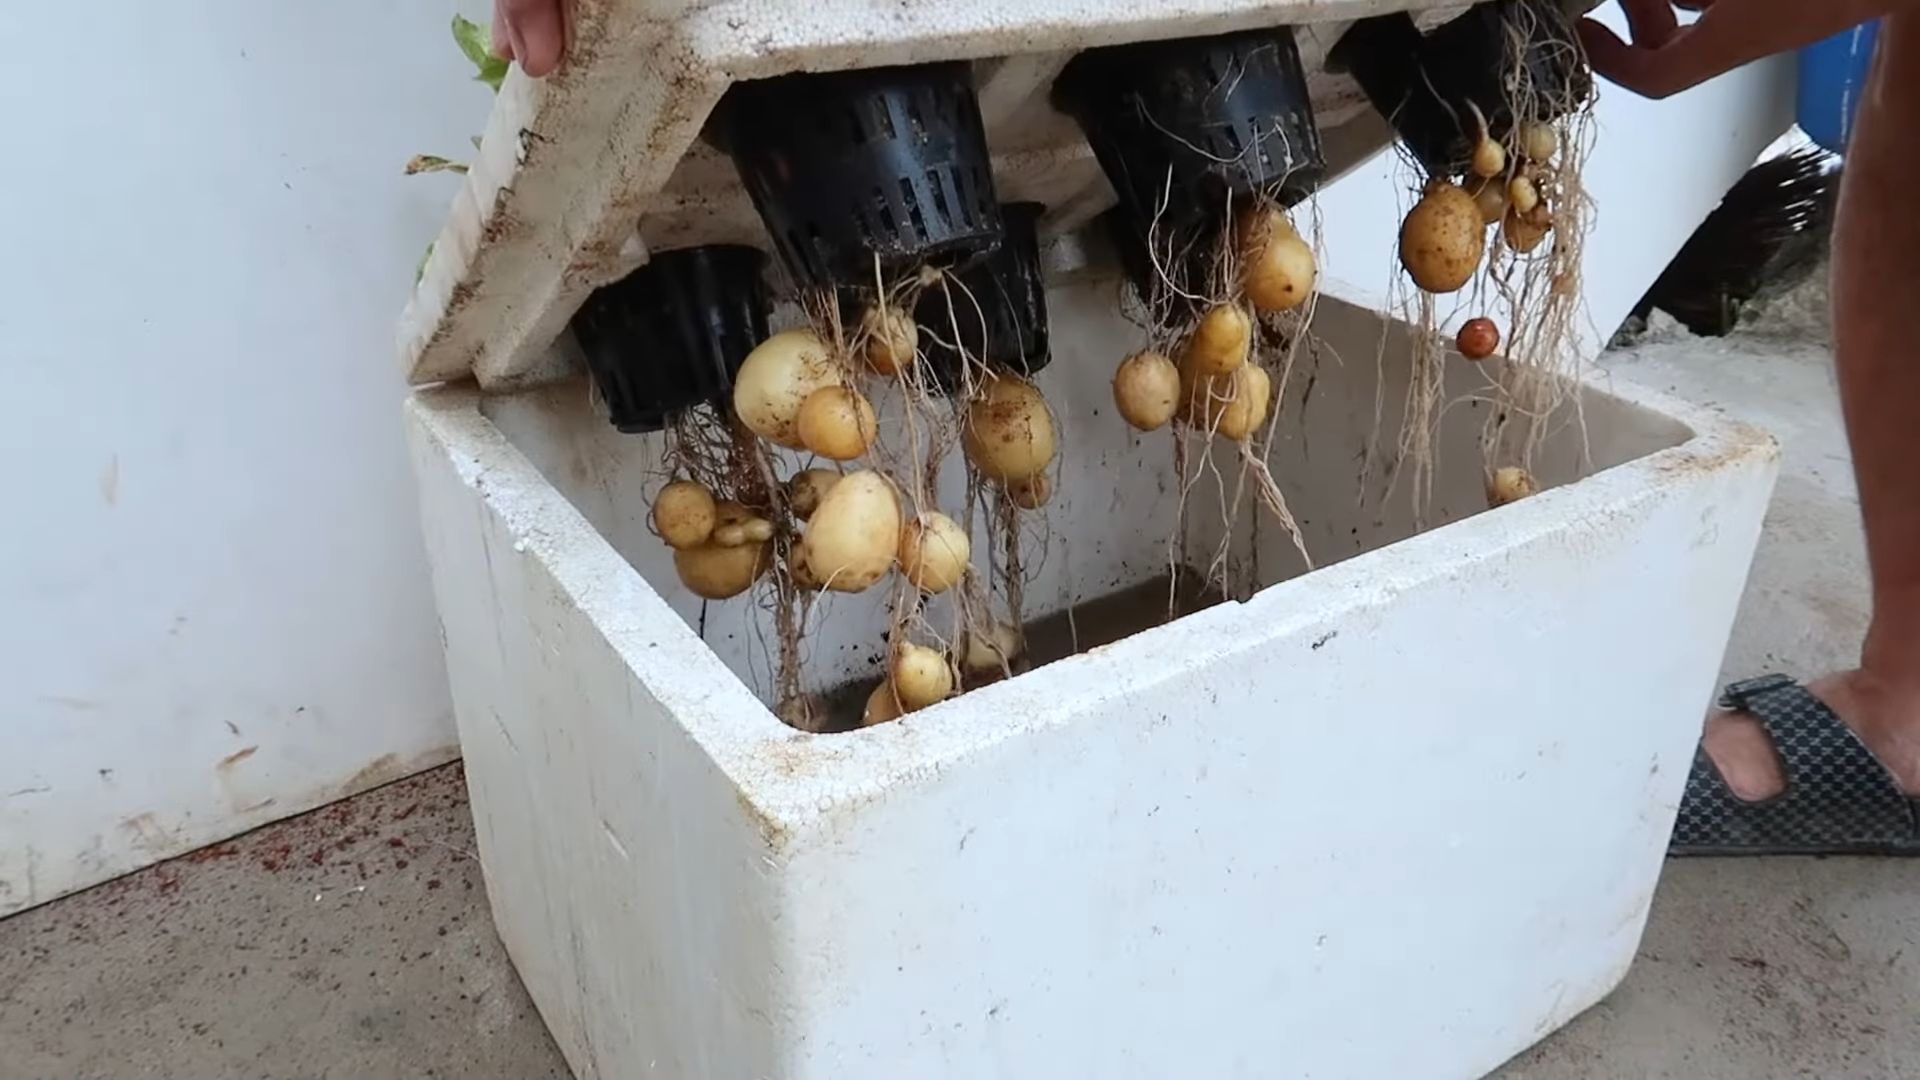
So, there you have it! Growing potatoes in water is not just a quirky experiment; it’s a surprisingly effective and rewarding way to cultivate your own spuds, even without a sprawling garden. This method offers a unique opportunity to witness the entire growth process, from the initial sprouting to the development of new potatoes, all within the confines of a simple jar or container.
Why is this DIY trick a must-try? Firstly, it’s incredibly space-efficient. Apartment dwellers and those with limited outdoor space can easily participate in the joy of growing their own food. Secondly, it’s a fantastic educational experience, especially for children. They can observe the roots developing and the tiny potatoes forming, providing a tangible lesson in plant biology. Thirdly, it’s a sustainable practice. You can use potatoes that have already started to sprout, preventing food waste and turning them into a productive resource. Finally, it’s just plain fun! There’s something deeply satisfying about nurturing a plant and harvesting your own homegrown produce.
But the beauty of this method lies in its adaptability. Feel free to experiment with different types of potatoes. Russets, Yukon Golds, and red potatoes all work well, each offering a slightly different flavor and texture. You can also try adding a diluted liquid fertilizer to the water every few weeks to boost growth. Just be sure to use a balanced fertilizer and avoid over-fertilizing, which can harm the plants. Consider using filtered water or letting tap water sit out for 24 hours to allow chlorine to dissipate, as chlorine can inhibit growth.
For a decorative touch, use clear glass jars or vases to showcase the potato’s root system. You can even add pebbles or marbles to the bottom of the container for added stability and visual appeal. If you’re growing multiple potatoes, space them out to allow for adequate light and air circulation. Remember to rotate the containers regularly to ensure that all sides of the plant receive equal sunlight.
Don’t be afraid to get creative! This is your chance to personalize your potato-growing experience. You might even consider adding a small air pump and airstone, like those used in aquariums, to oxygenate the water and further promote root growth.
We wholeheartedly encourage you to try this DIY trick for growing potatoes in water. It’s a simple, rewarding, and educational experience that anyone can enjoy. Once you’ve given it a try, we’d love to hear about your results! Share your photos, tips, and experiences in the comments below. Let’s build a community of indoor potato growers and learn from each other. What challenges did you face? What successes did you celebrate? Your insights can help others embark on their own potato-growing adventures.
Growing potatoes in water is more than just a gardening hack; it’s a gateway to a deeper connection with nature and a reminder that even in the smallest of spaces, we can cultivate our own food and experience the magic of life. So, grab a potato, fill a jar with water, and get ready to witness the amazing transformation unfold before your eyes. Happy growing!
FAQ
Q: What kind of potatoes work best for growing in water?
A: While you can technically use any type of potato, some varieties tend to perform better than others in water. Russet potatoes, Yukon Gold potatoes, and red potatoes are all excellent choices. These varieties are known for their vigorous growth and ability to produce a good yield of small potatoes. Avoid using potatoes that have been treated with sprout inhibitors, as these chemicals can prevent them from growing. Organic potatoes are generally a safer bet. Experimenting with different varieties can be a fun way to discover which ones thrive best in your specific environment.
Q: How much light do potatoes grown in water need?
A: Potatoes grown in water need plenty of bright, indirect sunlight. Aim for at least six hours of sunlight per day. A south-facing window is often ideal, but if you don’t have access to one, you can supplement with artificial grow lights. Insufficient light can lead to weak, leggy growth and reduced potato production. If you notice that your potato plant is stretching towards the light, it’s a sign that it needs more illumination. Rotate the container regularly to ensure that all sides of the plant receive equal exposure to light.
Q: How often should I change the water when growing potatoes in water?
A: It’s important to change the water regularly to prevent the buildup of bacteria and algae, which can harm the potato plant. Change the water every 3-5 days, or more frequently if it appears cloudy or discolored. When changing the water, be careful not to damage the roots. Gently lift the potato out of the container and pour out the old water. Rinse the container thoroughly before refilling it with fresh water. Using filtered water or letting tap water sit out for 24 hours to allow chlorine to dissipate can also help to promote healthy growth.
Q: Can I eat the potatoes that grow in water?
A: Yes, the potatoes that grow in water are perfectly edible. However, they will likely be smaller than potatoes grown in soil. They will also have a slightly different flavor and texture. The taste can be affected by the water quality and any nutrients added to the water. Be sure to wash the potatoes thoroughly before eating them. If the potatoes have been exposed to direct sunlight, they may develop a green tint, which indicates the presence of solanine, a toxic compound. While small amounts of solanine are generally harmless, it’s best to avoid eating potatoes that are significantly green.
Q: How long does it take to grow potatoes in water?
A: The time it takes to grow potatoes in water can vary depending on several factors, including the variety of potato, the amount of light it receives, and the temperature. Generally, you can expect to see sprouts within a week or two. Small potatoes will begin to form within a month or two. You can harvest the potatoes when they reach the desired size, typically after 2-3 months. Be patient and monitor the plant’s progress regularly.
Q: Can I use fertilizer when growing potatoes in water?
A: Yes, you can use a diluted liquid fertilizer to boost growth. Use a balanced fertilizer, such as a 20-20-20 formula, and dilute it to half strength. Add the fertilizer to the water every 2-3 weeks. Avoid over-fertilizing, as this can harm the plant. Look for signs of nutrient deficiencies, such as yellowing leaves, and adjust the fertilizer accordingly. Organic fertilizers, such as seaweed extract or fish emulsion, can also be used.
Q: What do I do if my potato starts to rot in the water?
A: If your potato starts to rot in the water, it’s important to take action immediately to prevent the rot from spreading. Remove the potato from the water and carefully inspect it. If the rot is localized, you may be able to cut away the affected area with a clean knife. However, if the rot is extensive, it’s best to discard the potato altogether. Clean the container thoroughly with soap and water before using it again. To prevent rot, ensure that the water is changed regularly and that the potato is not sitting in stagnant water. Good air circulation can also help to prevent fungal growth.
Q: Can I grow potatoes in water indefinitely?
A: While you can continue to grow potatoes in water for an extended period, the yield may decrease over time. The plant may eventually exhaust the nutrients in the water, even with regular fertilization. To maintain optimal growth, it’s best to start with a fresh potato every few months. You can also try transplanting the potato plant into soil once it has developed a strong root system. This will provide the plant with a wider range of nutrients and allow it to grow larger potatoes.
Q: What are some common problems when growing potatoes in water and how can I fix them?
A: Some common problems include algae growth, root rot, and nutrient deficiencies. Algae growth can be prevented by changing the water regularly and keeping the container out of direct sunlight. Root rot can be caused by stagnant water or overwatering. Ensure that the water is changed frequently and that the potato is not sitting in too much water. Nutrient deficiencies can be addressed by adding a diluted liquid fertilizer to the water. Yellowing leaves can indicate a lack of nitrogen, while stunted growth can indicate a lack of phosphorus or potassium. Regularly inspect your potato plant for signs of problems and take action promptly to prevent them from escalating.
Leave a Comment