
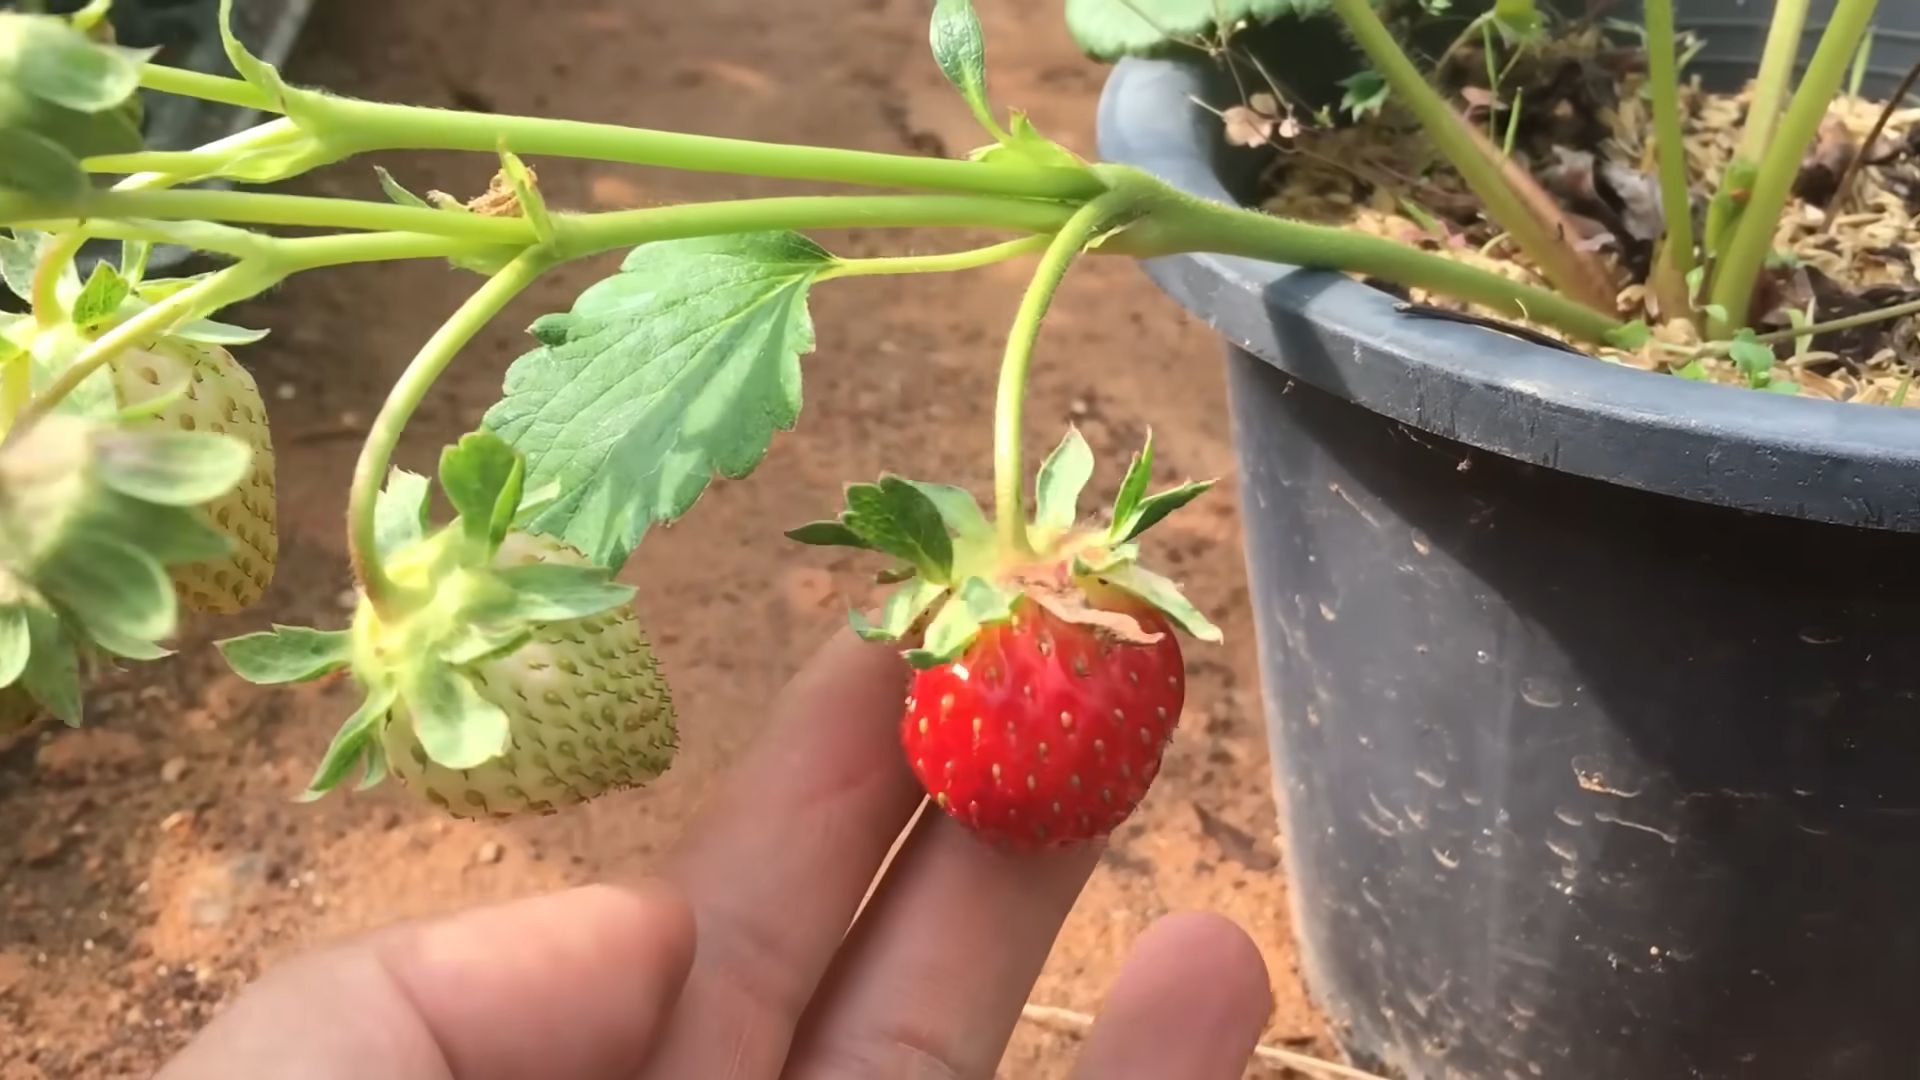
Growing Strawberries From Seed might seem like a daunting task, but trust me, the reward of plucking your own sun-ripened berries straight from your garden is absolutely worth the effort! For centuries, strawberries have been cherished not just for their delicious taste, but also for their vibrant color and nutritional benefits. From ancient Roman gardens to modern-day farms, these little red gems have captured our hearts (and taste buds!).
But let’s be honest, buying strawberry plants can sometimes be expensive, and you’re often limited to the varieties available at your local nursery. That’s where the magic of DIY comes in! I’m going to show you some simple, effective tricks and hacks that will empower you to start growing strawberries from seed successfully, right in your own backyard (or even on your balcony!).
Imagine the satisfaction of nurturing tiny seeds into thriving plants, knowing you’ve created something truly special. Plus, you’ll have access to a wider range of strawberry varieties, allowing you to experiment with different flavors and textures. So, grab your gardening gloves, and let’s embark on this exciting journey together! I promise, with a little patience and these easy-to-follow tips, you’ll be enjoying a bountiful harvest of homegrown strawberries in no time.
DIY Floating Shelves: A Simple Guide to Stylish Storage
Okay, let’s get started! I’m going to walk you through building your own floating shelves. These are a fantastic way to add a modern, minimalist touch to any room, and they’re surprisingly easy to make yourself. Plus, you get to customize them to perfectly fit your space and style.
Materials You’ll Need
Before we dive in, let’s gather our supplies. This is crucial for a smooth and enjoyable project.
* **Lumber:** This is the heart of your shelves! I recommend using solid wood like pine, oak, or maple. The type of wood will impact the look and durability of your shelves. Consider the weight you’ll be putting on them when choosing your wood. For a single shelf, you’ll need:
* One piece for the shelf itself (e.g., 1″ x 10″ x desired length)
* One piece for the mounting bracket (e.g., 1″ x 4″ x desired length minus a few inches)
* Scrap wood for the support pieces inside the bracket (e.g., 1″ x 2″ – you’ll need several small pieces)
* **Wood Screws:** Different sizes are needed for different parts of the project.
* 1 1/4″ wood screws for attaching the bracket to the wall.
* 1″ wood screws for assembling the bracket itself.
* Shorter screws (e.g., 3/4″) for attaching the shelf to the bracket (optional, but recommended for extra stability).
* **Wood Glue:** This will help create a strong and lasting bond between the bracket pieces.
* **Wood Stain or Paint:** Choose a color that complements your decor. I personally love using a natural stain to highlight the wood grain.
* **Sandpaper:** Various grits (e.g., 80, 120, 220) for smoothing the wood.
* **Clear Wood Finish (Polyurethane or Varnish):** This will protect the wood and give it a nice sheen.
* **Wall Anchors:** If you’re not screwing directly into studs, you’ll need these to ensure the shelves are securely mounted. Choose anchors appropriate for the weight you’ll be putting on the shelves.
* **Painter’s Tape:** For clean lines when staining or painting.
Tools You’ll Need
Having the right tools makes all the difference.
* **Measuring Tape:** Essential for accurate cuts and placement.
* **Pencil:** For marking measurements.
* **Saw:** A miter saw is ideal for precise cuts, but a hand saw will work too.
* **Drill:** With various drill bits for pilot holes and driving screws.
* **Screwdriver:** To manually tighten screws if needed.
* **Level:** Absolutely crucial for ensuring your shelves are straight.
* **Stud Finder:** To locate wall studs for secure mounting (if applicable).
* **Sandpaper Block or Orbital Sander:** For efficient sanding.
* **Clamps:** To hold pieces together while the glue dries.
* **Safety Glasses:** Protect your eyes from sawdust.
* **Dust Mask:** To avoid inhaling sawdust.
* **Paintbrushes or Rags:** For applying stain and finish.
Building the Mounting Bracket
This is the key to the “floating” effect! The bracket is what attaches to the wall and supports the shelf.
1. **Cut the Bracket Pieces:** Using your saw, cut the 1″ x 4″ lumber to the desired length (remember, it should be a few inches shorter than the shelf itself). This will be the main piece of the bracket that attaches to the wall. Also, cut several small pieces of the 1″ x 2″ scrap wood. These will act as supports inside the bracket. The number of supports you need depends on the length of your shelf; I usually space them about 8-12 inches apart.
2. **Sand the Bracket Pieces:** Use sandpaper (starting with a coarser grit like 80 or 120, then moving to a finer grit like 220) to smooth all the edges and surfaces of the bracket pieces. This will ensure a clean and professional look.
3. **Assemble the Bracket:** This is where the magic happens.
* Apply wood glue to one side of each support piece.
* Position the support pieces along the 1″ x 4″ bracket piece, spacing them evenly.
* Clamp the support pieces in place to the bracket piece.
* Pre-drill pilot holes through the bracket piece and into the support pieces. This prevents the wood from splitting when you drive in the screws.
* Drive 1″ wood screws through the pilot holes to secure the support pieces to the bracket piece.
* Let the glue dry completely (usually a few hours or overnight) before moving on.
4. **Finishing the Bracket (Optional):** You can paint or stain the bracket to match the shelf or the wall. If you’re staining, apply a wood conditioner first to ensure even stain absorption. Let the stain dry completely before applying a clear finish.
Preparing the Shelf
Now, let’s get the shelf itself ready.
1. **Cut the Shelf to Size:** If your lumber isn’t already the desired size, use your saw to cut it to the correct length and width.
2. **Sand the Shelf:** Just like with the bracket, sand all the edges and surfaces of the shelf. Pay extra attention to the corners to round them slightly.
3. **Stain or Paint the Shelf:** This is where you can really personalize your shelves.
* If you’re staining, apply a wood conditioner first.
* Apply the stain evenly with a brush or rag, following the grain of the wood.
* Wipe off any excess stain after a few minutes.
* Let the stain dry completely (refer to the stain manufacturer’s instructions).
* If you’re painting, apply a primer first for better adhesion.
* Apply two or three coats of paint, allowing each coat to dry completely before applying the next.
4. **Apply a Clear Finish:** Once the stain or paint is dry, apply a clear wood finish (polyurethane or varnish) to protect the wood and give it a nice sheen. Apply two or three coats, sanding lightly between coats with fine-grit sandpaper (220 or higher).
Mounting the Shelf
This is the final step! Make sure you take your time and get it right.
1. **Locate Wall Studs (If Possible):** Use a stud finder to locate the wall studs. Screwing directly into studs provides the most secure mounting. If you can’t find studs where you want to mount the shelves, you’ll need to use wall anchors.
2. **Mark the Shelf Position:** Use a measuring tape and level to mark the desired position of the shelf on the wall. Make sure the line is perfectly level!
3. **Attach the Bracket to the Wall:**
* Hold the bracket against the wall, aligning it with the marked line.
* Use a pencil to mark the locations of the screw holes on the wall.
* If you’re screwing into studs, pre-drill pilot holes through the bracket and into the studs.
* If you’re using wall anchors, drill holes in the wall according to the anchor manufacturer’s instructions. Insert the anchors into the holes.
* Attach the bracket to the wall using 1 1/4″ wood screws. Make sure the bracket is securely fastened.
4. **Slide the Shelf onto the Bracket:** Carefully slide the shelf onto the bracket. It should fit snugly.
5. **Secure the Shelf to the Bracket (Optional):** For extra stability, you can secure the shelf to the bracket with a few short screws. Pre-drill pilot holes through the bottom of the shelf and into the support pieces of the bracket. Then, drive in the screws. This will prevent the shelf from sliding off the bracket.
Tips and Tricks
Here are a few extra tips to help you along the way:
* Measure Twice, Cut Once: This is a classic woodworking saying for a reason! Accurate measurements are crucial for a successful project.
* Use Clamps: Clamps are your best friend when gluing and assembling wood. They hold the pieces together tightly and ensure a strong bond.
* Don’t Rush the Sanding: Sanding is essential for a smooth and professional finish. Take your time and use progressively finer grits of sandpaper.
* Apply Thin Coats of Stain and Finish: Multiple thin coats are better than one thick coat. This will prevent drips and runs and ensure an even finish.
* Let Everything Dry Completely: Patience is key! Make sure the glue, stain, and finish are completely dry before moving on to the next step.
* Consider the Weight: Think about what you’ll be putting on the shelves. If you’re planning to display heavy items, use thicker lumber
Conclusion
So, there you have it! Growing strawberries from seed might seem like a daunting task at first, but with a little patience and the right approach, you can cultivate your own patch of delicious, homegrown berries. This DIY trick, while requiring more time than purchasing seedlings, offers unparalleled control over the variety you grow and the satisfaction of nurturing a plant from its very beginning.
Think of the possibilities! You can explore heirloom varieties rarely found in stores, tailor your strawberry selection to your specific climate and soil conditions, and even create unique blends by cross-pollinating different plants. Imagine the bragging rights when you serve a strawberry shortcake made entirely from berries you grew yourself, from seed!
Beyond the sheer joy of gardening, starting strawberries from seed is also a budget-friendly option. A packet of seeds costs significantly less than a tray of established plants, making it an accessible way to enjoy fresh, organic produce. Plus, you’ll have a deeper understanding of the strawberry life cycle, fostering a greater appreciation for the food you eat.
Ready to take your strawberry game to the next level? Don’t be afraid to experiment! Try different seed starting mediums, adjust your watering schedule based on your local climate, and explore various methods of hardening off your seedlings. Consider companion planting with herbs like basil or thyme to deter pests and enhance the flavor of your strawberries.
For a fun variation, try growing alpine strawberries from seed. These tiny, intensely flavored berries are perfect for snacking and add a touch of elegance to desserts. They also tend to be more shade-tolerant than traditional strawberries, making them a great option for gardeners with limited sunlight.
We encourage you to embark on this rewarding journey of growing strawberries from seed. It’s a fantastic way to connect with nature, learn new skills, and enjoy the fruits (literally!) of your labor. Once you’ve harvested your first batch of homegrown strawberries, be sure to share your experience with us! We’d love to hear about your successes, challenges, and any tips you’ve discovered along the way. Post photos of your strawberry plants and delicious creations on social media using #HomegrownStrawberries and inspire others to try this amazing DIY trick. Let’s build a community of strawberry enthusiasts and celebrate the joy of growing our own food!
Frequently Asked Questions (FAQ)
Why should I bother growing strawberries from seed when I can just buy plants?
While buying established strawberry plants offers a quicker route to harvesting berries, growing strawberries from seed provides several advantages. Firstly, it allows you to access a wider variety of strawberry types, including rare and heirloom varieties that are often unavailable as plants. Secondly, it’s a more cost-effective option, especially if you’re looking to grow a large number of plants. Finally, it gives you complete control over the growing process, from the very beginning, and offers a unique sense of accomplishment. You also avoid the risk of introducing diseases or pests that might be present in purchased plants.
Is it really difficult to grow strawberries from seed?
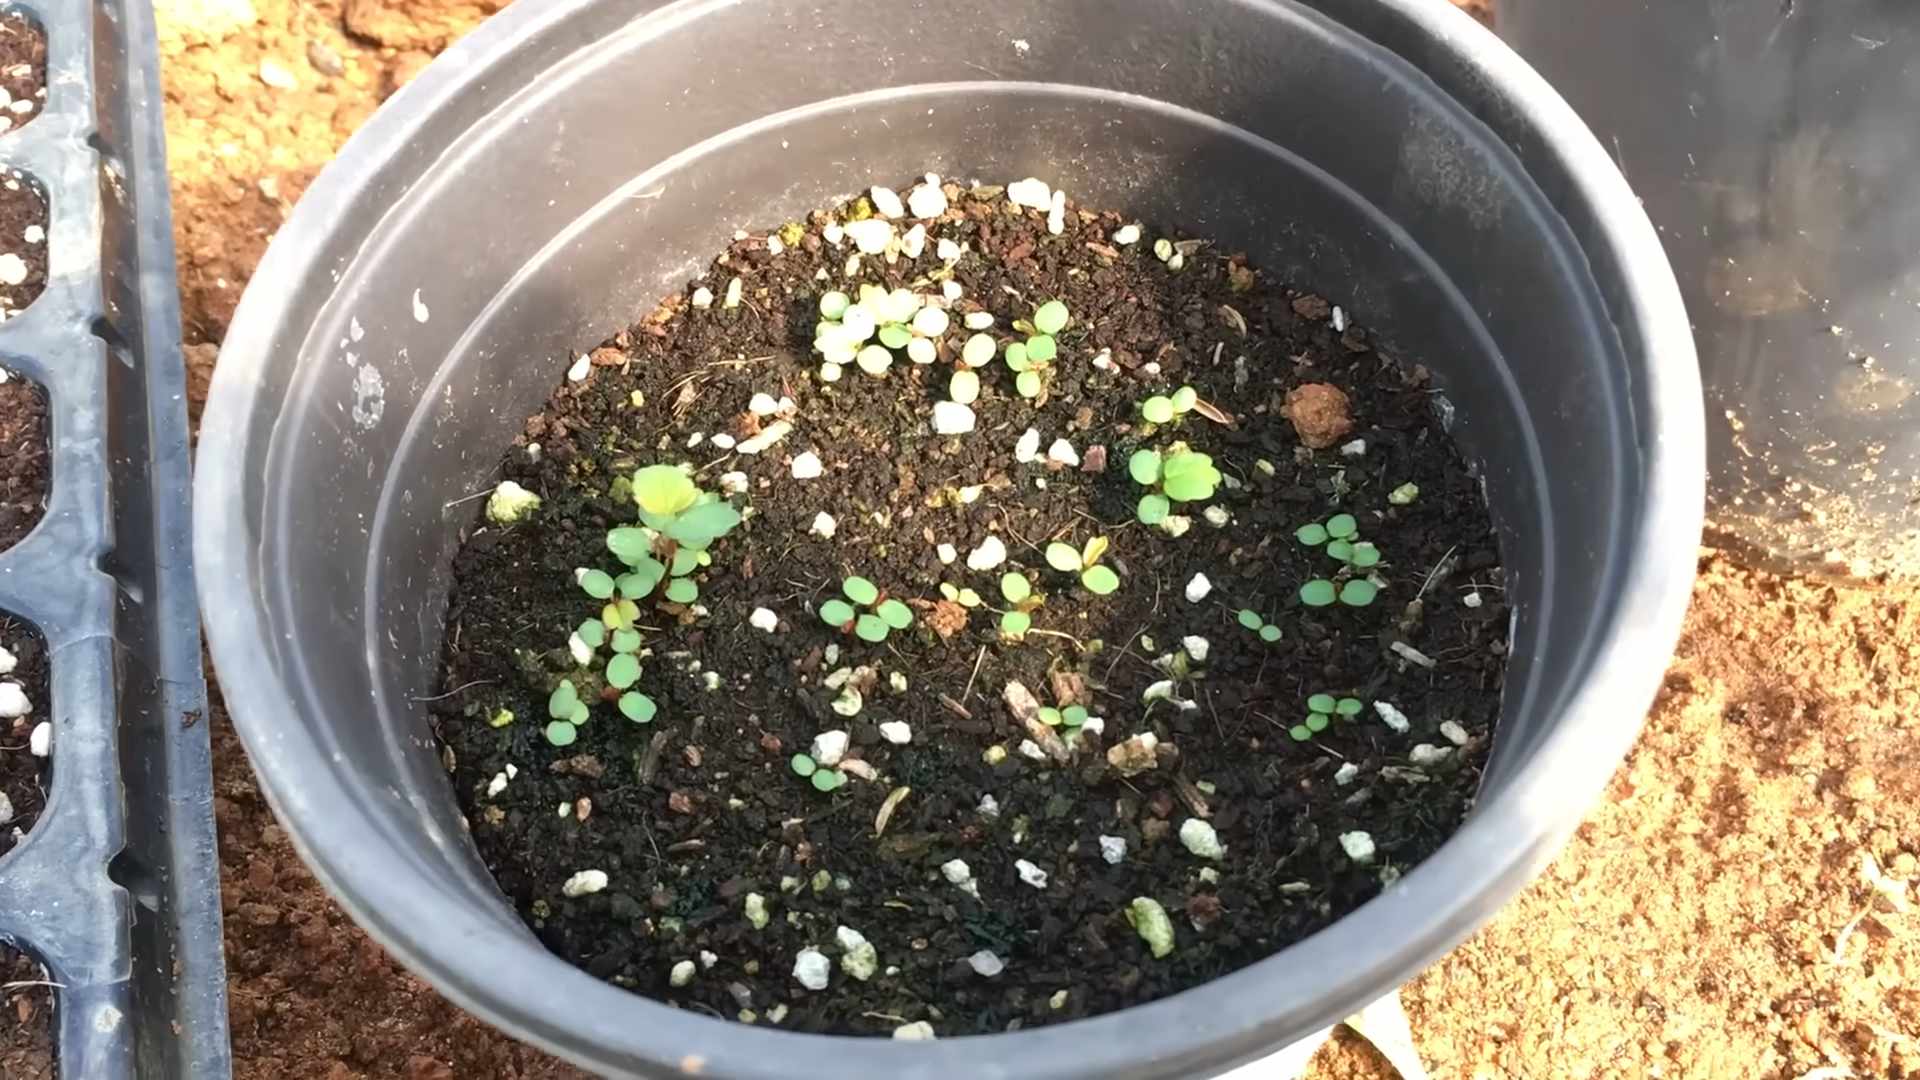
Growing strawberries from seed requires patience and attention to detail, but it’s not inherently difficult. The key is to provide the right conditions for germination and early growth. This includes using a sterile seed starting mix, maintaining consistent moisture, and providing adequate light. The most challenging part is often the initial germination phase, as strawberry seeds can be slow and erratic to sprout. However, with the right techniques and a little perseverance, you can successfully grow strawberries from seed.
How long does it take to grow strawberries from seed to harvest?
Growing strawberries from seed is a longer process than starting with established plants. It typically takes around 4-6 weeks for the seeds to germinate. After germination, the seedlings need to be nurtured indoors for another 8-10 weeks before they are ready to be transplanted outdoors. Once transplanted, it can take another 6-12 months for the plants to mature and produce a significant harvest. So, from seed to harvest, you can expect a timeframe of approximately 10-18 months.
What kind of soil is best for growing strawberries from seed?
For starting strawberry seeds, a sterile seed starting mix is crucial. This helps prevent fungal diseases that can kill young seedlings. Once the seedlings are ready to be transplanted, they prefer well-drained, slightly acidic soil with a pH between 5.5 and 6.5. Amend your garden soil with compost or other organic matter to improve drainage and fertility. Raised beds are also an excellent option for growing strawberries, as they provide good drainage and allow you to control the soil composition.
How much sunlight do strawberries need?
Strawberries thrive in full sun, which means they need at least 6-8 hours of direct sunlight per day. Insufficient sunlight can lead to weak growth, reduced fruit production, and increased susceptibility to diseases. If you live in a hot climate, providing some afternoon shade can help prevent the plants from overheating.
What are some common problems when growing strawberries from seed, and how can I prevent them?
Some common problems include poor germination, damping off (a fungal disease that kills seedlings), and pest infestations. To prevent poor germination, use fresh seeds, maintain consistent moisture, and provide adequate light. To prevent damping off, use a sterile seed starting mix and avoid overwatering. To prevent pest infestations, monitor your plants regularly and take action at the first sign of trouble. Organic pest control methods, such as insecticidal soap or neem oil, can be effective.
Can I grow strawberries from seed indoors year-round?
Yes, you can grow strawberries from seed indoors year-round, provided you can provide the necessary conditions. This includes adequate light (using grow lights if necessary), consistent temperature, and proper watering. Indoor strawberry plants may require hand-pollination to ensure fruit production.
What are some good strawberry varieties to grow from seed?
Some popular and reliable strawberry varieties to grow from seed include ‘Alpine’ strawberries (which are known for their small size and intense flavor), ‘Alexandria’ (a day-neutral variety that produces fruit throughout the growing season), and ‘Fresca’ (another day-neutral variety that is well-suited for container gardening). Research different varieties to find ones that are well-suited to your climate and growing conditions.
How often should I water my strawberry seedlings?
Strawberry seedlings need consistent moisture, but they should not be overwatered. Water them when the top inch of soil feels dry to the touch. Use a gentle watering can or spray bottle to avoid disturbing the delicate seedlings. As the plants mature, you can gradually reduce the frequency of watering, but ensure that the soil remains consistently moist, especially during fruiting.
How do I harden off my strawberry seedlings before transplanting them outdoors?
Hardening off is the process of gradually acclimating your seedlings to outdoor conditions. Start by placing the seedlings outdoors in a sheltered location for a few hours each day, gradually increasing the amount of time they spend outside. Protect them from direct sunlight and strong winds. After about a week, they should be ready to be transplanted into your garden. This process helps prevent transplant shock and ensures that your seedlings thrive in their new environment.

Leave a Comment