
Regrow Kitchen Basil: Imagine never having to buy basil again! Sounds like a dream, right? Well, it’s a dream that can easily become a reality with a few simple DIY tricks. For centuries, cultivating herbs at home has been a cornerstone of many cultures, from ancient Egyptians using basil for medicinal purposes to Italian grandmothers nurturing their fragrant basil plants for the perfect pesto. This isn’t just about saving money; it’s about connecting with nature and enjoying the freshest possible ingredients right at your fingertips.
Let’s be honest, those little plastic containers of basil from the grocery store are often expensive and wilt before you can even use half of them. That’s where the magic of DIY comes in! I’m going to show you how to regrow kitchen basil from those very same store-bought bunches, giving you a continuous supply of this fragrant herb. This simple hack is perfect for anyone, regardless of gardening experience. Whether you have a sprawling garden or just a sunny windowsill, you can enjoy the satisfaction of growing your own basil. So, ditch the wilting greens and get ready to transform your kitchen into a mini herb garden!
Regrow Your Kitchen Basil: A Simple DIY Guide
Hey there, fellow herb enthusiasts! Are you tired of buying fresh basil every week only to watch it wilt away in your fridge? I know I was! That’s why I’m so excited to share this super easy DIY trick with you: regrowing your kitchen basil from cuttings. It’s a fantastic way to save money, reduce waste, and always have fresh basil on hand for your favorite recipes. Trust me, once you get the hang of it, you’ll be swimming in pesto!
What You’ll Need
Before we dive in, let’s gather our supplies. This project is pretty low-key, so you probably already have most of these things lying around:
* Fresh Basil Stems: The stars of the show! You’ll need basil stems that are at least 4 inches long. Look for healthy stems with multiple leaves. The best ones are usually found in the middle of the bunch you buy from the store.
* A Clean Glass or Jar: Any glass or jar will do, as long as it’s tall enough to hold the stems upright and can be filled with water. I like to use mason jars, but an old drinking glass works just as well.
* Water: Tap water is fine, but filtered water is even better.
* Scissors or a Sharp Knife: For trimming the basil stems. Make sure they’re clean to prevent any bacteria from getting into the cuttings.
* Optional: Rooting Hormone: This isn’t essential, but it can speed up the rooting process. You can find it at most garden centers.
* Potting Soil: Once the roots have grown, you’ll need potting soil to plant your new basil plants.
* Small Pots: To transplant your rooted basil cuttings.
Preparing the Basil Cuttings
Okay, let’s get started! The first step is to prepare your basil cuttings. This is crucial for successful rooting.
1. Select Healthy Stems: Choose basil stems that are vibrant green and free from any signs of disease or damage. Avoid stems that are wilted, yellowing, or have brown spots.
2. Trim the Stems: Using your clean scissors or knife, cut the basil stems about ¼ inch below a leaf node (the point where leaves grow from the stem). This is where the roots will emerge.
3. Remove Lower Leaves: Carefully remove the leaves from the bottom 2 inches of each stem. This is important because these submerged leaves will rot in the water and contaminate it, hindering root growth. You want the energy to go into root production, not supporting leaves underwater.
4. Optional: Dip in Rooting Hormone: If you’re using rooting hormone, dip the cut end of each stem into the powder or liquid. Follow the instructions on the rooting hormone package. This step isn’t necessary, but it can definitely give your cuttings a boost.
Rooting the Basil Cuttings in Water
Now for the fun part: watching your basil cuttings grow roots!
1. Fill the Glass with Water: Fill your clean glass or jar with fresh water. Make sure the water is clean and free of any debris.
2. Place the Cuttings in the Water: Arrange the basil cuttings in the glass, making sure that the cut ends are submerged in the water and that the leaves are above the waterline. Don’t overcrowd the glass; give the cuttings enough space to breathe.
3. Find a Sunny Spot: Place the glass in a bright, sunny location, but avoid direct sunlight, which can scorch the leaves. A windowsill is usually a good spot.
4. Change the Water Regularly: This is super important! Change the water every 1-2 days to keep it fresh and prevent the growth of bacteria. This will also provide the cuttings with fresh oxygen.
5. Wait for Roots to Grow: Be patient! It usually takes about 1-2 weeks for roots to start appearing. You’ll see small, white roots emerging from the leaf nodes along the submerged part of the stem.
6. Monitor Root Growth: Keep an eye on the roots. You want them to be about 1-2 inches long before you transplant the cuttings into soil.
Transplanting the Rooted Basil Cuttings
Once your basil cuttings have developed healthy roots, it’s time to move them into soil!
1. Prepare the Pots: Fill your small pots with potting soil. Make sure the pots have drainage holes to prevent waterlogging.
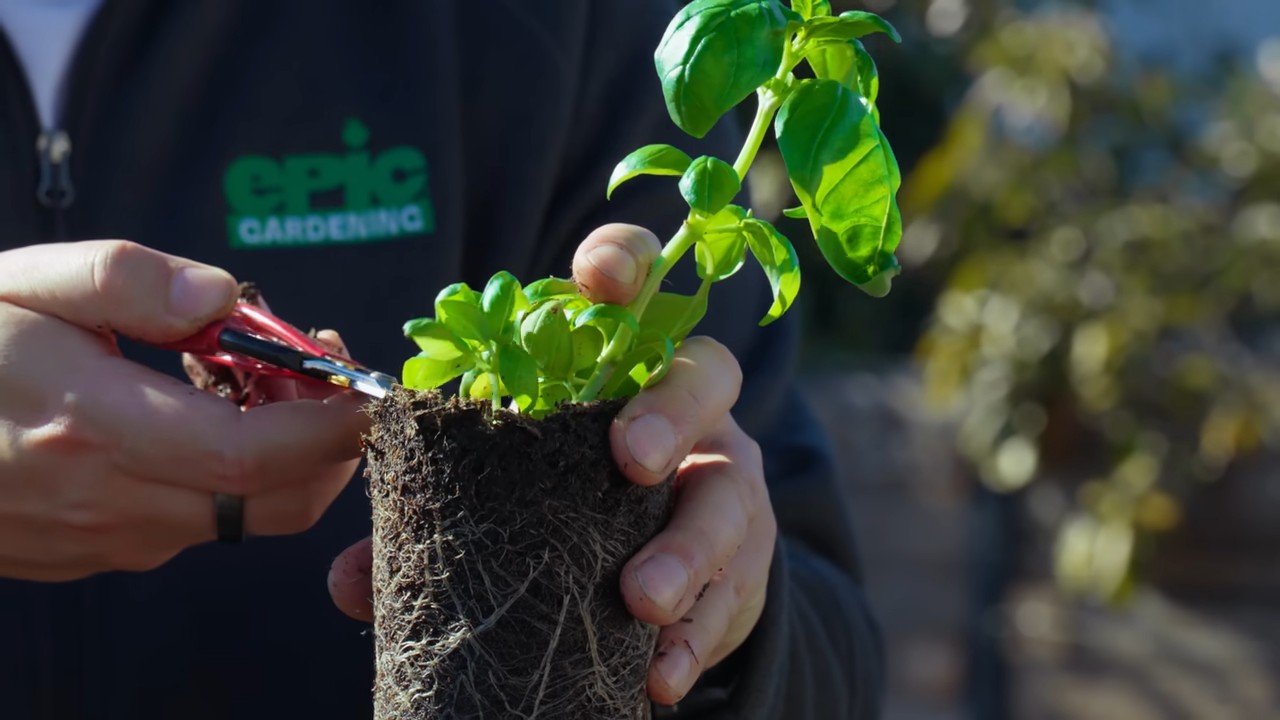
2. Gently Remove the Cuttings: Carefully remove the rooted basil cuttings from the glass of water. Be gentle to avoid damaging the delicate roots.
3. Plant the Cuttings: Make a small hole in the center of each pot and gently place the rooted cutting into the hole. Cover the roots with soil and gently pat the soil around the stem.
4. Water Thoroughly: Water the newly planted basil cuttings thoroughly until the water drains out of the bottom of the pot.
5. Place in a Sunny Location: Place the pots in a sunny location, but again, avoid direct sunlight.
6. Keep the Soil Moist: Keep the soil consistently moist, but not soggy. Water when the top inch of soil feels dry to the touch.
7. Fertilize Regularly: After a few weeks, you can start fertilizing your basil plants with a diluted liquid fertilizer. Follow the instructions on the fertilizer package.
Caring for Your New Basil Plants
Congratulations! You’ve successfully regrown your kitchen basil. Now, let’s talk about how to keep your new plants thriving.
* Sunlight: Basil loves sunlight, so make sure your plants get at least 6 hours of sunlight per day. If you don’t have enough natural light, you can supplement with a grow light.
* Watering: Water your basil plants regularly, keeping the soil consistently moist but not soggy. Overwatering can lead to root rot.
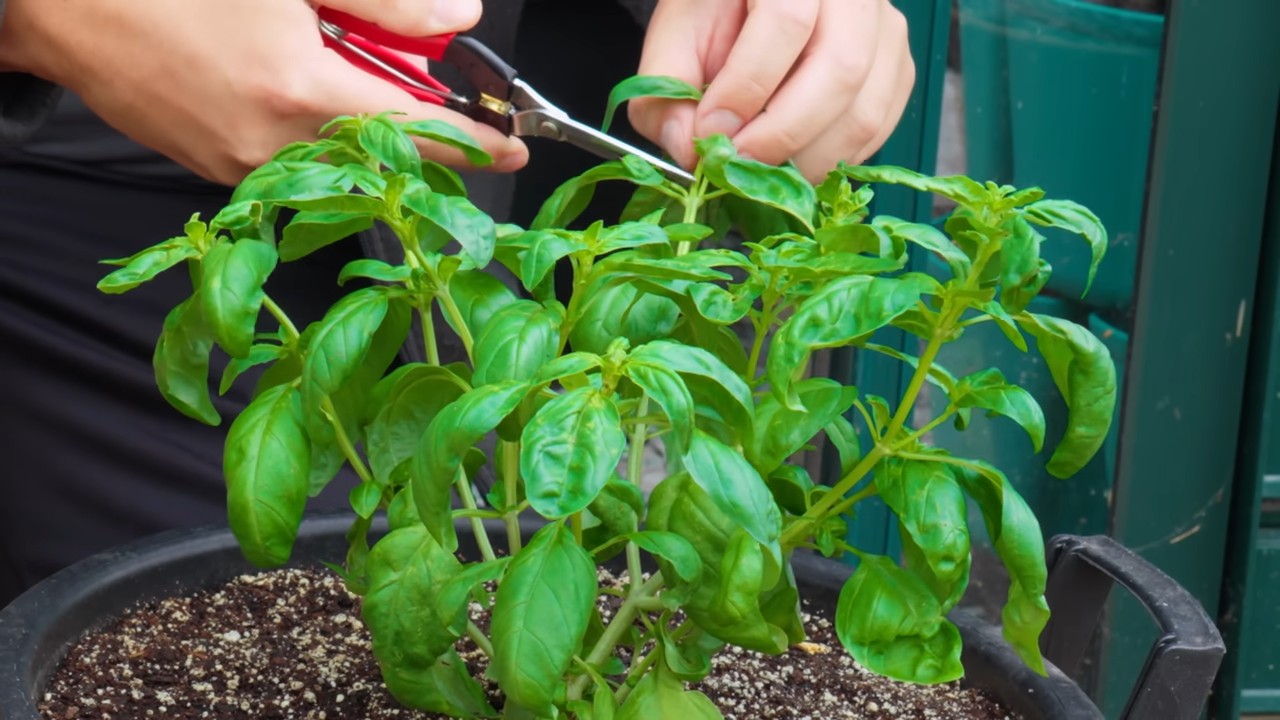
* Pruning: Pruning is essential for keeping your basil plants bushy and productive. Pinch off the top sets of leaves regularly to encourage branching. When you see flower buds forming, pinch them off as well, as flowering will reduce leaf production.
* Fertilizing: Fertilize your basil plants every few weeks with a diluted liquid fertilizer.
* Pest Control: Keep an eye out for pests like aphids and spider mites. If you spot any pests, treat your plants with an insecticidal soap or neem oil.
* Harvesting: Harvest your basil leaves regularly to encourage new growth. Simply snip off the leaves as needed, starting with the top leaves.
Troubleshooting
Sometimes, things don’t go exactly as planned. Here are a few common problems you might encounter and how to fix them:
* Cuttings Not Rooting: If your cuttings aren’t rooting, make sure you’re using fresh water, changing the water regularly, and providing enough sunlight. You can also try using rooting hormone.
* Leaves Turning Yellow: Yellowing leaves can be a sign of overwatering, underwatering, or nutrient deficiency. Adjust your watering schedule and fertilize your plants regularly.
* Root Rot: Root rot is caused by overwatering. If you suspect root rot, reduce your watering frequency and make sure your pots have good drainage.
* Pests: If you have pests, treat your plants with an insecticidal soap or neem oil.
Tips and Tricks for Success
Here are a few extra tips to help you succeed with regrowing your kitchen basil:
* Use Filtered Water: Filtered water is better for rooting cuttings than tap water, as it contains fewer chemicals.
* Keep the Water Clean: Change the water every 1-2 days to prevent the growth of bacteria.
* Provide Enough Sunlight: Basil needs plenty of sunlight to thrive.
* Don’t Overwater: Overwatering can lead to root rot.
* Prune Regularly: Pruning encourages bushy growth and prevents flowering.
* Be Patient: It takes time for cuttings to root and grow into healthy plants.
Enjoy Your Fresh Basil!
And there you have it! You’ve successfully regrown your kitchen basil from cuttings. Now you can enjoy fresh, homegrown basil in all your favorite dishes. I love adding it to pasta sauces, salads, and, of course, making pesto! This is a simple and rewarding DIY project that will save you money and reduce waste. Happy growing!
Conclusion
So, there you have it! Regrowing kitchen basil from cuttings isn’t just a clever gardening hack; it’s a game-changer for anyone who loves fresh herbs and wants to minimize waste. Think about it: no more last-minute grocery store runs for a handful of basil, no more watching those expensive bunches wilt away in your fridge. You’ll have a constant supply of fragrant, flavorful basil right at your fingertips, ready to elevate your pasta sauces, salads, and pesto to new heights.
This DIY trick is a must-try because it’s incredibly simple, cost-effective, and deeply satisfying. It connects you to the natural world in a small but meaningful way, allowing you to witness the magic of plant propagation firsthand. Plus, it’s a fantastic way to reduce your carbon footprint by growing your own food and avoiding the environmental impact of commercially grown herbs.
But the fun doesn’t stop there! Once you’ve mastered the basic technique, you can experiment with different varieties of basil. Try regrowing Thai basil for a spicy, anise-like flavor, or lemon basil for a citrusy twist. You can even try propagating other herbs like mint, rosemary, or oregano using similar methods. Imagine a windowsill overflowing with your favorite fresh herbs, all grown from scraps!
Don’t be afraid to get creative with your basil plants. You can transplant them into larger pots and grow them indoors year-round, or move them outdoors to a sunny spot in your garden during the warmer months. You can also use your homegrown basil to make infused oils, vinegars, or even homemade beauty products. The possibilities are endless!
We wholeheartedly encourage you to try this DIY trick and experience the joy of regrowing your own kitchen basil. It’s a rewarding project that will save you money, reduce waste, and bring a touch of green into your life. And most importantly, don’t forget to share your experiences with us! We’d love to hear about your successes, your challenges, and any creative variations you come up with. Post photos of your regrown basil on social media using #RegrowKitchenBasil and tag us so we can celebrate your green thumb achievements! Let’s build a community of basil-loving gardeners and inspire others to embrace the magic of propagation.
Frequently Asked Questions (FAQ)
Q: How long does it take for basil cuttings to root?
A: Generally, you can expect to see roots emerging from your basil cuttings within 7-14 days. The exact timeframe can vary depending on factors like the temperature of the water, the humidity levels, and the variety of basil you’re using. Make sure to change the water every 1-2 days to keep it fresh and oxygenated, which will encourage root growth. If you notice any signs of algae growth, clean the container thoroughly before refilling it with fresh water. Patience is key! Don’t give up if you don’t see roots immediately.
Q: What kind of basil works best for regrowing?
A: Sweet basil is the most common and easiest variety to regrow from cuttings. However, you can also successfully regrow other types of basil, such as Thai basil, lemon basil, and purple basil. The key is to use healthy, non-flowering stems for your cuttings. If your basil plant has already started to flower, it’s best to remove the flowers before taking cuttings, as the plant will be focusing its energy on producing seeds rather than growing roots.
Q: Can I regrow basil in soil instead of water?
A: Yes, you can regrow basil directly in soil, although the water propagation method is often considered easier and more reliable, especially for beginners. To regrow basil in soil, take your cuttings as described above, but instead of placing them in water, dip the cut ends in rooting hormone (optional) and plant them in a small pot filled with well-draining potting mix. Keep the soil consistently moist but not waterlogged, and cover the pot with a plastic bag or humidity dome to create a humid environment. Place the pot in a bright, indirect light location. It may take a bit longer for the cuttings to root in soil compared to water, but it’s definitely a viable option.
Q: What do I do after the basil cuttings have roots?
A: Once your basil cuttings have developed a good network of roots (at least an inch or two long), it’s time to transplant them into pots filled with well-draining potting mix. Choose pots that are appropriately sized for the size of the root system. Gently remove the cuttings from the water, being careful not to damage the delicate roots. Plant each cutting in its own pot, making sure to bury the roots completely. Water the newly transplanted basil plants thoroughly and place them in a bright, indirect light location. Gradually acclimate them to more direct sunlight over the course of a week or two.
Q: How do I care for my regrown basil plants?
A: Caring for regrown basil plants is relatively easy. Water them regularly, allowing the soil to dry out slightly between waterings. Avoid overwatering, as this can lead to root rot. Fertilize them every 2-3 weeks with a balanced liquid fertilizer. Pinch off the top leaves regularly to encourage bushier growth and prevent the plants from flowering prematurely. If you notice any signs of pests or diseases, treat them promptly with appropriate organic solutions. With proper care, your regrown basil plants will thrive and provide you with a continuous supply of fresh herbs.
Q: My basil cuttings are turning yellow or brown. What am I doing wrong?
A: Yellowing or browning leaves on your basil cuttings can indicate a few different problems. The most common cause is overwatering or poor drainage. Make sure the soil is well-draining and that you’re not watering too frequently. Another possible cause is lack of light. Basil needs plenty of sunlight to thrive, so make sure your cuttings are getting at least 6 hours of direct sunlight per day. Finally, yellowing or browning leaves can also be a sign of nutrient deficiency. Try fertilizing your basil plants with a balanced liquid fertilizer to provide them with the nutrients they need.
Q: Can I regrow basil indoors year-round?
A: Yes, you can absolutely regrow basil indoors year-round, especially if you live in a climate with cold winters. To successfully grow basil indoors, you’ll need to provide it with plenty of light, either from a sunny window or a grow light. You’ll also need to maintain a consistent temperature and humidity level. Basil prefers temperatures between 65-80°F and moderate humidity. You can increase humidity by placing a tray of water near your basil plants or by using a humidifier. With proper care, you can enjoy fresh, homegrown basil all year long.
Q: How often should I harvest my regrown basil?
A: You can start harvesting your regrown basil as soon as the plants have reached a decent size, typically when they are about 6-8 inches tall. The more you harvest, the bushier the plants will become. To harvest basil, simply pinch off the top leaves or stems, leaving at least a few sets of leaves on the plant. Avoid cutting off more than one-third of the plant at a time, as this can stress it. Regular harvesting will encourage new growth and prevent the plants from flowering prematurely.
Q: What are some creative ways to use my regrown basil?
A: The possibilities for using your regrown basil are endless! Of course, you can use it in all your favorite Italian dishes, such as pasta sauces, pesto, and pizzas. But basil is also delicious in salads, soups, and sandwiches. You can also use it to make infused oils, vinegars, and even cocktails. For a unique twist, try adding basil to your smoothies or desserts. You can even dry your basil and use it to make your own herbal teas or spice blends. Get creative and experiment with different ways to incorporate your homegrown basil into your cooking and baking!
Leave a Comment