
Lemongrass Propagation DIY: Unlock the secrets to multiplying your lemongrass and enjoy a continuous supply of this fragrant herb right in your backyard! Have you ever wished you could have an endless supply of fresh lemongrass for your favorite Thai curries, soothing teas, or even as a natural mosquito repellent? Well, you’re in luck! This isn’t just another gardening article; it’s your personal guide to mastering the art of lemongrass propagation.
Lemongrass, with its vibrant citrusy aroma, has been a staple in Asian cuisine and traditional medicine for centuries. From ancient Ayurvedic practices to modern culinary creations, its versatility is undeniable. But did you know that propagating lemongrass is surprisingly easy and incredibly rewarding?
Many gardeners struggle with keeping their lemongrass plants thriving, often facing issues like stunted growth or difficulty in expanding their harvest. That’s where this DIY guide comes in. I’m going to show you simple, step-by-step techniques that will empower you to effortlessly propagate lemongrass from existing stalks, ensuring a bountiful supply year after year. Forget expensive trips to the grocery store – with these Lemongrass Propagation DIY methods, you’ll have a thriving lemongrass patch in no time, adding a touch of exotic flavor and natural beauty to your home garden!
Propagating Lemongrass: A Beginner’s Guide to Growing Your Own!
Hey there, fellow plant enthusiasts! I’m so excited to share my tried-and-true method for propagating lemongrass. It’s surprisingly easy, and before you know it, you’ll have a thriving lemongrass patch ready for all your culinary adventures. Forget buying it at the store – let’s grow our own!
What You’ll Need
Before we dive in, let’s gather our supplies. This is a pretty straightforward process, so you won’t need much:
* Lemongrass stalks: You can usually find these at your local grocery store or Asian market. Look for stalks that are firm, healthy, and have a bit of the root end still attached. Avoid stalks that are dried out or mushy.
* A sharp knife or pruning shears: For trimming the stalks.
* A glass or jar: To hold the lemongrass stalks while they root.
* Water: Tap water is fine, but filtered water is even better.
* Potting mix: A well-draining potting mix is crucial for healthy growth.
* Pots: Choose pots that are at least 6 inches in diameter to give the lemongrass room to grow.
* Optional: Rooting hormone: While not essential, rooting hormone can speed up the rooting process.
* Spray bottle: To mist the plants.
Choosing Your Lemongrass Stalks
This is a crucial first step. You can’t just grab any old lemongrass stalk and expect it to root. Here’s what I look for:
* Firmness: The stalks should feel firm to the touch, not soft or mushy.
* Healthy color: Look for stalks that are green or light green. Avoid stalks that are yellow or brown.
* Root end: Make sure the stalks have a bit of the root end still attached. This is where the new roots will emerge.
* No signs of disease: Avoid stalks that have any spots, mold, or other signs of disease.
Preparing the Lemongrass Stalks for Rooting
Okay, now that we have our supplies and have selected our lemongrass stalks, let’s get them ready for rooting.
1. Trim the tops: Using your sharp knife or pruning shears, trim the tops of the lemongrass stalks to about 4-6 inches. This will help the plant focus its energy on root development rather than leaf growth. I usually cut at a slight angle.
2. Remove the outer leaves: Gently peel away the outer, dried-out leaves from the base of the stalk. You want to expose the fresh, inner layers. Be careful not to damage the stalk itself.
3. Optional: Scrape the base: Some people like to gently scrape the base of the stalk with a knife to encourage root growth. I’ve tried it both ways, and I haven’t noticed a huge difference, but it can’t hurt! Just be gentle.
Rooting the Lemongrass Stalks in Water
This is the easiest and most common method for propagating lemongrass.
1. Place the stalks in water: Fill your glass or jar with water and place the prepared lemongrass stalks in the water, root end down. Make sure the water covers the bottom 1-2 inches of the stalks.
2. Find a sunny spot: Place the glass or jar in a warm, sunny location. A windowsill is ideal. Lemongrass loves sunlight!
3. Change the water regularly: Change the water every 1-2 days to keep it fresh and prevent bacteria growth. This is really important!
4. Wait for roots to appear: Be patient! It can take anywhere from 1-3 weeks for roots to start to emerge. You should see small, white roots growing from the base of the stalks.
5. Monitor root growth: Once the roots are about 1-2 inches long, it’s time to plant your lemongrass in soil.
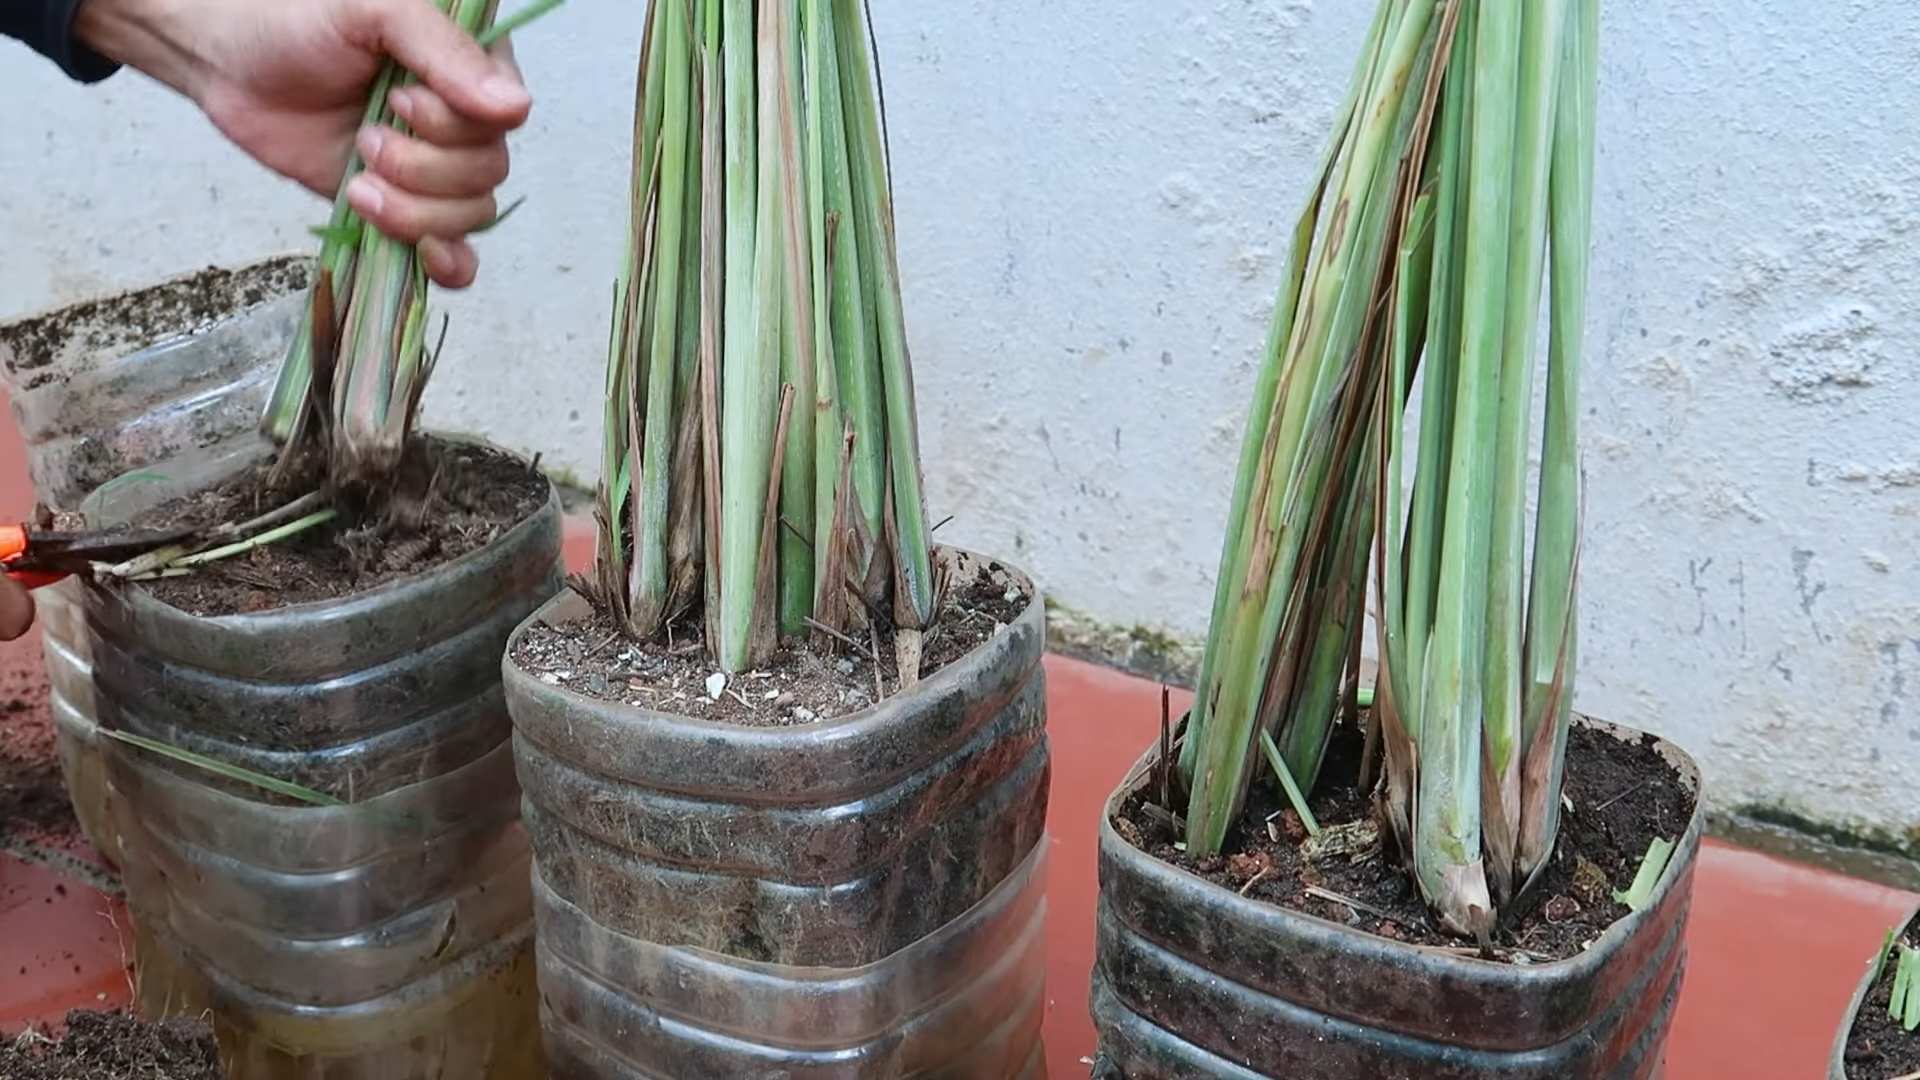
Planting Your Rooted Lemongrass
Now for the exciting part – planting your lemongrass!
1. Prepare your pots: Fill your pots with well-draining potting mix. Make a small hole in the center of each pot.
2. Gently remove the stalks from the water: Carefully remove the rooted lemongrass stalks from the water.
3. Plant the stalks: Place each stalk in the hole you made in the potting mix, making sure the roots are covered.
4. Water thoroughly: Water the newly planted lemongrass thoroughly.
5. Place in a sunny location: Place the pots in a warm, sunny location.
6. Keep the soil moist: Keep the soil consistently moist, but not soggy. Water when the top inch of soil feels dry to the touch.
7. Fertilize regularly: Feed your lemongrass with a balanced fertilizer every 2-3 weeks during the growing season (spring and summer).
Caring for Your Lemongrass
Once your lemongrass is planted, it’s important to provide it with the right care to ensure healthy growth.
* Sunlight: Lemongrass loves sunlight! Aim for at least 6 hours of direct sunlight per day.
* Watering: Water regularly, especially during hot, dry weather. Lemongrass prefers moist soil, but avoid overwatering, which can lead to root rot.
* Fertilizing: Fertilize regularly with a balanced fertilizer.
* Pruning: Prune your lemongrass regularly to encourage new growth. You can harvest the stalks as needed for cooking.
* Overwintering: If you live in a cold climate, you’ll need to bring your lemongrass indoors during the winter. Place it in a sunny location and water sparingly.
Troubleshooting
Sometimes, things don’t go exactly as planned. Here are a few common problems you might encounter and how to fix them:
* No roots are forming: Make sure the water is fresh and that the stalks are in a warm, sunny location. You can also try using rooting hormone to speed up the process.
* The stalks are turning yellow: This could be a sign of overwatering or lack of sunlight. Make sure the soil is well-draining and that the plant is getting enough sunlight.
* The leaves are turning brown: This could be a sign of underwatering or dry air. Water regularly and mist the plant with water to increase humidity.
* Pests: Lemongrass is generally pest-resistant, but occasionally it can be affected by aphids or spider mites. Treat infestations with insecticidal soap or neem oil.
Harvesting Your Lemongrass
The best part about growing your own lemongrass is harvesting it!
* When to harvest: You can start harvesting lemongrass when the stalks are about 1/2 inch in diameter.
* How to harvest: Use a sharp knife to cut the stalks near the base of the plant.
* Using your lemongrass: Lemongrass can be used fresh, dried, or frozen. It’s a delicious addition to soups, curries, stir-fries, and teas.
Propagating in Soil Directly (Alternative Method)
While I prefer the water propagation method, you *can* try planting the lemongrass stalks directly into the soil. This method is a bit less reliable, but it can work if you’re feeling adventurous.
1. Prepare the stalks: Follow the same steps as above for preparing the lemongrass stalks (trimming the tops and removing the outer leaves).
2. Dip in rooting hormone (optional): Dip the base of the stalks in rooting hormone.
3. Plant in well-draining soil: Plant the stalks in well-draining potting mix, burying the bottom 1-2 inches of the stalks.
4. Water thoroughly: Water the soil thoroughly.
5. Keep the soil moist: Keep the soil consistently moist, but not soggy.
6. Provide warmth and humidity: Cover the pot with a plastic bag or humidity dome to create a warm, humid environment.
7. Place in a warm, sunny location: Place the pot in a warm, sunny location.
8. Be patient: It can take several weeks for roots to develop. Check for roots by gently tugging on the stalks. If they resist, they’ve likely rooted.
Tips for Success
Here are a few extra tips to help you succeed with lemongrass propagation:
* Use fresh water: Always use fresh water when rooting lemongrass in water.
* Provide plenty of sunlight: Lemongrass needs plenty of sunlight to thrive.
* Don’t overwater: Overwatering can lead to root rot.
* Be patient: It can take time for roots to develop, so be patient and don’t give up!
* Experiment: Don’t be afraid to experiment with different methods and techniques to find what works best for you.
Enjoy Your Homegrown Lemongrass!
That’s it

Conclusion
So, there you have it! Mastering lemongrass propagation DIY is not just a fun gardening project; it’s a gateway to a continuous supply of this fragrant and versatile herb, right at your fingertips. Forget those expensive trips to the grocery store for a few sad-looking stalks. With a little patience and the simple techniques outlined above, you can cultivate a thriving lemongrass patch that will reward you with years of culinary and aromatic delights.
Why is this a must-try? Because it’s empowering! There’s a unique satisfaction in nurturing a plant from a simple cutting or division to a flourishing specimen. It’s also incredibly cost-effective. Think of all the money you’ll save by growing your own lemongrass, not to mention the environmental benefits of reducing your reliance on commercially grown and transported herbs. Plus, homegrown lemongrass simply tastes better – fresher, more vibrant, and bursting with flavor.
But the benefits don’t stop there. Lemongrass is incredibly versatile. Use it in your favorite Thai curries, Vietnamese pho, or even steep it in hot water for a soothing and aromatic tea. The possibilities are endless!
Ready to take your lemongrass game to the next level? Consider these variations:
* Water Propagation vs. Soil Propagation: Experiment with both methods to see which works best for you and your climate. Some gardeners find water propagation faster, while others prefer the directness of soil propagation.
* Different Lemongrass Varieties: Explore different varieties of lemongrass, such as the East Indian and West Indian types, each with its own subtle flavor nuances.
* Container Gardening: If you have limited space, lemongrass thrives in containers. Just be sure to choose a large pot with good drainage.
* Companion Planting: Plant lemongrass alongside other herbs and vegetables that benefit from its pest-repelling properties, such as tomatoes and basil.
Don’t be intimidated if you’re a beginner gardener. Lemongrass is surprisingly resilient and forgiving. The key is to provide it with plenty of sunlight, well-draining soil, and consistent moisture. And remember, even if your first attempt isn’t perfect, don’t give up! Gardening is a learning process, and every mistake is an opportunity to grow (pun intended!).
We are confident that you’ll find this lemongrass propagation DIY project rewarding and enjoyable. So, grab some lemongrass stalks, gather your supplies, and get ready to embark on a fragrant adventure. We can’t wait to hear about your success!
Share your experiences! We encourage you to try this DIY trick and share your results with us in the comments below. Let us know what worked for you, what challenges you faced, and any tips you have for fellow lemongrass enthusiasts. Your feedback will help us improve this guide and inspire others to give it a try. Happy growing!
Frequently Asked Questions (FAQ)
1. What is the best time of year to propagate lemongrass?
The ideal time for lemongrass propagation is during the spring or early summer. This is when the plant is actively growing and the weather is warm, providing optimal conditions for root development. However, if you live in a warm climate, you can propagate lemongrass year-round. Avoid propagating during the coldest months, as the plant may struggle to establish roots in cold soil.
2. How long does it take for lemongrass to root?
The time it takes for lemongrass to root can vary depending on the method you use and the environmental conditions. In water propagation, you should start to see roots emerge within 1-2 weeks. In soil propagation, it may take 2-4 weeks for roots to develop. Be patient and keep the soil consistently moist, but not waterlogged.
3. What kind of soil is best for lemongrass?
Lemongrass thrives in well-draining soil that is rich in organic matter. A sandy loam soil is ideal. You can amend your soil with compost or other organic materials to improve its drainage and fertility. Avoid heavy clay soils, as they can become waterlogged and lead to root rot.
4. How much sunlight does lemongrass need?
Lemongrass needs at least 6-8 hours of direct sunlight per day to thrive. Choose a sunny location in your garden or place your container-grown lemongrass in a spot that receives plenty of sunlight. If you live in a hot climate, you may need to provide some afternoon shade to prevent the leaves from scorching.
5. How often should I water lemongrass?
Water lemongrass regularly, especially during hot and dry weather. Keep the soil consistently moist, but not waterlogged. Allow the top inch of soil to dry out slightly between waterings. In the winter, you can reduce watering frequency.
6. How do I harvest lemongrass?
To harvest lemongrass, simply cut the stalks near the base of the plant. Use a sharp knife or pruning shears. You can harvest individual stalks as needed or cut back the entire plant to a few inches above the ground. The plant will quickly regrow.
7. Can I grow lemongrass indoors?
Yes, you can grow lemongrass indoors, but it can be challenging. Lemongrass needs a lot of sunlight, so you’ll need to place it near a sunny window or provide supplemental lighting. You’ll also need to ensure that the plant has good drainage and is watered regularly.
8. What are some common problems with lemongrass?
Some common problems with lemongrass include root rot, aphids, and spider mites. Root rot can occur if the soil is waterlogged. Aphids and spider mites can be controlled with insecticidal soap or neem oil.
9. Is lemongrass deer resistant?
Yes, lemongrass is generally considered to be deer resistant. Deer are not typically attracted to its strong scent and flavor. This makes it a great option for gardeners who struggle with deer browsing.
10. Can I propagate lemongrass from store-bought stalks?
Yes, you can propagate lemongrass from store-bought stalks, but it’s important to choose healthy-looking stalks that have a firm base. Look for stalks that are green and free from blemishes. Remove the outer leaves and place the stalks in water or soil, as described above.
11. My lemongrass is turning brown. What should I do?
Browning leaves on lemongrass can be caused by several factors, including underwatering, overwatering, nutrient deficiencies, or sunburn. Check the soil moisture and adjust your watering accordingly. If the plant is getting too much direct sunlight, move it to a shadier location. You can also fertilize the plant with a balanced fertilizer to address any nutrient deficiencies.
12. How do I overwinter lemongrass in cold climates?
In cold climates, lemongrass is typically grown as an annual or overwintered indoors. To overwinter lemongrass indoors, dig up the plant before the first frost and pot it in a large container. Cut back the foliage to a few inches above the soil. Place the container in a cool, bright location and water sparingly. In the spring, gradually acclimate the plant to outdoor conditions before planting it back in the garden.

Leave a Comment