
Mushroom Gardening in Bowls: Imagine harvesting fresh, flavorful mushrooms right from your kitchen counter! It sounds like something out of a fairytale, doesn’t it? But with this simple DIY guide, you can transform ordinary bowls into thriving mushroom gardens. For centuries, cultivating mushrooms has been a revered practice, particularly in Eastern cultures where they symbolize longevity and health. Now, you don’t need acres of land or specialized equipment to partake in this ancient tradition.
I know what you’re thinking: “Mushroom gardening? That sounds complicated!” But trust me, it’s surprisingly easy and incredibly rewarding. In today’s fast-paced world, we’re often disconnected from the food we eat. This DIY project offers a fantastic way to reconnect with nature, learn about the fascinating world of fungi, and enjoy the unparalleled taste of homegrown mushrooms. Plus, it’s a fantastic conversation starter!
This article will provide you with all the essential mushroom gardening in bowls tricks and hacks you need to succeed, from selecting the right mushroom spawn to maintaining optimal growing conditions. So, ditch the store-bought varieties and embark on a fun, fulfilling, and delicious adventure in your own home! Let’s get growing!
Mushroom Gardening in Bowls: A Fun and Easy DIY Project
Hey there, fellow fungi enthusiasts! Ever dreamed of growing your own delicious mushrooms right in your kitchen? Well, you’re in luck! This guide will walk you through the surprisingly simple process of cultivating mushrooms in bowls. It’s a fantastic project for beginners, requires minimal space, and provides a rewarding harvest of fresh, homegrown goodness. Let’s get started!
What You’ll Need
Before we dive in, let’s gather our supplies. This is a relatively low-cost project, and you might already have some of these items lying around.
* Mushroom Spawn: This is the most crucial ingredient! You’ll need mushroom spawn, which is essentially mushroom “seeds.” Oyster mushroom spawn is a great choice for beginners as they are relatively easy to grow and quite forgiving. You can find spawn online or at your local gardening supply store. Make sure to choose a reputable supplier to ensure the spawn is healthy and viable.
* Substrate: The substrate is the material the mushrooms will grow on. For oyster mushrooms, pasteurized straw is an excellent and readily available option. You can also use coffee grounds (cooled and drained), shredded cardboard (untreated), or a mixture of these.
* Bowls: Choose bowls that are food-safe and can hold the substrate. Plastic or ceramic bowls work well. The size will depend on how much you want to grow, but a bowl that’s about 6-8 inches in diameter is a good starting point.
* Spray Bottle: You’ll need a spray bottle filled with clean water to keep the substrate moist.
* Large Pot or Container: For pasteurizing the straw (if you choose to use straw).
* Thermometer: To monitor the water temperature during pasteurization.
* Gloves: To maintain cleanliness and prevent contamination.
* Optional: A clear plastic bag or container to create a humidity dome.
Preparing the Substrate
The substrate needs to be properly prepared to provide the ideal environment for the mushroom spawn to colonize. This usually involves pasteurization to kill off any competing organisms.
Pasteurizing Straw (If Using)
1. Chop the Straw: Cut the straw into smaller pieces, about 2-3 inches long. This will make it easier to pack into the bowls and for the mycelium (the vegetative part of the mushroom) to spread.
2. Soak the Straw: Place the chopped straw in a large pot or container and cover it with water. Let it soak for at least an hour to fully saturate it.
3. Heat the Water: Place the pot on the stove and heat the water to around 160-180°F (71-82°C). Use a thermometer to monitor the temperature. It’s crucial not to boil the straw, as this can damage it and make it less suitable for mushroom growth.
4. Maintain the Temperature: Keep the water at this temperature for about 60-90 minutes. This will kill off most of the unwanted microorganisms.
5. Drain and Cool: Carefully drain the hot water from the straw. Let the straw cool down completely before handling it. You want it to be cool enough to touch without burning yourself. Squeeze out any excess water; the straw should be damp but not dripping wet.
Preparing Coffee Grounds (If Using)
1. Collect Coffee Grounds: Gather used coffee grounds from your coffee maker. Make sure they are cooled down completely.
2. Drain Excess Water: Place the coffee grounds in a colander or strainer and let them drain thoroughly. You want them to be damp but not soggy.
3. That’s it! Coffee grounds are naturally pasteurized during the brewing process, so no further treatment is needed.
Preparing Cardboard (If Using)
1. Shred the Cardboard: Tear or shred the cardboard into small pieces, about 1-2 inches in size. Remove any tape, labels, or glossy coatings.
2. Soak the Cardboard: Place the shredded cardboard in a container and cover it with boiling water. Let it soak for several hours or overnight to soften it.
3. Drain and Cool: Drain the water from the cardboard and let it cool down completely. Squeeze out any excess water; the cardboard should be damp but not dripping wet.
Inoculating the Bowls
Now comes the fun part – introducing the mushroom spawn to the prepared substrate!
1. Clean Your Bowls: Thoroughly clean your bowls with soap and water to remove any potential contaminants.
2. Layer the Substrate and Spawn: Put on your gloves to maintain cleanliness. Start by placing a layer of the prepared substrate at the bottom of the bowl. Then, sprinkle a layer of mushroom spawn over the substrate. Repeat this process, alternating layers of substrate and spawn, until the bowl is almost full. The top layer should be a layer of substrate.
3. Gently Press Down: Gently press down on the substrate to compact it slightly. This will help the spawn make good contact with the substrate.
4. Cover (Optional): If you want to create a humidity dome, place the bowl inside a clear plastic bag or container. This will help retain moisture and create a favorable environment for the mycelium to grow. Make sure to leave some air circulation to prevent the build-up of excess moisture and mold.
Incubation
This is the waiting game! The mycelium needs time to colonize the substrate.
1. Find a Suitable Location: Place the inoculated bowls in a dark, warm, and humid location. A temperature of around 65-75°F (18-24°C) is ideal. A closet, basement, or spare room can work well.
2. Maintain Moisture: Check the moisture level of the substrate regularly. If it starts to dry out, lightly mist it with water using your spray bottle. You want the substrate to be damp but not waterlogged.
3. Monitor for Colonization: Over the next few weeks, you should start to see white, fuzzy growth spreading throughout the substrate. This is the mycelium, and it’s a sign that the spawn is colonizing the substrate.
4. Be Patient: Colonization can take anywhere from 2-4 weeks, depending on the type of mushroom, the temperature, and the humidity. Don’t be discouraged if it takes a little longer.
Fruiting
Once the substrate is fully colonized, it’s time to trigger fruiting – the formation of mushrooms!
1. Introduce Light and Fresh Air: Move the bowls to a location with indirect light and good air circulation. A windowsill or a well-lit room is suitable.
2. Increase Humidity: Mushrooms need high humidity to fruit properly. You can increase humidity by misting the bowls with water several times a day or by placing them in a humidity tent (a plastic bag with holes for ventilation).
3. Maintain Moisture: Continue to mist the substrate regularly to keep it moist.
4. Watch for Pinheads: After a few days, you should start to see small mushroom “pinheads” forming on the surface of the substrate. These are the beginnings of your mushrooms!
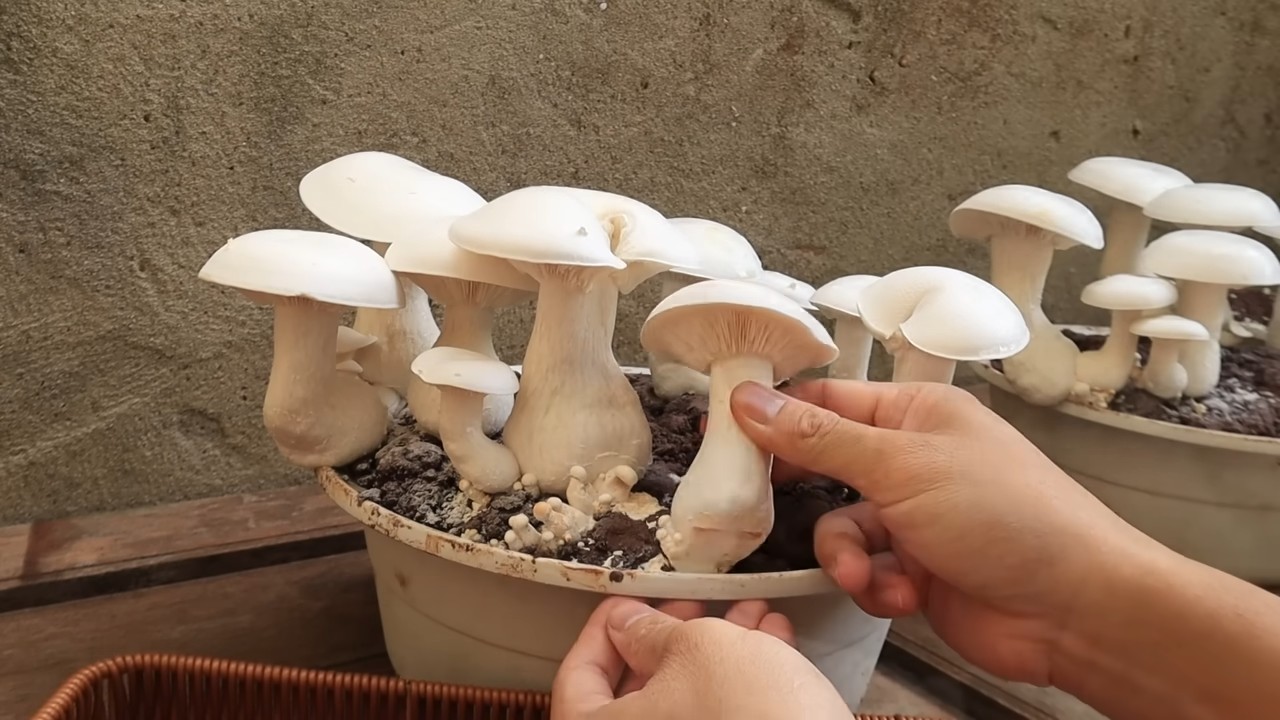
5. Harvest Your Mushrooms: The mushrooms will grow rapidly over the next few days. Harvest them when the caps are fully formed but before they start to release spores (you’ll see a powdery substance on the caps). To harvest, gently twist or cut the mushrooms off at the base of the stem.
Subsequent Flushes
After harvesting your first flush of mushrooms, you can often get several more flushes from the same substrate.
1. Soak the Substrate: After harvesting, soak the substrate in water for a few hours to rehydrate it.
2. Drain Excess Water: Drain the water from the substrate and return it to its fruiting location.
3. Repeat the Fruiting Process: Repeat the fruiting process as described above. You may need to wait a few weeks for the mycelium to recover and produce another flush of mushrooms.
4. Discard the Substrate: Eventually, the substrate will become depleted of nutrients and will no longer produce mushrooms. At this point, you can discard it in your compost pile or garden.
Troubleshooting
Even with the best intentions, things don’t always go according to plan. Here are some common problems you might encounter and how to address them:
* Mold: If you see mold growing on the substrate, it’s a sign that there’s too much moisture or not enough air circulation. Remove the moldy areas and improve ventilation. If the mold is widespread, it’s best to discard the substrate and start over.
* Slow Colonization: Slow colonization can be caused by low temperatures, dry substrate, or poor-quality spawn. Make sure the temperature is within the ideal range, keep the substrate moist, and use high-quality spawn.
* No Fruiting: If the substrate is fully colonized but you’re not seeing any

Conclusion
So, there you have it! Cultivating your own mushrooms in bowls isn’t just a quirky gardening experiment; it’s a gateway to fresh, flavorful fungi right at your fingertips. We’ve walked you through the simple steps, highlighting how accessible and rewarding this DIY project can be. Forget those expensive, pre-packaged mushrooms from the grocery store – imagine the satisfaction of harvesting your own, knowing exactly where they came from and how they were grown.
This method is a must-try for several reasons. First, it’s incredibly space-efficient. Whether you live in a sprawling suburban home or a cozy apartment, you can find room for a few bowls of mushroom-growing goodness. Second, it’s a fantastic way to recycle kitchen scraps and contribute to a more sustainable lifestyle. Coffee grounds, cardboard, and even vegetable peels can all play a role in nourishing your mushroom colony. Third, it’s a surprisingly educational and engaging activity, perfect for families or anyone curious about the wonders of mycology.
But the best part? The taste! Homegrown mushrooms, bursting with freshness, elevate any dish. Imagine adding them to your morning omelet, tossing them into a hearty pasta sauce, or grilling them as a delicious side dish. The possibilities are endless.
Don’t be afraid to experiment with different mushroom varieties. While oyster mushrooms are a great starting point due to their ease of cultivation, you can also explore shiitake, lion’s mane, or even wine cap mushrooms as you gain more experience. Each variety offers a unique flavor profile and texture, adding exciting dimensions to your culinary creations. You can also experiment with different substrates. While coffee grounds are popular, straw, wood chips, and even paper waste can be used, depending on the mushroom species.
Consider adding a humidity dome to your bowl setup, especially if you live in a drier climate. A simple plastic bag or a repurposed container can help maintain the moisture levels necessary for optimal mushroom growth. Remember to mist regularly to keep the substrate moist but not waterlogged.
Don’t be intimidated by the process. Mushroom gardening in bowls is surprisingly forgiving. Even if your first attempt isn’t a resounding success, you’ll learn valuable lessons that will help you improve your technique. The key is to be patient, observant, and willing to adapt.
We wholeheartedly encourage you to give this DIY trick a try. It’s a fun, rewarding, and delicious way to connect with nature and enjoy the fruits (or rather, fungi) of your labor. Once you’ve harvested your first batch of homegrown mushrooms, we’d love to hear about your experience! Share your photos, tips, and stories in the comments below. Let’s build a community of mushroom enthusiasts and spread the joy of this simple yet satisfying gardening technique. Happy growing! Let us know how your mushroom gardening goes!
Frequently Asked Questions (FAQ)
What kind of mushrooms are easiest to grow in bowls?
Oyster mushrooms are generally considered the easiest variety for beginners. They are fast-growing, relatively tolerant of different conditions, and readily available in spawn form. They also thrive on a variety of substrates, including coffee grounds, straw, and cardboard. Other good options for beginners include shiitake and wine cap mushrooms, although they may require slightly more attention and specific substrates.
What is the best substrate to use for mushroom gardening in bowls?
The best substrate depends on the type of mushroom you’re growing. Oyster mushrooms do well on coffee grounds, straw, cardboard, and even shredded paper. Shiitake mushrooms prefer hardwood sawdust or wood chips. Wine cap mushrooms thrive on wood chips and straw. Coffee grounds are a popular choice because they are readily available, provide essential nutrients, and help retain moisture. However, it’s important to ensure that the coffee grounds are pasteurized to kill any competing organisms.
How do I pasteurize my substrate?
Pasteurization is crucial to eliminate competing molds and bacteria that can hinder mushroom growth. For coffee grounds, you can pasteurize them by placing them in a heat-safe container and pouring boiling water over them. Let them sit for about an hour, then drain off the excess water. For straw or wood chips, you can soak them in hot water (around 160-180°F) for a similar amount of time. Make sure the substrate is cooled down before introducing the mushroom spawn.
How long does it take for mushrooms to grow in bowls?
The time it takes for mushrooms to grow depends on the variety, the substrate, and the environmental conditions. Oyster mushrooms typically start pinning (forming small mushroom buds) within 1-2 weeks after inoculation and can be harvested within a week or two after that. Shiitake mushrooms take longer, usually several weeks to months to start fruiting. Maintaining optimal humidity and temperature is crucial for faster growth.
How do I maintain the humidity in my mushroom bowl?
Maintaining adequate humidity is essential for mushroom growth. You can use a humidity dome, such as a plastic bag or a repurposed container, to trap moisture around the substrate. Mist the substrate regularly with water to keep it moist but not waterlogged. Avoid spraying the mushrooms directly, as this can cause them to rot. A humidity level of 80-90% is ideal for most mushroom varieties.
What temperature is best for mushroom growth?
The ideal temperature varies depending on the mushroom variety. Oyster mushrooms generally prefer temperatures between 60-75°F (15-24°C). Shiitake mushrooms prefer slightly cooler temperatures, around 50-65°F (10-18°C). Maintaining a consistent temperature within the optimal range will promote faster and more abundant fruiting.
How often should I water my mushroom bowl?
You should water your mushroom bowl regularly to keep the substrate moist but not waterlogged. The frequency of watering will depend on the humidity levels and the type of substrate you’re using. Check the moisture level of the substrate daily and mist it with water when it feels dry to the touch. Avoid overwatering, as this can lead to mold growth and rot.
How do I know when my mushrooms are ready to harvest?
Mushrooms are typically ready to harvest when the caps have fully expanded but before they start to release spores. Oyster mushrooms are ready when the edges of the caps start to flatten out or curl upwards. Shiitake mushrooms are ready when the caps have fully opened and the gills are visible. Harvest the mushrooms by gently twisting them off the substrate.
Can I reuse the substrate after harvesting mushrooms?
Yes, you can often get multiple flushes (harvests) from the same substrate. After harvesting the first flush, soak the substrate in water for a few hours to rehydrate it. Then, drain off the excess water and place the bowl back in its growing environment. You may get another flush of mushrooms within a few weeks. However, the subsequent flushes may be smaller than the first. Eventually, the substrate will become depleted of nutrients and will no longer produce mushrooms.
What if I see mold growing in my mushroom bowl?
If you see mold growing in your mushroom bowl, it’s important to address it promptly. Small amounts of mold can sometimes be tolerated, but large amounts can inhibit mushroom growth. You can try removing the moldy areas with a clean spoon or knife. You can also try spraying the affected areas with a diluted hydrogen peroxide solution. If the mold is widespread, it may be best to discard the substrate and start over with fresh materials. Ensure proper pasteurization and ventilation to prevent mold growth in the future.

Leave a Comment