
Mushroom Growing From Food Scraps: Imagine transforming your kitchen waste into a delicious and sustainable food source! It sounds like something out of a futuristic novel, doesn’t it? But trust me, it’s entirely possible, and I’m here to show you how. For centuries, humans have foraged for wild mushrooms, appreciating their unique flavors and nutritional benefits. Now, we can bring that magic into our own homes, reducing waste and enjoying fresh, homegrown mushrooms with minimal effort.
In this DIY guide, I’ll walk you through the surprisingly simple process of mushroom growing from food scraps. Forget complicated setups and expensive equipment! We’ll focus on using readily available materials and kitchen byproducts like coffee grounds and cardboard to cultivate these fascinating fungi.
Why is this DIY trick so important? Well, for starters, it’s a fantastic way to reduce your environmental footprint. Instead of tossing those coffee grounds into the trash, you’re giving them a second life as a nutrient-rich substrate for your mushrooms. Plus, who doesn’t love the idea of fresh, organic mushrooms right at their fingertips? Whether you’re a seasoned gardener or a complete beginner, this project is a fun, rewarding, and delicious way to connect with nature and embrace sustainable living. Let’s get started!
Growing Mushrooms From Food Scraps: A Beginner’s Guide
Hey there, fellow DIY enthusiasts! Ever thought about turning your kitchen scraps into a delicious and sustainable source of food? Well, get ready to dive into the fascinating world of mushroom cultivation! This guide will walk you through the process of growing mushrooms using readily available food scraps. It’s easier than you think, and the reward of harvesting your own homegrown mushrooms is incredibly satisfying.
What You’ll Need
Before we get started, let’s gather our supplies. Don’t worry, most of these are probably already in your kitchen or garden!
* Mushroom Spawn: This is essentially the “seed” of the mushroom. You can purchase mushroom spawn online or from a local gardening supply store. Oyster mushrooms are a great choice for beginners as they are relatively easy to grow and thrive on a variety of substrates.
* Food Scraps: This is where the magic happens! We’ll be using food scraps as the growing medium for our mushrooms. Ideal options include:
* Coffee grounds (used)
* Cardboard (shredded)
* Straw (chopped)
* Sawdust (untreated)
* Paper (shredded, unbleached)
* Vegetable scraps (chopped, avoid oily or strong-smelling scraps)
* Containers: You’ll need containers to house your mushroom growing medium. Plastic tubs, buckets, or even repurposed containers like ice cream tubs work well. Just make sure they are clean and have drainage holes.
* Spray Bottle: For misting the growing medium to maintain humidity.
* Gloves: To keep things sanitary and prevent contamination.
* Optional:
* Microwave-safe container (for pasteurizing the substrate)
* Thermometer (to monitor substrate temperature)
* Clear plastic bag or humidity tent (to maintain high humidity)
Preparing the Substrate
The substrate is the foundation upon which your mushrooms will grow. It’s crucial to prepare it properly to provide the right nutrients and environment for the mushroom spawn.
1. Gather Your Food Scraps: Collect a good amount of your chosen food scraps. Aim for a mix of materials to provide a diverse range of nutrients. For example, a combination of coffee grounds, shredded cardboard, and straw works well.
2. Chop and Shred: Chop larger vegetable scraps into smaller pieces. Shred cardboard and paper into small strips. This increases the surface area for the mushroom mycelium to colonize.
3. Pasteurize the Substrate (Important!): This step is crucial to kill off any competing molds or bacteria that could hinder mushroom growth. There are a few ways to pasteurize your substrate:
* Microwave Method: This is a quick and easy option for smaller batches. Place the substrate in a microwave-safe container and add enough water to moisten it thoroughly. Microwave on high for 2-3 minutes, or until the internal temperature reaches 160-180°F (71-82°C). Use a thermometer to check the temperature. Let it cool completely before moving on to the next step.
* Hot Water Soak: For larger batches, you can soak the substrate in hot water. Fill a large container with hot (not boiling) water and submerge the substrate. Let it soak for 1-2 hours. Drain the excess water thoroughly before using.
* Steam Pasteurization: This method involves steaming the substrate for a longer period. Place the substrate in a heat-resistant container and steam it for 1-2 hours. This is a more effective method for killing off contaminants.
4. Cool Down: After pasteurization, allow the substrate to cool down completely to room temperature. This is important because the heat can kill the mushroom spawn.
Inoculating the Substrate
Now comes the exciting part – introducing the mushroom spawn to the prepared substrate!
1. Clean Your Work Area: Before you begin, clean your work area thoroughly to minimize the risk of contamination. Wipe down surfaces with a disinfectant solution.
2. Wear Gloves: Put on your gloves to maintain a sterile environment.
3. Mix Spawn and Substrate: In a clean container, mix the mushroom spawn with the cooled substrate. Aim for a spawn rate of around 5-10% by weight. This means that for every 100 grams of substrate, you’ll use 5-10 grams of spawn. Mix thoroughly to ensure the spawn is evenly distributed throughout the substrate.
4. Pack the Mixture: Pack the inoculated substrate into your chosen containers. Make sure to pack it firmly but not too tightly. Leave some space at the top of the container for air circulation.
5. Create Drainage Holes: If your containers don’t already have drainage holes, create some at the bottom to prevent waterlogging.
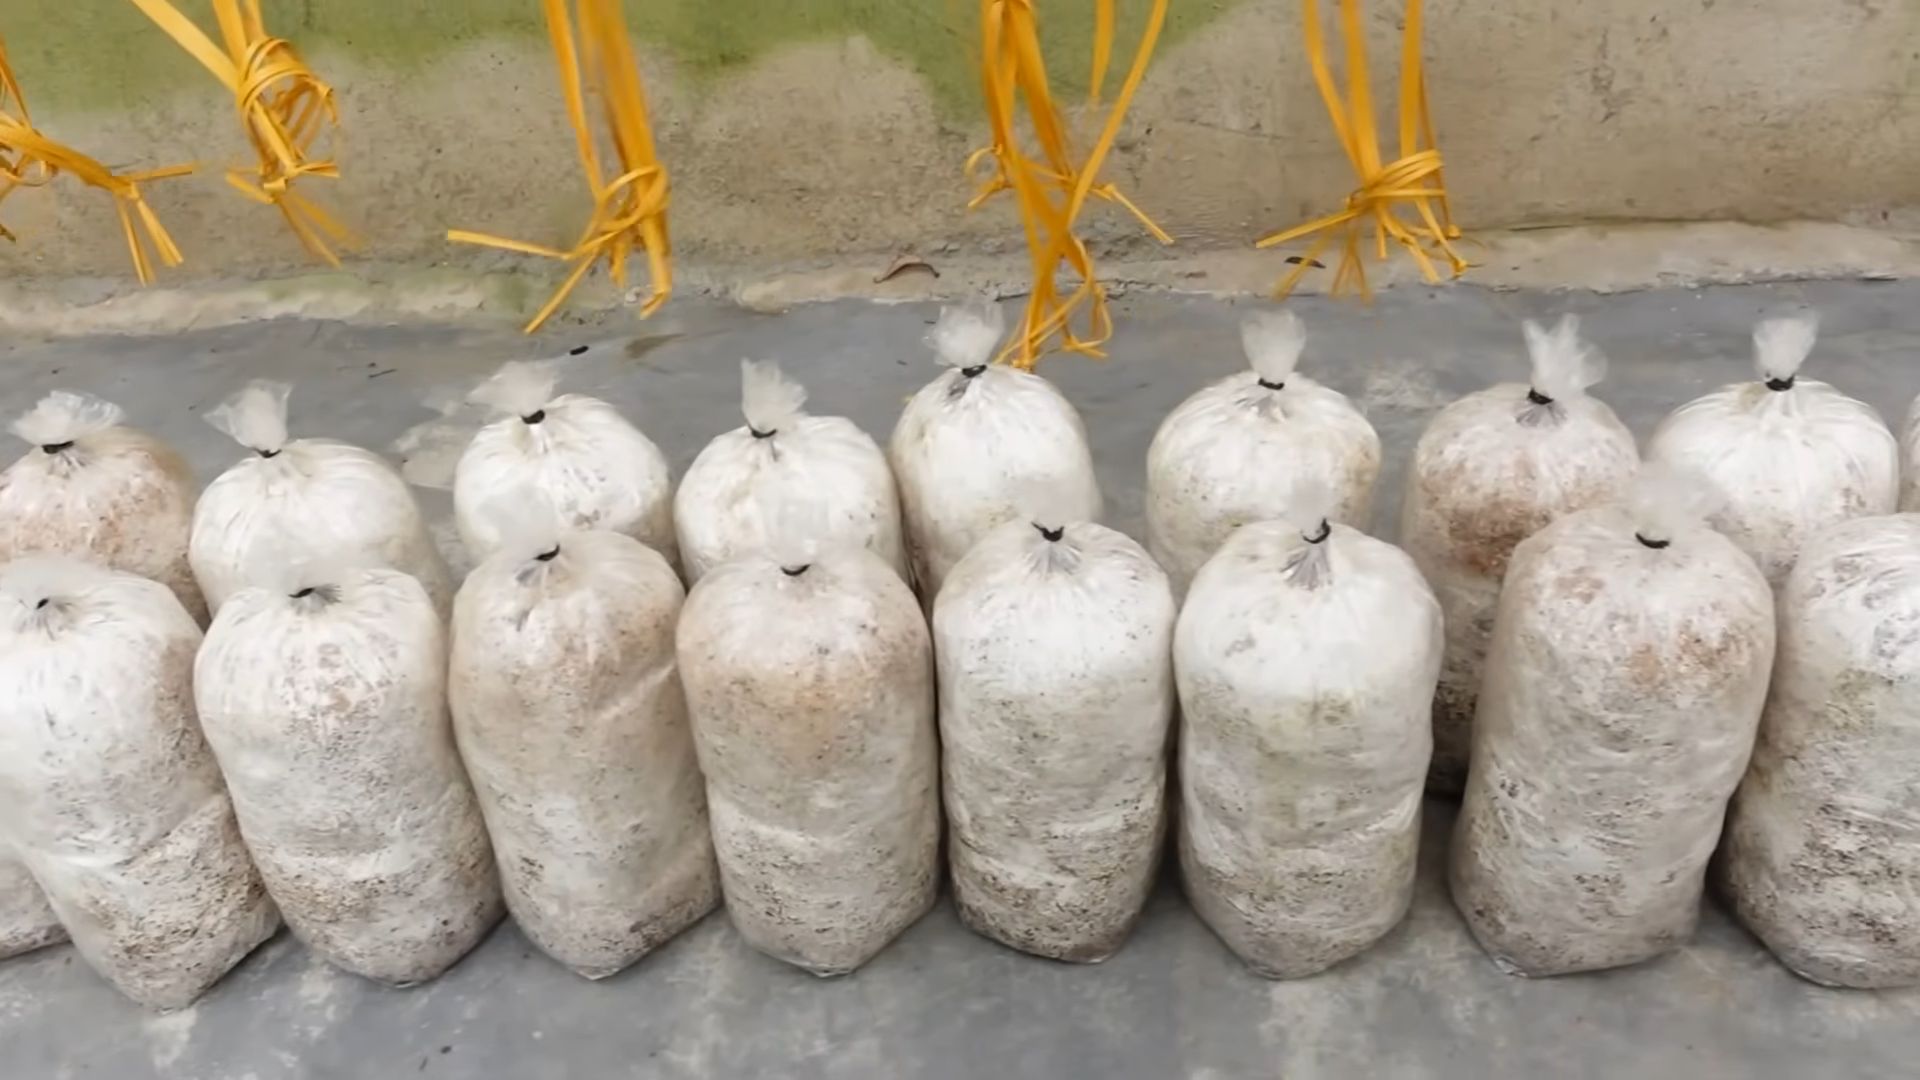
Incubation
This is the period where the mushroom mycelium (the vegetative part of the mushroom) colonizes the substrate.
1. Find a Suitable Location: Place the containers in a dark, humid, and well-ventilated location. A basement, closet, or garage are good options. The ideal temperature for incubation is around 65-75°F (18-24°C).
2. Maintain Humidity: Keep the substrate moist by misting it regularly with a spray bottle. You can also cover the containers with a clear plastic bag or create a humidity tent to help retain moisture. Make sure to leave some ventilation to prevent the buildup of mold.
3. Monitor Colonization: Check the containers regularly for signs of colonization. You should start to see white, thread-like mycelium spreading throughout the substrate. This process can take anywhere from 2-4 weeks, depending on the type of mushroom and the environmental conditions.
4. Be Patient: It’s important to be patient during this stage. Avoid disturbing the containers too much and allow the mycelium to fully colonize the substrate.
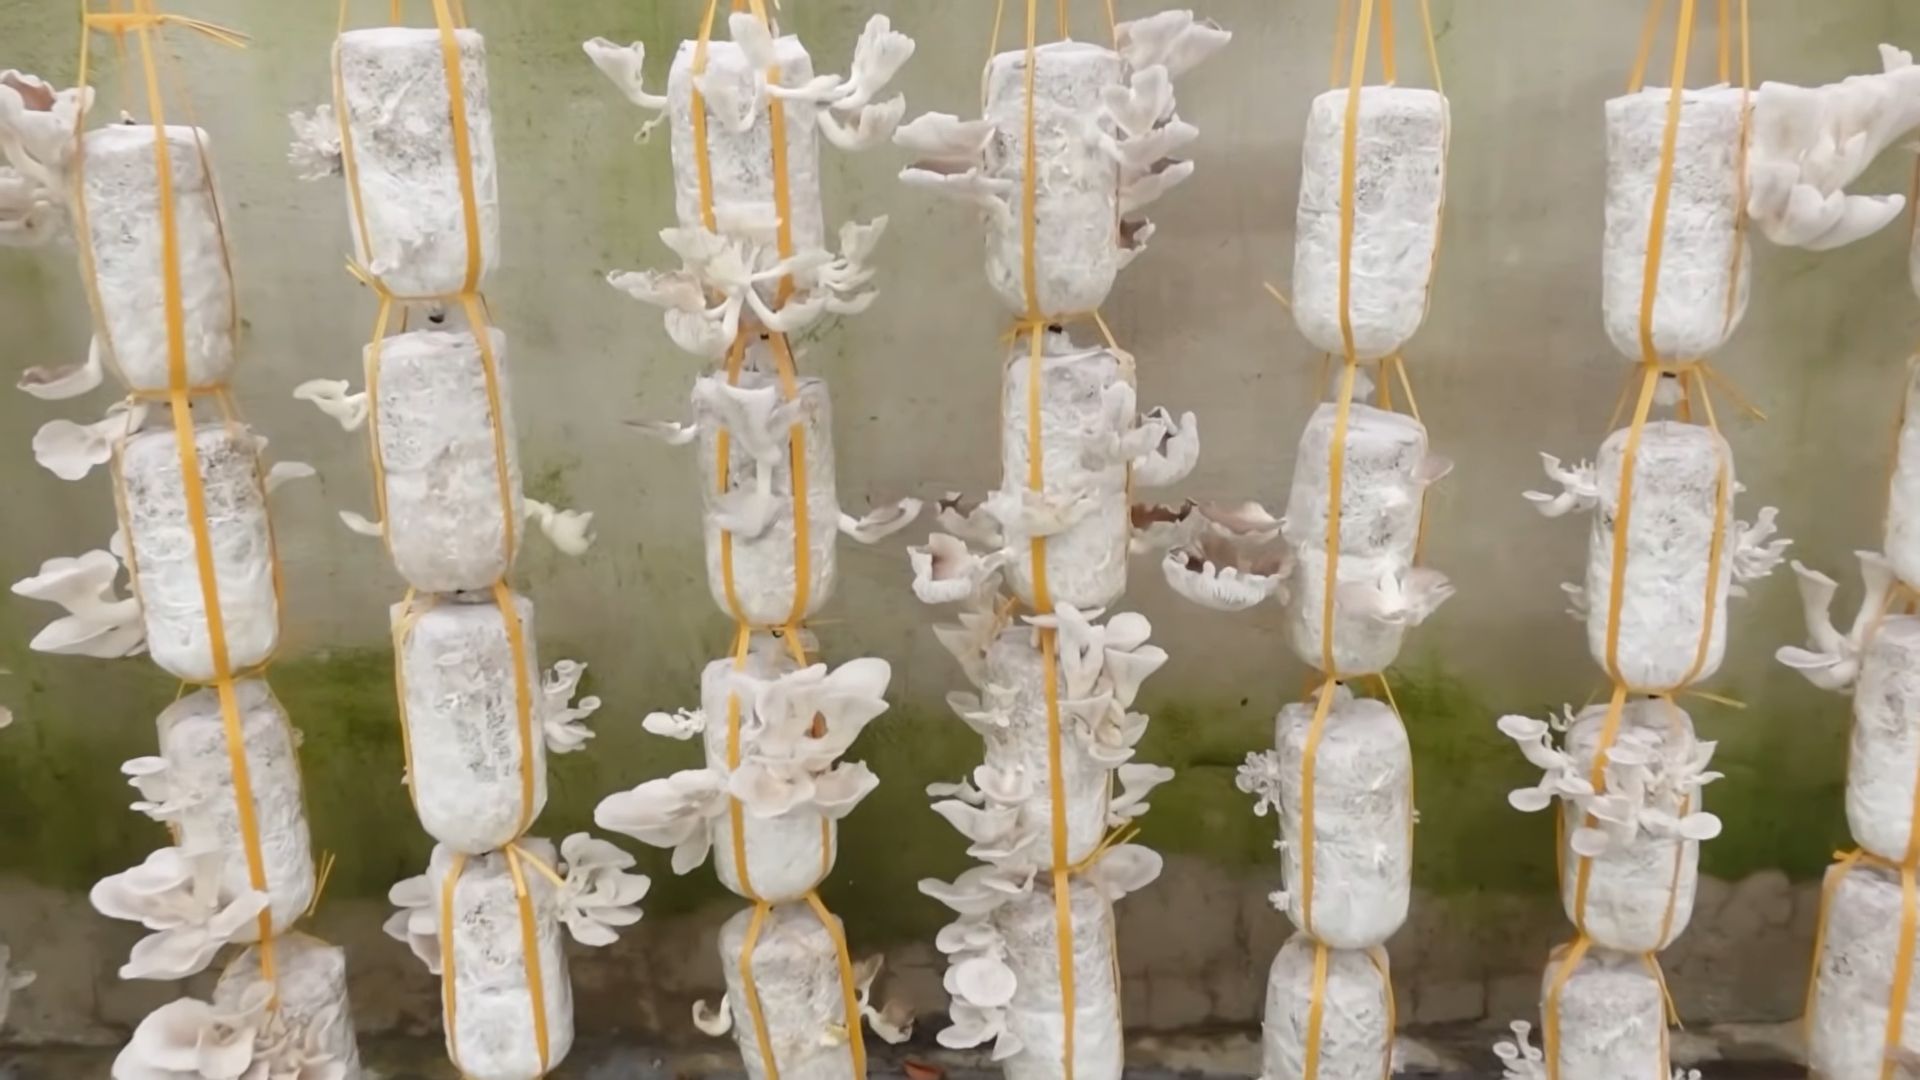
Fruiting
Once the substrate is fully colonized, it’s time to trigger fruiting, which is the process of the mushrooms forming.
1. Introduce Light: Move the containers to a location with indirect light. Mushrooms need light to trigger fruiting.
2. Increase Humidity: Increase the humidity even further by misting the containers more frequently. You can also use a humidifier to maintain a high humidity level.
3. Lower Temperature (Optional): Some mushroom species benefit from a slight drop in temperature to trigger fruiting. Try lowering the temperature by a few degrees.
4. Provide Fresh Air: Ensure adequate fresh air circulation to prevent the buildup of carbon dioxide. Open the plastic bag or humidity tent for a few hours each day.
5. Watch for Pinheads: After a few days, you should start to see small mushroom “pinheads” forming on the surface of the substrate. These are the beginnings of your mushrooms!
6. Maintain Conditions: Continue to maintain high humidity, indirect light, and fresh air circulation.
Harvesting
The moment you’ve been waiting for!
1. Harvest at the Right Time: Harvest the mushrooms when the caps are fully developed but before they start to release spores. The timing will vary depending on the type of mushroom. For oyster mushrooms, harvest when the caps are still slightly curled downwards.
2. Twist and Pull: To harvest, gently twist and pull the mushrooms from the substrate. Avoid cutting them, as this can leave behind a stump that can rot and contaminate the substrate.
3. Enjoy Your Harvest: Congratulations! You’ve successfully grown your own mushrooms from food scraps. Enjoy them in your favorite recipes.
Troubleshooting
Even with the best preparation, things can sometimes go wrong. Here are some common problems and how to address them:
* Mold Contamination: If you see green, black, or other colored molds growing on the substrate, it’s likely contaminated. Unfortunately, there’s not much you can do at this point except discard the contaminated substrate. To prevent contamination in the future, make sure to pasteurize the substrate thoroughly and maintain a clean work environment.
* Slow Colonization: If the mycelium is colonizing the substrate slowly, it could be due to low temperature, low humidity, or poor spawn quality. Try increasing the temperature and humidity, and make sure you’re using fresh, high-quality spawn.
* No Fruiting: If the substrate is fully colonized but no mushrooms are forming, it could be due to lack of light, low humidity, or lack of fresh air. Try moving the containers to a location with indirect light, increasing the humidity, and providing more fresh air circulation.
* Small Mushrooms: If the mushrooms are small and stunted, it could be due to lack of nutrients or poor environmental conditions. Try adding more nutrient-rich food scraps to the substrate and ensuring optimal temperature, humidity, and fresh air circulation.
Tips for Success
* Start Small: Begin with a small batch to get a feel for the process.
Conclusion
So, there you have it! Transforming your kitchen scraps into a thriving mushroom patch is not only surprisingly simple, but also incredibly rewarding. We’ve shown you how to harness the power of discarded coffee grounds, vegetable trimmings, and even cardboard to cultivate delicious and nutritious mushrooms right in your own home. Forget those expensive grocery store prices and embrace a sustainable, eco-friendly approach to enjoying fresh fungi.
This DIY mushroom growing method is a must-try for several compelling reasons. First and foremost, it’s an excellent way to reduce food waste. Instead of tossing those coffee grounds and vegetable scraps into the trash, you’re giving them a second life as a valuable resource. Secondly, it provides you with a constant supply of fresh, organic mushrooms, free from the pesticides and herbicides often used in commercial farming. Imagine the satisfaction of harvesting your own gourmet mushrooms for your next culinary creation! Finally, it’s a fascinating and educational project that connects you to the natural world and allows you to witness the magic of decomposition and growth firsthand.
But the fun doesn’t stop there! Feel free to experiment with different types of mushrooms. Oyster mushrooms are particularly well-suited to this method, but you can also try growing shiitake, wine cap, or even lion’s mane mushrooms, depending on the availability of spawn and your local climate. Consider adding other nutrient-rich materials to your substrate, such as spent grain from brewing or shredded paper. You can also adjust the humidity and temperature levels to optimize growth for specific mushroom varieties.
Don’t be afraid to get creative and personalize your mushroom growing setup! You can use different containers, such as buckets, tubs, or even repurposed plastic bags. Just make sure to provide adequate drainage and ventilation. You can also experiment with different layering techniques to create a more diverse and nutrient-rich substrate.
We understand that the idea of growing mushrooms from food scraps might seem a bit daunting at first, but trust us, it’s easier than you think. With a little patience and attention to detail, you’ll be harvesting your own delicious mushrooms in no time. The key is to maintain a clean and sterile environment, provide adequate moisture and ventilation, and be patient. Remember, mushrooms are living organisms, and they need time to grow and develop.
We are confident that you’ll find this DIY mushroom growing trick to be a fun, rewarding, and sustainable way to enjoy fresh, organic mushrooms. So, gather your supplies, follow our instructions, and get ready to embark on a fascinating journey into the world of fungi.
We encourage you to try this DIY mushroom growing trick and share your experiences with us! Let us know what types of mushrooms you’re growing, what challenges you’ve encountered, and what successes you’ve achieved. Share your photos and videos on social media using the hashtag #DIYMushroomGrowing. We can’t wait to see what you create!
FAQ
Frequently Asked Questions About Growing Mushrooms From Food Scraps
What types of mushrooms can I grow using this method?
Oyster mushrooms are generally considered the easiest and most reliable choice for beginners. They thrive on a variety of substrates, including coffee grounds, straw, and cardboard. Other options include shiitake, wine cap (also known as garden giant), and lion’s mane mushrooms, but these may require more specific substrates and environmental conditions. Research the specific needs of each mushroom variety before you begin. Consider starting with oyster mushrooms and then branching out to other varieties as you gain experience. The success of your mushroom growing endeavor often hinges on selecting the right mushroom for your environment and available resources.
What kind of coffee grounds should I use?
Used coffee grounds are ideal. Fresh coffee grounds are too acidic for mushroom growth. Make sure the coffee grounds are cool and have drained before using them. Avoid using coffee grounds that have been sitting for more than a few days, as they may become contaminated with mold. You can store used coffee grounds in the refrigerator for a short period to prevent mold growth. The key is to use coffee grounds that are moist but not waterlogged.
How do I prevent contamination?
Contamination is the biggest challenge in mushroom cultivation. To minimize the risk of contamination, sterilize your containers and tools before use. Pasteurize your substrate by heating it to 160-180°F (71-82°C) for an hour. This will kill off any competing organisms without harming the beneficial fungi. Maintain a clean workspace and avoid introducing any potential contaminants, such as soil or dust. Regularly inspect your mushroom growing setup for signs of mold or other contaminants. If you spot any contamination, remove the affected area immediately to prevent it from spreading.
How long does it take for mushrooms to grow?
The time it takes for mushrooms to grow depends on the variety of mushroom, the substrate used, and the environmental conditions. Oyster mushrooms typically start to fruit within 2-3 weeks, while other varieties may take longer. Maintain consistent moisture and temperature levels to encourage rapid growth. Be patient and don’t be discouraged if you don’t see results immediately. Mushroom growing is a process that requires time and attention.
How do I know when the mushrooms are ready to harvest?
Mushrooms are typically ready to harvest when the caps have fully opened and the gills are visible. The caps should be firm and slightly curved downwards. Avoid harvesting mushrooms that are overly mature or have started to decay. Gently twist or cut the mushrooms from the substrate, being careful not to damage the surrounding mycelium. Harvesting at the right time will ensure the best flavor and texture.
What if my mushrooms don’t grow?
If your mushrooms don’t grow, there could be several reasons. The most common causes are contamination, insufficient moisture, inadequate ventilation, or unsuitable temperature. Review your setup and make sure that you’re providing the optimal conditions for mushroom growth. Check for signs of contamination and address any issues immediately. Adjust the moisture and ventilation levels as needed. If you’re still having trouble, try using a different substrate or mushroom variety. Don’t give up! Mushroom growing can be challenging, but it’s also incredibly rewarding.
Can I use this method to grow mushrooms indoors?
Yes, this method is well-suited for indoor mushroom growing. You can grow mushrooms in a basement, closet, or even a spare room. Just make sure to provide adequate lighting, ventilation, and humidity. You may need to use a humidifier or spray bottle to maintain the proper humidity levels. A simple grow tent can also help to create a controlled environment for your mushrooms.
Is this method sustainable?
Yes, growing mushrooms from food scraps is a highly sustainable practice. It reduces food waste, conserves resources, and provides you with a healthy and delicious food source. By using recycled materials and organic methods, you can minimize your environmental impact and contribute to a more sustainable food system. This DIY mushroom growing trick is a great way to reduce your carbon footprint and embrace a more eco-friendly lifestyle.

Leave a Comment