
Onion Cultivation Methods: Unlock the secrets to a thriving garden and say goodbye to bland meals forever! Have you ever dreamt of strolling through your backyard, plucking plump, juicy onions straight from the earth? It’s more achievable than you think, and this DIY guide is your passport to onion-growing success.
For centuries, onions have been a culinary cornerstone, gracing dishes from humble stews to gourmet creations. Their cultivation dates back thousands of years, with evidence suggesting they were grown in ancient Egypt and beyond. Beyond their culinary uses, onions have also held cultural significance, believed to possess medicinal properties and even ward off evil spirits!
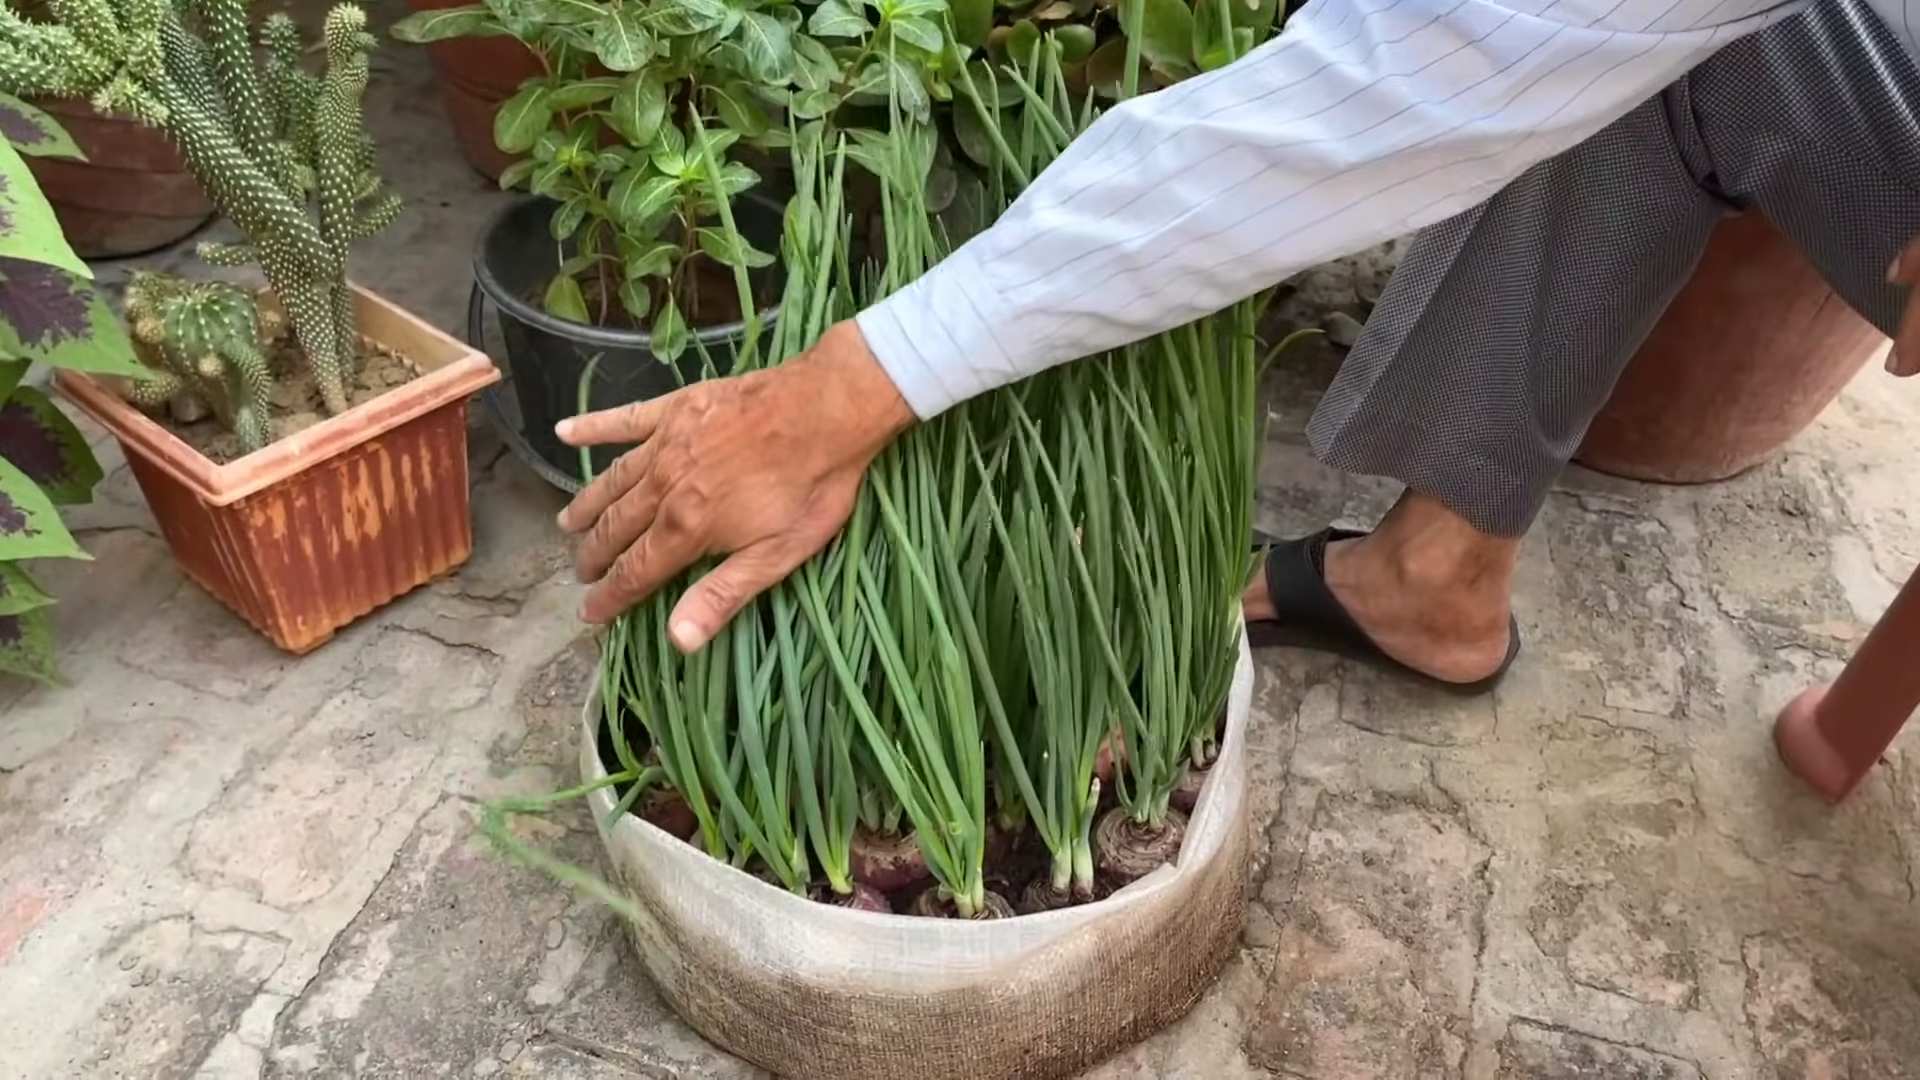
But let’s be honest, sometimes growing onions can feel like a mystery. Why do some bulbs stay stubbornly small? Why do others bolt before their time? That’s where these simple yet effective onion cultivation methods come in. I’m going to share my favorite DIY tricks and hacks that will help you maximize your yield, minimize common problems, and enjoy a bountiful harvest of delicious, homegrown onions. Whether you’re a seasoned gardener or just starting out, these tips will empower you to grow onions like a pro. So, grab your gardening gloves, and let’s get started!
DIY Home Theater Seating: Building Your Dream Cinema Experience
Okay, movie buffs, gather ’round! Are you tired of uncomfortable couches and stiff chairs ruining your home theater experience? I know I was! That’s why I decided to take matters into my own hands and build my own custom home theater seating. It’s a project that might seem daunting at first, but trust me, with a little patience and these detailed instructions, you can create a luxurious and personalized cinema right in your living room.
Planning and Design: Laying the Foundation for Comfort
Before you even think about picking up a saw, it’s crucial to plan your seating arrangement. This will save you time, money, and a whole lot of frustration down the road.
* **Measure Your Space:** This is the most important step! Accurately measure the dimensions of your home theater room. Consider the screen size, viewing distance, and the number of seats you want to accommodate. Don’t forget to factor in walkways and space for other furniture.
* **Determine Seating Configuration:** Decide on the type of seating arrangement you want. Do you prefer a straight row, a curved arrangement, or individual recliners? Think about how many people you typically watch movies with and how much space each person needs to be comfortable. I personally went with a curved row of three recliners for optimal viewing angles.
* **Choose Your Seating Style:** Are you aiming for a classic theater look with plush recliners, or something more modern and minimalist? Consider the overall aesthetic of your room and choose a style that complements it. Think about features like cup holders, headrests, and lumbar support.
* **Sketch a Design:** Once you have a good idea of the layout and style, sketch a rough design of your seating arrangement. This will help you visualize the final product and identify any potential problems. I used a simple online floor plan tool to create a 3D model of my room and experiment with different seating configurations.
* **Material Selection:** Choosing the right materials is key to creating comfortable and durable seating. Consider the following:
* **Wood:** For the frame, I recommend using sturdy hardwood like oak or maple. Plywood is a more affordable option, but make sure it’s at least ¾ inch thick.
* **Foam:** High-density foam is essential for comfortable seating. Look for foam with a density of at least 2.0 lbs/cubic foot.
* **Fabric:** Choose a durable and stain-resistant fabric that complements your room’s decor. Microfiber, leather, and velvet are popular choices.
* **Hardware:** You’ll need screws, nails, staples, and other hardware to assemble the frame and attach the fabric.
* **Budgeting:** Before you start buying materials, create a budget to avoid overspending. Research the cost of each item and factor in any potential unexpected expenses.
Building the Frame: The Backbone of Your Seating
Now for the fun part! Building the frame is the most time-consuming aspect of this project, but it’s also the most rewarding.
1. **Cut the Wood:** Using your design as a guide, cut the wood to the required dimensions. Be precise with your cuts to ensure a sturdy and square frame. I used a circular saw and a miter saw for this step. Remember to always wear safety glasses and ear protection when working with power tools.
2. **Assemble the Base:** Start by assembling the base of the seating. This will typically consist of four pieces of wood that form a rectangular or square frame. Use screws and wood glue to secure the pieces together. Make sure the corners are square.
3. **Add Vertical Supports:** Add vertical supports to the base to provide additional strength and stability. These supports should be evenly spaced and securely attached to the base. I added supports every 16 inches.
4. **Build the Backrest Frame:** Construct the frame for the backrest. This will typically be a separate frame that is attached to the base. The angle of the backrest will depend on your desired seating position. I opted for a slightly reclined backrest for maximum comfort.
5. **Attach the Backrest Frame to the Base:** Securely attach the backrest frame to the base using screws and wood glue. Make sure the backrest is properly aligned and stable.
6. **Add Armrests (Optional):** If you want to add armrests, build separate frames for them and attach them to the sides of the base. The height and width of the armrests will depend on your personal preference. I made mine wide enough to comfortably rest my arms and hold a drink.
7. **Reinforce the Frame:** Once the frame is assembled, reinforce it with additional screws and wood glue. This will ensure that the frame is strong and durable enough to withstand years of use.
Upholstering the Frame: Adding Comfort and Style
Upholstering the frame is what will transform it from a basic structure into comfortable and stylish seating.
1. **Attach the Foam:** Cut the foam to the required dimensions and attach it to the frame using spray adhesive. Start with the seat cushion, then move on to the backrest and armrests. Make sure the foam is evenly distributed and securely attached. I used a combination of high-density foam and memory foam for maximum comfort.
2. **Wrap with Batting:** Wrap the foam with batting to create a smooth and even surface for the fabric. This will also help to prevent the fabric from wrinkling or sagging. Secure the batting with staples.
3. **Cut the Fabric:** Cut the fabric to the required dimensions, leaving enough extra fabric to wrap around the edges of the frame. Be precise with your cuts to ensure a professional-looking finish.
4. **Attach the Fabric:** Start by attaching the fabric to the seat cushion, then move on to the backrest and armrests. Use a staple gun to secure the fabric to the frame. Pull the fabric taut as you staple to avoid wrinkles and sagging. I found it helpful to work in small sections and use clamps to hold the fabric in place while I stapled.
5. **Trim Excess Fabric:** Once the fabric is attached, trim any excess fabric around the edges of the frame. Use a sharp pair of scissors or a utility knife to make clean cuts.
6. **Add Finishing Touches:** Add any finishing touches, such as decorative trim, buttons, or piping. These details can add a touch of elegance and personalization to your seating. I added some decorative nailhead trim to the armrests for a classic look.
Adding Reclining Mechanisms (Optional): Elevating Your Comfort
If you want to take your home theater seating to the next level, consider adding reclining mechanisms. This will allow you to adjust the seating position for maximum comfort.
1. **Choose Reclining Mechanisms:** There are many different types of reclining mechanisms available, so choose one that is compatible with your seating design and budget. I opted for manual reclining mechanisms that are easy to install and operate.
2. **Install the Reclining Mechanisms:** Follow the manufacturer’s instructions to install the reclining mechanisms. This will typically involve attaching the mechanisms to the frame and connecting them to the seat cushion and backrest.
3. **Test the Reclining Mechanisms:** Once the reclining mechanisms are installed, test them to make sure they are working properly. Adjust the tension as needed to ensure smooth and effortless reclining.
Final Touches and Enjoying Your Creation
Congratulations! You’ve successfully built your own custom home theater seating. Now it’s time to add the final touches and enjoy your creation.
* **Add Cup Holders:** Install cup holders in the armrests to keep your drinks within easy reach.
* **Add Headrests:** Attach adjustable headrests to the backrests for added comfort.
* **Add Lumbar Support:** Consider adding lumbar support cushions to the backrests to provide extra support for your lower back.
* **Arrange the Seating:** Arrange the seating in your home theater room according to your design.
* **Test the Sound and Viewing Angles:** Test the sound and viewing angles from each seat to ensure optimal performance.
* **Enjoy Your Home Theater:** Sit back, relax, and enjoy your favorite movies in your new custom home theater seating!
This project took me a few weekends to complete, but the result was well worth the effort. I now have a comfortable and stylish home theater that I can enjoy with my family and friends. I hope this guide has inspired you to create your own dream cinema experience. Happy building!
Conclusion
So, there you have it! Mastering these onion cultivation methods isn’t just about saving money; it’s about connecting with your food source, understanding the growing process, and enjoying the unparalleled flavor of homegrown onions. From selecting the right variety for your climate to nurturing those tiny seedlings and finally harvesting your bounty, each step is a rewarding experience.
Why is this DIY approach a must-try? Because store-bought onions, while convenient, often lack the vibrant taste and freshness of those you’ve nurtured yourself. Plus, you have complete control over the growing process, ensuring no harmful pesticides or chemicals are used. You’re not just growing onions; you’re cultivating a healthier, more sustainable lifestyle.
But the journey doesn’t end here! Feel free to experiment with different onion varieties. Try growing red onions for their beautiful color and mild flavor, or shallots for their delicate sweetness. Consider companion planting – carrots and onions are excellent partners, as the carrots deter onion flies, and the onions repel carrot root flies. You could even explore different soil amendments to see how they impact your onion yield and flavor. Adding compost or well-rotted manure can significantly improve soil fertility and drainage, leading to healthier, more robust plants.
Don’t be afraid to get your hands dirty and embrace the learning process. Gardening is all about trial and error, and even if you encounter challenges along the way, you’ll gain valuable knowledge and experience. Remember to document your progress, noting which methods worked best for you and which ones you might tweak for future seasons.
We’re confident that once you taste the difference between a store-bought onion and one you’ve lovingly grown yourself, you’ll be hooked! The satisfaction of harvesting your own onions and using them in your favorite recipes is truly unmatched.
So, what are you waiting for? Grab your gardening gloves, prepare your soil, and embark on this exciting adventure of onion cultivation. We encourage you to try these methods and share your experiences with us. Let us know which techniques worked best for you, what challenges you faced, and any tips or tricks you discovered along the way. Your insights could help other aspiring gardeners achieve their own onion-growing success! Share your photos and stories on our social media channels using #HomegrownOnions and #DIYGardening. We can’t wait to see your amazing onion harvests!
Frequently Asked Questions (FAQ)
What is the best time of year to start growing onions?
The ideal time to start growing onions depends largely on your climate and the type of onion you’re growing. In general, onions are classified as either long-day or short-day varieties. Long-day onions require 14-16 hours of daylight to form bulbs and are best suited for northern regions with long summer days. Short-day onions, on the other hand, need only 10-12 hours of daylight and are ideal for southern regions with milder winters.
For long-day onions, start seeds indoors 8-10 weeks before the last expected frost. You can then transplant them outdoors once the soil has warmed up and the risk of frost has passed. For short-day onions, start seeds indoors in the fall or early winter and transplant them outdoors in late winter or early spring. If you live in a region with mild winters, you can even direct sow short-day onion seeds in the fall.
What type of soil is best for growing onions?
Onions thrive in well-drained, fertile soil that is rich in organic matter. The ideal soil pH for onions is between 6.0 and 7.0. Before planting, amend your soil with compost, well-rotted manure, or other organic materials to improve its fertility and drainage. Onions also require a good supply of nutrients, particularly nitrogen, phosphorus, and potassium. Consider adding a balanced fertilizer to your soil before planting or side-dressing your onions with fertilizer throughout the growing season.
Heavy clay soils can be challenging for growing onions, as they tend to retain too much moisture and can lead to bulb rot. If you have clay soil, amend it with plenty of organic matter to improve its drainage and aeration. You can also consider growing onions in raised beds or containers to provide better drainage.
How often should I water my onions?
Onions require consistent moisture throughout the growing season, especially during bulb formation. Water your onions deeply and regularly, especially during dry periods. Aim to keep the soil consistently moist but not waterlogged. Overwatering can lead to bulb rot, while underwatering can stunt growth and reduce yields.
The frequency of watering will depend on your climate, soil type, and the stage of growth of your onions. Check the soil moisture regularly and water when the top inch of soil feels dry to the touch. During hot, dry weather, you may need to water your onions daily.
What are some common pests and diseases that affect onions?
Onions are susceptible to a variety of pests and diseases, including onion maggots, thrips, onion flies, downy mildew, and bulb rot. To prevent pest and disease problems, practice good garden hygiene, such as removing weeds and debris from around your onion plants. Rotate your crops regularly to avoid the buildup of soilborne pathogens.
Onion maggots are small, white larvae that feed on the roots and bulbs of onions, causing them to wilt and die. To prevent onion maggots, cover your onion plants with row covers or use a biological insecticide containing beneficial nematodes. Thrips are tiny, slender insects that suck the sap from onion leaves, causing them to become silvery and distorted. Control thrips by spraying your onion plants with insecticidal soap or neem oil.
Downy mildew is a fungal disease that causes yellow spots on onion leaves. To prevent downy mildew, provide good air circulation around your onion plants and avoid overhead watering. Bulb rot is a fungal disease that causes onion bulbs to rot in the ground. To prevent bulb rot, plant onions in well-drained soil and avoid overwatering.
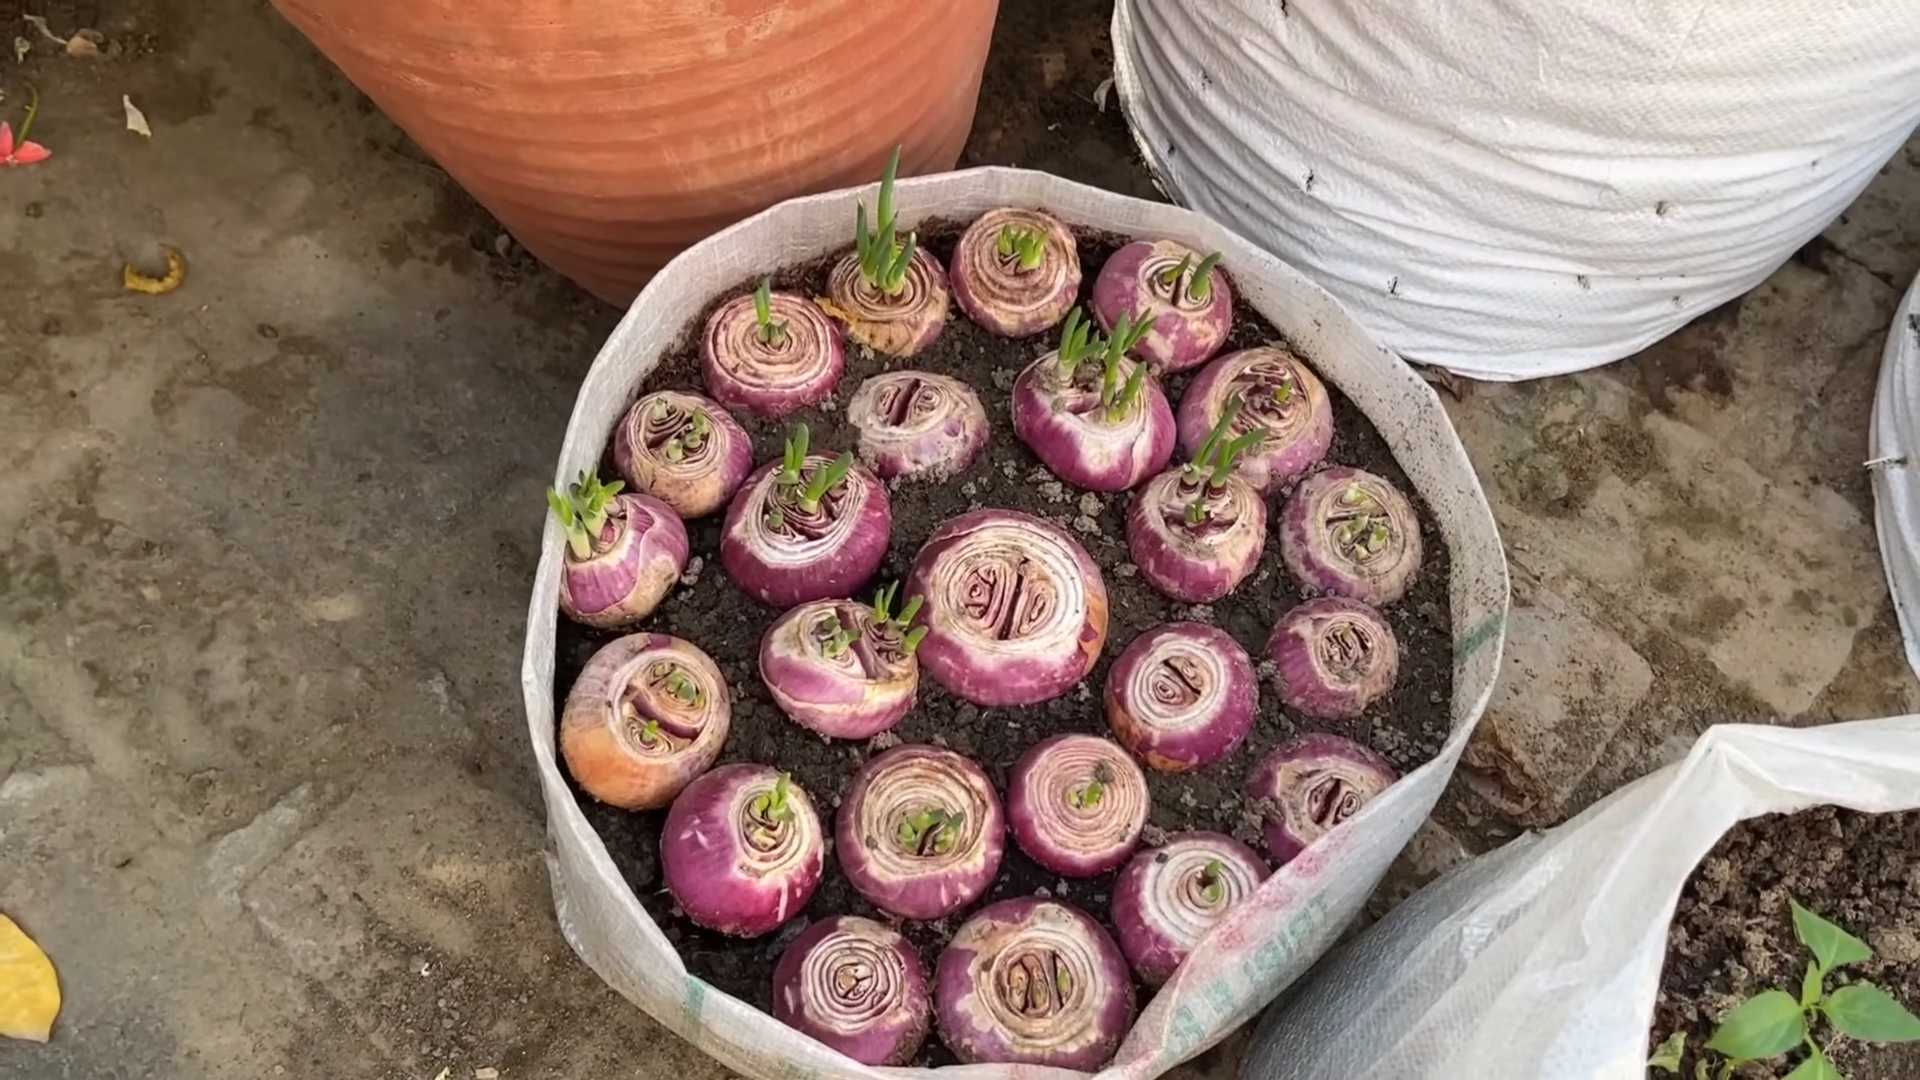
Can I grow onions in containers?
Yes, you can successfully grow onions in containers, especially if you have limited garden space or poor soil. Choose a container that is at least 8 inches deep and wide to accommodate the onion bulbs. Use a well-draining potting mix that is rich in organic matter.
When planting onions in containers, space them about 4 inches apart. Water your container-grown onions regularly and fertilize them every few weeks with a balanced fertilizer. Place your containers in a sunny location that receives at least 6 hours of sunlight per day.
How do I know when my onions are ready to harvest?
Onions are typically ready to harvest when the tops begin to fall over and turn yellow or brown. This usually occurs about 100-120 days after planting, depending on the variety and growing conditions. Once the tops have fallen over, stop watering your onions and allow them to dry out in the ground for a few days.
To harvest your onions, gently pull them from the soil. Brush off any excess dirt and allow them to cure in a warm, dry place for 1-2 weeks. Curing helps to dry out the outer layers of the onion bulbs, which improves their storage life. Once the onions are cured, store them in a cool, dry, and well-ventilated place.
What are some good companion plants for onions?
Companion planting can be a beneficial practice for growing onions, as certain plants can help to deter pests, attract beneficial insects, or improve soil health. Some good companion plants for onions include carrots, chamomile, marigolds, and rosemary.
Carrots are excellent companions for onions because they deter onion flies, while onions repel carrot root flies. Chamomile can help to improve the flavor of onions and attract beneficial insects. Marigolds are known to repel nematodes and other soil pests. Rosemary can help to deter onion flies and other pests.
Can I save onion seeds to plant next year?
Yes, you can save onion seeds to plant next year, but it requires a bit more effort than simply harvesting the bulbs. Onions are biennials, meaning they typically take two years to complete their life cycle and produce seeds. In the first year, they form bulbs, and in the second year, they flower and produce seeds.
To save onion seeds, select a few healthy, disease-free onion plants and allow them to overwinter in the ground. In the spring, they will send up flower stalks. Allow the flowers to dry on the plant and then harvest the seed heads. Dry the seed heads thoroughly and then thresh them to release the seeds. Store the seeds in a cool, dry place until you are ready to plant them. Keep in mind that onion seeds have a relatively short shelf life, so it’s best to use them within a year or two.

Leave a Comment