
Planting Pineapple Successfully might seem like an exotic dream reserved for tropical climates, but I’m here to tell you that with a few clever tricks and a little patience, you can cultivate your own spiky delight right at home! Forget those expensive grocery store pineapples – imagine the satisfaction of harvesting your own juicy, sun-ripened fruit.
The pineapple, a symbol of hospitality and welcome, has a rich history. Originating in South America, it was quickly embraced by explorers and traders, eventually becoming a status symbol in Europe. Pineapples were so prized that they were often rented out as table decorations for lavish parties! Now, you can bring a touch of that historical luxury into your own home.
Why bother with the effort, you ask? Well, beyond the sheer joy of growing your own food, planting pineapple successfully offers a sustainable and rewarding experience. Store-bought pineapples often travel long distances, impacting their flavor and freshness. Plus, knowing exactly where your food comes from and how it’s grown is incredibly empowering. In this article, I’ll share my tried-and-true DIY hacks to help you navigate the process, from selecting the perfect pineapple top to nurturing your plant for a bountiful harvest. Get ready to transform your kitchen scraps into a tropical treasure!
Grow Your Own Pineapple: A Step-by-Step Guide
Hey there, fellow plant enthusiasts! Ever dreamt of harvesting your own juicy pineapple right from your backyard? Well, dream no more! Growing a pineapple from the top of a store-bought fruit is surprisingly easy and incredibly rewarding. It takes patience, but the process is fascinating, and the eventual payoff is a delicious, homegrown pineapple. Let’s dive into how you can make this happen!
Choosing the Right Pineapple
Before we even get our hands dirty, selecting the right pineapple is crucial for success. Here’s what to look for:
* Freshness is Key: Pick a pineapple that looks healthy and vibrant. Avoid pineapples with brown or mushy spots on the crown (the leafy top).
* Firm Fruit: The pineapple itself should feel firm to the touch, not overly soft.
* Healthy Crown: The leaves of the crown should be green and perky, not wilted or brown. A little browning at the very tips is okay, but avoid crowns that are significantly damaged.
* Variety Matters (Sort Of): While any pineapple can technically be used, some varieties are more readily available and tend to root more easily. Smooth Cayenne is a common and reliable choice.
Preparing the Pineapple Top
This is where the magic begins! We’re going to separate the crown from the fruit and prepare it for rooting.
1. Twisting Method: This is my preferred method because it’s less likely to damage the base of the crown. Hold the pineapple firmly in one hand and the crown in the other. Twist the crown firmly until it separates from the fruit. You might need to use a bit of force, but be careful not to rip the leaves.
2. Cutting Method (If Twisting Fails): If the twisting method doesn’t work, use a sharp, clean knife to cut the crown off the pineapple. Make sure to leave about an inch of fruit attached to the crown.
3. Remove Excess Fruit: Whether you twisted or cut, carefully remove any remaining fruit from the base of the crown. This is important because the fruit will rot and can prevent rooting. You can use a knife to gently scrape away the fruit, being careful not to damage the root buds (those little brown bumps) at the base.
4. Peel Back Lower Leaves: Gently peel back the bottom few layers of leaves from the base of the crown. This will expose more of the root buds and encourage them to develop into roots. Don’t be afraid to remove a good amount of leaves – you want to see a decent amount of the stem.
5. Let it Dry: This is a crucial step! Allow the prepared crown to dry out for several days (3-7 days is ideal). This allows the cut end to callous over, preventing rot when you plant it. Place the crown in a dry, well-ventilated area, away from direct sunlight. I usually just leave mine on a paper towel on my kitchen counter.
Rooting Your Pineapple Top
Now that our pineapple top is prepped, it’s time to encourage those roots to grow! You have two main options here: water rooting and direct planting. I’ll explain both.
Water Rooting (My Preferred Method)
This method allows you to see the roots develop, which is super satisfying!
1. Choose a Container: Select a clear glass or jar that’s wide enough to hold the pineapple crown without the leaves touching the sides.
2. Add Water: Fill the container with fresh, clean water. Make sure the water level is high enough to submerge the base of the crown (where you removed the leaves) but not so high that it covers the remaining leaves.
3. Place the Crown: Carefully place the pineapple crown in the water, ensuring that only the base is submerged.
4. Find a Sunny Spot: Place the container in a bright, sunny location. A windowsill is perfect.
5. Change the Water Regularly: Change the water every 2-3 days to prevent algae growth and keep the water fresh.
6. Be Patient: Root development can take several weeks, so don’t get discouraged if you don’t see roots right away. Just keep changing the water and providing plenty of sunlight. You should start to see small roots emerging from the base of the crown within 2-4 weeks.
7. Wait for Root Growth: Allow the roots to grow to about 2-3 inches long before planting in soil. This will give the pineapple a good head start.
Direct Planting
This method skips the water rooting stage and plants the crown directly into soil.
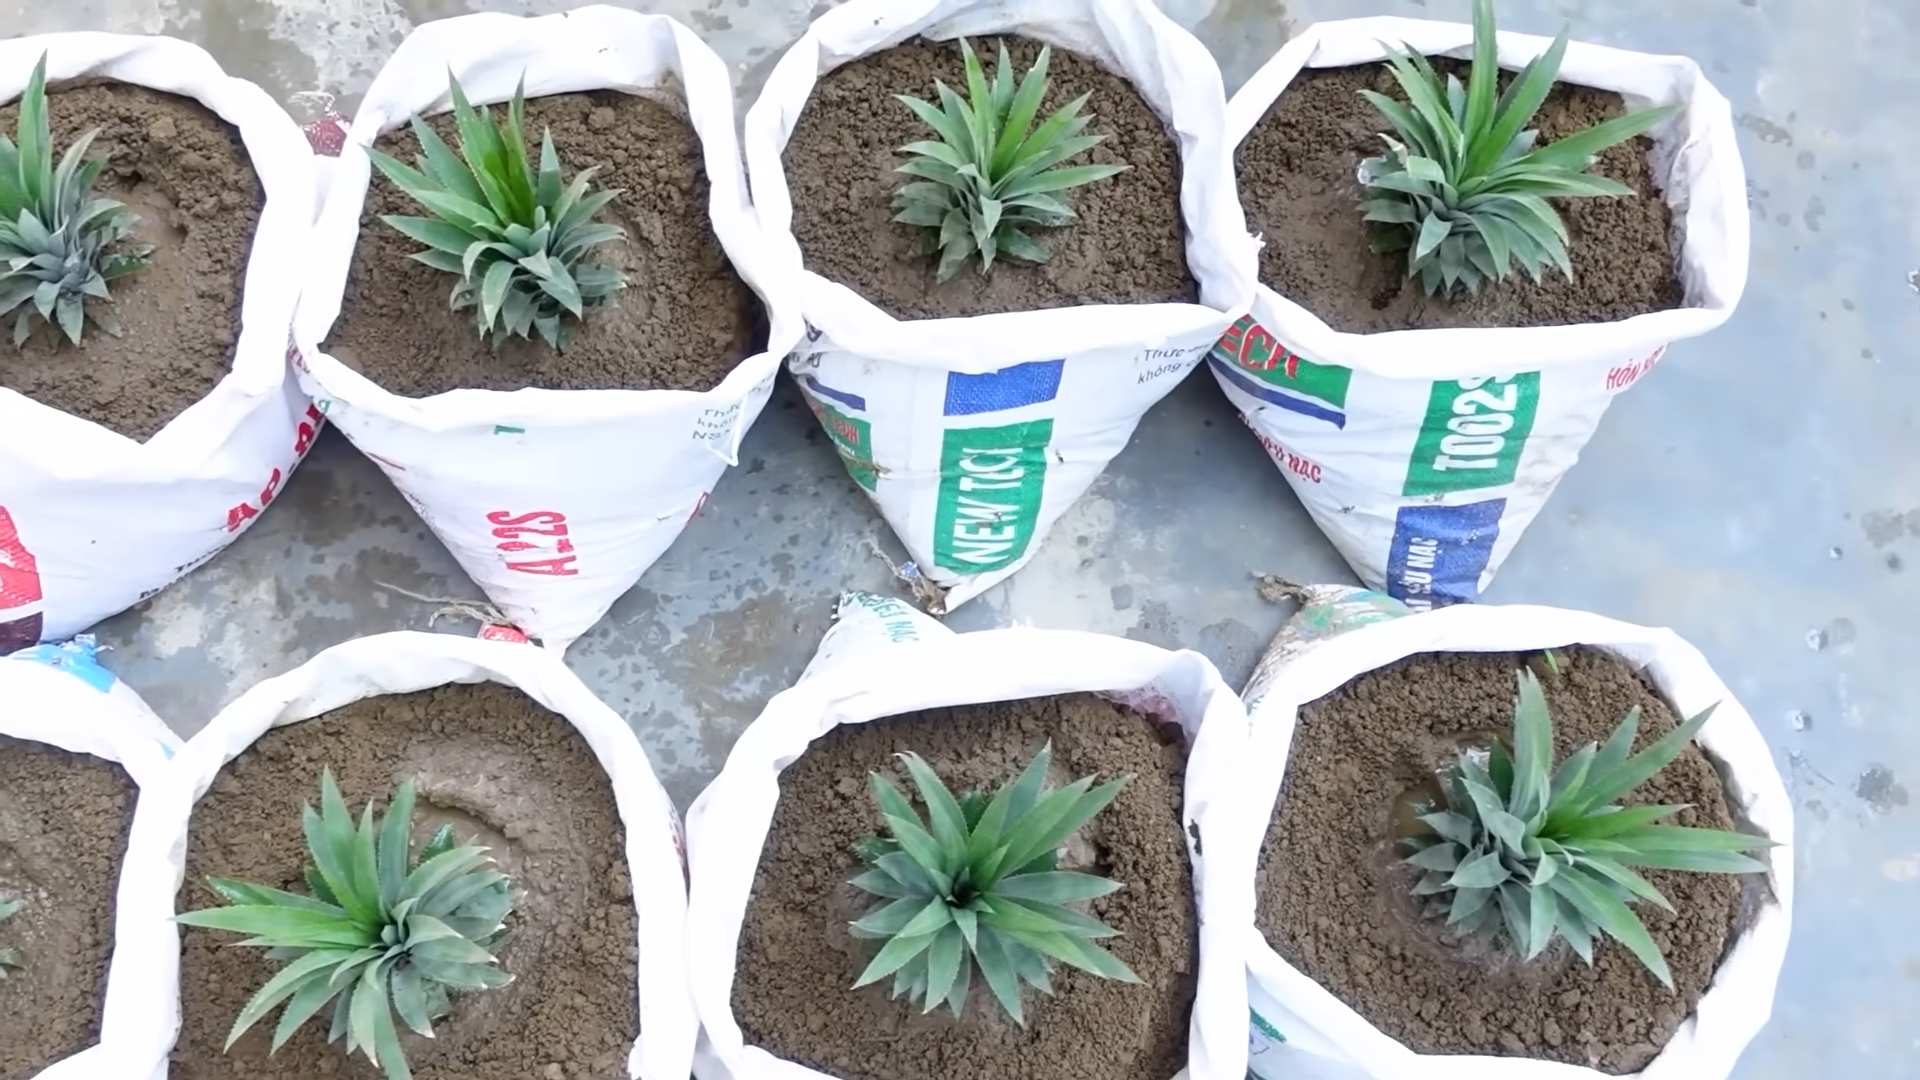
1. Prepare Your Pot: Choose a pot that’s at least 6 inches in diameter and has drainage holes.
2. Use Well-Draining Soil: Pineapples need well-draining soil to prevent root rot. A mix of potting soil, perlite, and sand works well. I usually use a cactus and succulent mix.
3. Plant the Crown: Make a hole in the center of the pot and plant the pineapple crown, burying the base (where you removed the leaves) in the soil. Make sure the leaves are above the soil line.
4. Water Thoroughly: Water the soil thoroughly after planting.
5. Find a Sunny Spot: Place the pot in a bright, sunny location.
6. Keep Soil Moist (But Not Soggy): Keep the soil consistently moist, but not soggy. Allow the top inch of soil to dry out between waterings.
Planting Your Rooted Pineapple Top
Once your pineapple top has developed roots (either in water or directly in soil), it’s time to plant it in a larger pot or in the ground (if you live in a warm climate).
1. Choose a Pot (If Needed): If you rooted your pineapple in water, choose a pot that’s at least 10-12 inches in diameter and has drainage holes. If you already planted it directly, you might need to repot it into a larger container as it grows.
2. Prepare Your Soil: Again, well-draining soil is key. Use a mix of potting soil, perlite, and sand, or a cactus and succulent mix.
3. Plant Carefully: Gently remove the pineapple from its current container (if applicable) and plant it in the new pot. Make sure the roots are spread out and covered with soil.
4. Water Thoroughly: Water the soil thoroughly after planting.
5. Mulch (Optional): Add a layer of mulch around the base of the plant to help retain moisture and suppress weeds.
6. Find a Sunny Spot: Pineapples need at least 6 hours of direct sunlight per day. Place your pot in a sunny location, such as a patio or balcony.
Caring for Your Pineapple Plant
Now that your pineapple is planted, it’s time to provide it with the care it needs to thrive.
* Watering: Water your pineapple plant regularly, allowing the top inch of soil to dry out between waterings. Avoid overwatering, as this can lead to root rot. During the winter months, you can reduce watering frequency.
* Fertilizing: Feed your pineapple plant with a balanced fertilizer every 2-3 months during the growing season (spring and summer). Follow the instructions on the fertilizer label. I like to use a liquid fertilizer diluted to half strength.
* Temperature: Pineapples thrive in warm temperatures (65-85°F). If you live in a colder climate, you’ll need to bring your pineapple plant indoors during the winter months.
* Sunlight: As mentioned before, pineapples need plenty of sunlight. Make sure your plant is getting at least 6 hours of direct sunlight per day.
* Pest Control: Keep an eye out for pests such as mealybugs and scale. If you notice any pests, treat them with insecticidal soap or neem oil.
* Patience is a Virtue: It can take anywhere from 1 to 3 years for a pineapple plant to produce fruit. Be patient and continue to provide it with the care it needs.
Encouraging Fruiting
Getting your pineapple plant to fruit can sometimes be a challenge, but there are a few things you can do to encourage it.
* Ethylene Gas: Pineapples are stimulated to fruit by ethylene gas. You can create ethylene gas by placing a ripe apple near the plant and covering both with a plastic bag for a few days. The apple will release ethylene gas, which can trigger flowering.
* Magnesium Sulfate (Epsom Salts): Some gardeners recommend applying magnesium sulfate (Epsom salts) to the soil to encourage flowering. Dissolve 1 tablespoon of Epsom salts in 1 gallon of water and water the plant with the solution.
* Consistent Care: The most important thing you can do to encourage fruiting is to provide your pineapple plant with consistent care. Make sure it’s getting enough sunlight, water, and fertilizer.
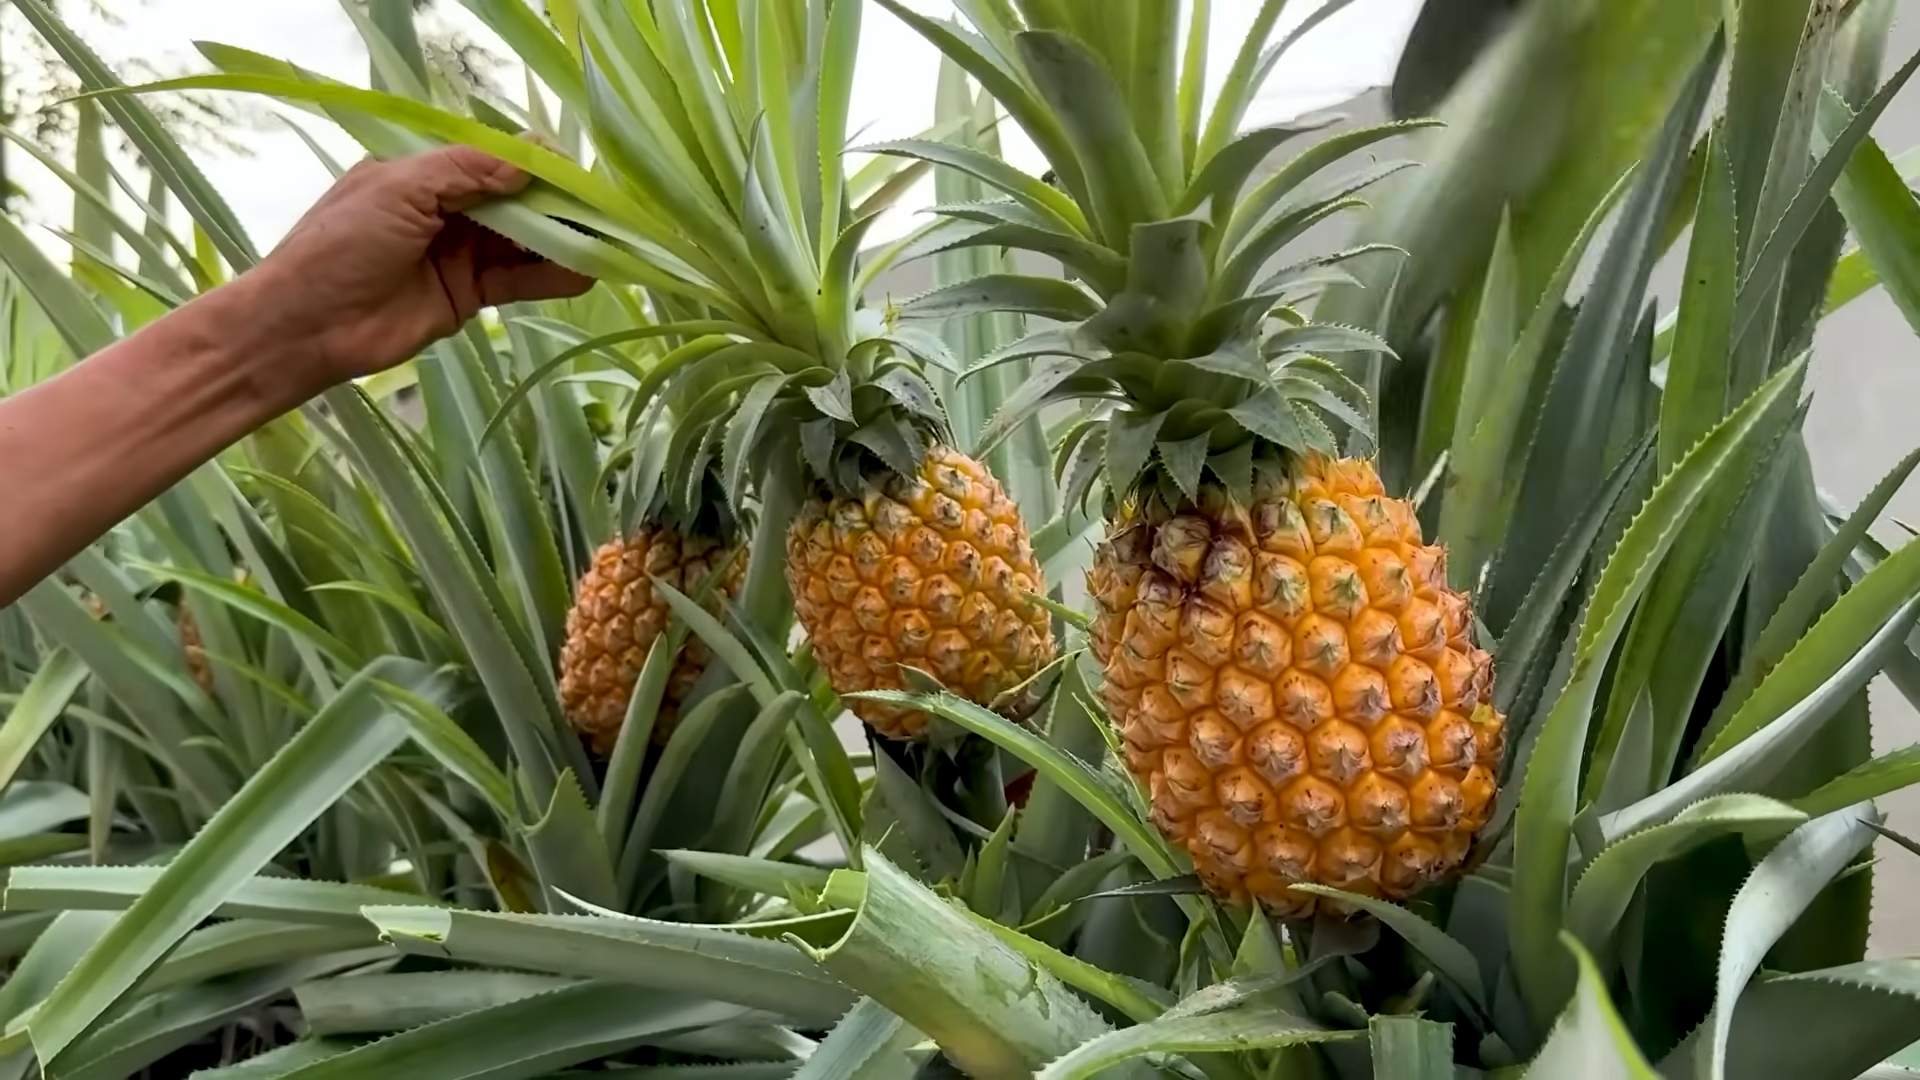
Harvesting Your Pineapple
After all your hard work and
Conclusion
So, there you have it! Planting pineapple successfully at home isn’t just a fun gardening project; it’s a rewarding experience that brings a touch of the tropics to your backyard or even your windowsill. We’ve walked through the simple steps, from selecting the perfect pineapple top to nurturing your new plant until it bears its own delicious fruit.
Why is this DIY trick a must-try? Because it’s sustainable, cost-effective, and incredibly satisfying. Instead of tossing that pineapple top into the compost, you’re giving it a new life, reducing waste, and growing your own food. Plus, imagine the bragging rights when you serve a pineapple you grew yourself! It’s a conversation starter, a testament to your green thumb (or budding green thumb!), and a delicious treat all rolled into one.
But the journey doesn’t end here. Feel free to experiment with different soil types. Some gardeners swear by a mix that’s heavier on the perlite for extra drainage, while others prefer a richer compost blend. You can also try growing your pineapple in a larger container to give the roots more room to spread. Consider the variety of pineapple you’re planting. Some varieties are better suited for container gardening than others. Explore different fertilizers, too. Organic options like compost tea can provide a gentle boost of nutrients without the risk of burning the roots.
And don’t be afraid to get creative with your presentation! Plant your pineapple in a decorative pot to add a touch of flair to your patio or balcony. Use companion planting techniques to deter pests and attract beneficial insects. The possibilities are endless!
Remember, patience is key. It takes time for a pineapple plant to mature and produce fruit, but the wait is well worth it. The sweet, juicy reward of a homegrown pineapple is unlike anything you can buy in the store.
We’re confident that with a little care and attention, you’ll be enjoying your own homegrown pineapples in no time. So, grab a pineapple, follow our guide, and embark on this exciting gardening adventure. We can’t wait to hear about your experiences! Share your photos, tips, and stories with us in the comments below. Let’s build a community of pineapple-growing enthusiasts and spread the joy of homegrown goodness. Happy planting!
Frequently Asked Questions (FAQs)
How long does it take for a pineapple plant to produce fruit?
This is one of the most common questions, and the answer is: patience is a virtue! Generally, it takes anywhere from 1 to 3 years for a pineapple plant to produce fruit. Several factors influence this timeframe, including the variety of pineapple, the climate, and the growing conditions. Warmer climates tend to speed up the process, while cooler climates may require a longer wait. Proper fertilization and adequate sunlight are also crucial for encouraging fruit production. Don’t be discouraged if it takes longer than expected; the wait will be worth it!
What kind of soil is best for planting pineapple?
Pineapples thrive in well-draining soil that is slightly acidic. A mixture of equal parts potting soil, perlite, and peat moss is a good starting point. The perlite ensures good drainage, which is essential for preventing root rot, a common problem with pineapples. The peat moss helps to retain moisture while also providing acidity. You can also amend your soil with compost to add nutrients and improve drainage. Avoid heavy clay soils, as they tend to retain too much water.
How much sunlight does a pineapple plant need?
Pineapples are sun-loving plants and require at least 6 hours of direct sunlight per day. If you’re growing your pineapple indoors, place it near a sunny window, preferably one that faces south or west. If you don’t have enough natural light, you can supplement with a grow light. Insufficient sunlight can lead to stunted growth and reduced fruit production.
How often should I water my pineapple plant?
Water your pineapple plant when the top inch of soil feels dry to the touch. Avoid overwatering, as this can lead to root rot. During the growing season (spring and summer), you may need to water more frequently than during the dormant season (fall and winter). When watering, water thoroughly until the water drains out of the bottom of the pot.
What kind of fertilizer should I use for my pineapple plant?
Pineapples benefit from regular fertilization, especially during the growing season. Use a balanced fertilizer with an NPK ratio of 10-10-10 or 14-14-14. You can also use a fertilizer specifically formulated for bromeliads, as pineapples are members of the bromeliad family. Fertilize every 2-3 months during the growing season. Avoid over-fertilizing, as this can burn the roots.
How do I know when my pineapple is ripe?
Determining when a pineapple is ripe can be tricky, but there are a few telltale signs. The pineapple should have a strong, sweet aroma. The color should change from green to yellow or golden-orange, depending on the variety. The eyes (the individual segments of the pineapple) should be relatively flat and slightly bulging. You can also try gently pulling on one of the leaves; if it comes out easily, the pineapple is likely ripe.
Can I grow a pineapple indoors?
Yes, you can absolutely grow a pineapple indoors, especially if you live in a climate with cold winters. Choose a pot that is at least 12 inches in diameter and ensure that it has good drainage. Place the pot near a sunny window or supplement with a grow light. Water regularly and fertilize as needed. Keep in mind that indoor-grown pineapples may take longer to fruit than those grown outdoors.
What are some common pests and diseases that affect pineapple plants?
Pineapples are relatively pest-resistant, but they can be susceptible to certain pests and diseases. Mealybugs, scale, and spider mites are common pests that can infest pineapple plants. These pests can be controlled with insecticidal soap or neem oil. Root rot is a common disease that can occur if the soil is not well-draining. Prevent root rot by ensuring that your pineapple plant is planted in well-draining soil and that you avoid overwatering.
Can I propagate pineapple from slips or suckers?
Yes, in addition to planting the top of the pineapple, you can also propagate from slips (small plantlets that grow from the base of the fruit) or suckers (small plantlets that grow from the base of the plant). Allow the slips or suckers to dry for a few days before planting them in well-draining soil. Keep the soil moist but not soggy until the roots develop.
My pineapple plant is flowering, what should I do?
Congratulations! This is a sign that your pineapple plant is maturing and getting ready to produce fruit. Continue to care for your plant as usual, ensuring that it receives adequate sunlight, water, and fertilizer. Avoid disturbing the plant during this critical stage. Be patient, and soon you’ll be enjoying your own homegrown pineapple!

Leave a Comment