
Planting radishes might seem intimidating if you’re new to gardening, but trust me, it’s one of the most rewarding and quickest wins you can experience! Imagine harvesting vibrant, peppery radishes just weeks after sowing the seeds – that’s the magic we’re about to unlock together. For centuries, radishes have been a staple in gardens worldwide, from ancient Egypt where they were a common food, to modern-day kitchen gardens. Their ease of cultivation and zesty flavor have made them a beloved crop across cultures.
But why should you bother planting radishes? Well, besides the sheer joy of growing your own food, radishes are incredibly versatile in the kitchen. They add a delightful crunch and spice to salads, can be pickled for a tangy treat, or even roasted for a surprisingly sweet flavor. Plus, they’re packed with nutrients!
This beginner’s guide is designed to take you from radish novice to radish pro in no time. We’ll cover everything from choosing the right variety and preparing your soil to troubleshooting common problems and harvesting your bounty. Get ready to experience the satisfaction of growing your own delicious, homegrown radishes!
Planting Radishes: A Beginner’s Guide to Crunchy Success!
Hey there, fellow gardening enthusiasts! Radishes are seriously one of the most rewarding veggies to grow, especially if you’re just starting out. They’re quick, they’re easy, and they add a delightful peppery kick to salads and snacks. I’m going to walk you through everything you need to know to get a bumper crop of radishes in your own backyard (or even in a container!).
Choosing Your Radish Variety
First things first, let’s talk about radish varieties. There are tons to choose from, and each one has its own unique flavor and growing time. Here are a few of my favorites:
* **Cherry Belle:** These are the classic red, round radishes you probably picture when you think of radishes. They’re super quick to mature (around 22 days!) and have a mild flavor.
* **French Breakfast:** These are elongated, red radishes with a white tip. They have a slightly milder flavor than Cherry Belle and mature in about 25 days.
* **Easter Egg:** This is a mix of radishes that come in a variety of colors – red, pink, purple, and white! It’s a fun option if you want a colorful harvest. They mature in about 28 days.
* **Black Spanish:** If you’re feeling adventurous, try Black Spanish radishes. They have a black skin and a pungent, spicy flavor. They take a bit longer to mature (around 55 days) and are best grown in the fall.
* **Watermelon Radish:** These are larger, round radishes with a green and white exterior and a bright pink interior, resembling a watermelon. They have a mild, slightly sweet flavor and mature in about 60 days.
Consider your climate and the time of year when choosing your radish variety. Some varieties are better suited for warmer weather, while others can tolerate cooler temperatures.
Preparing Your Planting Area
Radishes are pretty adaptable, but they do best in well-drained soil that’s rich in organic matter. Here’s how I prepare my planting area:
* **Choose a sunny spot:** Radishes need at least 6 hours of sunlight per day.
* **Loosen the soil:** Use a garden fork or tiller to loosen the soil to a depth of at least 6 inches. This will help the radish roots grow easily.
* **Amend the soil:** Mix in some compost or well-rotted manure to improve the soil’s fertility and drainage. I usually add a couple of inches of compost to my radish beds.
* **Remove rocks and debris:** Radish roots can be deformed if they encounter rocks or other obstacles in the soil.
Planting Your Radish Seeds
Now for the fun part – planting! Radishes are direct-sown, which means you plant the seeds directly into the ground.
1. **Create shallow furrows:** Use your finger or a garden tool to create furrows about ½ inch deep and 1 inch apart.
2. **Sow the seeds:** Sprinkle the radish seeds evenly into the furrows, spacing them about ½ inch apart. Don’t overcrowd them!
3. **Cover the seeds:** Gently cover the seeds with soil and pat it down lightly.
4. **Water thoroughly:** Water the planting area gently but thoroughly. You want to make sure the soil is moist but not soggy.
Succession planting is key for a continuous harvest. Plant a new batch of radishes every 1-2 weeks to ensure you have a steady supply throughout the growing season.
Caring for Your Radishes
Radishes are relatively low-maintenance, but there are a few things you can do to help them thrive:
* **Water regularly:** Keep the soil consistently moist, especially during hot, dry weather. Radishes need about 1 inch of water per week.
* **Thin seedlings:** Once the seedlings emerge, thin them to about 1 inch apart. This will give the radishes enough room to grow. You can eat the thinnings as microgreens!
* **Weed regularly:** Keep the planting area free of weeds, which can compete with the radishes for nutrients and water.
* **Fertilize (optional):** If your soil is poor, you can fertilize your radishes with a balanced fertilizer. Follow the instructions on the fertilizer package. I usually don’t fertilize mine, as the compost I added at planting time is usually enough.
Dealing with Pests and Diseases
Radishes are generally pest-resistant, but there are a few pests and diseases that can sometimes cause problems:
* **Flea beetles:** These tiny beetles can chew small holes in the radish leaves. Cover your plants with row covers to prevent flea beetles from reaching them. You can also use insecticidal soap if necessary.
* **Root maggots:** These are small, white larvae that feed on the radish roots. Rotate your crops to prevent root maggots from building up in the soil. You can also use beneficial nematodes to control them.
* **Downy mildew:** This fungal disease can cause yellow spots on the radish leaves. Improve air circulation by thinning the plants and avoid overhead watering. You can also use a fungicide if necessary.
Regularly inspect your radish plants for signs of pests or diseases. The sooner you catch a problem, the easier it will be to control.
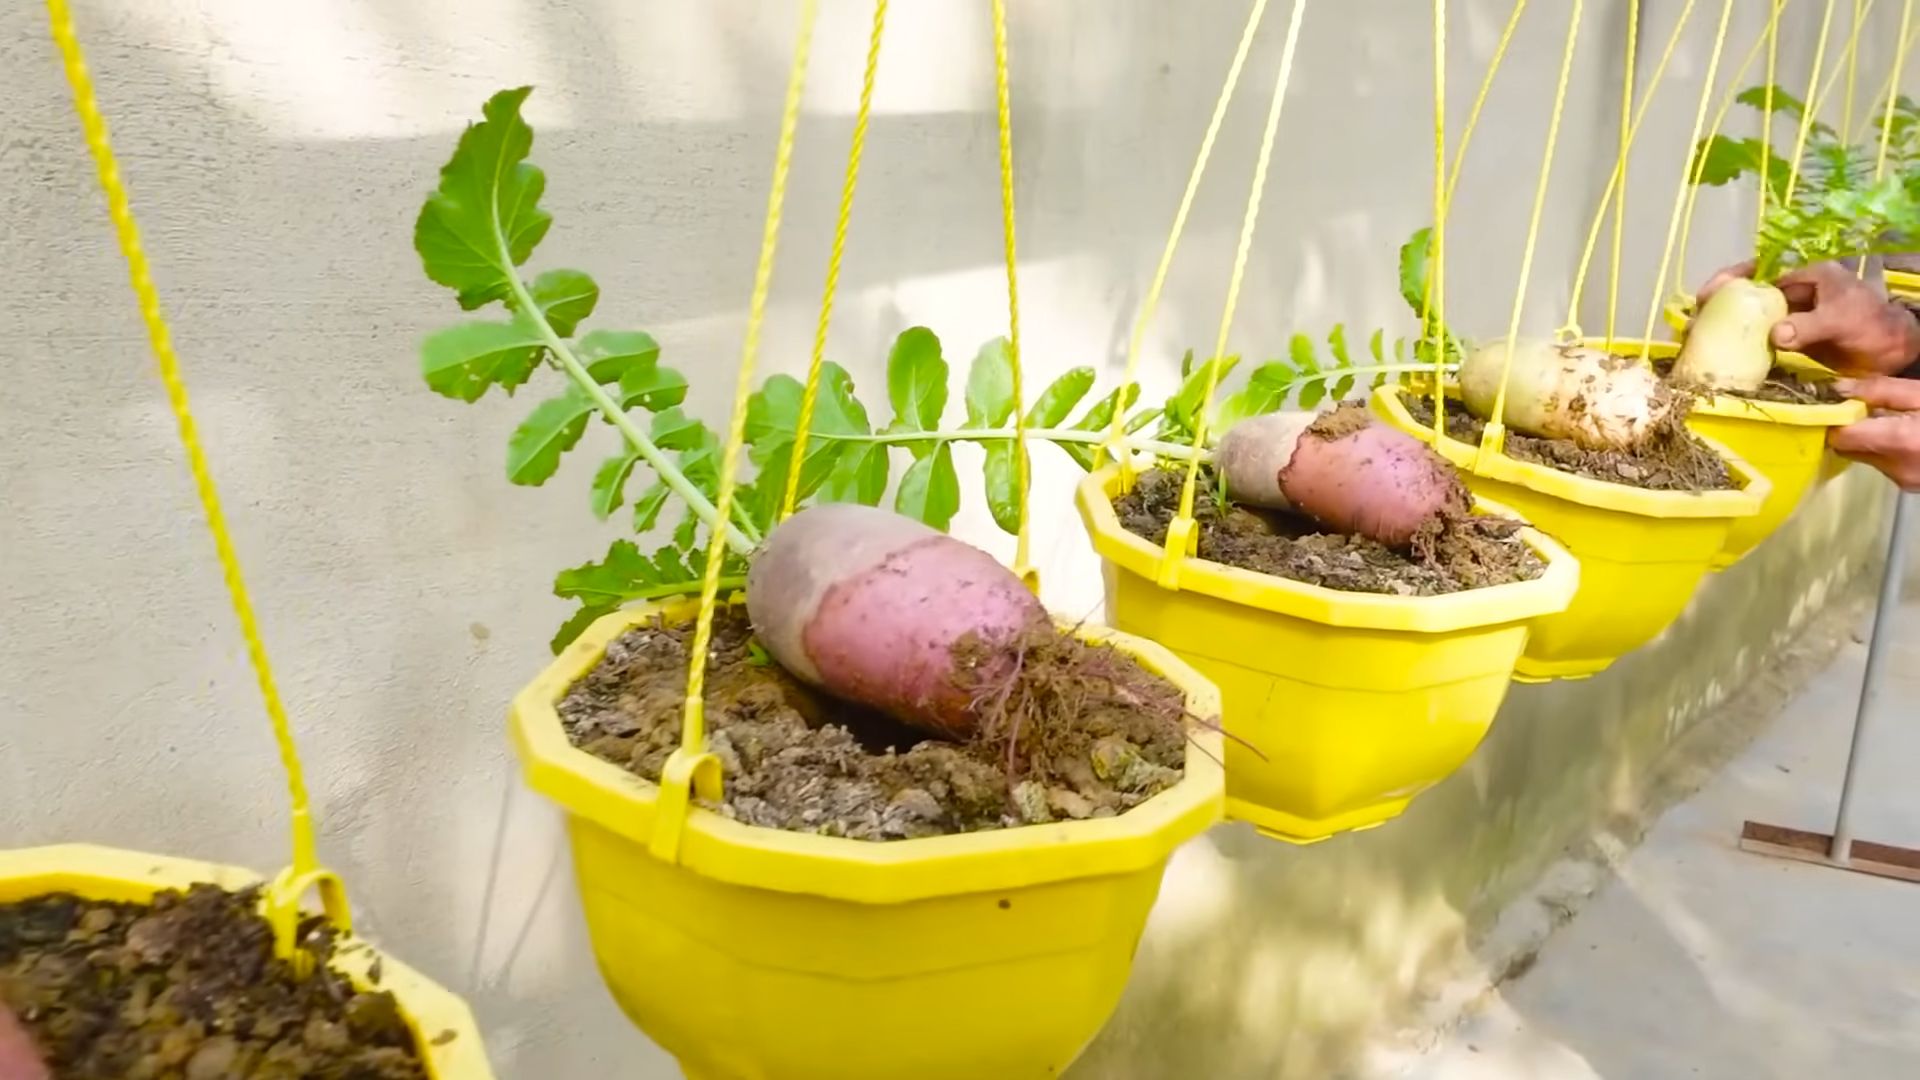
Harvesting Your Radishes
The best part! Radishes are ready to harvest when they reach the size specified for their variety. This is usually about 3-4 weeks after planting.
1. **Check for size:** Gently brush away the soil around the base of the radish to check its size.
2. **Pull them up:** Grasp the radish leaves near the base and gently pull the radish out of the ground.
3. **Wash and store:** Wash the radishes thoroughly and store them in the refrigerator in a plastic bag or container. They will keep for about a week.
Don’t let your radishes get too big, or they will become woody and bitter. Harvest them as soon as they are ready.
Troubleshooting Common Radish Problems
Even with the best planning, sometimes things don’t go exactly as expected. Here are a few common radish problems and how to fix them:
* **Radishes are too spicy:** This can be caused by hot weather or dry soil. Make sure to water your radishes regularly and harvest them before they get too big.
* **Radishes are small and stunted:** This can be caused by poor soil, overcrowding, or lack of sunlight. Amend your soil with compost, thin the plants to the proper spacing, and make sure they are getting enough sunlight.
* **Radishes are cracked:** This can be caused by inconsistent watering. Water your radishes regularly and evenly.
* **Radishes are woody:** This can be caused by letting them get too big. Harvest them as soon as they are ready.
Radish Recipes and Uses
Now that you’ve harvested your radishes, it’s time to enjoy them! Here are a few of my favorite ways to use radishes:
* **Salads:** Radishes add a peppery crunch to salads. Slice them thinly or grate them.
* **Snacks:** Eat radishes raw with a sprinkle of salt or dip them in hummus or ranch dressing.
* **Sandwiches:** Add sliced radishes to sandwiches for a bit of zing.
* **Roasted radishes:** Roasting radishes mellows their flavor and makes them slightly sweet. Toss them with olive oil, salt, and pepper and roast them at 400°F for 20-25 minutes.
* **Radish greens:** Don’t throw away the radish greens! They are edible and nutritious. Sauté them with garlic and olive oil or add them to soups and stews.
* **Radish butter:** Blend radishes with softened butter, salt, and pepper for a delicious spread for bread or crackers.
* **Pickled radishes:** Pickled radishes are a tangy and crunchy condiment that can be added to tacos, sandwiches, or salads.
Get creative and experiment with different ways to use radishes in your cooking! They are a versatile and delicious vegetable that can be enjoyed in many different ways.
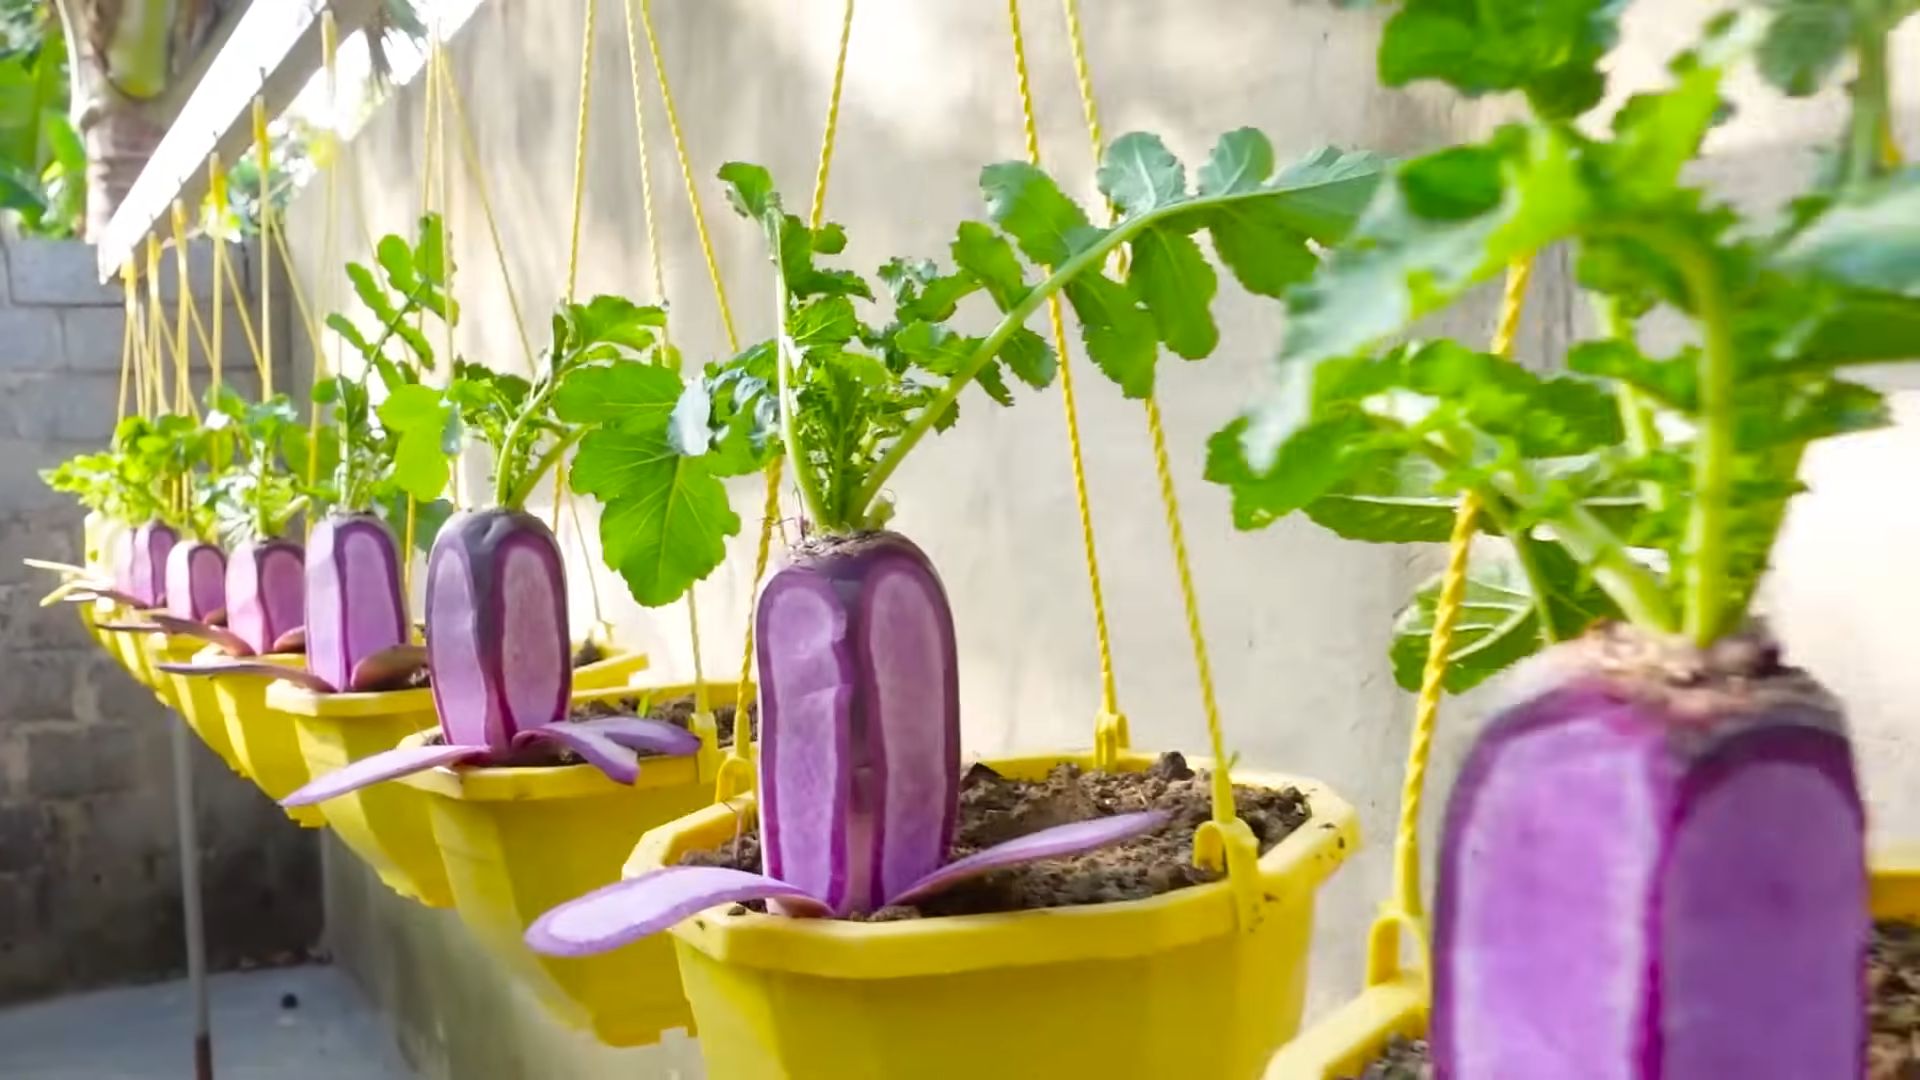
Growing Radishes in Containers
Don’t have a garden? No problem! You can easily grow radishes in containers.
* **Choose a container:** Select a container that is at least 6 inches deep and has drainage holes.
* **Use a good potting mix:** Fill the container with a high-quality potting mix.
* **Plant the seeds:** Sow the radish seeds as described above, spacing them about 1 inch apart.
* **Water regularly:** Keep the potting mix consistently moist.
* **Place in a sunny location:** Place the container in a sunny location that gets at least 6 hours of sunlight per day.
* **Harvest:** Harvest the radishes when they are ready, just like you would if you were growing them in the ground.
Growing radishes in containers is a great way to enjoy fresh radishes even if you don’t have a lot of space.
Extending Your Rad
Conclusion
So, there you have it! Mastering the art of planting radishes is surprisingly simple, and the rewards are incredibly satisfying. From seed to table in just a few weeks, these peppery little gems offer a burst of flavor and a satisfying crunch that store-bought radishes often lack. This isn’t just about growing vegetables; it’s about connecting with the earth, understanding the growing process, and enjoying the fruits (or rather, roots!) of your labor.
Why is this DIY radish-growing trick a must-try? Because it’s fast, it’s easy, and it’s incredibly rewarding. Even if you’re a complete beginner with no prior gardening experience, you can successfully grow radishes. They’re forgiving, adaptable, and perfect for small spaces, making them ideal for urban gardeners or anyone with limited outdoor space. Plus, the vibrant colors and peppery taste of homegrown radishes will elevate your salads, snacks, and even cooked dishes.
But don’t stop there! Experiment with different varieties of radishes. Try the classic Cherry Belle for its bright red color and mild flavor, or venture into the world of French Breakfast radishes with their elongated shape and delicate taste. For a spicier kick, explore the Black Spanish radish, but be warned, it packs a punch! You can also try succession planting, sowing a new batch of seeds every couple of weeks to ensure a continuous harvest throughout the growing season. Consider companion planting too. Radishes are known to deter certain pests, making them excellent companions for carrots, lettuce, and other vegetables.
Don’t be afraid to get your hands dirty and embrace the learning process. Gardening is all about experimentation and discovery. You might encounter challenges along the way, but that’s part of the fun. The satisfaction of harvesting your own homegrown radishes will far outweigh any minor setbacks.
We wholeheartedly encourage you to try this DIY trick for planting radishes. It’s a simple, effective, and incredibly rewarding way to add fresh, flavorful vegetables to your diet. And most importantly, have fun with it!
Once you’ve harvested your first batch of radishes, we’d love to hear about your experience. Share your tips, tricks, and photos in the comments below. Let’s build a community of radish-growing enthusiasts and inspire others to discover the joys of homegrown vegetables. What variety did you plant? What challenges did you face? What delicious dishes did you create with your homegrown radishes? We can’t wait to hear your stories! So go ahead, get planting, and share your radish-growing adventures with us! Let’s all become radish-growing experts together!
FAQ
What is the best time of year to plant radishes?
Radishes are cool-season crops, meaning they thrive in cooler temperatures. The best time to plant radishes is in early spring or late summer/early fall. In spring, plant as soon as the soil can be worked, typically 4-6 weeks before the last expected frost. For a fall harvest, plant 4-6 weeks before the first expected frost. Avoid planting during the hottest months of summer, as the heat can cause the radishes to bolt (go to seed) and become bitter.
How much sunlight do radishes need?
Radishes need at least 6 hours of sunlight per day to grow properly. While they can tolerate some shade, especially in hotter climates, insufficient sunlight can result in smaller, less flavorful radishes. Choose a planting location that receives full sun for the best results.
What kind of soil is best for planting radishes?
Radishes prefer loose, well-drained soil that is rich in organic matter. Heavy clay soil can hinder root development and result in misshapen radishes. Amend heavy soil with compost or other organic matter to improve drainage and aeration. A soil pH of 6.0 to 7.0 is ideal for radish growth.
How deep and far apart should I plant radish seeds?
Plant radish seeds about ½ inch deep and 1 inch apart in rows that are 6-12 inches apart. Thin the seedlings to 2 inches apart once they emerge to allow for proper root development. Overcrowding can result in smaller radishes.
How often should I water radishes?
Radishes need consistent moisture to grow quickly and develop a crisp, tender texture. Water regularly, especially during dry periods, to keep the soil consistently moist but not waterlogged. Aim for about 1 inch of water per week. Irregular watering can cause the radishes to crack or become tough.
How long does it take for radishes to mature?
One of the great things about radishes is their quick maturity. Most varieties are ready to harvest in just 3-4 weeks after planting. Check the seed packet for the specific maturity time of the variety you are growing.
How do I know when radishes are ready to harvest?
Radishes are ready to harvest when the roots reach the size specified on the seed packet. Gently loosen the soil around the radish and pull it out of the ground. Don’t let them get too big, as they can become woody and bitter.
What are some common pests and diseases that affect radishes?
Common pests that can affect radishes include flea beetles, root maggots, and aphids. Flea beetles can be controlled with row covers or insecticidal soap. Root maggots can be prevented by using row covers and practicing crop rotation. Aphids can be controlled with a strong spray of water or insecticidal soap. Diseases that can affect radishes include damping-off and white rust. Damping-off can be prevented by using well-drained soil and avoiding overwatering. White rust can be controlled with fungicides.
Can I eat the radish greens?
Yes, radish greens are edible and nutritious! They have a peppery flavor similar to the roots. Use them in salads, stir-fries, or soups. Make sure to wash them thoroughly before eating.
Can I grow radishes in containers?
Absolutely! Radishes are well-suited for container gardening. Choose a container that is at least 6 inches deep and has drainage holes. Use a good-quality potting mix and follow the same planting and care instructions as for growing radishes in the ground.
My radishes are all tops and no roots. What went wrong?
Several factors can contribute to this problem. Insufficient sunlight, overcrowding, and soil that is too rich in nitrogen can all cause radishes to produce excessive foliage at the expense of root development. Make sure your radishes are getting at least 6 hours of sunlight per day, thin the seedlings to the proper spacing, and avoid over-fertilizing with nitrogen-rich fertilizers.
Why are my radishes cracking?
Cracking is usually caused by inconsistent watering. When the soil dries out and then is suddenly saturated, the radishes can absorb water too quickly, causing them to crack. Water regularly and consistently to prevent cracking.
Why do my radishes taste bitter?
Bitterness in radishes can be caused by several factors, including hot weather, overmaturity, and dry soil. Harvest radishes before they get too large, water them regularly, and provide some shade during the hottest part of the day to prevent bitterness.
Can I save radish seeds for next year?
Saving radish seeds is possible, but it requires allowing the plants to bolt (go to seed). This typically happens in the second year of growth. However, radishes are often cross-pollinated, so the seeds may not produce plants that are true to type. If you want to save seeds, isolate your radish plants from other flowering plants in the brassica family (such as broccoli, cabbage, and kale) to prevent cross-pollination.

Leave a Comment