
Potato planting technique: Unlock the secrets to a bountiful harvest right in your backyard! Have you ever dreamed of digging up your own homegrown potatoes, bursting with flavor and freshness? I know I have! For centuries, potatoes have been a staple food around the world, playing a vital role in feeding communities and shaping cultures. From the Inca civilization in the Andes Mountains, where they were first cultivated, to their introduction to Europe and beyond, potatoes have a rich and fascinating history.
But let’s be honest, sometimes getting those spuds to sprout can feel like a real challenge. That’s where this DIY guide comes in! I’m going to share some simple yet effective potato planting techniques that will help you maximize your yield, even if you’re a complete beginner. Whether you’re dealing with limited space, poor soil, or just want to learn some clever hacks, I’ve got you covered. Imagine the satisfaction of serving up a delicious potato dish made entirely from your own garden – it’s an experience you won’t want to miss! So, grab your gardening gloves, and let’s dive into the wonderful world of potato planting!
Growing Potatoes in Buckets: A Beginner’s Guide
Hey there, fellow gardening enthusiasts! I’m so excited to share my favorite method for growing potatoes – in buckets! It’s perfect for small spaces, balconies, or even just to get a head start on the season. Plus, the harvest is super easy and satisfying. Let’s dive in!
Why Grow Potatoes in Buckets?
Before we get started, you might be wondering why buckets are so great. Here’s the lowdown:
* Space-Saving: Ideal for patios, balconies, or small gardens.
* Easy Harvesting: No digging required! Just tip the bucket over.
* Pest Control: Easier to manage pests and diseases compared to in-ground planting.
* Mobility: You can move your potato plants to the sunniest spot.
* Early Harvest: Start your potatoes indoors and transplant them later for an earlier crop.
What You’ll Need
Okay, let’s gather our supplies. Here’s what you’ll need to grow potatoes in buckets:
* Buckets: 5-gallon buckets are a good size, but larger ones (10-gallon or even larger) will give you even better results. Make sure they’re clean and have drainage holes.
* Seed Potatoes: These are potatoes specifically grown for planting. You can find them at your local garden center. Choose varieties that are suited to your climate.
* Potting Mix: A good quality potting mix is essential. Avoid using garden soil, as it can compact and hinder drainage. I like to use a mix of compost, peat moss, and perlite.
* Fertilizer: A slow-release fertilizer formulated for vegetables will provide your potatoes with the nutrients they need.
* Watering Can or Hose: For keeping your potatoes well-hydrated.
* Knife (Optional): For cutting larger seed potatoes into smaller pieces.
* Gloves: To protect your hands.
* Trowel or Small Shovel: For planting.
Preparing Your Seed Potatoes
This is a crucial step! You can’t just throw any old potato in a bucket and expect it to grow.
1. Chitting (Sprouting): A few weeks before planting, place your seed potatoes in a cool, bright location (but not direct sunlight). This encourages them to sprout “eyes.” You can use an egg carton or a tray. This process is called “chitting.”
2. Cutting (Optional): If your seed potatoes are large (bigger than an egg), you can cut them into smaller pieces. Make sure each piece has at least 2-3 “eyes.” Let the cut pieces dry for a day or two to callous over. This helps prevent rot. I usually cut mine into quarters if they are large.
Planting Your Potatoes
Now for the fun part! Let’s get those potatoes in the ground (or, rather, in the bucket).
1. Prepare the Bucket: Make sure your bucket has drainage holes. If it doesn’t, drill a few in the bottom.
2. Add Soil: Fill the bottom of the bucket with about 4-6 inches of potting mix.
3. Fertilize: Sprinkle a small amount of slow-release fertilizer over the soil. Follow the instructions on the fertilizer package.
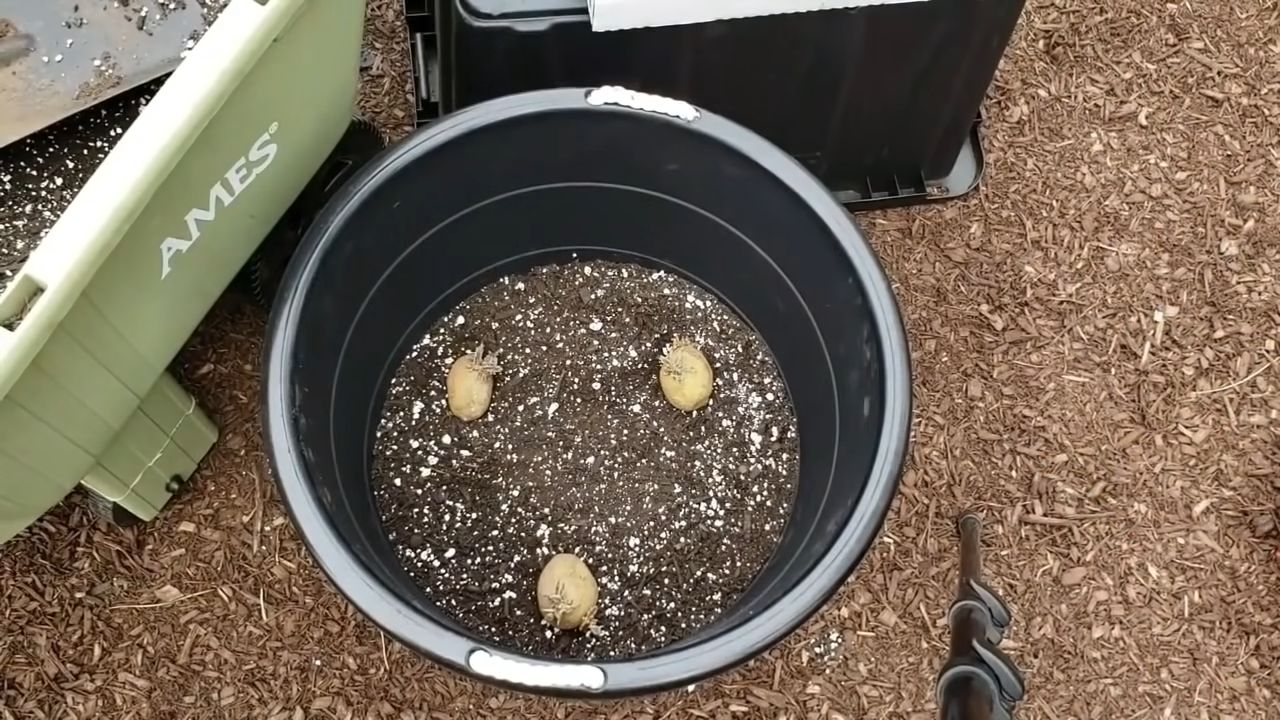
4. Plant the Seed Potatoes: Place the seed potato pieces (or whole small seed potatoes) on top of the soil, with the “eyes” facing upwards. Space them evenly if you’re planting multiple pieces in one bucket. I usually plant 3-4 pieces in a 5-gallon bucket.
5. Cover with Soil: Cover the seed potatoes with another 4-6 inches of potting mix.
6. Water Thoroughly: Water the soil until it’s moist but not soggy.
“Hilling” Your Potatoes
This is the secret to getting a big harvest! “Hilling” encourages the potato plants to produce more potatoes along the stem.
1. Wait for Growth: Once the potato plants have grown about 6-8 inches tall, it’s time to “hill” them.
2. Add More Soil: Add more potting mix to the bucket, covering the stems of the plants, leaving only the top few leaves exposed.
3. Repeat: Continue to “hill” the potatoes every few weeks as they grow, until the bucket is almost full. This encourages the plant to produce more potatoes along the buried stem. I usually do this 3-4 times during the growing season.
Caring for Your Potato Plants
Now that your potatoes are planted, it’s important to give them the care they need to thrive.
1. Watering: Water your potato plants regularly, especially during dry periods. The soil should be consistently moist, but not waterlogged. Check the soil moisture by sticking your finger into the soil. If it feels dry an inch or two down, it’s time to water.
2. Sunlight: Potatoes need at least 6-8 hours of sunlight per day. Place your buckets in a sunny location.
3. Fertilizing: Continue to fertilize your potato plants every few weeks with a balanced fertilizer. Follow the instructions on the fertilizer package.
4. Pest Control: Keep an eye out for pests like aphids, potato beetles, and flea beetles. If you spot any pests, treat them with an appropriate insecticide or organic pest control method. I prefer using neem oil for most pests.
5. Disease Prevention: Potatoes can be susceptible to diseases like blight. To prevent diseases, make sure your plants have good air circulation and avoid overhead watering. If you notice any signs of disease, treat them with an appropriate fungicide.
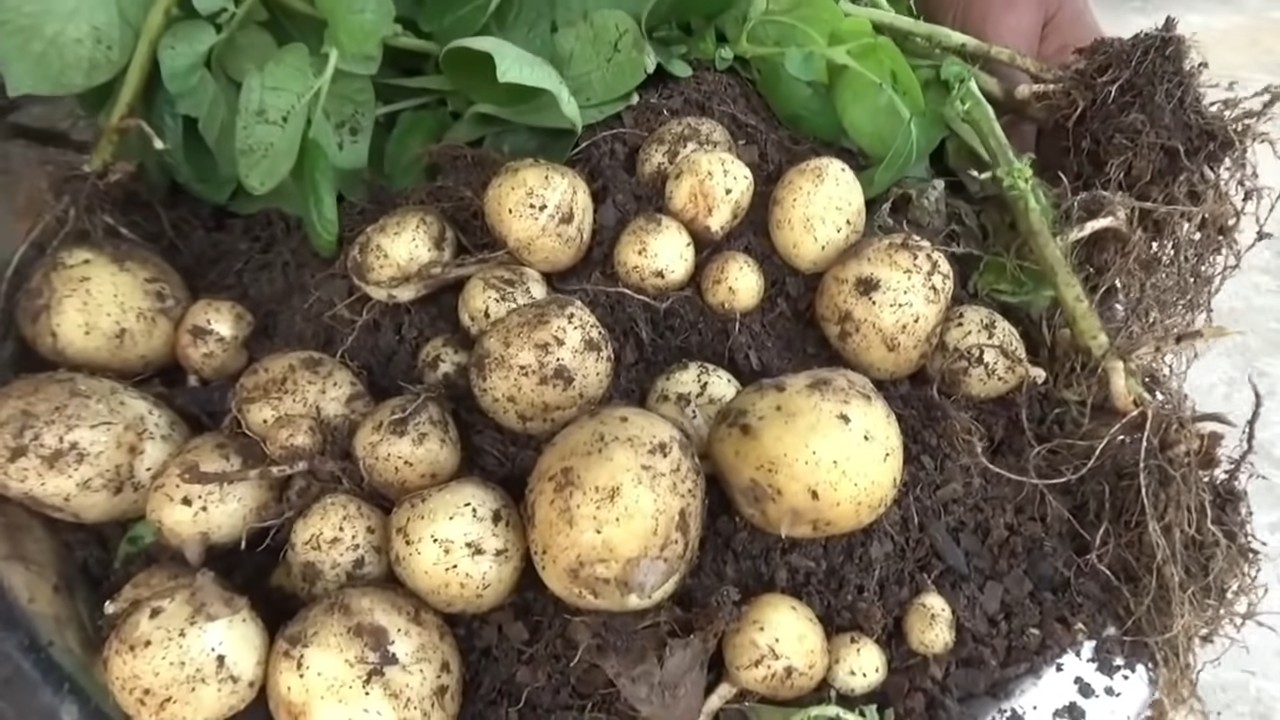
Harvesting Your Potatoes
The moment we’ve all been waiting for! Harvesting your potatoes is the most rewarding part of the process.
1. When to Harvest: You can harvest “new potatoes” (small, tender potatoes) about 2-3 weeks after the plants flower. For larger, mature potatoes, wait until the plants start to die back and the foliage turns yellow or brown. This usually takes about 80-100 days from planting.
2. Harvesting: The beauty of growing potatoes in buckets is that harvesting is super easy! Simply tip the bucket over and gently remove the potatoes from the soil.
3. Curing (Optional): If you want to store your potatoes for a longer period, you can “cure” them. To cure potatoes, spread them out in a cool, dark, and well-ventilated place for about a week. This allows the skins to harden and helps prevent rot.
Troubleshooting
Sometimes things don’t go exactly as planned. Here are a few common problems you might encounter and how to fix them:
* No Sprouts: If your seed potatoes don’t sprout, they may be old or damaged. Try using fresh seed potatoes.
* Yellowing Leaves: Yellowing leaves can be a sign of overwatering, underwatering, or nutrient deficiency. Check the soil moisture and fertilize your plants if necessary.
* Pests: As mentioned earlier, keep an eye out for pests and treat them promptly.
* Disease: If you notice any signs of disease, treat them with an appropriate fungicide.
Choosing the Right Potato Variety
Selecting the right potato variety is key to a successful harvest. Consider your climate, growing season, and personal preferences when making your choice. Here are a few popular varieties that do well in buckets:
* Yukon Gold: A classic all-purpose potato with a creamy texture and buttery flavor.
* Red Pontiac: A red-skinned potato with a firm texture, great for boiling and salads.
* Kennebec: A versatile potato that’s good for baking, frying, and mashing.
* Fingerling Potatoes: These small, elongated potatoes have a unique flavor and texture. They come in various colors, including red, yellow, and purple.
Tips for Success
Here are a few extra tips to help you grow the best potatoes possible:
* Use High-Quality Potting Mix: Don’t skimp on the potting mix. A good quality mix will provide your potatoes with the nutrients and drainage they need.
* Don’t Overwater: Overwatering can lead to root rot. Make sure the soil is well-draining and avoid letting the buckets sit in standing water.
* Rotate Your Crops: If you’re growing potatoes in the same buckets year after year, rotate your crops to prevent soilborne diseases.
* Have Fun! Gardening should be enjoyable. Don’t be afraid to experiment and learn from your mistakes.
Storing Your Harvest
Once you’ve harvested your potatoes, you’ll want to store them properly to keep them fresh for as long as possible.
1. Curing (Optional): As mentioned earlier, curing your potatoes helps them last longer.
2
Conclusion
So, there you have it! This simple yet incredibly effective potato planting technique is more than just a gardening hack; it’s a game-changer for anyone looking to maximize their yield, minimize their effort, and enjoy the unparalleled satisfaction of harvesting their own homegrown potatoes. We’ve walked you through the process, highlighting the benefits of this method, and hopefully, inspired you to ditch the traditional row planting and embrace a more efficient and rewarding approach.
Why is this a must-try? Because it’s about more than just growing potatoes. It’s about reclaiming control over your food source, connecting with nature, and experiencing the joy of nurturing life from a tiny seed (or in this case, a seed potato) to a bountiful harvest. It’s about reducing your carbon footprint by growing locally and organically. And let’s be honest, there’s nothing quite like the taste of freshly dug, homegrown potatoes, bursting with flavor and nutrients.
But the beauty of this potato planting technique lies in its adaptability. Feel free to experiment with different potato varieties to discover your favorites. Try adding companion plants like marigolds or basil around your potato plants to deter pests and attract beneficial insects. Consider using different types of containers, from repurposed burlap sacks to large plastic tubs, depending on your space and aesthetic preferences.
For those with limited space, this method is a lifesaver. You can grow a surprisingly large number of potatoes in a relatively small area, making it perfect for balconies, patios, or even small backyards. And for those with more space, you can scale up the operation and create a truly impressive potato patch.
Don’t be afraid to get your hands dirty and experiment. Gardening is a journey of discovery, and there’s always something new to learn. The most important thing is to have fun and enjoy the process.
We wholeheartedly encourage you to try this potato planting technique this season. We’re confident that you’ll be amazed by the results. And once you’ve harvested your first crop of homegrown potatoes, we’d love to hear about your experience. Share your photos, tips, and stories with us in the comments below. Let’s build a community of potato-growing enthusiasts and inspire others to embrace the joys of gardening. Happy planting!
Frequently Asked Questions (FAQ)
What type of potatoes are best for this planting technique?
Almost any type of potato can be grown using this method, but some varieties tend to perform better than others. Early-season potatoes like Yukon Gold and Red Norland are popular choices because they mature quickly. Mid-season potatoes like Kennebec and All Blue are also excellent options. Late-season potatoes like Russet Burbank are suitable for those who want to store their potatoes for longer periods. Ultimately, the best variety depends on your personal preferences and local climate. Experiment with different types to see what grows best in your area.
How often should I water my potato plants?
Watering frequency depends on several factors, including the climate, soil type, and container size. Generally, you should water your potato plants when the top inch of soil feels dry to the touch. Avoid overwatering, as this can lead to root rot. During hot, dry weather, you may need to water more frequently. Ensure that your containers have adequate drainage to prevent waterlogging. A good rule of thumb is to water deeply and less frequently, rather than shallowly and more often.
What kind of soil should I use?
Potatoes prefer well-draining, slightly acidic soil with a pH between 6.0 and 6.8. A good potting mix specifically formulated for vegetables is ideal. You can also create your own mix by combining equal parts of compost, peat moss (or coconut coir), and perlite or vermiculite. Avoid using heavy clay soil, as it can become waterlogged and hinder potato development. Adding organic matter to the soil will improve drainage, aeration, and nutrient content.
How much sunlight do potato plants need?
Potato plants need at least six hours of direct sunlight per day to thrive. Choose a location that receives plenty of sunlight throughout the day. If you’re growing potatoes in containers, you can move them around to ensure they get enough sunlight. Insufficient sunlight can result in smaller potatoes and reduced yields.
When is the best time to plant potatoes?
The best time to plant potatoes depends on your local climate. Generally, you should plant potatoes in early spring, about two to four weeks before the last expected frost. The soil temperature should be at least 45°F (7°C). In warmer climates, you can plant potatoes in late winter or early spring. Check your local gardening resources for specific planting dates in your area.
How do I know when my potatoes are ready to harvest?
The timing of harvest depends on the potato variety and your desired size. Early-season potatoes can be harvested when the plants begin to flower. Mid-season potatoes are typically ready to harvest about 80-100 days after planting. Late-season potatoes should be harvested after the foliage has died back completely. To check if your potatoes are ready, gently dig around the base of a plant and feel for the size of the potatoes. If they are the size you want, you can harvest the entire plant.
What are some common pests and diseases that affect potato plants?
Common pests that affect potato plants include aphids, potato beetles, and flea beetles. Diseases include early blight, late blight, and potato scab. To prevent pests and diseases, choose disease-resistant varieties, practice crop rotation, and keep your garden clean. You can also use organic pest control methods, such as insecticidal soap or neem oil. If you suspect your plants have a disease, consult with your local agricultural extension office for advice on treatment options.
Can I grow potatoes in containers indoors?
While it’s possible to grow potatoes in containers indoors, it can be challenging to provide them with the necessary sunlight and space. You’ll need a very large container, a sunny location (or grow lights), and consistent watering and fertilization. Indoor-grown potatoes may not produce as large of a yield as those grown outdoors.
What should I do with my potato plants after harvesting the potatoes?
After harvesting the potatoes, you can compost the foliage or use it as mulch in your garden. Avoid composting foliage that shows signs of disease. You can also leave the potato plants in the ground to decompose and enrich the soil.
How do I store my harvested potatoes?
Store your harvested potatoes in a cool, dark, and dry place with good ventilation. The ideal temperature is between 40°F and 50°F (4°C and 10°C). Avoid storing potatoes near apples or onions, as they can release gases that cause potatoes to sprout or rot. Properly stored potatoes can last for several months.
Leave a Comment