
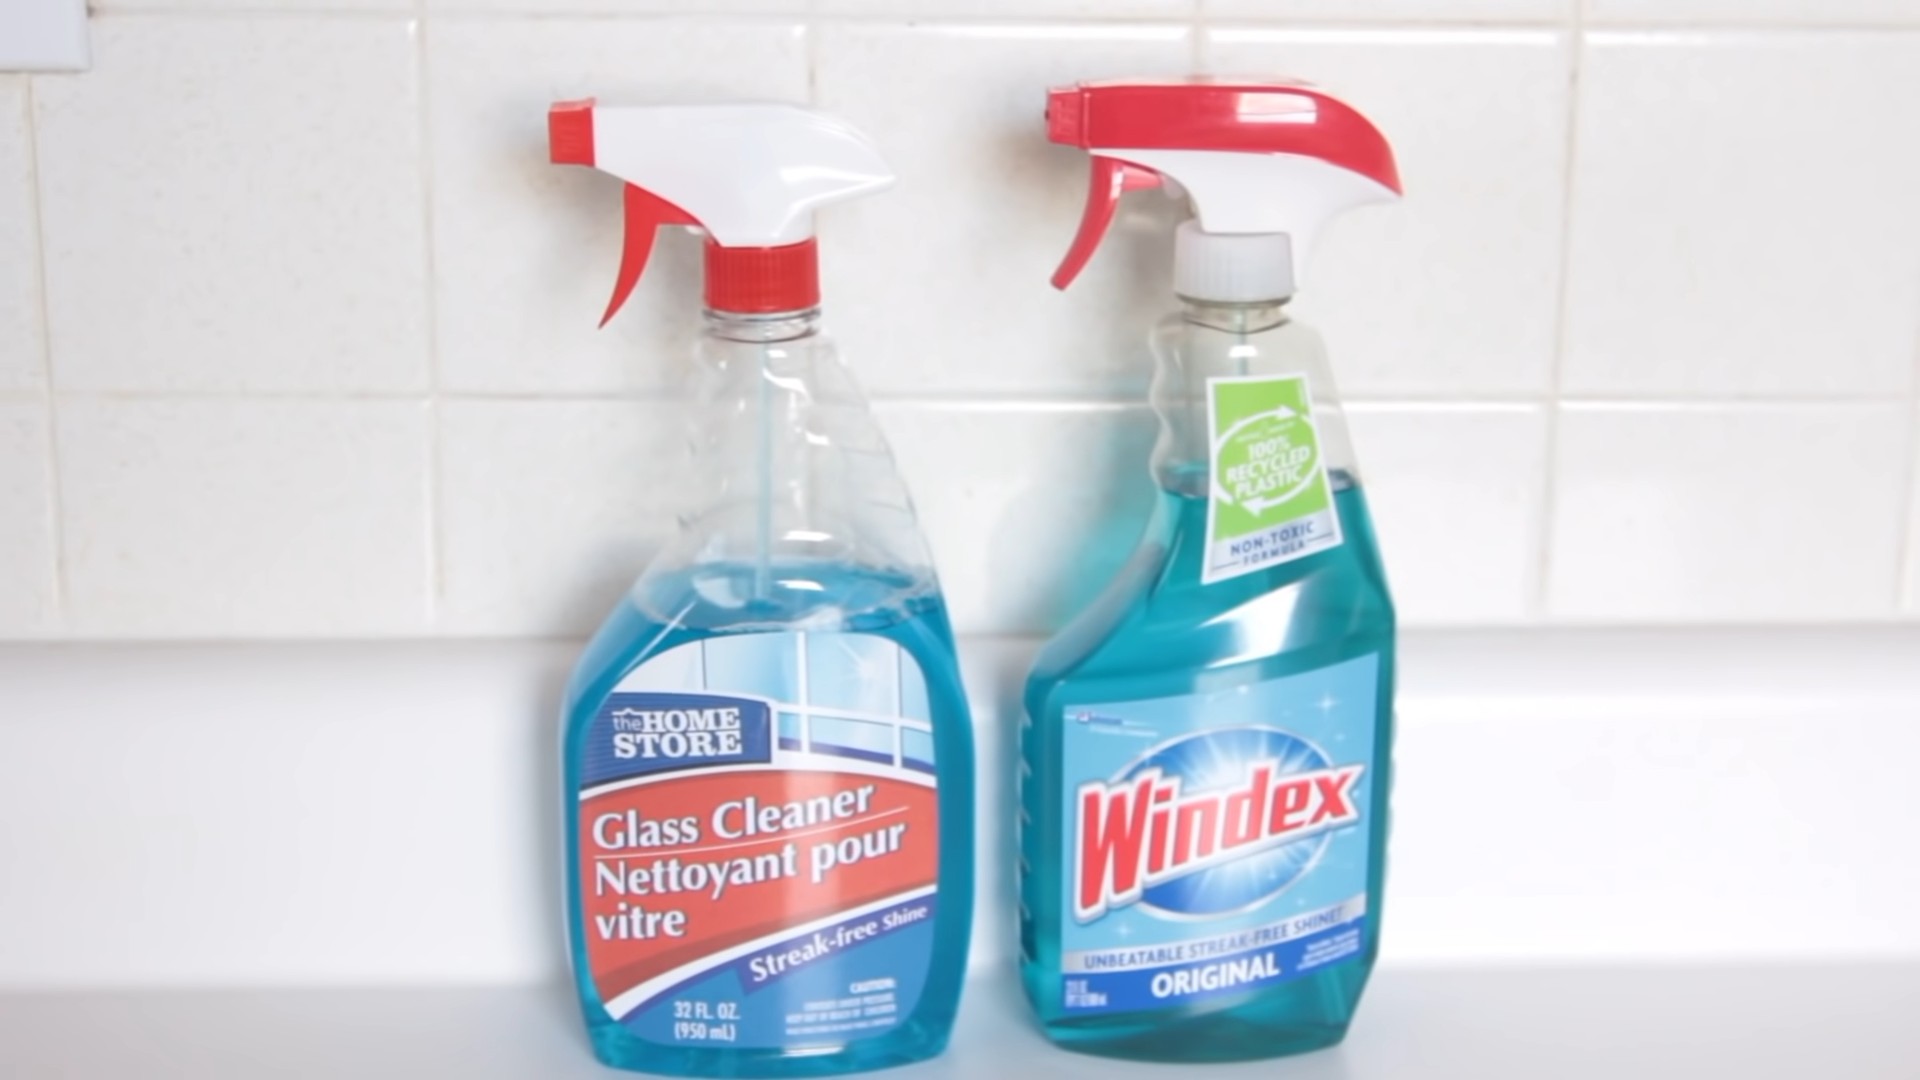
Streak Free Glass Cleaning – it’s the holy grail of home maintenance, isn’t it? I know I’ve spent countless hours battling smudges and smears, only to be left with a window that looks… well, almost as bad as before I started! But fear not, fellow cleaning enthusiasts, because I’m about to share some game-changing DIY tricks that will leave your windows sparkling and your view crystal clear.
The quest for perfectly clean glass has been around for ages. Think about the grand cathedrals of Europe, their stained-glass windows shimmering with light, or the meticulously polished mirrors in ancient Egyptian tombs. While their methods might have been a little different (and probably involved a lot more elbow grease!), the desire for pristine, reflective surfaces is a timeless one. Today, we’re lucky enough to have access to some seriously effective, and surprisingly simple, solutions.
Why is mastering streak free glass cleaning so important? Beyond the obvious aesthetic appeal, clean windows let in more natural light, which can boost your mood and even save on energy bills. Plus, let’s be honest, a sparkling home just feels good! But more than that, these DIY hacks are about taking control, saving money, and using eco-friendly alternatives to harsh chemicals. So, ditch the expensive cleaners and get ready to unlock the secrets to streak-free shine with these easy-to-follow tips!
DIY Streak-Free Glass Cleaner: My Secret Weapon!
Okay, friends, let’s talk about something we all struggle with: streaky windows and mirrors. I’ve tried countless store-bought glass cleaners, and honestly, I’ve always been left disappointed. They either leave a film, streaks, or just don’t seem to get the job done. So, I decided to take matters into my own hands and create my own DIY streak-free glass cleaner. And guess what? It works like a charm! It’s super affordable, uses ingredients you probably already have, and is much better for the environment.
Here’s my tried-and-true recipe and method for achieving sparkling, streak-free glass every time. Get ready to say goodbye to those annoying streaks!
What You’ll Need: The Ingredients for Success
Before we dive into the mixing and cleaning, let’s gather our supplies. This is a pretty simple list, which is one of the things I love about this DIY project.
* **Spray Bottle:** A clean, empty spray bottle is essential. I prefer a sturdy one that’s easy to grip. You can repurpose an old cleaner bottle, just make sure to rinse it out thoroughly!
* **Distilled Water:** This is key for avoiding mineral deposits that can cause streaks. Tap water can work in a pinch, but distilled water is the way to go for the best results.
* **White Vinegar:** The star of the show! White vinegar is a natural cleaner and disinfectant. Its acidity helps cut through grime and grease.
* **Rubbing Alcohol (Isopropyl Alcohol):** This helps the cleaner evaporate quickly, preventing streaks. I use 70% isopropyl alcohol, but 90% or higher will work even better.
* **Essential Oil (Optional):** This is purely for fragrance. I like to add a few drops of lemon, lavender, or tea tree oil to mask the vinegar smell. But honestly, the vinegar smell dissipates quickly, so it’s not essential.
* **Microfiber Cloths:** These are a must-have for streak-free cleaning. They’re super absorbent and won’t leave lint behind like paper towels can.
* **Optional: Small Funnel:** This makes pouring the ingredients into the spray bottle much easier and less messy.
Mixing the Magic: Creating Your Streak-Free Solution
Now for the fun part: mixing the cleaner! This is a super simple process, and you’ll have your own homemade glass cleaner in just a few minutes.
1. **Prepare Your Spray Bottle:** Make sure your spray bottle is clean and dry. If you’re reusing an old bottle, rinse it out several times with hot water to remove any residue.
2. **Add Distilled Water:** Pour 2 cups of distilled water into the spray bottle. Using a funnel can help prevent spills.
3. **Add White Vinegar:** Next, add 1/4 cup of white vinegar to the spray bottle. The vinegar is what will help cut through grease and grime.
4. **Add Rubbing Alcohol:** Now, add 1/4 cup of rubbing alcohol to the spray bottle. This will help the cleaner evaporate quickly and prevent streaks.
5. **Add Essential Oil (Optional):** If you’re using essential oil, add 5-10 drops to the spray bottle. Be careful not to add too much, as it can leave a residue.
6. **Shake Well:** Secure the spray nozzle onto the bottle and shake well to combine all the ingredients.
7. **Label Your Bottle:** It’s always a good idea to label your spray bottle so you know what’s inside. You can use a permanent marker or a label maker. I usually write “DIY Glass Cleaner” on mine.
Cleaning Time: Achieving Sparkling Results
Okay, now that we have our amazing DIY glass cleaner, let’s get to the actual cleaning! This is where the magic happens.
1. **Prepare Your Surface:** Before you start spraying, it’s a good idea to wipe down the surface with a damp cloth to remove any loose dirt or debris. This will prevent you from just spreading the dirt around.
2. **Spray the Cleaner:** Lightly spray the glass surface with your DIY cleaner. You don’t need to saturate the surface; a light mist is enough.
3. **Wipe with a Microfiber Cloth:** Immediately wipe the surface with a clean, dry microfiber cloth. Use a circular motion to spread the cleaner, then switch to a back-and-forth motion to remove any streaks.
4. **Buff to a Shine:** If you notice any streaks, use a clean, dry section of the microfiber cloth to buff the surface to a shine. This will remove any remaining residue and leave your glass sparkling.
5. **Repeat if Necessary:** For heavily soiled surfaces, you may need to repeat the process. Don’t be afraid to spray and wipe again until you achieve the desired results.
Tips and Tricks for Extra Sparkle
Here are a few extra tips and tricks I’ve learned over time to get the best possible results with my DIY glass cleaner:
* **Use Clean Microfiber Cloths:** This is crucial! Dirty microfiber cloths will just spread dirt and grime around. I recommend having a few on hand so you can switch to a clean one when needed. Wash your microfiber cloths regularly in hot water with a mild detergent. Avoid using fabric softener, as it can leave a residue on the cloths.
* **Avoid Cleaning in Direct Sunlight:** Direct sunlight can cause the cleaner to dry too quickly, leaving streaks. If possible, clean your windows on a cloudy day or in the early morning or late afternoon.
* **Don’t Over-Spray:** Using too much cleaner can actually make it harder to achieve a streak-free finish. A light mist is all you need.
* **Fold Your Microfiber Cloth:** Folding your microfiber cloth into quarters gives you multiple clean surfaces to work with. As one section gets dirty, simply unfold the cloth to reveal a clean section.
* **Clean Windows Inside and Out:** For truly sparkling windows, clean both the inside and outside surfaces. This will remove dirt and grime from both sides of the glass.
* **Clean Your Mirrors Regularly:** Regular cleaning will prevent buildup and make it easier to keep your mirrors sparkling. I like to clean my bathroom mirror after every shower to prevent water spots.
* **Test in an Inconspicuous Area:** Before cleaning a large surface, test the cleaner in an inconspicuous area to make sure it doesn’t damage the surface. This is especially important for delicate surfaces like antique mirrors.
* **For Extra Stubborn Spots:** For extra stubborn spots, like dried-on food or bird droppings, let the cleaner sit on the spot for a few minutes before wiping it away. You can also use a plastic scraper to gently remove the spot.
* **Vinegar Smell:** Don’t worry too much about the vinegar smell. It dissipates quickly. Opening a window while you clean can help speed up the process.
* Consider a Squeegee: For large windows, especially exterior ones, a squeegee can be a game-changer. Use the DIY cleaner to wet the window, then use the squeegee in overlapping strokes, wiping the blade after each stroke.
Troubleshooting: What to Do If You Still See Streaks
Even with the best recipe and technique, you might still encounter streaks from time to time. Here’s what to do if you’re still seeing streaks:
* **Check Your Microfiber Cloth:** Make sure your microfiber cloth is clean and dry. A dirty or damp cloth can cause streaks.
* **Use a Clean, Dry Cloth to Buff:** If you see streaks after wiping, use a clean, dry microfiber cloth to buff the surface to a shine.
* **Reduce the Amount of Cleaner:** You might be using too much cleaner. Try spraying less and wiping more.
* **Adjust the Recipe:** If you’re still having trouble, you can try adjusting the recipe. Some people find that they need to use a little more vinegar or rubbing alcohol to achieve the desired results.
* **Hard Water:** If you have hard water, it can be more difficult to achieve a streak-free finish. Using distilled water is even more important in this case. You might also consider adding a water softener to your home.
* **Residue from Previous Cleaners:** If you’ve used other cleaners in the past, there might be a residue on the glass that’s preventing the DIY cleaner from working properly. Try cleaning the glass with a solution of warm water and dish soap to remove any residue before using the DIY cleaner. Rinse thoroughly and dry before applying the DIY cleaner.
Why I Love This DIY Glass Cleaner
I’ve been using this DIY glass cleaner for years, and I absolutely love it. Here’s why:
* **It’s Effective:** It really works! It cleans my windows and mirrors beautifully, leaving them sparkling and streak-free.
* **It’s Affordable:** The ingredients are inexpensive and readily available. I save a ton of money compared to buying store-bought cleaners.
* **It’s Eco-Friendly:** It’s made with natural ingredients and doesn’t contain any harsh chemicals. I feel good about using it in my home.
*

Conclusion
So, there you have it! Achieving truly streak-free glass cleaning doesn’t require expensive, chemical-laden products. This simple, DIY solution, using ingredients you likely already have in your pantry, is a game-changer. We’ve shown you how to unlock the secret to sparkling windows, mirrors, and glass surfaces without the frustration of lingering streaks.
Why is this DIY trick a must-try? Because it’s effective, economical, and environmentally friendly. Commercial glass cleaners often contain harsh chemicals that can be harmful to your health and the planet. This homemade version allows you to control exactly what you’re using, ensuring a safer and healthier cleaning experience for you and your family. Plus, think of the money you’ll save by ditching those pricey store-bought bottles!
But the benefits don’t stop there. This method is incredibly versatile. Feel free to experiment with variations to find what works best for your specific needs and preferences. For example, if you have particularly hard water, you might want to increase the amount of vinegar slightly. Or, if you prefer a more fragrant cleaning experience, add a few drops of your favorite essential oil, such as lemon, lavender, or tea tree oil (known for its antibacterial properties). Just be sure to use essential oils sparingly, as too much can leave a residue. Another variation is to use distilled water instead of tap water for even better results, especially if you live in an area with very hard water. You can also try using a microfiber cloth specifically designed for glass cleaning; these cloths are incredibly effective at lifting dirt and grime without leaving streaks.
This DIY streak-free glass cleaning solution is not just a cleaning method; it’s a lifestyle choice. It’s about taking control of the products you use in your home, prioritizing your health and the environment, and saving money in the process. It’s about achieving professional-quality results with minimal effort and maximum satisfaction.
We’re confident that once you try this DIY trick, you’ll never go back to store-bought glass cleaners again. The difference is truly remarkable. Imagine looking through crystal-clear windows, admiring spotless mirrors, and enjoying the satisfaction of knowing you achieved it all with a simple, homemade solution.
So, what are you waiting for? Gather your ingredients, grab your spray bottle, and prepare to be amazed. We encourage you to try this DIY streak-free glass cleaning method today and experience the difference for yourself. And most importantly, we want to hear about your experience! Share your results, tips, and variations in the comments below. Let’s build a community of sparkling clean homes, one streak-free window at a time! We are eager to learn how this method works for you and any tweaks you might have made to perfect your glass cleaning routine. Your feedback is invaluable and helps us all achieve the ultimate in clean, clear glass.
Frequently Asked Questions (FAQ)
What exactly makes this DIY glass cleaner streak-free?
The combination of ingredients is key. Vinegar is a natural degreaser and helps to cut through grime and dirt. The rubbing alcohol helps the solution evaporate quickly, preventing water spots and streaks. The water dilutes the vinegar and alcohol, making the solution safe for most glass surfaces. Using a clean microfiber cloth is also crucial, as it absorbs dirt and moisture effectively without leaving lint or residue. The proper technique, spraying lightly and wiping in overlapping strokes, also contributes to a streak-free finish.
Can I use this DIY glass cleaner on all types of glass?
Generally, yes, this DIY glass cleaner is safe for most types of glass, including windows, mirrors, glass tables, and shower doors. However, it’s always a good idea to test a small, inconspicuous area first, especially if you’re dealing with antique or delicate glass. Avoid using it on tinted windows, as the vinegar could potentially damage the tinting film. Also, be cautious when using it on coated glass, such as some types of eyeglasses, and consult the manufacturer’s instructions first.
What if I don’t have rubbing alcohol? Can I substitute it with something else?
Rubbing alcohol (isopropyl alcohol) is ideal because it evaporates quickly and helps prevent streaks. However, if you don’t have it on hand, you can try using vodka as a substitute. Vodka has a similar alcohol content and will also help the solution evaporate quickly. Avoid using other types of alcohol, such as denatured alcohol, as they may contain additives that can leave a residue. If you absolutely can’t find any alcohol, you can try using the solution without it, but be sure to wipe the glass very thoroughly and quickly to prevent streaks.
How often should I clean my windows and mirrors?
The frequency of cleaning depends on several factors, such as your location, the weather, and the amount of dust and dirt in your environment. Generally, cleaning your windows and mirrors every few weeks is a good starting point. If you live in a dusty area or have pets, you may need to clean them more frequently. You’ll know it’s time to clean when you start to notice streaks, smudges, or a buildup of dirt and grime.
My glass cleaner is leaving a vinegar smell. How can I get rid of it?
The vinegar smell is temporary and should dissipate quickly as the solution dries. If you’re sensitive to the smell of vinegar, you can add a few drops of your favorite essential oil to the solution. Lemon, lavender, and tea tree oil are all good options. Just be sure to use essential oils sparingly, as too much can leave a residue. You can also open a window or turn on a fan to help ventilate the area and speed up the drying process.
Can I use this glass cleaner on my car windows?
Yes, this DIY glass cleaner is generally safe to use on car windows. However, be cautious when using it on tinted car windows, as the vinegar could potentially damage the tinting film. Test a small, inconspicuous area first. Also, avoid getting the solution on the car’s paint, as it could potentially damage the finish over time.
What’s the best type of microfiber cloth to use for cleaning glass?
Look for microfiber cloths specifically designed for glass cleaning. These cloths have a tighter weave and are less likely to leave lint or streaks. Avoid using microfiber cloths that are too plush or fluffy, as they may not be as effective at cleaning glass. It’s also important to use a clean microfiber cloth each time you clean your glass. Dirty cloths can spread dirt and grime around, leaving streaks and smudges.
How do I clean my microfiber cloths after using them to clean glass?
You can wash your microfiber cloths in the washing machine with warm water and a mild detergent. Avoid using fabric softener, as it can leave a residue on the cloths and make them less effective at cleaning glass. Tumble dry the cloths on low heat or hang them to dry. Avoid using bleach, as it can damage the fibers of the cloths.
What if I have hard water? Will this DIY glass cleaner still work?
If you have hard water, you may need to adjust the recipe slightly. Hard water contains minerals that can leave spots and streaks on glass. To combat this, use distilled water instead of tap water when making the solution. You can also increase the amount of vinegar slightly, but be careful not to use too much, as it can leave a vinegar smell.
Is this DIY glass cleaner safe for pets and children?
Yes, this DIY glass cleaner is generally safe for pets and children, as it doesn’t contain any harsh chemicals. However, it’s still important to keep the solution out of reach of children and pets. Avoid spraying the solution directly into their eyes or mouths. If they accidentally ingest the solution, it may cause mild irritation, but it’s unlikely to be harmful.
Leave a Comment