
Sweet Potato Growing Tips: Unlock the secrets to bountiful harvests right in your backyard! Have you ever dreamed of pulling vibrant, earthy sweet potatoes straight from your own garden? It’s easier than you think, and this DIY guide is your passport to sweet potato success.
For centuries, sweet potatoes have been a staple in diets around the world, from their origins in Central and South America to their adoption in cuisines across Asia and Africa. They’re not just delicious; they’re packed with nutrients and represent a connection to the earth that our ancestors cherished. But you don’t need to be a seasoned farmer to enjoy the fruits (or rather, roots!) of your labor.
In today’s fast-paced world, reconnecting with nature and growing your own food is more important than ever. Not only does it provide fresh, healthy produce, but it’s also a therapeutic and rewarding experience. Many people struggle with knowing where to start or how to overcome common challenges like pests, soil conditions, and proper watering. That’s where these sweet potato growing tips come in! I’m going to share simple, effective DIY tricks and hacks that will transform your garden into a sweet potato paradise, even if you’re a complete beginner. Get ready to dig in and discover the joy of homegrown goodness!
Growing Sweet Potatoes: A Beginner’s Guide to a Bountiful Harvest
Hey there, fellow gardening enthusiasts! I’m so excited to share my experience with growing sweet potatoes. It’s surprisingly easy and incredibly rewarding to harvest your own delicious, nutritious sweet potatoes right from your backyard. This guide will walk you through every step, from choosing the right variety to curing your harvest for long-term storage. Let’s get started!
Choosing Your Sweet Potato Variety
Before you even think about planting, you need to decide which sweet potato variety is right for you. There are tons of options, each with its own unique flavor, texture, and growing requirements. Here are a few popular choices:
* Beauregard: This is probably the most common variety you’ll find. It’s known for its reddish-purple skin and orange flesh. It’s a reliable producer and matures relatively quickly.
* Jewel: Similar to Beauregard, Jewel sweet potatoes have reddish skin and orange flesh, but they tend to be a bit sweeter.
* Garnet: These have a deep red skin and a vibrant orange flesh. They’re known for being moist and sweet, perfect for baking.
* Okinawan Purple: If you’re feeling adventurous, try Okinawan Purple sweet potatoes. They have tan skin and a striking purple flesh. They’re less sweet than orange varieties and have a slightly nutty flavor.
* White Sweet Potatoes (Bonita, Japanese): These varieties have lighter skin and white or yellowish flesh. They are less sweet and have a drier texture, making them great for savory dishes.
Consider your climate, soil conditions, and personal taste preferences when making your choice. I personally love Beauregard for its reliability and classic sweet potato flavor.
Preparing Your Sweet Potato Slips
Sweet potatoes are typically grown from “slips,” which are sprouts that grow from a mature sweet potato. You can buy slips from a nursery or garden center, or you can easily grow your own! I prefer to grow my own because it’s cheaper and more satisfying.
Here’s how to grow your own sweet potato slips:
1. Choose a Healthy Sweet Potato: Select a firm, healthy sweet potato from your local grocery store or farmers market. Organic is always a good choice.
2. Sprouting the Sweet Potato: There are two main methods for sprouting:
* Water Method: Suspend the sweet potato in a jar or glass of water, with the bottom half submerged. You can use toothpicks to hold it in place. Place the jar in a warm, sunny location.
* Soil Method: Bury the sweet potato horizontally in a container filled with moist potting soil, leaving the top slightly exposed. Place the container in a warm, sunny location.
3. Wait for Sprouts: Within a few weeks, you should start to see sprouts (slips) emerging from the sweet potato. Keep the water fresh or the soil moist.
4. Separating the Slips: Once the slips are about 6-8 inches long, gently twist or cut them off the sweet potato.
5. Rooting the Slips: Place the slips in a glass of water, making sure the bottom inch or two is submerged. Within a few days, roots will start to develop.
6. Planting the Slips: Once the roots are about an inch long, your slips are ready to be planted in the garden!
Preparing the Garden Bed
Sweet potatoes need plenty of sunshine and well-drained soil to thrive. Here’s how to prepare your garden bed:
1. Choose a Sunny Location: Select a spot in your garden that receives at least 6-8 hours of direct sunlight per day.
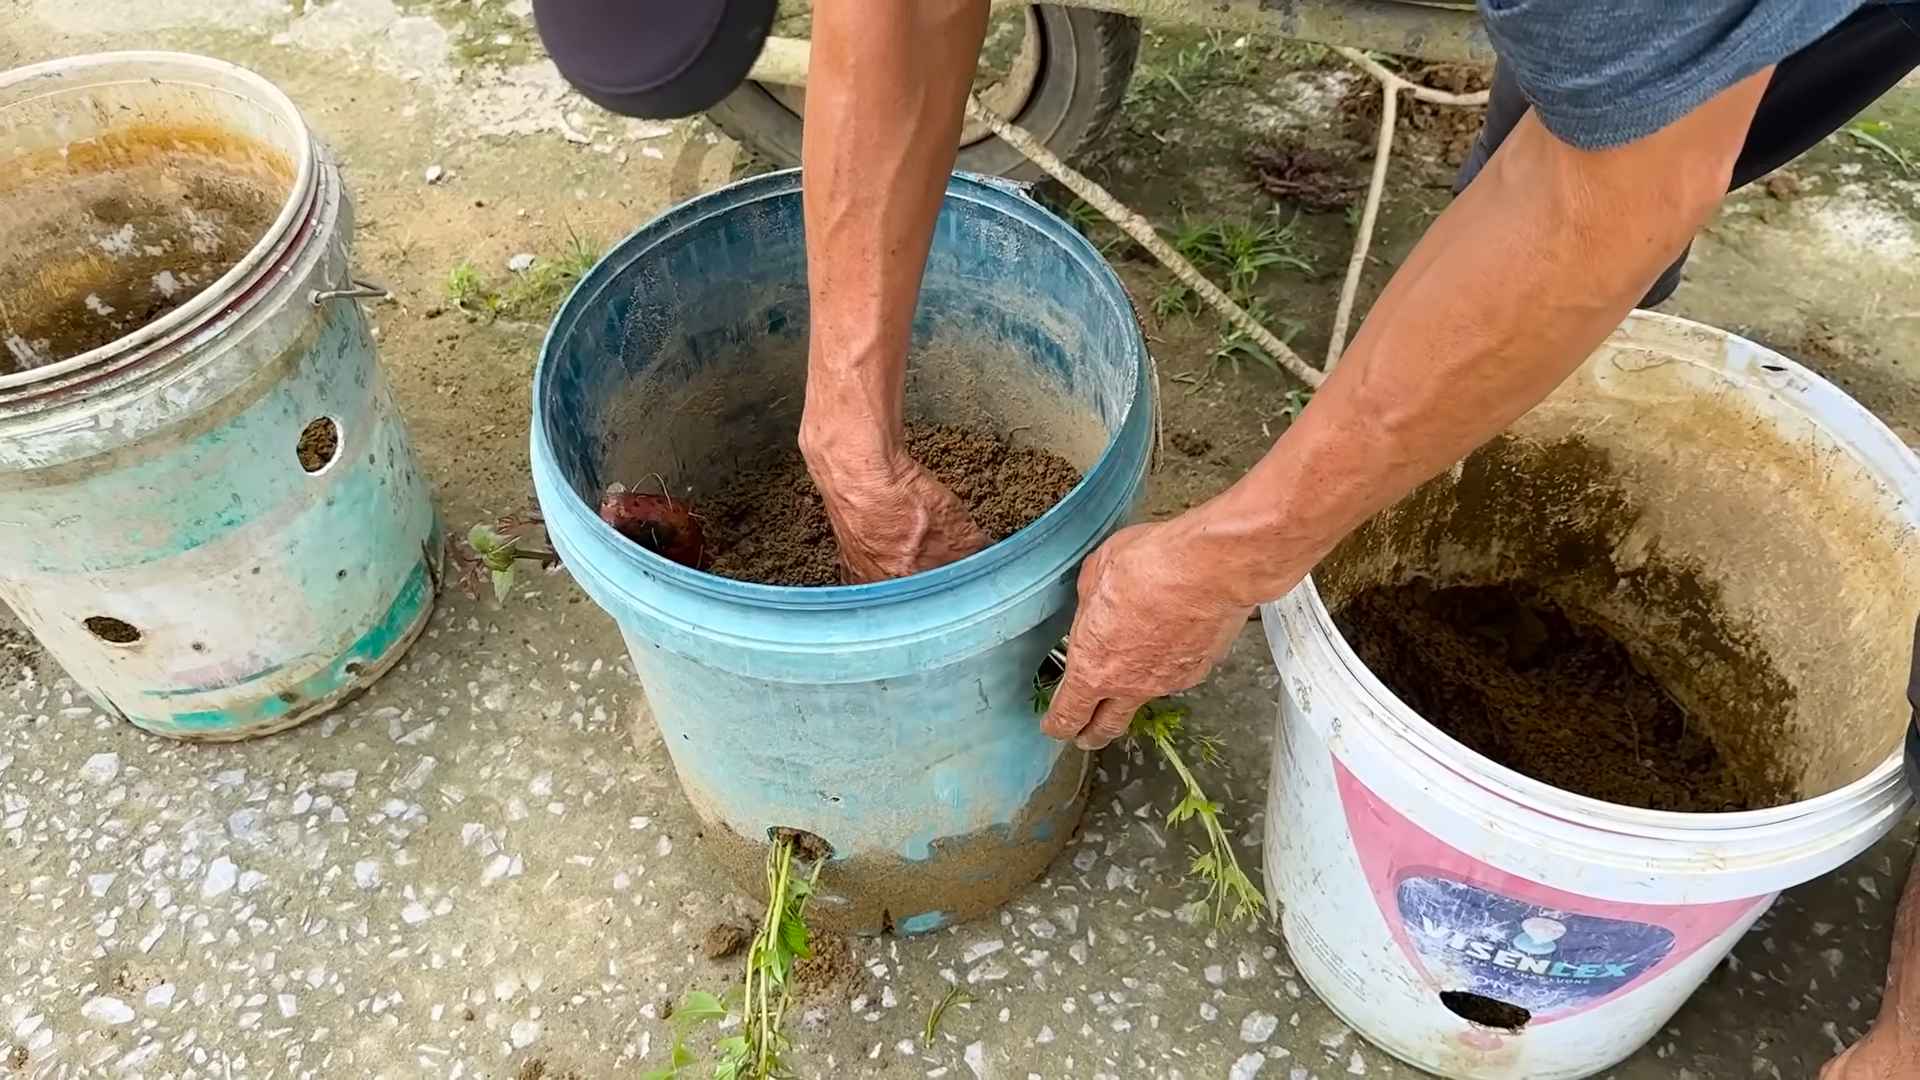
2. Improve the Soil: Sweet potatoes prefer loose, sandy loam soil. If your soil is heavy clay, amend it with plenty of compost, aged manure, or other organic matter to improve drainage.
3. Create Raised Beds or Hills: Sweet potatoes grow best in raised beds or hills. This helps with drainage and allows the roots to expand easily. I usually create hills that are about 12 inches high and 3 feet apart.
4. Fertilize the Soil: Sweet potatoes don’t need a lot of fertilizer, but a little boost can help them get started. Incorporate a slow-release fertilizer or compost into the soil before planting. Avoid using fertilizers that are high in nitrogen, as this can promote leafy growth at the expense of tuber development.
Planting Your Sweet Potato Slips
Now comes the fun part – planting your sweet potato slips!
1. Wait for Warm Weather: Sweet potatoes are sensitive to frost, so wait until the soil has warmed up to at least 60°F (15°C) before planting. This is usually a few weeks after the last frost.
2. Water the Slips: Before planting, soak the roots of the slips in water for a few hours to rehydrate them.
3. Plant the Slips: Plant the slips about 12-18 inches apart in the raised beds or hills. Bury the slips deep enough so that only the top few leaves are exposed.
4. Water Thoroughly: After planting, water the slips thoroughly to help them establish roots.
Caring for Your Sweet Potato Plants
Once your sweet potato plants are in the ground, they’re relatively low-maintenance. Here are a few tips for keeping them healthy and productive:
1. Water Regularly: Water your sweet potato plants regularly, especially during dry spells. Aim for about 1 inch of water per week.
2. Weed Regularly: Keep the garden bed free of weeds, as they can compete with the sweet potato plants for nutrients and water.
3. Fertilize Sparingly: As mentioned earlier, sweet potatoes don’t need a lot of fertilizer. If you notice that the plants are growing slowly or the leaves are pale, you can apply a small amount of balanced fertilizer.
4. Control Pests and Diseases: Sweet potatoes are generally resistant to pests and diseases, but they can be susceptible to problems like sweet potato weevils and fungal diseases. Inspect your plants regularly and take action if you notice any signs of trouble. Organic pest control methods, like neem oil, can be effective.
5. Vine Management: Sweet potato vines can spread quite a bit. While they don’t necessarily *need* pruning, you can trim them back if they’re taking over your garden. Some gardeners even lift the vines occasionally to prevent them from rooting at the nodes, which can divert energy away from tuber development.
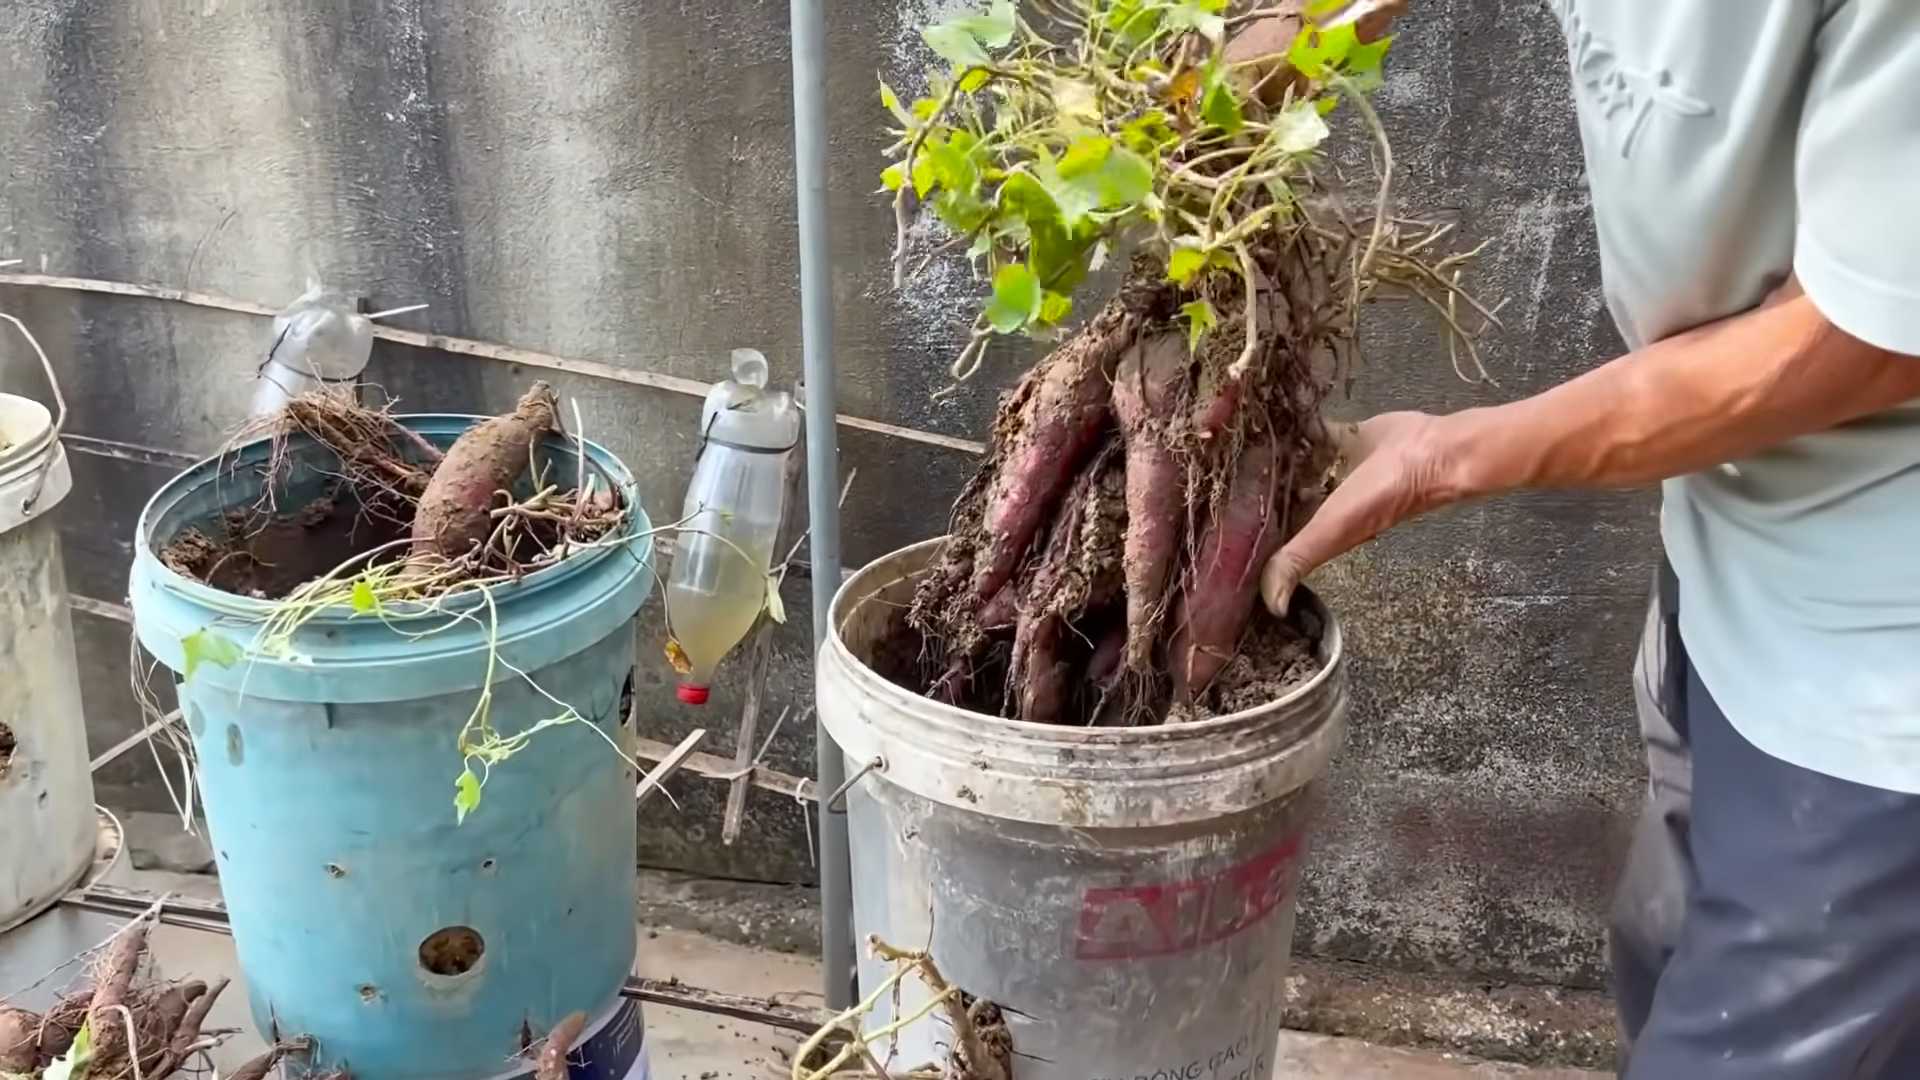
Harvesting Your Sweet Potatoes
The moment you’ve been waiting for! Harvesting sweet potatoes is a rewarding experience.
1. Timing is Key: Sweet potatoes typically take 90-120 days to mature. You’ll know they’re ready to harvest when the leaves start to turn yellow and the vines begin to die back.
2. Choose a Dry Day: Harvest your sweet potatoes on a dry day to prevent them from rotting.
3. Dig Carefully: Use a garden fork or shovel to carefully dig around the plants, being careful not to damage the tubers. Start digging a foot or so away from the plant to avoid accidentally spearing the sweet potatoes.
4. Lift the Tubers: Gently lift the tubers out of the ground.
5. Handle with Care: Sweet potatoes are delicate, so handle them with care. Avoid bruising or cutting them, as this can lead to rot.
Curing Your Sweet Potatoes
Curing is an essential step in the sweet potato growing process. It helps to heal any wounds on the tubers and converts starches into sugars, resulting in a sweeter, more flavorful sweet potato.
1. Clean the Sweet Potatoes: Gently brush off any excess soil from the sweet potatoes. Don’t wash them, as this can promote rot.
2. Curing Environment: Place the sweet potatoes in a warm, humid location with good air circulation. The ideal temperature is 80-85°F (27-29°C) and the humidity should be around 85-90%. A greenhouse, garage, or shed can work well.
3. Curing Time: Cure the sweet potatoes for 7-10 days.
4. Storage: After curing, store the sweet potatoes in a cool, dry, and dark location with good ventilation. The ideal storage temperature is 55-60°F (13-16°C). A basement or root cellar is ideal.
5. Check Regularly: Check the sweet potatoes regularly for signs of rot. Remove any that are starting to spoil to prevent the rot from spreading.
Enjoying Your Homegrown Sweet Potatoes
Congratulations! You’ve successfully grown and harvested your own sweet potatoes. Now it’s time to enjoy the fruits (or rather, tubers) of your labor. Sweet potatoes are incredibly versatile and can be used in a variety of dishes, from sweet to savory.
Here are a few ideas:
* Baked Sweet Potatoes:
Conclusion
So, there you have it! Growing your own sweet potatoes, especially using our simple DIY trick, is not just a fun gardening project; it’s a gateway to fresher, more flavorful produce right from your backyard. We’ve walked you through the process, highlighting the ease and accessibility of this method, even for those with limited space or gardening experience.
Why is this DIY approach a must-try? Because it empowers you to take control of your food source, reduces your reliance on store-bought options (often shipped from afar), and connects you with the natural world in a tangible way. Imagine the satisfaction of harvesting your own sweet potatoes, knowing exactly where they came from and how they were grown. Plus, let’s be honest, the taste of a homegrown sweet potato is simply unparalleled – richer, sweeter, and bursting with flavor that you just can’t find in the supermarket.
But the beauty of this DIY sweet potato growing adventure lies in its adaptability. Feel free to experiment with different varieties of sweet potatoes to discover your personal favorite. Try growing them in raised beds, containers, or even directly in the ground, depending on your space and soil conditions. Consider companion planting with herbs like basil or rosemary to deter pests and enhance the flavor of your sweet potatoes. You can also adjust the amount of sunlight and water based on your specific climate and growing conditions.
Don’t be afraid to get creative! Perhaps you want to try sprouting your sweet potato slips indoors before transplanting them outside for an even earlier harvest. Or maybe you’ll experiment with different types of soil amendments to optimize growth. The possibilities are endless, and the journey is just as rewarding as the final harvest.
We are confident that with a little patience and our simple DIY trick, you’ll be enjoying a bountiful harvest of delicious, homegrown sweet potatoes in no time. This method is especially effective for those looking for an organic and sustainable way to grow their own food.
We wholeheartedly encourage you to give this DIY sweet potato growing method a try. It’s a rewarding experience that will not only provide you with delicious produce but also connect you with the natural world in a meaningful way.
Once you’ve harvested your sweet potatoes, we’d love to hear about your experience! Share your photos, tips, and stories with us in the comments below. Let’s build a community of sweet potato enthusiasts and learn from each other’s successes and challenges. Happy growing!
Frequently Asked Questions (FAQ)
1. What kind of sweet potato should I use for sprouting?
You can use any variety of sweet potato you prefer! However, organic sweet potatoes are generally recommended, as they are less likely to have been treated with sprout inhibitors. Look for firm, healthy sweet potatoes without any signs of rot or blemishes. Popular varieties for home growing include Beauregard, Georgia Jet, and Centennial. Experiment with different varieties to find your favorite!
2. How long does it take for sweet potato slips to grow?
The time it takes for slips to grow varies depending on the temperature and humidity. Generally, you can expect to see slips emerging within 2-4 weeks. Keep the sweet potato consistently moist and in a warm location to encourage faster growth. Be patient, and don’t be discouraged if it takes a little longer – sometimes, it just depends on the specific sweet potato.
3. How do I know when the sweet potato slips are ready to be transplanted?
Your sweet potato slips are ready to be transplanted when they are about 6-8 inches long and have several leaves. They should also have developed a good root system. Gently twist or cut the slips from the sweet potato, being careful not to damage the roots. Place the slips in a glass of water for a few days to allow the roots to develop further before transplanting them into your garden.
4. What kind of soil is best for growing sweet potatoes?
Sweet potatoes thrive in well-drained, sandy loam soil. Avoid heavy clay soils, as they can become waterlogged and hinder root development. Amend your soil with compost or other organic matter to improve drainage and fertility. A slightly acidic soil pH (around 6.0-6.5) is ideal.
5. How much sunlight do sweet potatoes need?
Sweet potatoes need at least 6-8 hours of direct sunlight per day to thrive. Choose a sunny location in your garden for planting. If you are growing them in containers, make sure to place them in a spot that receives plenty of sunlight.
6. How often should I water sweet potatoes?
Water sweet potatoes regularly, especially during dry periods. Keep the soil consistently moist, but avoid overwatering, which can lead to root rot. Water deeply and less frequently, rather than shallowly and more often. Mulching around the plants can help retain moisture in the soil.
7. What are some common pests and diseases that affect sweet potatoes?
Common pests that can affect sweet potatoes include sweet potato weevils, flea beetles, and aphids. Diseases include stem rot, scurf, and black rot. Practice crop rotation, use disease-resistant varieties, and monitor your plants regularly for signs of pests or diseases. Organic pest control methods, such as insecticidal soap or neem oil, can be used to manage infestations.
8. When is the best time to harvest sweet potatoes?
Sweet potatoes are typically ready to harvest about 90-120 days after planting. The leaves will start to turn yellow and the vines will begin to die back. Dig up a test plant to check the size and maturity of the sweet potatoes. Harvest on a dry day to prevent rot.
9. How do I cure sweet potatoes after harvesting?
Curing sweet potatoes is essential for improving their flavor and storage life. After harvesting, gently brush off any excess soil and allow the sweet potatoes to dry in a warm, humid place (80-85°F and 85-90% humidity) for about 7-10 days. This process allows the skins to harden and heal any wounds, preventing rot.
10. How should I store sweet potatoes after curing?
After curing, store sweet potatoes in a cool, dry, and well-ventilated place (55-60°F). Avoid storing them in the refrigerator, as this can cause them to develop a hard core and lose their flavor. Properly cured and stored sweet potatoes can last for several months.
11. Can I grow sweet potatoes in containers?
Yes, you can definitely grow sweet potatoes in containers! Choose a large container (at least 20 gallons) with good drainage. Fill it with well-draining potting mix and follow the same planting and care instructions as for growing them in the ground. Container-grown sweet potatoes may not produce as many or as large tubers as those grown in the ground, but it’s still a great option for those with limited space.
12. What are some good companion plants for sweet potatoes?
Good companion plants for sweet potatoes include beans, peas, thyme, oregano, and rosemary. These plants can help deter pests, improve soil health, and enhance the flavor of your sweet potatoes. Avoid planting sweet potatoes near fennel, as it can inhibit their growth.
13. Can I save slips from my sweet potato harvest to grow next year?
Yes, you can save slips from your sweet potato harvest to grow next year. Before harvesting, select a few healthy, disease-free plants and mark them. After harvesting, carefully dig up these plants and store them in a cool, dry place. In the spring, you can sprout slips from these stored sweet potatoes using the same method described earlier. This allows you to maintain your favorite varieties and save money on buying new slips each year.
14. Is growing sweet potatoes organically difficult?
Growing sweet potatoes organically is not particularly difficult, but it does require some attention to detail. Focus on building healthy soil, using disease-resistant varieties, and implementing organic pest control methods. Avoid using synthetic fertilizers and pesticides. With a little effort, you can enjoy a bountiful harvest of delicious, organically grown sweet potatoes.
Leave a Comment